Author: sandeeppote

Python- Class Method

Class Methods are like Class Varaibles which works on Class but not on object level.

So this methods are bound to class and not object. See class varaibles here

Clas Methods are decorated with @classmethod attribute to the method in class.

This method can be called without creating instance of the class.

See below example definition and usage of class method.

In the above example get_instance_counter() method is decorated as @classmethod and a cls variable is passed. This holdsthe class reference for which the method is called.

The constructor works normal with __init__ method and updates calss variable counter increments the counter when an instance is created. This class variable accessed in the get_instance_counter() method.

You can also provision Python class to have multiple constructor with class method. See here – How to add multiple constructor to Python class?

Dockerfile Best Practice

Build Modular Images i.e. Decouple applications

Create a seperate image for each application. Containers can talk to each other and can form a single large application and helps to scale each application

Don’t sotre data in Images

Images are read-only layer. When a container or image is deleted the data is lost

Use Cache Busting strategy

Install the repositories and packages together. As the docker file ises layered architecture having a seperate command for updating repositories and packages may not gurantee the repsoitories will be upto date and may result in dependency issue.

Use Version Pinning

When installing packages specifiy which version you want to install as everytime the image is build it will install the latest package where a application may not be compatible. Version pinning will always ensure the image will have specific version which your application supports.

Create slim images

This will help pull the images from which ever repository you are using quickly

Install only necessary or required packages

This will make image slim or with minimal packages and no unwanted packages are installed so every time image is build with minimal packages the build is fast and light weight. Also the containers created from such images are light weight and fast.

Maintain different images for different environements

Development images may contain debug tools and temprorary files required for debugging and bulding your application. However there tools are not required for production images. Hence remvoe any temporary files/folder and such tools for prodcution by creating a seperate image for different environments.

Use multi-stage builds to create images

Multi-stage build helps to or uses multiple FROM statements where each FROM instruction can use a different base, and each of them begins with new stage of the build and everything that is required for application is in the final image leaving behind unwanted files. This will avoid executing any script that was done traditionaly.

Exclude any unwanted files and folders using .dockerignore file

Use .dockerignore to exlcude any unwanted files and folders e.g.:- temp folder etc. this make the image lighter.

Use CMD instructions to run software in Image

Use CMD instructions to run the software contained in your image along with arguments. CMD should be used in JSON format that is the command and parameters should be seperated by comma.

Minimize build times

By avoiding to send unwanted files to the build context using .dockerengine

References –

https://docs.docker.com/develop/develop-images/multistage-build/

https://docs.docker.com/develop/develop-images/dockerfile_best-practices/

Linux and Docker on Ubuntu Series

Linux basic commands (Ubuntu)

Linux Kernel and hardware

Linux Runlevels

Linux Package Management for Ubuntu

Linux User Management commands

Linux Networking commands

Install Docker on Linux

Linux File Types

Create a file in Linux

How to check the file size in Linux

Compressing and Uncompressing Files in Linux

Searching files and directories in Linux

Search content with pattern in the file in Linux

Search content with pattern in the file in Linux

File Permissions in Linux

Check running services in Linux

DOCKER

Docker FAQ’s

Install Docker on Ubuntu

Install Docker using install script on Ubuntu

Setup a Docker Swarm

Cache Busting and Version Pinning when building Docker images

Docker storage on Ubuntu

How to start docker in debug mode in Ubuntu

Docker Restart Policies

Use Docker image offline with Save and Load command in Ubuntu

Export Container and Import as Image using Docker in Ubuntu

Create a custom network in docker for communication between containers

Dcoker Security

Docker Best practice

Index and Search OrderCloud Extended Properties

This article explains usage of extended properties in OrderCloud-

https://ordercloud.io/knowledge-base/extended-properties

But it doesn’t tell about how to index the extended properties to get the search results.

This blog post helps to setup the XP Indices feature already available with the OrderCloud and search such properties.

This example shows extended properties for Categories for which first Catalog needs to setup

1. Create Catalog from Portal (Assume Marketplace is already created)-

Navigate to Product Catalogs => Catalog => Select an operation “Create a new catalog”

Use below JSON or fill in form to create catalog

{
  "ID": "0001",
  "Active": true,
  "Name": "HabitatMaster",
  "Description": "HabitatMaster"
}

Catalog will be created with 201 status

2. Create Catagories from Portal with reference to Catalog Id created previously-

Navigate to Product Catalogs => Categories=> Select an operation “Create a new category”

Use below JSON to create catqagory for Catalog “0001” with the extended property “DisplayType” as “Text”

{
  "ID": "0001-CategoryDisplayText",
  "Active": true,
  "Name": "CategoryDisplayText",
  "Description": "CategoryDisplayText",
  "xp": {
    "DisplayType": "Text"
  }
}

Likewise create another catagory with DisplayType Image as per below JSON-

{
  "ID": "0001-CategoryDisplayImage",
  "Active": true,
  "Name": "CategoryDisplayImage",
  "Description": "CategoryDisplayImage",
  "xp": {
    "DisplayType": "Image"
  }
}

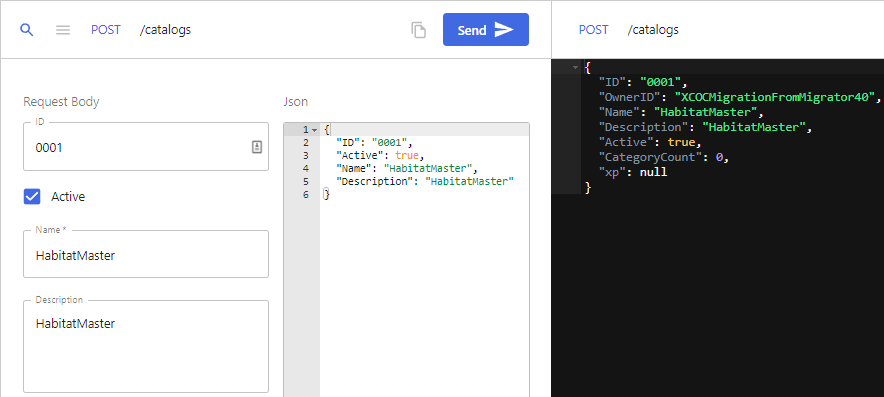
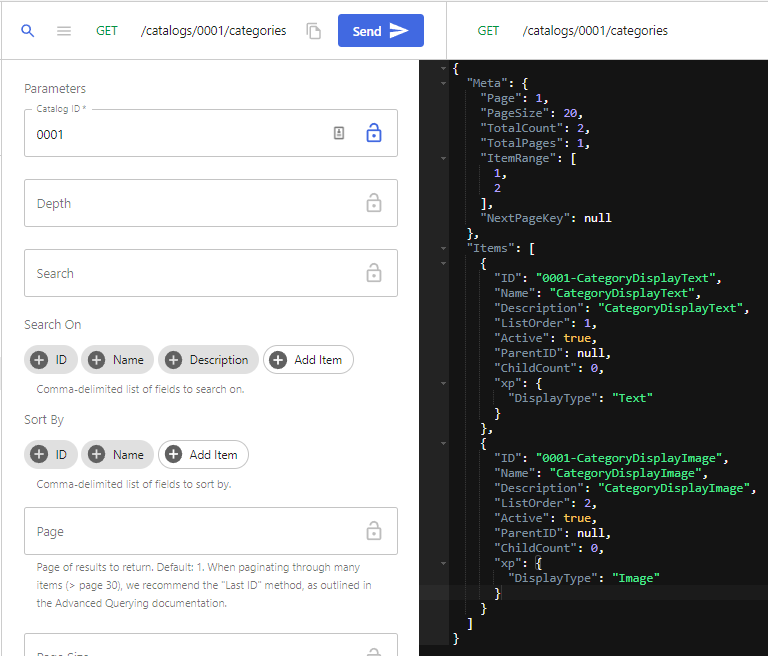
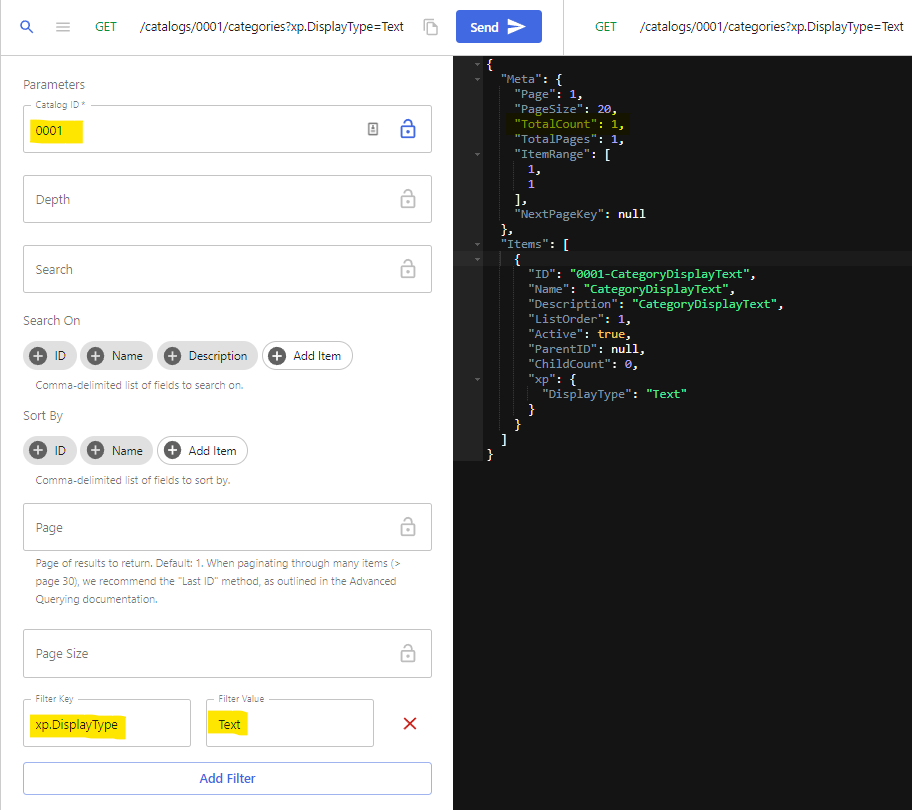
3. Search Category with newly created extended property i.e. DisplayType

First search all categories with Catalog Id “0001”. Following results will be shown-

Now lets try and search with extended properties i.e. Catalog Id “0001” and DisplayType as Text. For this use “Add Filter” option and key as “xp.DisplayType” and Filter Value as “Text”.

This request wont show any results and hence Xp Indices needs to created for Category

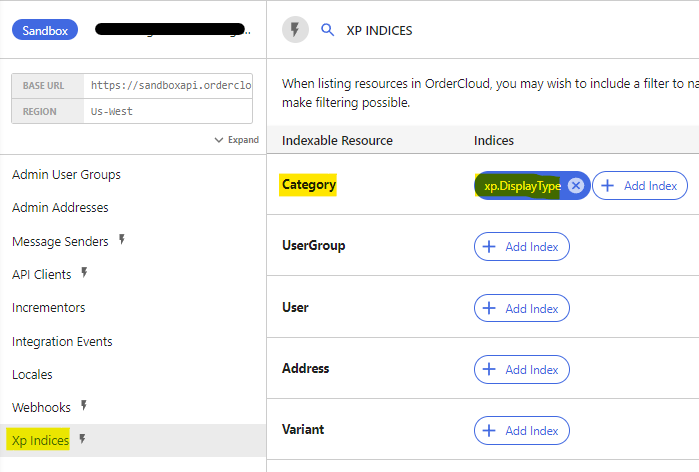
4. Create XP Indices

Navigate to Seller => Xp Indices

Indexable resources Catagory “Add Index” => “xp.DisplayType” and Save Changes

Now search the Catagories same as in Step 3 with Filter option and this time you should be able to see the results-

Compressing and Uncompressing Files in Linux

Compress a file in Linux using tar command

To compress multiple files us tar command with cf option

tar -cf test.tar <<file1>> <<file2>> <<file3>>

To see the content of the tar files use tf option

tar -tf test.tar

To extract the contents from tar file use xf option-

tar -f test.tar

Use zcf command to reduce the file size

tar -zcf testzcf.tar <<file1>> <<file2>>

See the size of test.tar and testzcf.tar file. The content in the tar is same but the size of the testzcf.tar is reduced with zcf command

There are other utlitlies to reduce the file size i.e. to compress files

Use gzip to compress file-

gzip <<file>>

This created filename.gz file. See the size of the firstfile.txt when comperessed

You can also use bzip2 and xz to compress files

Decompress a file

To decompress the gzip file use gunzip command-

You can use bunzip2 and unxz to decompress file

Use Docker Image offline with Save and Load command in Ubuntu

Docker Save and Load command

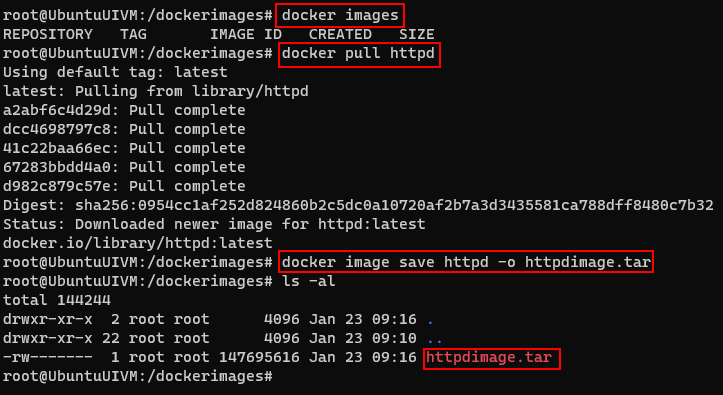
At times if you dont want to always pull the image from image registry which takes time to pull if the image’s are heavy, it makes sense to save the image and use it offline. This avoids to always pull the image from the registry.

Save the image once into tar file and reuse the images.

To Save image use follwoing command

First pull the image from repository

docker pull httpd
docker image save httpd -o httpdimage.tar

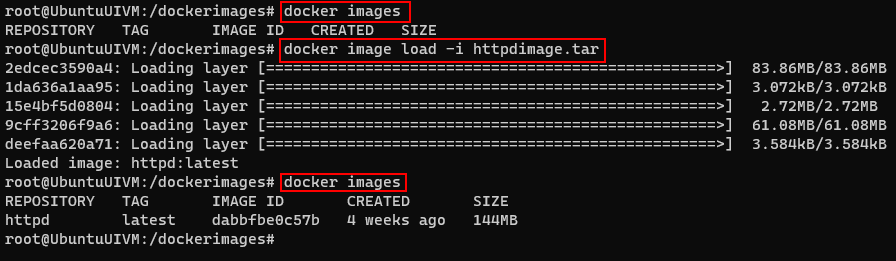
Get the image from the tar file instead pulling it from the registry

docker image load -i httpdimage.tar

Docker Security

Docker engine consists of Docker Daemon, Rest API and Docker CLI

To access the containers through Docker CLI the request is sent to Rest API and then to Docker Daemon to serve the request.

Docker Daemon service is accessible from within the host using unix socket which located in /var/run/docker.sock file

Applications can access the Docker daemon service from outside the host.

For accessing the docker daemon from outside the host securely configure /etc/docker/daemon.json when it is absolutely necessary

Setup the following in daemon.json file

{
   "hosts": ["tcp://hostip:2376"],
   "tls": "true",
   "tlscert": "/var/docker/server.pem",
   "tlskey": "/var/docker/serverkey.pem"
}

The above configuration help to connect to the Docker Daemon securely and in encrypted manner. On client run the docker command with tls set to true

docker --tls=true
OR 
export DOCKER_TLS=true
export DOCKER_HOST="tcp://hostip:2376"

Port 2376 allows to connect securely to Docker Daemon service.

But the above can be connected without authentication.

Access Docker Daemon using Certificate based Authentication

To access the Docker Daemon with certificate based authentication use following configuration-

{
   "hosts": ["tcp://hostip:2376"],
   "tls": "true",
   "tlscert": "/var/docker/server.pem",
   "tlskey": "/var/docker/serverkey.pem"
   "tlsverify": true,
   "tlscacert": "/var/docker/caserver.pem"
}

Here the tls_verify option enables certificate authentication based connection.

–tls will enable the connection with encryption

Clients with signed certificate will be able to access the host.

Client need to connect using following-

docker --tlsverify --tlscert=<<client.pem>> --tlskey=<<clientkey.pem>> --tlscacert=<<cacert.pem>>

Above can be also configured in ~/.docker file

Create a custom network in docker for communication between containers

When docker is installed it creates 3 networks. The default network is bridge.

To check the networks installed on host use following command-

docker network ls

To get the details of the network use inspect command

docker network inspect bridge

Now lets create a custom network for check the communication between the various containers

docker network create --driver=bridge --subnet=192.168.12.0/10 mycustomnetwork

Now lets create a container with the newly created network

docker container run -itd --net mycustomnetwork --name ubuntuone ubuntu

docker container run -itd --net mycustomnetwork --name ubuntutwo ubuntu

Here I have create 2 containers ubuntone and ubuntutwo

Inspect the containers to see the network details-

Lets ping the container e.g.- ubunttwo from ubuntuone-

docker exec -itd ubuntuone ping ubuntutwo

Error response from daemon: OCI runtime exec failed: exec failed: container_linux.go:380: starting container process caused: exec: "ping": executable file not found in $PATH: unknown

If you receive above error you have to update repository and install ping utility

Install ping utility by interactively connecting to container and running the bash command

docker exec -it ubuntuone bash
apt-get udpate
apt-get install inetutils-ping

Execute the same for other container i.e. ubuntutwo

Now try to ping from ubuntuone to unbuntutwo

Here you should see the container is able to conect another-

docker exec -it ubuntuone ping ubuntutwo

For existing running container, you can use following command to connect to the network

docker network connect <<network name>> <<container name>>

Or if you want to move the container out of the network use network disconnect command-

docker network disconnect <<network name>> <<container name>>

To remove network – user rm command

docker network rm <<network name>>

To remove all unused network use prun command-

Prune will not remove OOTB network and will only remove user defined networks.

docker network prune

Setup Sitecore OrderCloud Headstart Buyer UI App – Part 4

Part 1 using offline Azure resource and Part 1 using online Azure resources gives a walkthrough on setting Sitecore Ordercloud Headstart pre-requisites. While Part 2 helps setup middleware.

Part 3 helps setup Seller UI App

In this blog will setup Buyer UI

Step 1- Setup the Buyer UI project

If you have followed earlier steps to setup Seller UI App you must have already installed node js.

Open the BuyerUI project in Visual Studio Code (prefered) from /src/UI/Buyer folder

Step 2 – Change configuration defaultbuyer-test.json

Navigate to \src\UI\Buyer\src\assets\appConfigs\defaultbuyer-test.json

Update the clientID to your Marketplace Buyer UI client ID

Update baseUrl e.g.:- http://localhost:4300

Update middlewareUrl. If you are in local update this to – https://localhost:5001

Update translateBlobUrl e.g.:- http://127.0.0.1:10000/devstoreaccount1/ngx-translate/i18n/

Step 3 – Change configuration environment.local.ts

Update the useLocalMiddleware to true if this is locally setup

Update localMiddlewareURL to https://localhost:5001

Update localBuyerApiClient, same as in the previous step

Step 4 – Run the Buyer UI application

RUN – from the visual studio terminal or powershell

npm install
np run start

This should compile successfully and ;listen to 4300 port

Headstart Buyer application- http://localhost:4300