
Category: CDP and Personalize

Sitecore CDP – Guest Data Extensions

Guest data extensions enable your organization to store any additional information around customer interactions, beyond the predefined Sitecore CDP guest attributes

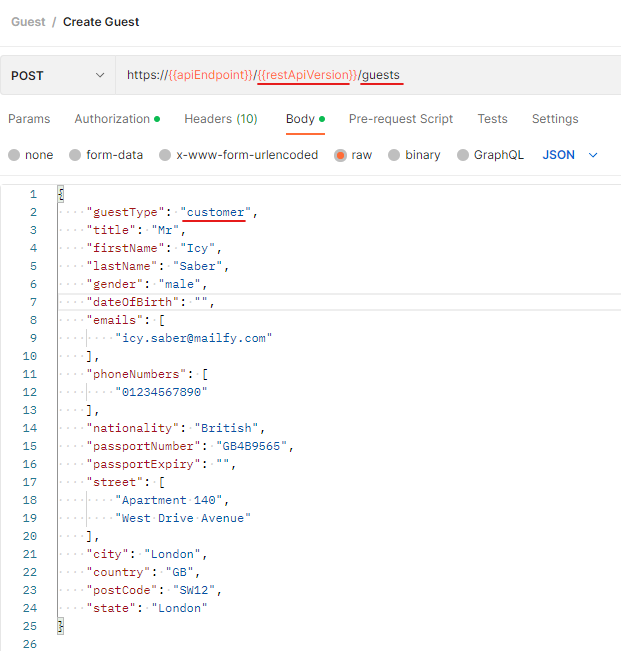
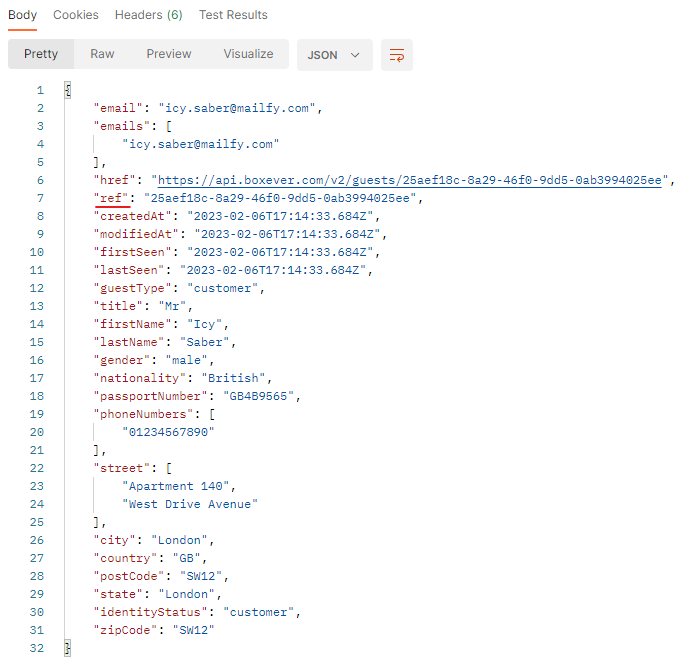
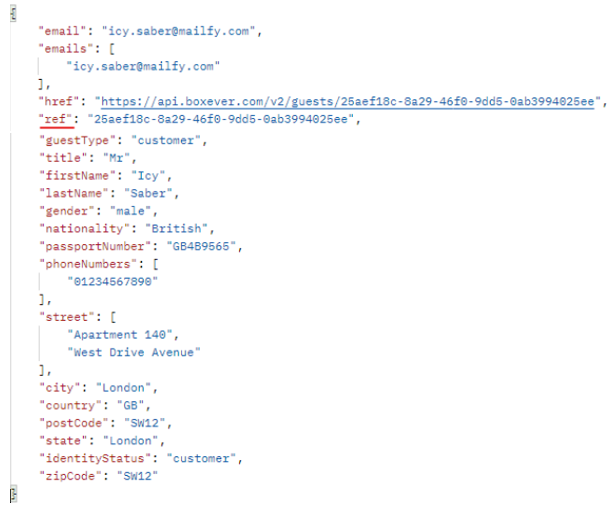
While creating Guest the response provide the gust ref. Using this reference we can add data extension to the guest. See screen below to get the various ways to get gust referece-
You can also get the ref from portal for the respective guest (set the debug mode)-

Go to Portal and Guest page. Search the gust with name-
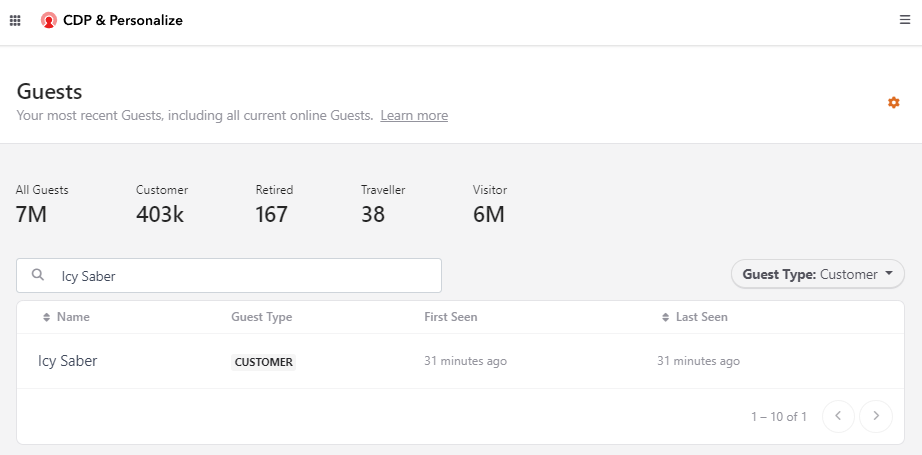
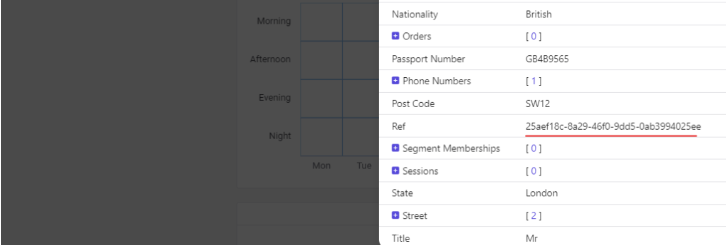
Click on the settings button (only available in debug mode). Note the reference of guest.
Create Data Extension for Guest-

https://{{apiEndpoint}}/{{restApiVersion}}/25aef18c-8a29-46f0-9dd5-0ab3994025ee/extExt

Ext – is the extension key

Request-
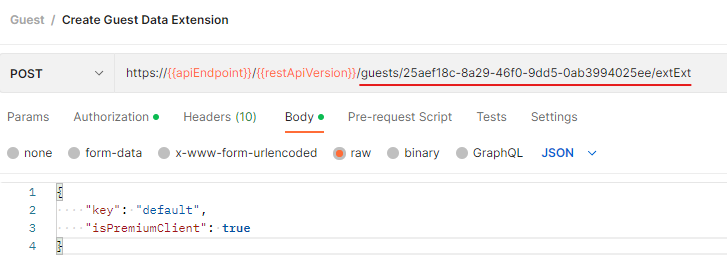
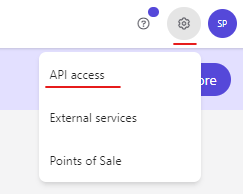
Ensure request is sent using Basic Auth where User Name is the Client Key and Password is Api Token. Take the credentials from portal (API Access menu option).

Response-

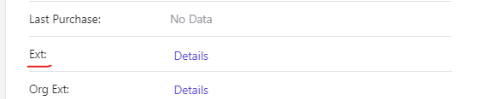
Check the extension data in portal, under properties tab-
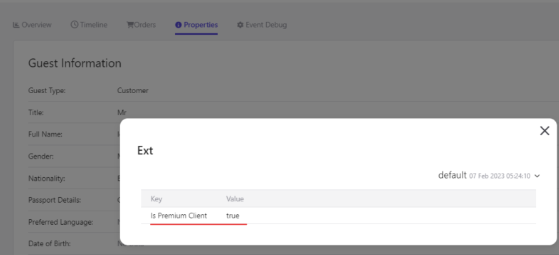
You can create multiple gust extension for given guest, although it is recommended to have one-
cURL code snippet-

curl --location --request POST 'https://api.boxever.com/v2/guests/25aef18c-8a29-46f0-9dd5-0ab3994025ee/extExt' \
--header 'Authorization: Basic <<Enter Toekn>>' \
--header 'Content-Type: application/json' \
--data-raw '{
    "key": "default",
    "isPremiumClient": true
}'

C# code snippet-

var client = new RestClient("https://api.boxever.com/v2/guests/25aef18c-8a29-46f0-9dd5-0ab3994025ee/extExt");
client.Timeout = -1;
var request = new RestRequest(Method.POST);
request.AddHeader("Authorization", "Basic <<Enter Token>>");
request.AddHeader("Content-Type", "application/json");
var body = @"{
" + "\n" +
@"    ""key"": ""default"",
" + "\n" +
@"    ""isPremiumClient"": true
" + "\n" +
@"}";
request.AddParameter("application/json", body,  ParameterType.RequestBody);
IRestResponse response = client.Execute(request);
Console.WriteLine(response.Content);

Python code snippet-

import http.client
import json

conn = http.client.HTTPSConnection("api.boxever.com")
payload = json.dumps({
  "key": "default",
  "isPremiumClient": True
})
headers = {
  'Authorization': 'Basic <<Entert Token>>',
  'Content-Type': 'application/json'
}
conn.request("POST", "/v2/guests/25aef18c-8a29-46f0-9dd5-0ab3994025ee/extExt", payload, headers)
res = conn.getresponse()
data = res.read()
print(data.decode("utf-8"))

Javascript code snippet-

var settings = {
  "url": "https://api.boxever.com/v2/guests/25aef18c-8a29-46f0-9dd5-0ab3994025ee/extExt",
  "method": "POST",
  "timeout": 0,
  "headers": {
    "Authorization": "Basic <<Enter Token>>",
    "Content-Type": "application/json"
  },
  "data": JSON.stringify({
    "key": "default",
    "isPremiumClient": true
  }),
};

$.ajax(settings).done(function (response) {
  console.log(response);
});

Similarly you can update and delete guest extension data. See the links here

Update guest data extension-

https://doc.sitecore.com/cdp/en/developers/sitecore-customer-data-platform–data-model-2-1/using-the-update-guest-data-extension-function-in-sitecore-cdp-rest-api.html

Delete guest data extension-

https://doc.sitecore.com/cdp/en/developers/sitecore-customer-data-platform–data-model-2-1/using-the-delete-guest-data-extension-function-in-sitecore-cdp-rest-api.html

Reference-
https://doc.sitecore.com/cdp/en/developers/sitecore-customer-data-platform–data-model-2-1/sending-additional-guest-data-to-sitecore-cdp-using-rest-api.html

https://doc.sitecore.com/cdp/en/developers/sitecore-customer-data-platform–data-model-2-1/sitecore-cdp-guest-extensions-data-model-for-rest-api.html

Loading

Evaluating CDP vendor capabilities

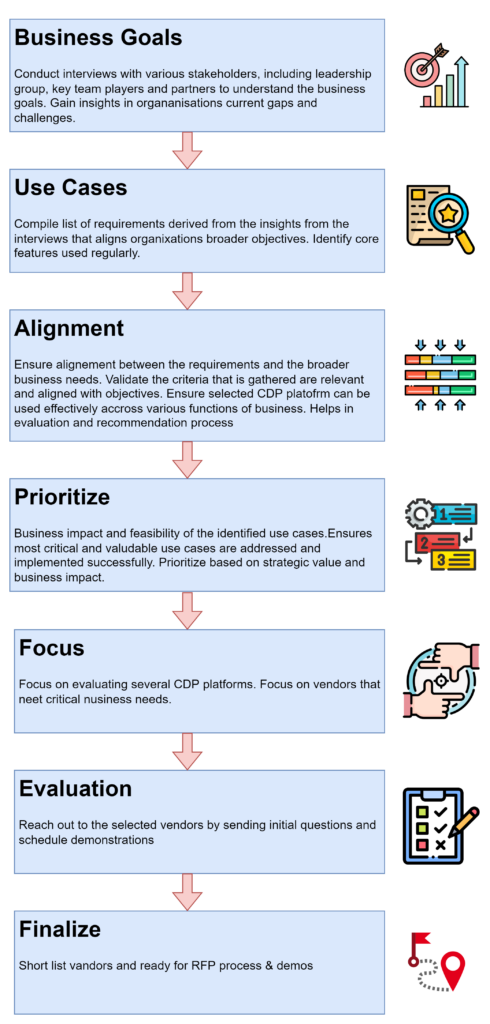
Evaluating a CDP platform is very crucial. An informed decision has to be taken while selecting a CDP platform based on necessary information from various stakeholders in an organization.

Feedback from peers or other factors may influence the preferences for certain vendors. Understanding business goals and required use cases and scenarios better uunderstands which platforms better suits your organization.

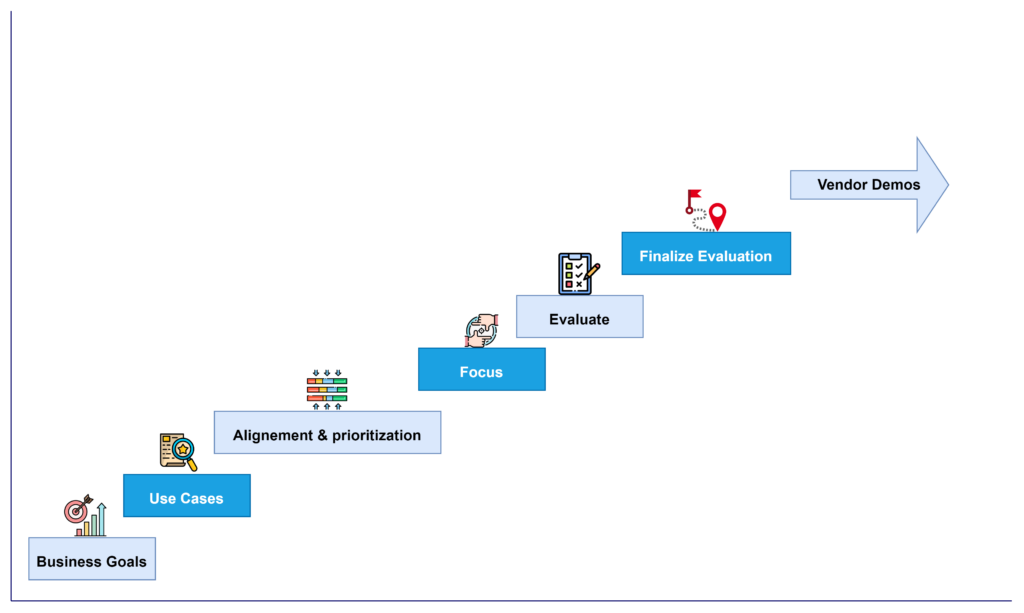
The following steps could help you to choose a CDP platform based on the inputs from the team players that better fits the organization goals.

Process for evaluating vendor capabilities-

Reference – CDP Institute

Sitecore Personalize – Create Fullstack Interactive Experience

Run interactive expereince using the friendlyID attribute. When the expereinces are created in Sitecore CDP an ID is created for the experience. Use this ID to run an experiemnet.

How to create a fullstack experience in Sitecore CDP-

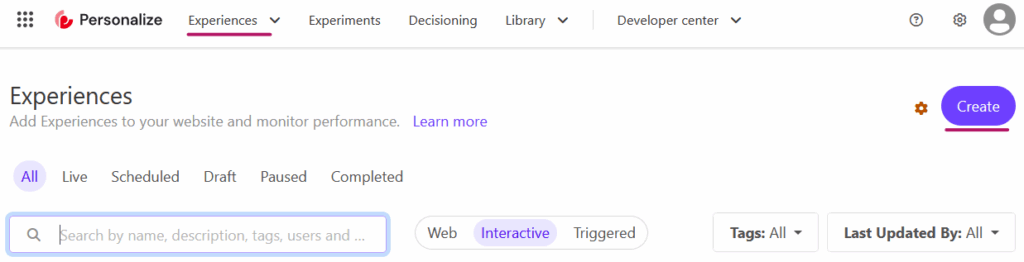
In the menu option click on Experiences => Full stack

This should show the list of existing experiences . Click on Create Experience

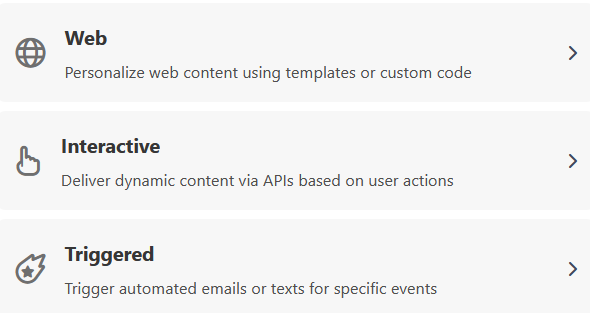
Select Interactive Experimence option-

Provide a name and note the ID –

Click on the Configure API response option-

Create a json response. Use “Copy Path as Freemaker” to copy the field name. In this case guest.title, guest.firstname etc.

One variant

You can have only one variant in an experience. Optionally, choose who will receive this experience using the audience filter. If you want to have multiple variants, create an experiment instead.

Click Save and “Preview API” to test the response

Note: dont forget to Save before testing the response.

Search for the guests. See how to create guests here <<enter blog details>>

Response for the guest that is searched. Back to “Interactive Expereience”

Error- if you receive this error. I had to add “” to the field names-

Run the Expereince immediately or schedule-

Experience is now live and the performance can be tracked in “Operational” Tab

At this point of time there are no executions. Check the “Operational” tab-

See this Full Stack Experiences list-

Next run the Experience in Postman or from the Web Site.

Loading

Sitecore Personalize – Run Fullstack Experience using Rest API endpoint

Continuing with the post – Sitecore Personalize – Create Fullstack Experience

In earlier post created a new Fullstack experience named- pastoral grill experience and ID for same was “”

Get the ID of the expereince in “Details” tab and a code snippet to run this in frontend. But in this post will see how to interact using rest api endpoint.

Send request to Rest API to recieve response-

https://{{apiEndpoint}}/{{restApiVersion}}/callFlows

See here API target endpoint to be used based on region-

https://doc.sitecore.com/cdp/en/developers/sitecore-customer-data-platform–data-model-2-1/walkthrough–preparing-to-integrate-with-sitecore-cdp.html

https://doc.sitecore.com/cdp/en/developers/sitecore-customer-data-platform–data-model-2-1/base-url-of-sitecore-cdp-apis-for-v2-1-data-model.html

Request and Response-

clientKey- I have client key as a ennvironment variable. See how to find Client Key

pointOfSale- Enter your configured point of sale. See how to create or get POS

friendlyId- Fullstack/Web Epxerience friendly id. See how to get interactive experience id

In the operational tab there is a spike at the time the request was sent-

Loading

Siteocre Personalize – Create a triggered experience to send abandon cart mail

This blog describes the step by step process to create a triggered expereience in Sitecore Personalize to send a abandon cart mail.

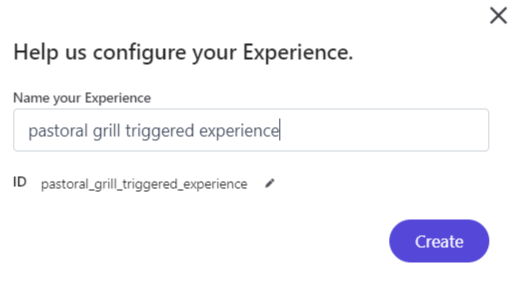
Create Experience

Choose Triggered Experience

Name the experience

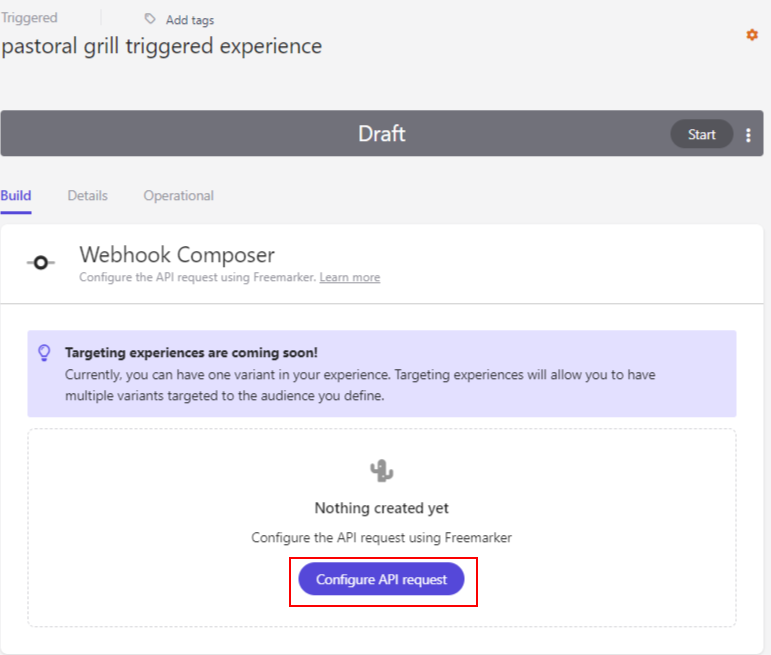
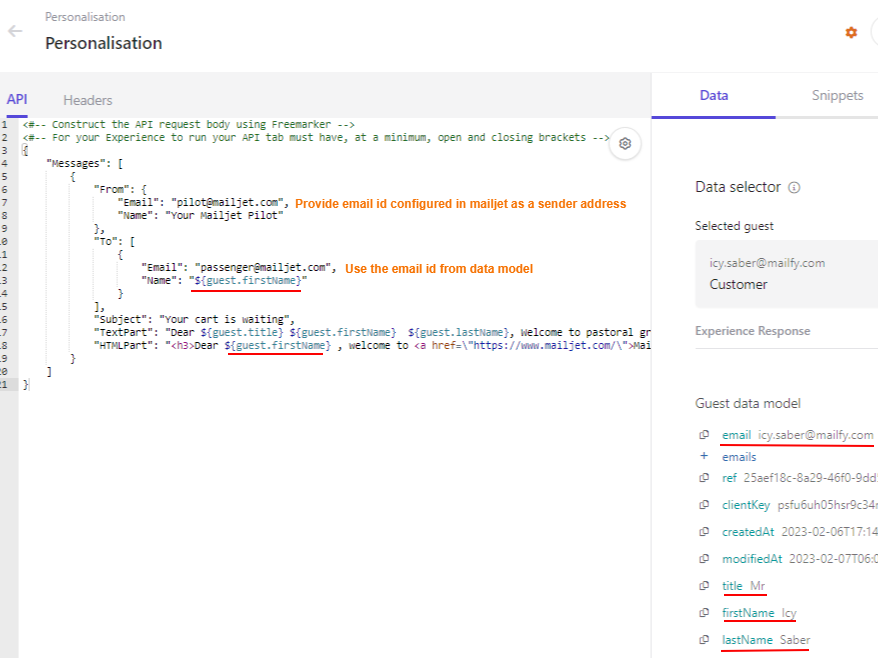
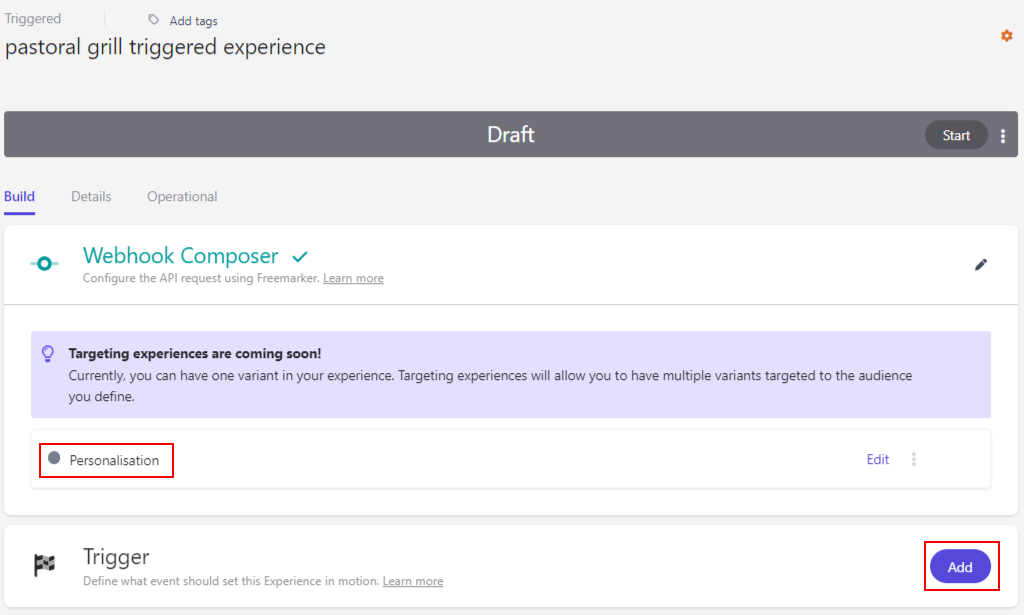
Configure API Request

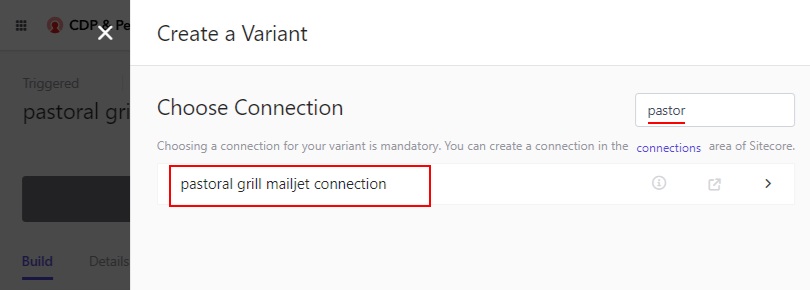
Choose a connection created in this blog post – here

Configure the reponse

Save and Close

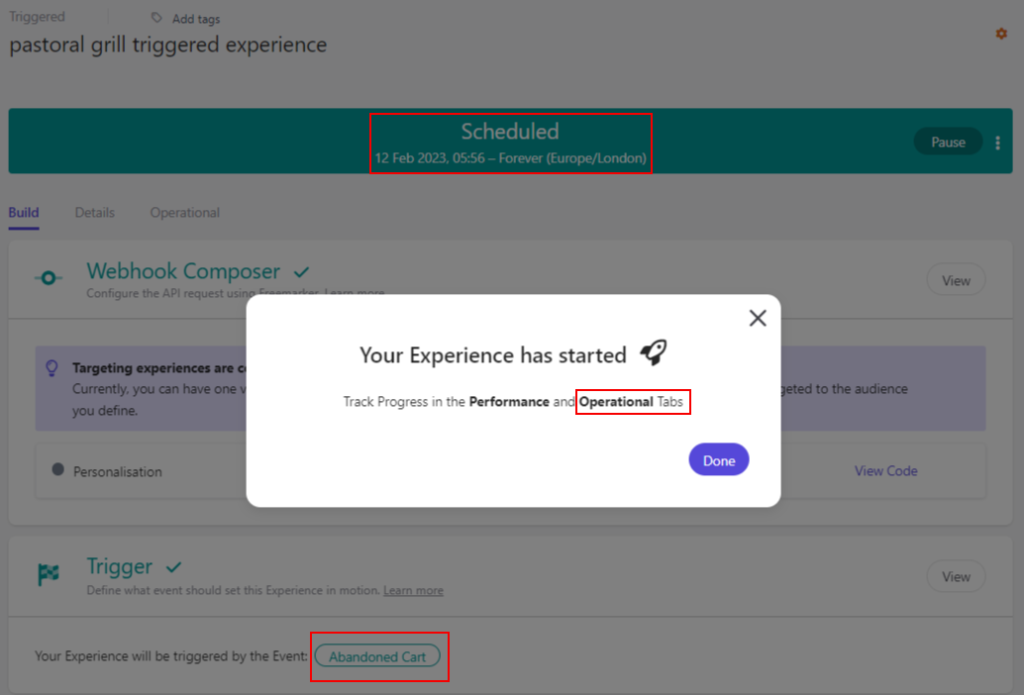
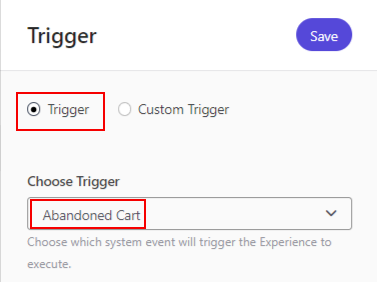
Start the Expereince and select option “Run immediately”

Steps to add abandon the cart-

Step 1 – View event

Follow the blog post – here

Step 2- Identity event

Follow the blog post – here

Step 3- Add event

Follow the blog post – here

Step 4 – Force Close event

Follow the blog post – here OR wait for session to expire ( normally 20 minutes or as configured in POS)

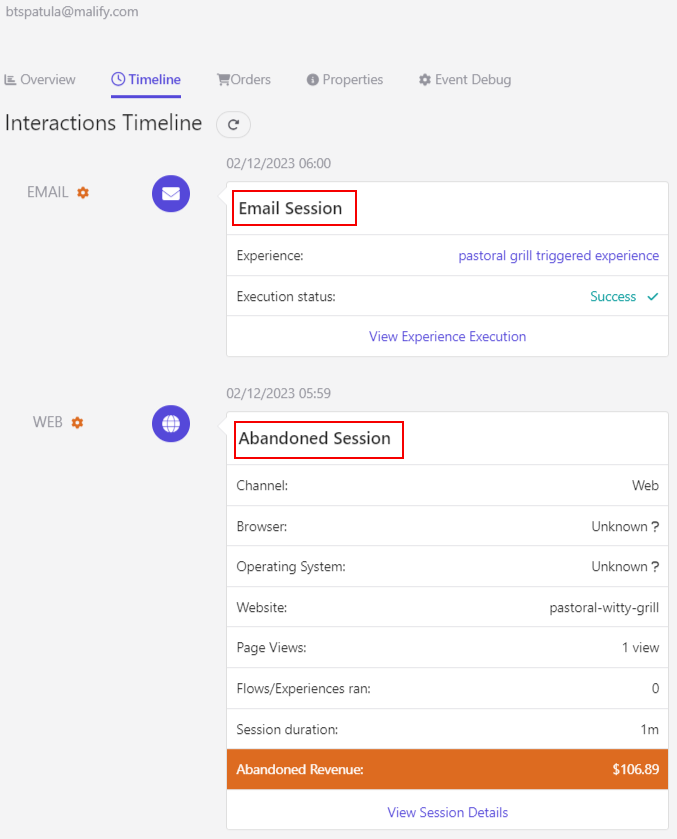
Mail is delivered to the customer

Loading

Sitecore Personalize – Create connection used by triggered experience

Create connection to external service used to trigger experience. This connections are outbound.

In this blog will see an example to create a connection to mailjet which can be used to trigger a expereience for abandon cart(covered in another blog post)- here

Setup mailjet account

Create a new account if you don’t have any- https://www.mailjet.com/

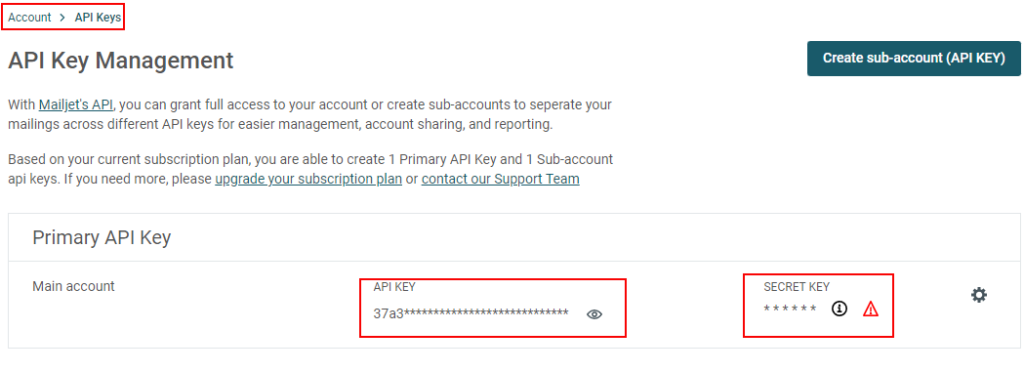
In the Account Settings => select optin “API Key management”

Note the API Key and Secret Key

Generate a secret key if not already generated.

Create a connection in Sitecore CDP portal

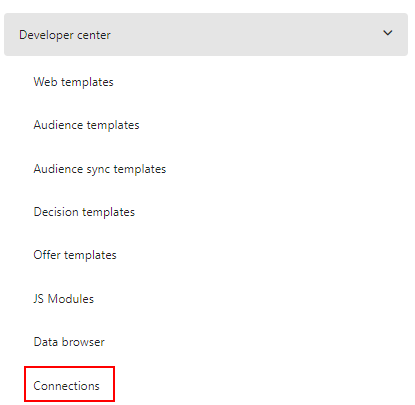
Navigate to “Develoepr center” => Connections option

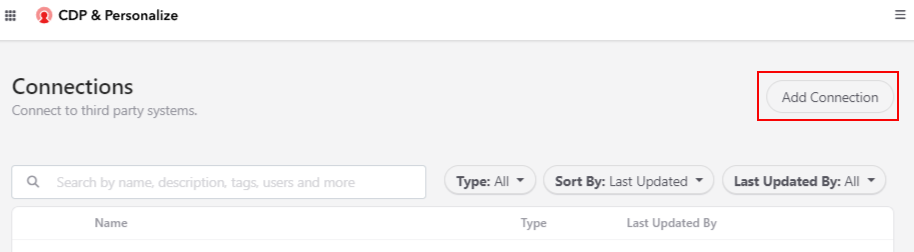
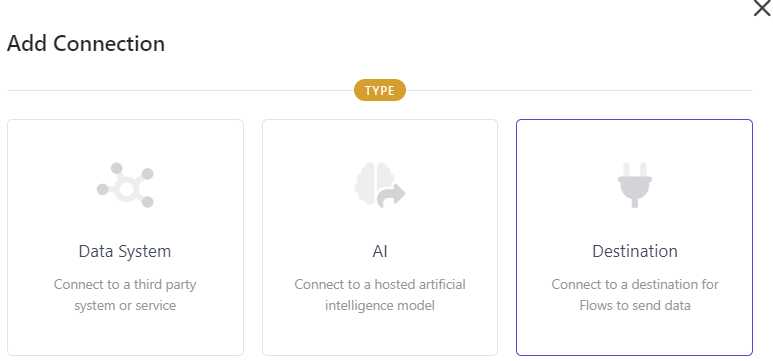
Search for existing connection or “Add Connection”

Select “Destination” option for Flows to send data.

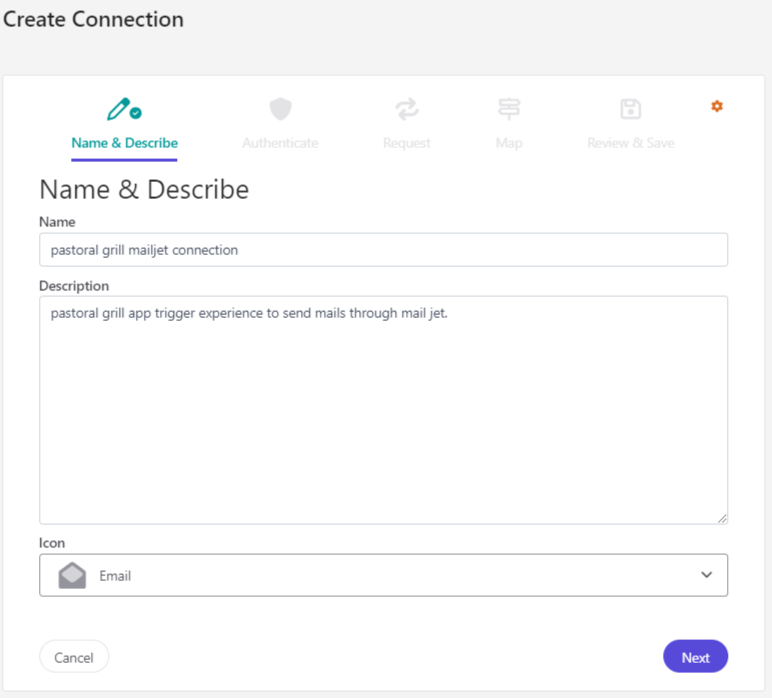
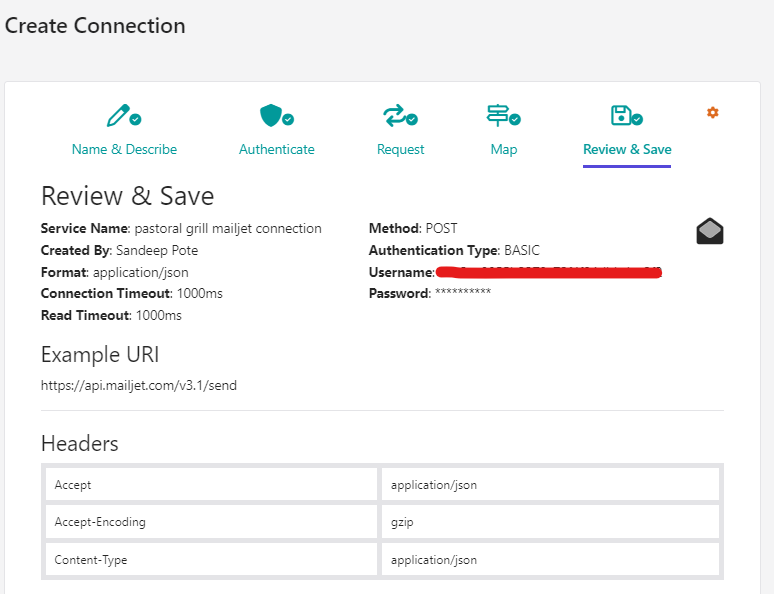
Fille in the required details and select icon-

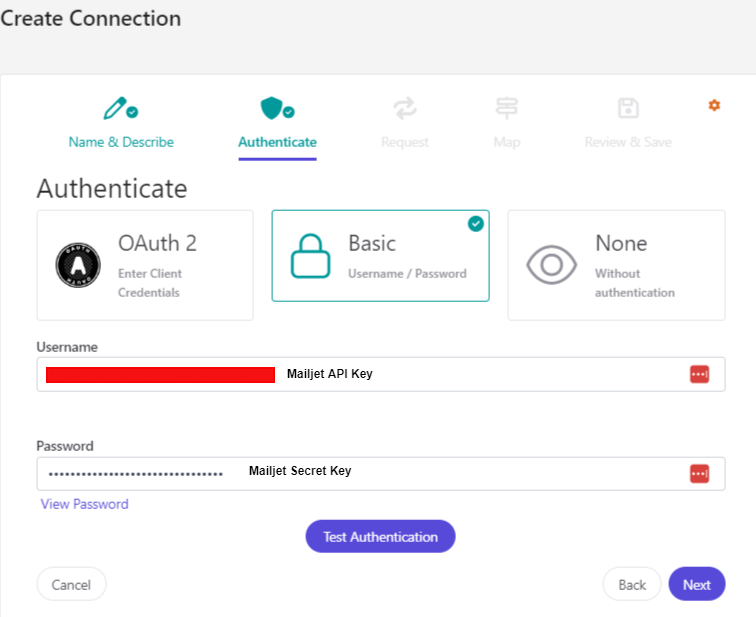
Authentication

Next setup the Basic Authentication. Copy the API Key as User Name and Password as Secret Key and “Test Authentication”

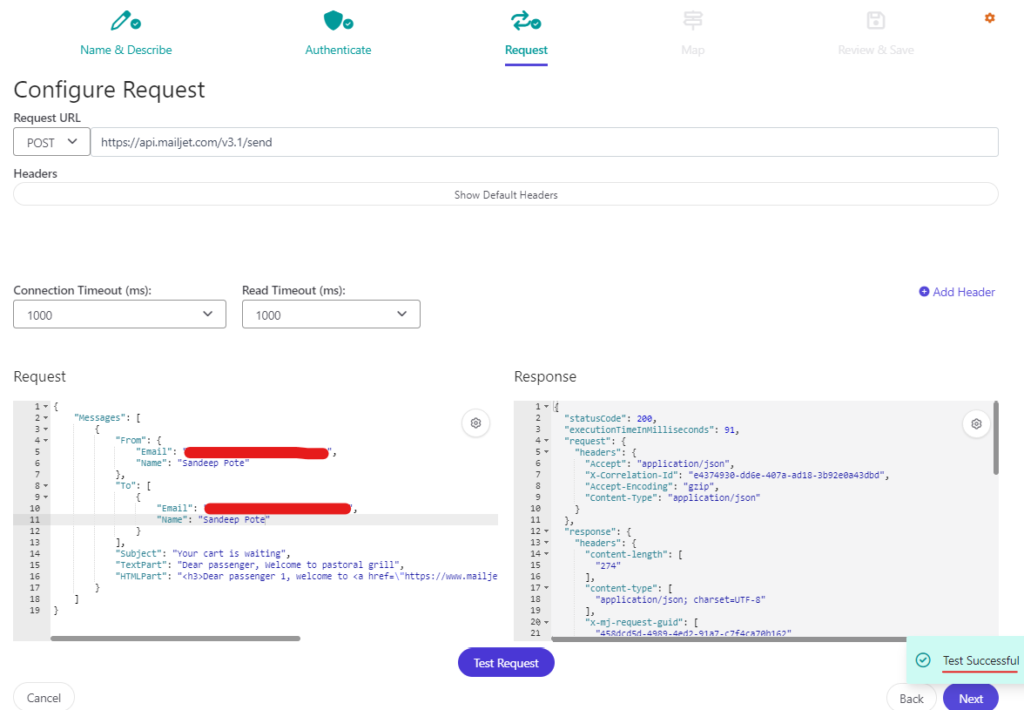
Setup the request

Get the api endpoint and the request body from here – https://dev.mailjet.com/email/guides/getting-started/

// Sample mail 
{
    "Messages": [
        {
            "From": {
                "Email": "pilot@mailjet.com",
                "Name": "Your Mailjet Pilot"
            },
            "To": [
                {
                    "Email": "passenger@mailjet.com",
                    "Name": "Customer 1"
                }
            ],
            "Subject": "Your cart is waiting",
            "TextPart": "Dear passenger, Welcome to pastoral grill",
            "HTMLPart": "<h3>Dear passenger 1, welcome to <a href=\"https://www.mailjet.com/\">Mailjet!</a></h3><br />May the delivery force be with you!"
        }
    ]
}

Tet the connection-

Note- add sender address to the contact list in mailjet or the mails will be blocked. Also the mails from gmail wont be triggered. Use this URL to add sender address-

https://app.mailjet.com/account/sender

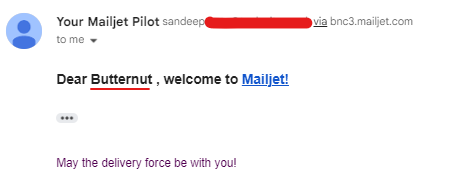
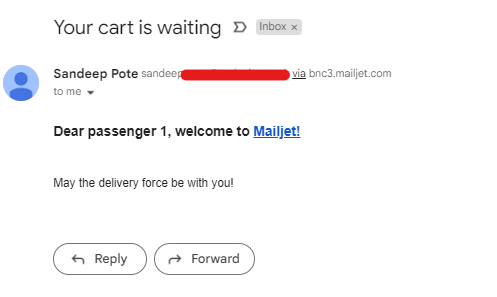
Check if the test Mail received-

Click Next, Review & Save

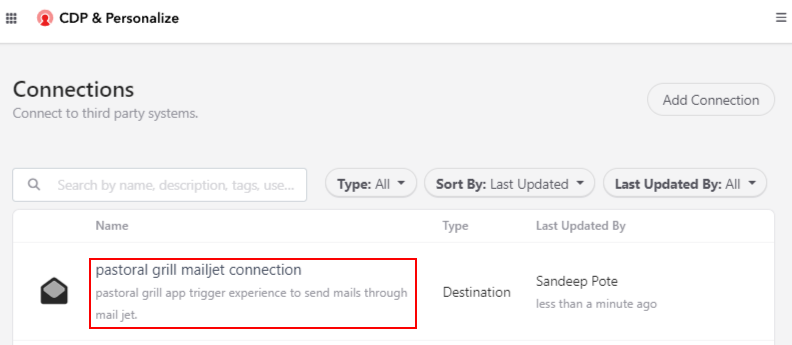
Connection is created and this can be used when an expereince is triggered.

Next setup the Triggered Expereince

Loading

Sitecore CDP- Create Guests using REST Api

https://{apiEndpoint}/v2/guests

Request to the api-

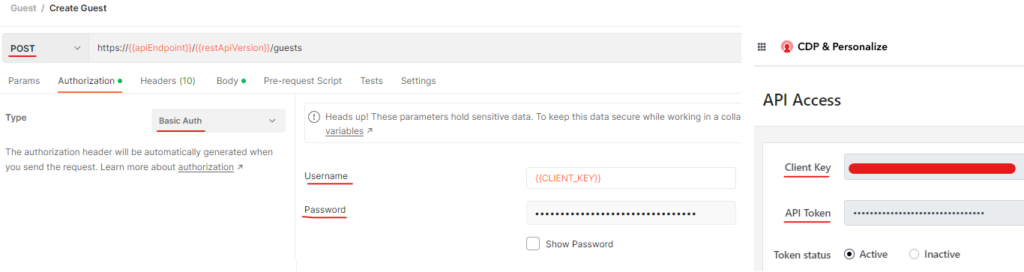
Use Client Key in User name and API Token in password to send request with Basic Auth-

Response-

Note ref field. The ref field is a guest reference which can be used further to extend or pull the guests details-

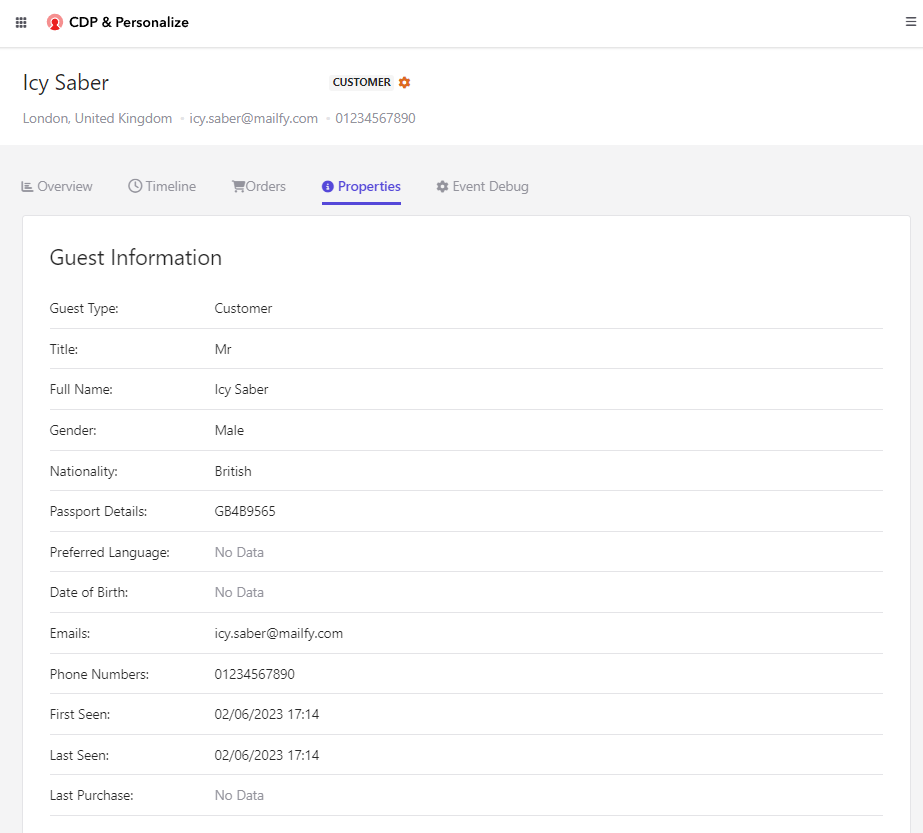
See the Properties tab to verify all the guests details-

cURL code snippet-

curl --location --request POST 'https://api.boxever.com/v2/guests' \
--header 'Authorization: Basic <<Enter Token>>' \
--header 'Content-Type: application/json' \
--data-raw '{
    "guestType": "customer",
    "title": "Mr",
    "firstName": "Icy",
    "lastName": "Saber",
    "gender": "male",
    "dateOfBirth": "",
    "emails": [
        "icy.saber@mailfy.com"
    ],
    "phoneNumbers": [
        "01234567890"
    ],
    "nationality": "British",
    "passportNumber": "GB4B9565",
    "passportExpiry": "",
    "street": [
        "Apartment 140",
        "West Drive Avenue"
    ],
    "city": "London",
    "country": "GB",
    "postCode": "SW12",
    "state": "London"
}

C# code snippet-

var client = new RestClient("https://api.boxever.com/v2/guests");
client.Timeout = -1;
var request = new RestRequest(Method.POST);
request.AddHeader("Authorization", "Basic <<Enter Token>>");
request.AddHeader("Content-Type", "application/json");
var body = @"{
" + "\n" +
@"    ""guestType"": ""customer"",
" + "\n" +
@"    ""title"": ""Mr"",
" + "\n" +
@"    ""firstName"": ""Icy"",
" + "\n" +
@"    ""lastName"": ""Saber"",
" + "\n" +
@"    ""gender"": ""male"",
" + "\n" +
@"    ""dateOfBirth"": """",
" + "\n" +
@"    ""emails"": [
" + "\n" +
@"        ""icy.saber@mailfy.com""
" + "\n" +
@"    ],
" + "\n" +
@"    ""phoneNumbers"": [
" + "\n" +
@"        ""01234567890""
" + "\n" +
@"    ],
" + "\n" +
@"    ""nationality"": ""British"",
" + "\n" +
@"    ""passportNumber"": ""GB4B9565"",
" + "\n" +
@"    ""passportExpiry"": """",
" + "\n" +
@"    ""street"": [
" + "\n" +
@"        ""Apartment 140"",
" + "\n" +
@"        ""West Drive Avenue""
" + "\n" +
@"    ],
" + "\n" +
@"    ""city"": ""London"",
" + "\n" +
@"    ""country"": ""GB"",
" + "\n" +
@"    ""postCode"": ""SW12"",
" + "\n" +
@"    ""state"": ""London""
" + "\n" +
@"}
" + "\n" +
@"
" + "\n" +
@"";
request.AddParameter("application/json", body,  ParameterType.RequestBody);
IRestResponse response = client.Execute(request);
Console.WriteLine(response.Content);

Python code snippet-

import http.client
import json

conn = http.client.HTTPSConnection("api.boxever.com")
payload = json.dumps({
  "guestType": "customer",
  "title": "Mr",
  "firstName": "Icy",
  "lastName": "Saber",
  "gender": "male",
  "dateOfBirth": "",
  "emails": [
    "icy.saber@mailfy.com"
  ],
  "phoneNumbers": [
    "01234567890"
  ],
  "nationality": "British",
  "passportNumber": "GB4B9565",
  "passportExpiry": "",
  "street": [
    "Apartment 140",
    "West Drive Avenue"
  ],
  "city": "London",
  "country": "GB",
  "postCode": "SW12",
  "state": "London"
})
headers = {
  'Authorization': 'Basic <Enter Token>>',
  'Content-Type': 'application/json'
}
conn.request("POST", "/v2/guests", payload, headers)
res = conn.getresponse()
data = res.read()
print(data.decode("utf-8"))

Reference-
https://doc.sitecore.com/cdp/en/developers/sitecore-customer-data-platform–data-model-2-1/use-the-create-guest-function-in-sitecore-cdp-rest-api.html

https://doc.sitecore.com/cdp/en/developers/sitecore-customer-data-platform–data-model-2-1/overview-of-sitecore-cdp-rest-apis.html

https://doc.sitecore.com/cdp/en/developers/sitecore-customer-data-platform–data-model-2-1/sitecore-cdp-guest-extensions-data-model-for-rest-api.html

Loading

Sitecore CDP- Generate browser ID

The browser ID is a universally unique identifier (UUID) that Sitecore CDP assigns to every user of your application. It associates sessions, events, and orders with the respective user.

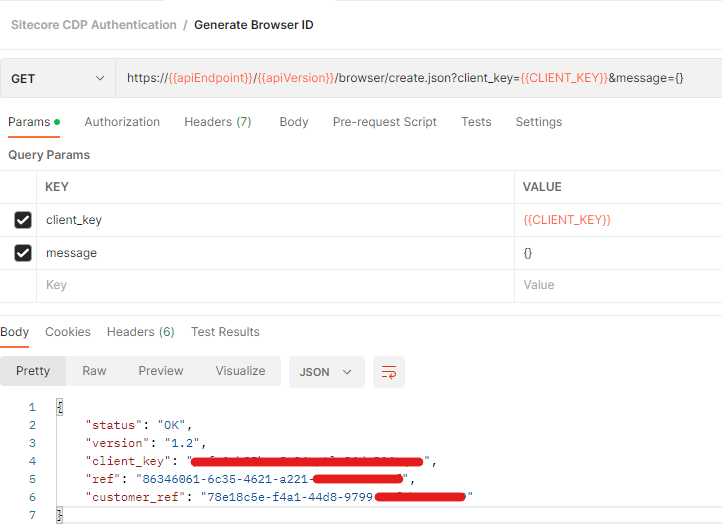
To generate browser id at server side in this case using postman use following URL-

https://{{apiEndpoint}}/{{apiVersion}}/browser/create.json?client_key={{CLIENT_KEY}}&message={}

API Endpoint

{{apiEndpoint}} – API target endpoint depends on the region client key is available in. Following are the regions and url available at the point of writing this blog and as per this document

Europe – https://api.boxever.com

Asia Pacific – https://api-ap-southeast-2-production.boxever.com

United States – https://api-us.boxever.com

See here for more details on the Sitecore CDP Rest API

API Version

API Version is v1.2

Client Key

See here for more details on How to get Client Key and API Token

Get the client key from the Sandbox/CDP & Personalise portal.

Login to portal – https://app.boxever.com/#/

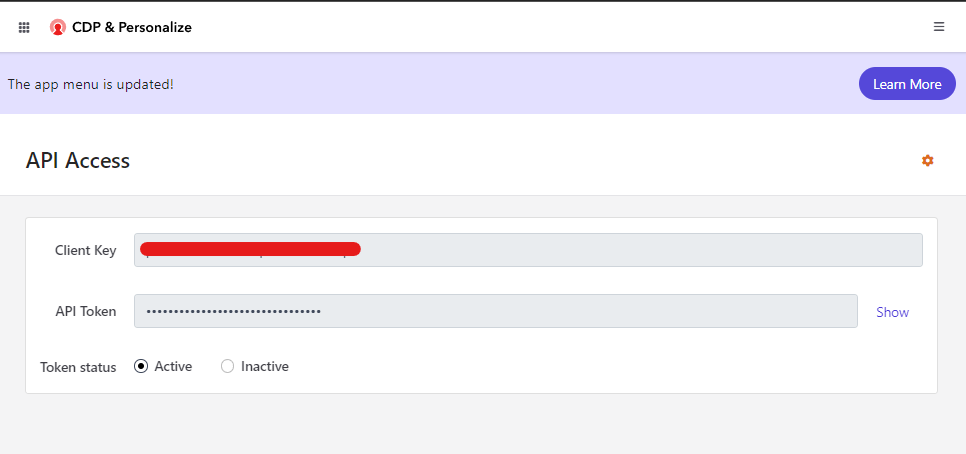
Top right click the clog icon. Select API Access option

Get teh client key from this page-

Request/Response-

Status- OK. The request was served successfuly

Anantmous(Guest) should be created. Browser ID is in “ref” field in the response

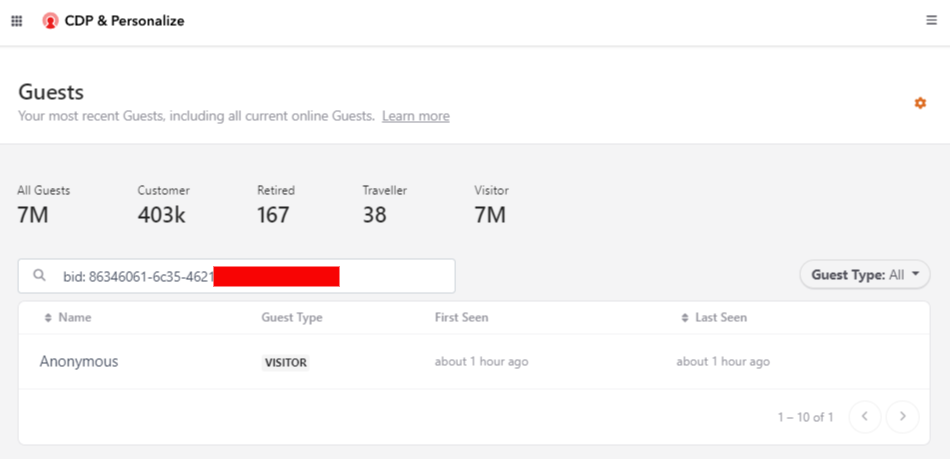
Check the guest details in portal with the Browser ID-

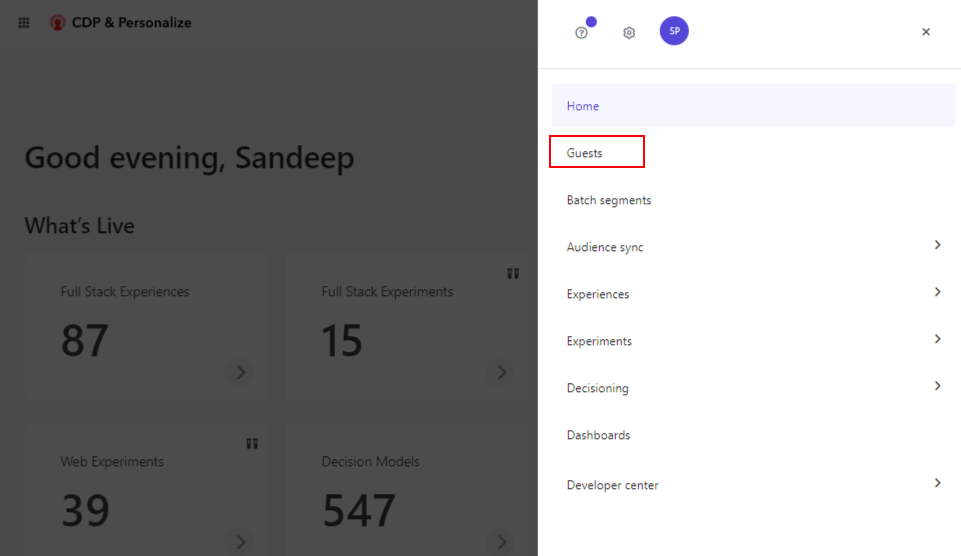
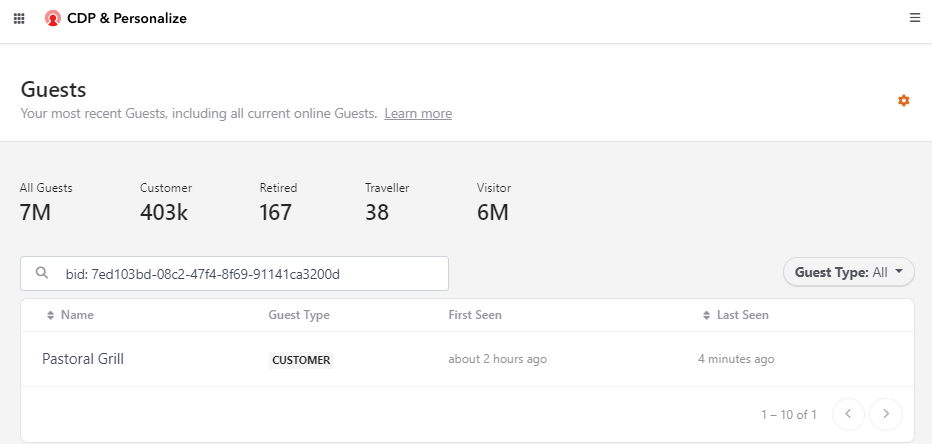
Goto the Guests page –

Search guests with browser id. (bid: <<browser id>>)

This should the Guest Type as Visitor which means its Anonymous and not yet known or uniquely identified.

CURL code snippet-

curl --location -g --request GET 'https://api.boxever.com/v1.2/browser/create.json?client_key=<<client key>>&message={}'

C# code snippet-

var client = new RestClient("https://api.boxever.com/v1.2/browser/create.json?client_key=<<client key>>&message={}");
client.Timeout = -1;
var request = new RestRequest(Method.GET);
IRestResponse response = client.Execute(request);
Console.WriteLine(response.Content);

Python code snippet-

import http.client

conn = http.client.HTTPSConnection("api.boxever.com")
payload = ''
headers = {}
conn.request("GET", "/v1.2/browser/create.json?client_key=<<code key>>&message=%7B%7D", payload, headers)
res = conn.getresponse()
data = res.read()
print(data.decode("utf-8"))

References

Preparing to integrate with Sitecore CDP

Understanding integration details

Loading

Sitecore CDP – Send Checkout Event

The CHECKOUT event captures a guest’s action of checking out an order.

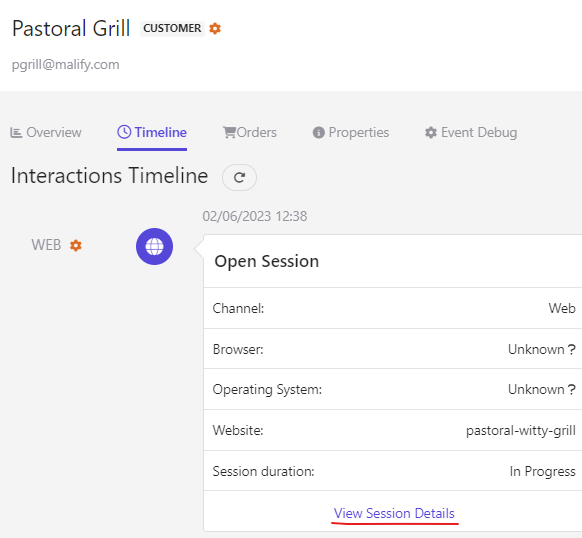
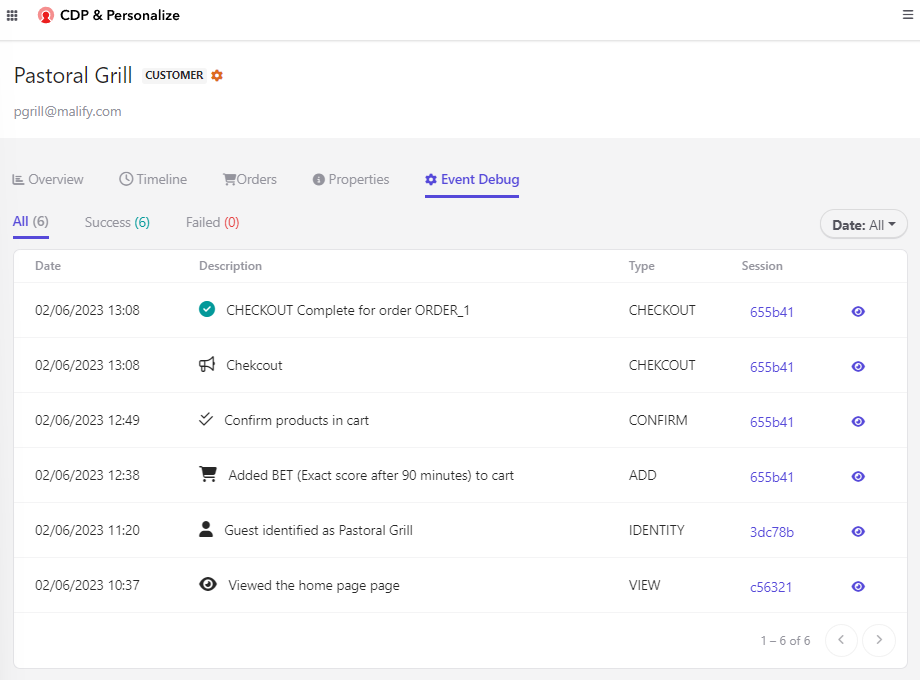
After you send this event, you can view the event in the guest profile.

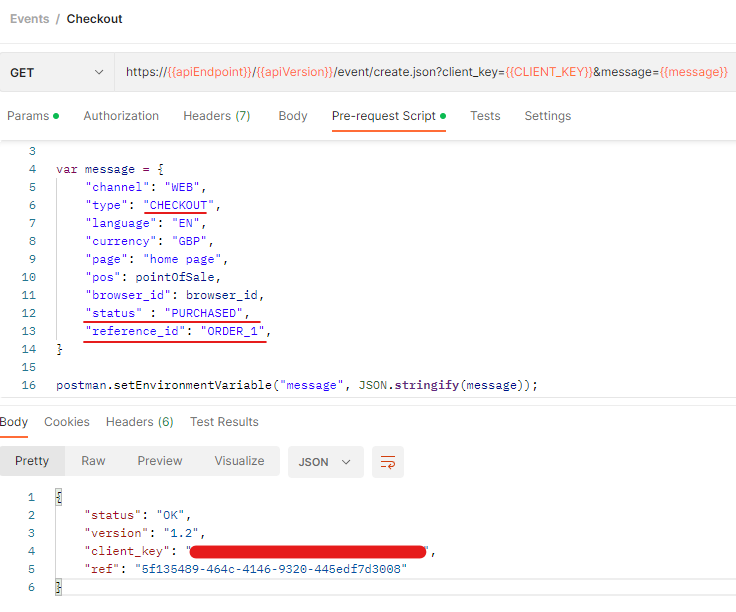
API url for CHECKOUT event

https://{{apiEndpoint}}/{{apiVersion}}/event/create.json?client_key={{CLIENT_KEY}}&message={{message}}

Request payload for CHECKOUT event

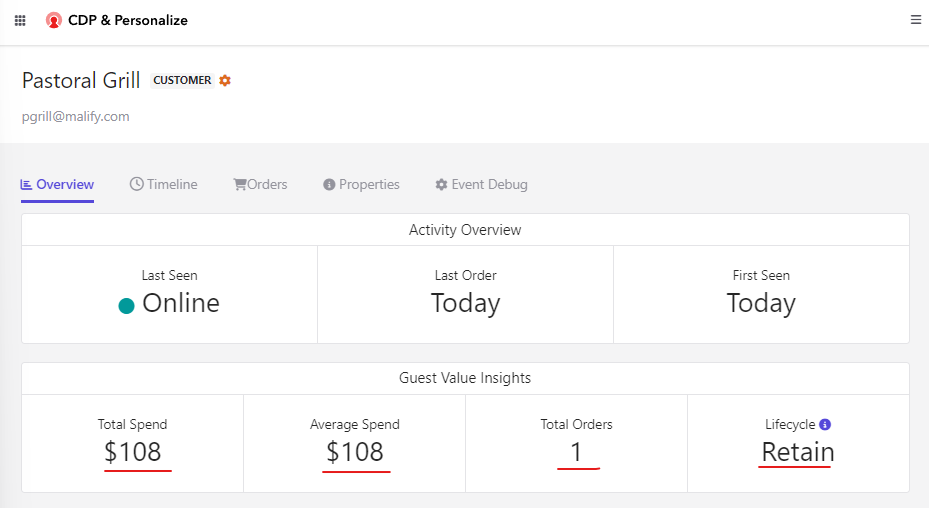
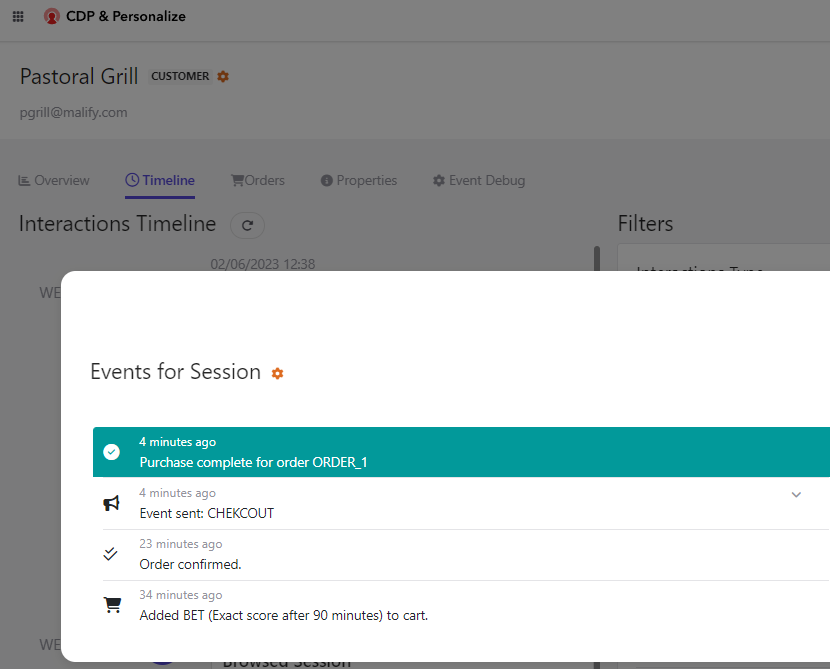
In the session event you should be able to see the Purchase Complete event with the Order Number where the customer completed the checkout.

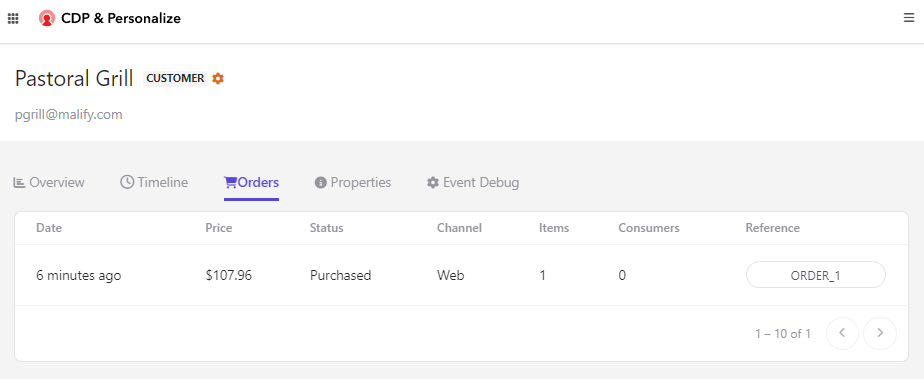
This should help to get the revenue earned.

cURL code snippet-

curl --location -g --request GET 'https://api.boxever.com/v1.2/event/create.json?client_key=<<Client Key>>&message={"channel":"WEB","type":"CHECKOUT","language":"EN","currency":"GBP","page":"home page","pos":"pastoral-witty-grill","browser_id":"7ed103bd-08c2-47f4-8f69-91141ca3200d","status":"PURCHASED","reference_id":"ORDER_1"}'

C# code snippet-

var client = new RestClient("https://api.boxever.com/v1.2/event/create.json?client_key=<<Client Key>>&message={\"channel\":\"WEB\",\"type\":\"CHECKOUT\",\"language\":\"EN\",\"currency\":\"GBP\",\"page\":\"home page\",\"pos\":\"pastoral-witty-grill\",\"browser_id\":\"7ed103bd-08c2-47f4-8f69-91141ca3200d\",\"status\":\"PURCHASED\",\"reference_id\":\"ORDER_1\"}");
client.Timeout = -1;
var request = new RestRequest(Method.GET);
IRestResponse response = client.Execute(request);
Console.WriteLine(response.Content);

Python code snippet-

import http.client

conn = http.client.HTTPSConnection("api.boxever.com")
payload = ''
headers = {}
conn.request("GET", "/v1.2/event/create.json?client_key=<<Client Key>>&message=%7B%22channel%22:%22WEB%22,%22type%22:%22CHECKOUT%22,%22language%22:%22EN%22,%22currency%22:%22GBP%22,%22page%22:%22home%20page%22,%22pos%22:%22pastoral-witty-grill%22,%22browser_id%22:%227ed103bd-08c2-47f4-8f69-91141ca3200d%22,%22status%22:%22PURCHASED%22,%22reference_id%22:%22ORDER_1%22%7D", payload, headers)
res = conn.getresponse()
data = res.read()
print(data.decode("utf-8"))

Reference- https://doc.sitecore.com/cdp/en/developers/sitecore-customer-data-platform–data-model-2-1/send-a-checkout-event-to-sitecore-cdp.html
Loading

Sitecore CDP – Send Confirm Event

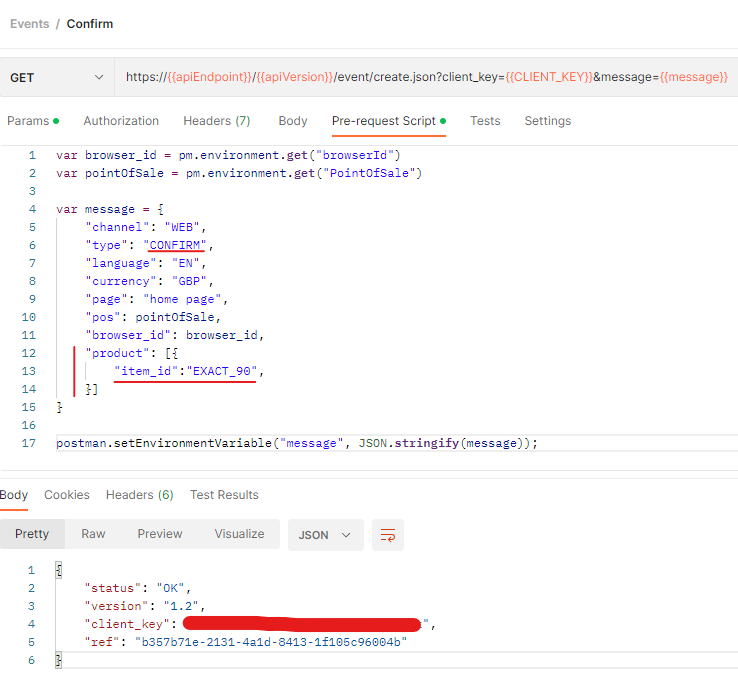
The CONFIRM event captures the confirmation of purchased products.

Use the following endpoint for sending the confirm event.

https://{{apiEndpoint}}/{{apiVersion}}/event/create.json?client_key={{CLIENT_KEY}}&message={{message}}

ADD event

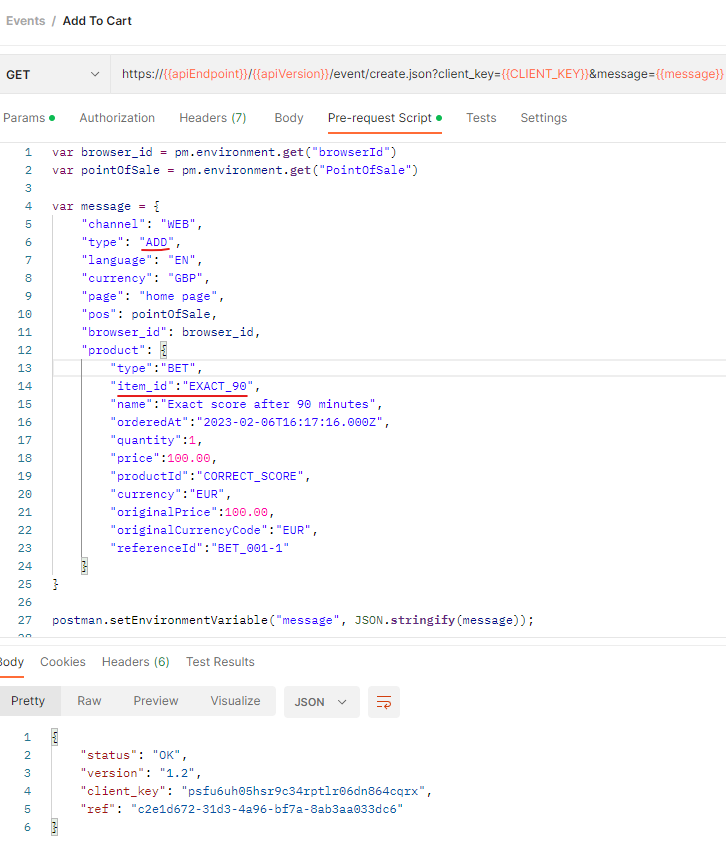
See how to create a browser id and Add Event before a confirm event is sent.

CONFIRM Event

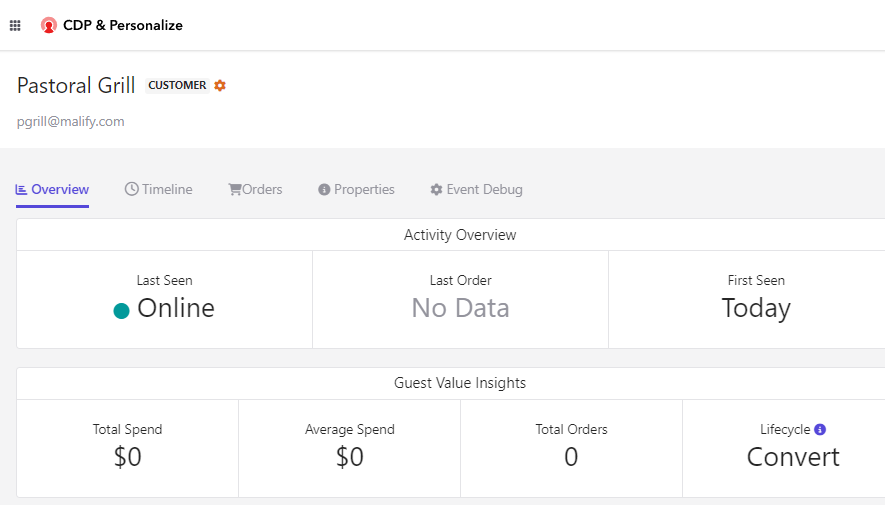
Search Customer by browserid or Name.

You should be able to see the customer Online at that point odf instance

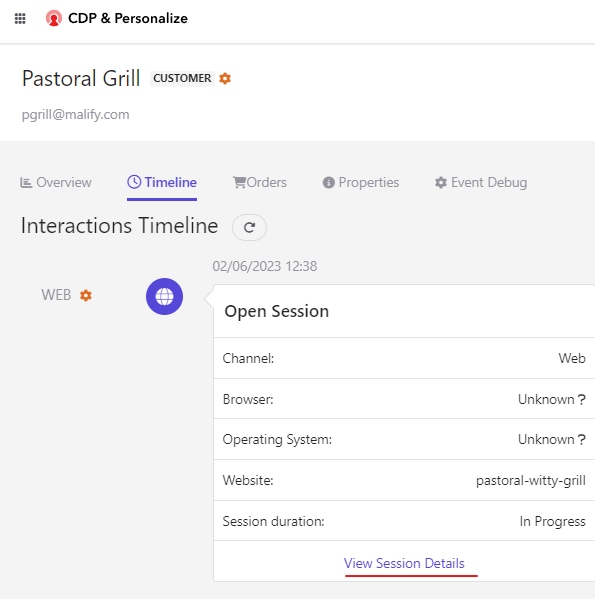
Click on Timeline and View Session details

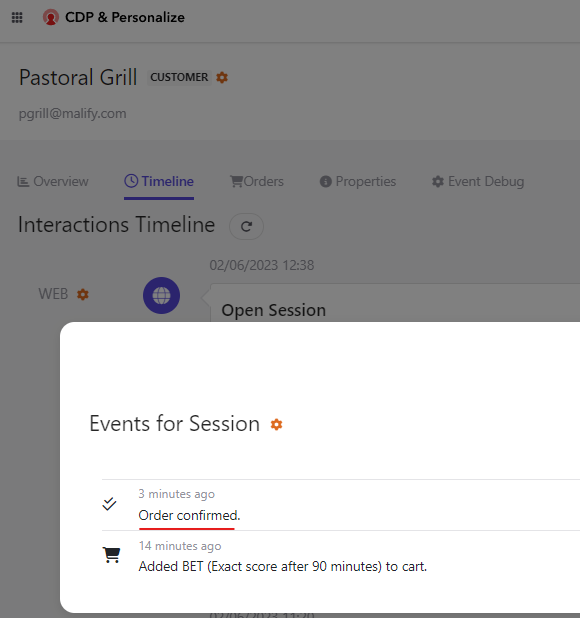
Get the session details and should see the Order Confirmed event

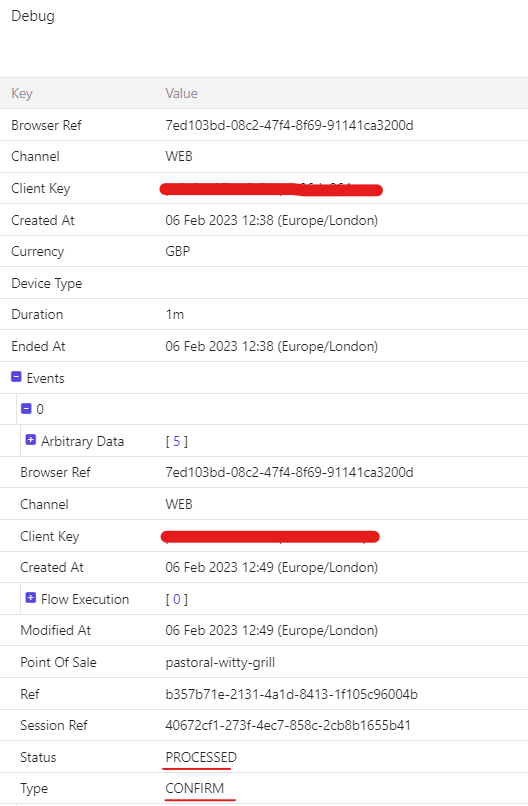
Clieck on the settings icon to see more details-

cURL code snippet-

curl --location -g --request GET 'https://api.boxever.com/v1.2/event/create.json?client_key=<<Client Key>>&message={"channel":"WEB","type":"CONFIRM","language":"EN","currency":"GBP","page":"home page","pos":"pastoral-witty-grill","browser_id":"7ed103bd-08c2-47f4-8f69-91141ca3200d","product":[{"item_id":"EXACT_90"}]}'

C# code snippet-

var client = new RestClient("https://api.boxever.com/v1.2/event/create.json?client_key=<<Client Key>>&message={\"channel\":\"WEB\",\"type\":\"CONFIRM\",\"language\":\"EN\",\"currency\":\"GBP\",\"page\":\"home page\",\"pos\":\"pastoral-witty-grill\",\"browser_id\":\"7ed103bd-08c2-47f4-8f69-91141ca3200d\",\"product\":[{\"item_id\":\"EXACT_90\"}]}");
client.Timeout = -1;
var request = new RestRequest(Method.GET);
IRestResponse response = client.Execute(request);
Console.WriteLine(response.Content);

Python code snippet-

import http.client

conn = http.client.HTTPSConnection("api.boxever.com")
payload = ''
headers = {}
conn.request("GET", "/v1.2/event/create.json?client_key=<<Client Key>>&message=%7B%22channel%22:%22WEB%22,%22type%22:%22CONFIRM%22,%22language%22:%22EN%22,%22currency%22:%22GBP%22,%22page%22:%22home%20page%22,%22pos%22:%22pastoral-witty-grill%22,%22browser_id%22:%227ed103bd-08c2-47f4-8f69-91141ca3200d%22,%22product%22:%5B%7B%22item_id%22:%22EXACT_90%22%7D%5D%7D", payload, headers)
res = conn.getresponse()
data = res.read()
print(data.decode("utf-8"))

Reference- https://doc.sitecore.com/cdp/en/developers/sitecore-customer-data-platform–data-model-2-1/send-a-confirm-event-to-sitecore-cdp.html
Loading