Welcome! This is my personal blog about Web technologies, software development, open source and other related topics
The ideas and opinions expressed here are solely mine and don't represent those of others, either individuals or companies.The code snippets or references to software products or analogous are to be used without any warranty of any kind. If you enjoy the content, feel free to share it and re-use it as long as you provide a link to the original post.
Functions are use for efficient programming and eliminates the need to constantly rewrite the code.
Rust is a strictly typed language and therefore needs to know the data type for all variables at compilation.
When there is not a specified return value, the function will return the unit data type which is represented as () and indicates there is no other meaningful values that could be returned. A statement does not return a value.
In the below example we can see how a function can be defined and called from the main.
Function without and with parameters. Define the parmeter data type and return data type.
fn main(){
    display_message();
    display_message_with_parameters(10);
    let addition  = add_numbers(10, 20);
    println!("Addition of 2 number is {}", addition);
}

fn display_message(){
    println!("Display message....");
}

fn display_message_with_parameters(value : i8){
    println!("Function paramter value is {}", value);
}

fn add_numbers(param1: i8, param2: i8) -> i8{
    param1 + param2
}
Output-
Display message....
Function paramter value is 10
Addition of 2 number is 30
Diverging Functions
Diverging functions never return. They are marked using !, which is an empty type.
fn foo() -> ! {
    panic!("This call never returns.");
}
Empty return functions
Function return empty (). It doesn’t return anything but returns back to caller
fn some_fn() {
    ()
}

fn main() {
    let _a: () = some_fn();
    println!("This function returns and you can see this line.");
}
In Rust arrays are stored in contigious section of memory locations and sorted in order. They are fixed length and cannot be dynamically resize, containing elements of same data type.
A fix size array denotes [T;N]. where T denotes element type i.e. i32, u64 etc. and N denoted non-negative compile time constant size. This means compiler needs to know before running the code the size of array.
One way of declaring an array is to have the values comma seperated in square brackets e.g.- [1, 2, 3]
Example-
let fruits = ["apple", "orange"];
let selected_fruit = fruits[0];

// Retrieve first element of an array.
println!("Selected fruit is - {}", selected_fruit);
Output-
Selected fruit is - apple
To modify the value in the array make the array mutable and change the value of an element in array, in this case first element.
let mut fruits = ["apple", "orange"];
fruits[0]= "mango";

let selected_fruit = fruits[0];
println!("Selected fruit is - {}", selected_fruit);
Output-
Selected fruit is - mango
Repeat expression – Declaring arrays with the data type and length [expr, N] where N is the times to repeat expression (expr).
Note that [expr; 0] is allowed, and produces an empty array. This will still evaluate expr, however, and immediately drop the resulting value, so be mindful of side effects.
let numbers : [i32; 5]; // declare array
numbers= [1, 3, 5, 7, 9]; // initalize array
println!("Selected number - {}", numbers[0]); // print first element
Output-
Selected number - 1
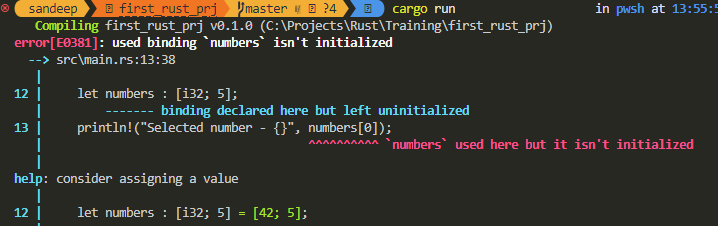
Compiler Errors-
If array is not initalised and the element of array is tried to access the compiler thorws an error-
let numbers : [i32; 5];
println!("Selected number - {}", numbers[0]);
Solution-
let numbers : [i32; 5];
numbers = [0;5]; // All elements has value 0
println!("Selected number - {}", numbers[0]);
Output-
Selected number - 0
Compiler Errors-
Index out of bounds – if the element accessed is larger than the array length.
let numbers : [i32; 5];
println!("Selected number - {}", numbers[5]);
The array length is 5 and index starts from 0, so the last index is 4. But in above program the index 5 is trying to access hence error
Solution-
The element accessed here is the last element i.e. index 4.
let numbers : [i32; 5];
numbers = [0;5]; // all elements has value 0
println!("Selected number - {}", numbers[4]);/ Compiles successfully
Count of elements
Get the length of an array using extension function len()
let numbers : [i32; 5];
numbers = [0;5];
println!("Length of numbers is {}", numbers.len());
Output-
Length of numbers is 5
SliceArray
Slice the array by giving an expression the starting and ending index with double dots between. e.g.- [starting_index..ending_index]. Access the memory of the variable and provide the range e.g.- &array_variable[2..4]
Print the array and the slice using {:?}
Omit start index and end index [..4] and [2..] respectively
let numbers : [i32; 5] = [10, 20, 30, 40, 50];
let array_slice = &numbers[2..4];
let omit_start_index = &numbers[..4];
let omit_end_index = &numbers[2..];
println!("array = {:?}", numbers);
println!("slice = {:?}", array_slice);
println!("omit start index = {:?}", omit_start_index );
println!("omit end index = {:?}", omit_end_index );
let fruits = [["1", "2"],["apple", "orange"]];
println!("Selected fruit is - {}", fruits[1][1]);
Tuples
Tuples are similar to arrays except that tuples can have mixed data types. Similar to arrays tuples are stored in a fiexed-length and the data types must be know at compile time with elements are ordered.
Tuples is declared with comma seperated elements with round braces – (“hello”, 5 , ‘c’)
Here the first element is string then integer and character. See below example how to declare tuples and access elements.
Example-
// declare and inititaize tuple
let tuple = ("Hello", 5 , 's');
// Access elements
println!("First element in tupple is - {}",tuple.0)
Output-
First element in tupple is - Hello
Explict declaration can be done as follows-
Example-
// declare and inititaize tuple
let tuple: (&str, i32, char) = ("Hello", 5 , 's');
// Access elements
println!("First element in tupple is - {}",tuple.0)
// Prints "First element in tupple is Hello"
Updating element in tuple
First mark the variable as mutable. Access the element of the tuple and update.
// declare and inititaize tuple
let mut tuple: (&str, i32, char)    = ("Hello", 5 , 's');
// Access second element and add 5
tuple.1 += 5;
// Print updated element
println!("Add 5 to second element in tupple - {}",tuple.1)
While updating the element be careful that the element value does-not exceeds the max value a data type can hold or there will be memory overflow error.
Copy the tuple object
Continuing to the aboce code, decalre the tuple with 3 elements, assign the updated tuple and access the declared variable in tuple.
// declare and inititaize tuple
let mut tuple: (&str, i32, char)    = ("Hello", 5 , 's');
// Access second element and add 5
tuple.1 += 5;
// Print updated element
println!("Add 5 to second element in tupple - {}",tuple.1);

let (first, second , third ) = tuple;
println!("Copied tuple third element is {}", third);
Output-
Add 5 to second element in tupple - 10
Copied tuple third element is s
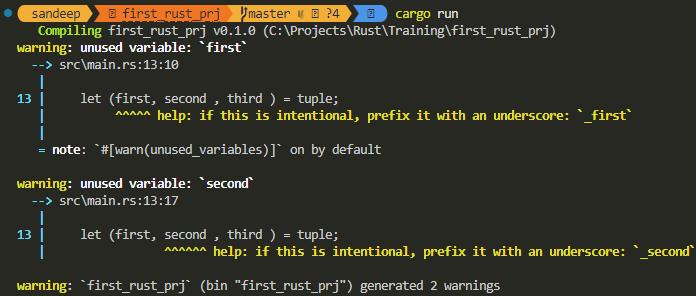
Warnings-
Above code, first and second element are never used, hence the compiler will give warnings – unused variable:
Although it won’t stop the compiler from running the code. The suggestion here is to use prefix tuple element with _ (underscore) i.e. _first and _second. Lets change this and see if there are no warnings.
    // declare and inititaize tuple
    let mut tuple: (&str, i32, char)    = ("Hello", 5 , 's');
    // Access second element and add 5
    tuple.1 += 5;
    // Print updated element
    println!("Add 5 to second element in tupple - {}",tuple.1);

    let (_first, _second , _third ) = tuple;
    println!("Copied tuple third element is {}", _third);
Now there are no warnings and compiles with results-
Variables must be explicitly declared as mutable using mut keyword
Rust is a statically typed language – all variable data types must be know at compile time.
Example-
//default immutable. value cannot be changed after declaration
let x = 10;

// marked as mutable. i.e value can be changed after declaration
let mut y = 20;
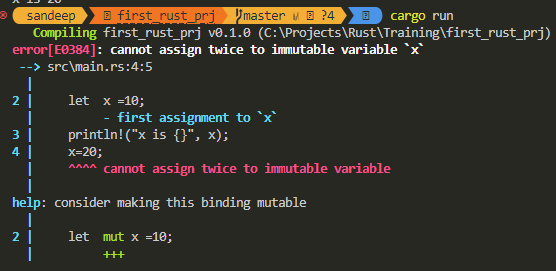
Compiler Errors-
let x = 10;
println!("x is {}", x);
x=20; // Error. Cannot be assigned twice. consider making this muttable
println!("x is {}", x);
Solution-
let mut x = 10; // make this mutable
println!("x is {}", x);
x=20; // compiles successfully
println!("x is {}", x);
Type of the varaible is declared after the : (colon)
Example:-
// signed 8-bit integer. max value can hold is 255
let x: i8 = 255;
let y: i8 = -10;

// unsigned 8-bit integer.
let z: u8 = 255;
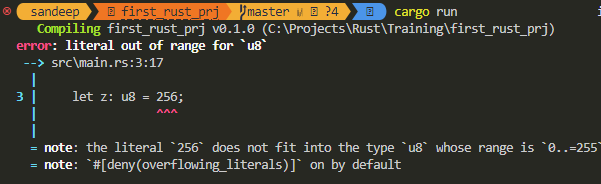
Compiler Errors-
// unsigned 8-bit integer. max value 255
let z: u8 = 256;
Solution-
// unsigned 8-bit integer. max value 255
let z: u8 = 255; // compiles successfully
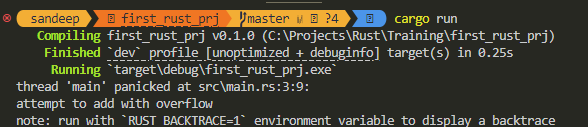
Runtime Errors-
// unsigned 8-bit integer. max value 255
let mut z: u8 = 255;
z = z + 1; // Error: panicked - attempt to add with overflow
println!("z is {}", z);
Solution-
// unsigned 8-bit integer. max value 255
let mut z: u8 = 254;
z = z + 1; // compiles and runs successfully
println!("z is {}", z);
Output- z is 255
Floating-Point Data Types
Represent numbers with decimal points
f32 and f64 are two floating-point types
Value stored as fractional and exponential components
f32- represents value from 6 to 9 decimal digits of precision.
f64- represents value from 15 to 17 decimal digits of precision.
Example-
let x= 10.00; // default is f64
println!("x is {} deafult type is f64", x);

let y: f32= 10.1234567890132456798; // default is f64
println!("y is {} with f32 floating-point type", y);

let z: f64= 10.1234567890132456798; // default is f64
println!("z is {} with f64 floating-point type", z);
Output-
x is 10 deafult type is f64
y is 10.123457 with f32 floating-point type
z is 10.123456789013245 with f64 floating-point type
Guidelines for Numeric data types–
Values with fractional component or decimal places use floating-point data type.
Use f64 or been default gives most precision range. With modern computers it is as good as using f32. So perrfomance should not be an issue.
Use f32 with embedded systems where memory is a limitation.
Default 32 signed integer (i32) provides a generous range – between and around plus or minus 2 billion
For memory concerns use smaller size integers to conserve and use less memory
Arithmetic Operations
Rust uses arithmetic operations with the operators +, -, *, / and %
Artihmentic operation results depend on the type of variables. example, if both operators are integer then will get result in integer
let x= 10; // default is i32
let y=3; // default is i32
let z= x / y;
println!("z is {}", z) // so z will be i32
Output- Here the value of z is 3 since both the variables are defaulted to signed integer i.e. i32
z is 3
Now if we add decimals to x and y the output is floating-point-
let x= 10.00; // default is f64
let y=3.00;
let z= x / y;
println!("z is {}", z)
Output- Here the default is f64.
z is 3.3333333333333335
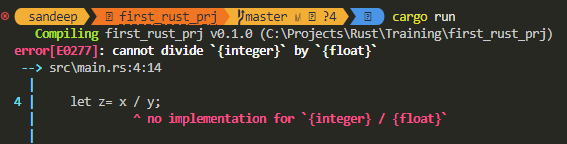
Compiler Errors-
If one of the variables data type is different from other, then will receive error-
let x= 10; // default is i32
let y=3.00; // default is f64s
let z= x / y;
println!("z is {}", z)
Here the default integer is i32 and floating-point is f64. Dividing different data types will result in error. This is applicable for all artihmetic operations.
Solution-
For the above error cast the variable.
 let x= 10; // default is i32
 let y=3.00; // default is f64s
 let z= x as f64 + y;
 println!("z is {}", z)
Binary trait formats the output as a number in binary
Example-
let value= 0b11110101u8;
println!("value is {}", value)// Prints the number
println!("value is {:b}", value) // prints the binary
println!("value is {:010b}", value) // prints the binary upto 10 digits and preceding 0.
Output-
value is 245
value is 11110101
value is 0011110101
Here the binary is converted to number. The prefix 0b mentions the value is binary and suffix u8 converts the binary to unsigned integer.
Bitwise operations-
Logical operations on patterns using NOT, AND, OR, XOR and SHIFT.
Taking the above example, Bitwise NOT-
let mut value= 0b11110101u8;
value=!value;
println!("value is {:08b}", value); // prints the negated binary
Output-
value is 00001010
Bitwise AND- change the value of a specific Bit-
Use the & with the anotehr binary to change the value.
Example- to change the value of the highlighted 11110111 to 0, & this with 11110011. Ouput will be 11110011
Example-
let mut value= 0b11110111u8;
value=value & 0b11110011;
println!("value is {:08b}", value);
Output-
value is 11110011
Likewise use | (pipe) for OR, ^ for XOR, << Left shift and >> Right Shift
Boolean data types and operations
Use the above operatos used in bitwise for boolean operations.
Example-
let a = true;
let b= false;
println!("a is {} and b is {}", a, b);
println!("NOT a is {} ", !a);
println!("a AND b is {} ", a & b);
println!("a OR b is {} ", a | b);
println!("a XOR b is {} ", a ^ b);
Output-
a is true and b is false
NOT a is false
a AND b is false
a OR b is true
a XOR b is true
Short-Circuiting Logical Operations
With this in OR operation if the left side is True then it won’t check the right side since the result for OR will be always true.
Similarly, for AND operation if the left side is False, it won’t check the value at the right side, since the result will be always False.
This can be done using && or ||. This improves the code effeciency.
Example-
let a = true;
let b= false;
let c= (a ^ b) || (a & b);
println!("c is {}", c);
Use compareision operators to compare values. Some of these are-
Equal ==
Not Equal !=
Greater Than >
Less Than <
Greater Than Equal >=
Less Than Equal <=
Example-
let a = 1;
let b= 2;
println!("a is {} and b is {}", a, b);
println!("a EQUAL TO b is {} ", a == b);
println!("a NOT EQUAL TO b is {} ", a != b);
println!("a GREATER THAN TO b is {} ", a > b);
println!("a LESS THAN TO b is {} ", a < b);
println!("a GREATER THAN EQUAL TO b is {} ", a >= b);
println!("a LESS THAN EQUAL TO b is {} ", a <= b);
Output-
a is 1 and b is 2
a EQUAL TO b is false
a NOT EQUAL TO b is true
a GREATER THAN TO b is false
a LESS THAN TO b is true
a GREATER THAN EQUAL TO b is false
a LESS THAN EQUAL TO b is true
The comparision can be used with the similar data types.
Char Data Type
Represents a single character
Stored using 4 bytes
Unicode scalar value
Char can be represented within a single quote e.g.- ‘a’
Unicode characters can be represented using “\u{hexa decimal value}”
let letter = 'a';
let number = '1';
let unicode= '\u{0024}';
println!("Letter is {}", letter);
println!("Number is {}", number);
println!("Unicode is {}", unicode);
There are various ways you should be able to do this. I am adding 5 times more space to the existing indent-top style.
_indent.scss
// $middle-margin is defined in _margins.scss
.indent-large-top {
  margin-top: calc($middle-margin * 5);
}
Apply a custom style to rendering
Select the component or container you want to apply style and choose option “Indent Large Top” in Spacing section
Now the space between the 2 component is increased and is 100px as per the requirement.
New style applied to container-
Apply style to specific renderings
As above when the style was created it was applied to all renderings.
If you want to restrict the style to be applied to only certain renderings you can do so by setting Allowed renderings field in new created Style item.
For “Indent Large Top” only SectionContainer will be able to see the new Spacing Style.
In Experience Editor you wont see the “Indent Large Top” for other renderings e.g.- for container rendering-
While for Section Container rendering the new style is available-
For Noncustodial wallets keep your recovery code safe
Don’t fall in trap if wallet application asks for recovery code for no reason – Recovery code is asked while creating a wallet i.e. initial setup or if you have lost your wallet i.e. recovery – other than that ensure that you are been not phished
Don’t keep all you crypto assets in a single address –
Don’t share the same address to multiple person – Private keys are used to generate the Bitcoin Address. For each transaction create a new address. This way you avoid anybody to know how much bitcoin has been sent to that address in total. Generating new address everytime also protects your privacy.
Block explorer privacy – Block explorer is a web appplication that operates as a Bitcoin search engine. You can search by Bitcoin addresse, transaction hash, block number and block hash. Using these applications and searching a transaction allows them to associate the IP address, previous earches and browser details through which can identify and learn your activities. Searching somebody else transaction should not be a problem but if you search your own transactions these operators might be able to analyse the Bitcoin your have received and spent or currently own. So as mentioned earleir each transaction should be on different address to make the operators difficult to identify you.
Ways to acquire a Bitcoin as a new user
Bitcoin transactions are irreversible. So be careful when doing transaction either send or receive. Since the transactions are done on address and there is not identity attached, there is no verification process to check if the address is your’s before doing a transaction. This way acquring, holding and spending bitcoin does not expose your personal identity. Although everybody in the network can see the how much bitcoin is in a address but that address doesn’t disclose your identity. As a new user follow this guidelines-
First do a self study how the crypto transaction works. With most of the mobile apps its as as easy as transfering the fiat currency. But if you have a self custodial assets its very important to understand the process. Understand the current Price of bitcoin from the currency exchange, transaction fees, location from where you will be doing transactions. It is good to understand the rules and regulations of the country where you reside.
Get introduction about bitcoin from a friend – Take help from you friend who already has Bitcoin and buy from your them directly with a small amount. This should give you a confidence when doing further transactions by yourself. Once you are familiarised and have confidently done transactions help new users and share your expereince.
Earn a bitcoin. Earn a bitcoin by providing service with which ever profession you are in. Example- if you are porgrammer you sell your skills for firat currency, instead sell your service for bitcoin. This requires to share your adddress along with the invoice to your client who should then send agreed bitcoin to your address. This way you learn how to generate address to receive bitcoin. Always remember to genereate new address for each invoice. See section “Don’t share the same address to multiple person“.
Use Bitcoin ATM – A Bitcoin ATM is a standalone device or kiosk that allows you to buy or sell bitcoin or other cryptocurrencies using a terminal. Bitcoin ATMs are connected to the Internet and often utilize QR codes to send and receive tokens to users’ digital wallets. Bitcoin ATM accepts cash and send bitcoins to your wallet. This way you get to familiarise with bitcoin transaction’s.
Use Bitcoin currency eschange – you can buy bitcoin from the digital curerncy exchange such as Coinbase which is linked to your back account. Although they will take the transaction fees but a safe way to buy or sell the bitcoins.
Generating Private Key
Do not write your own code to create a random number or use a simple random number generator offered by programming language. Use CSPRNG (crytpographically secure pseudorandom number generator) with a seed from a source of sufficient entropy. What is entropy – see here blog post of private key
This is a very common scenario where a background image needs to be set to certain components. Banner’s on any page on your website is a very common place to have a background image.
This blog assumes you have setup the Foundation Head setup or have your own Nextjs project setup implemented using the Sitecore NextJS SDK.
Note: This is not specific to XM Cloud but for any Headless implementation
Foundation Head already has an example on setting the background image using params. In this blog post will explore how this works and where in Sitecore the image can be applied. Will see how this can applied using using OOTB _Background Image item.
To apply image background using rendering parameters to the container see this blog here
Applying background image using rendering field to the components
Background image can be applied to components inheriting the existing __Background Image item to the custom component template.
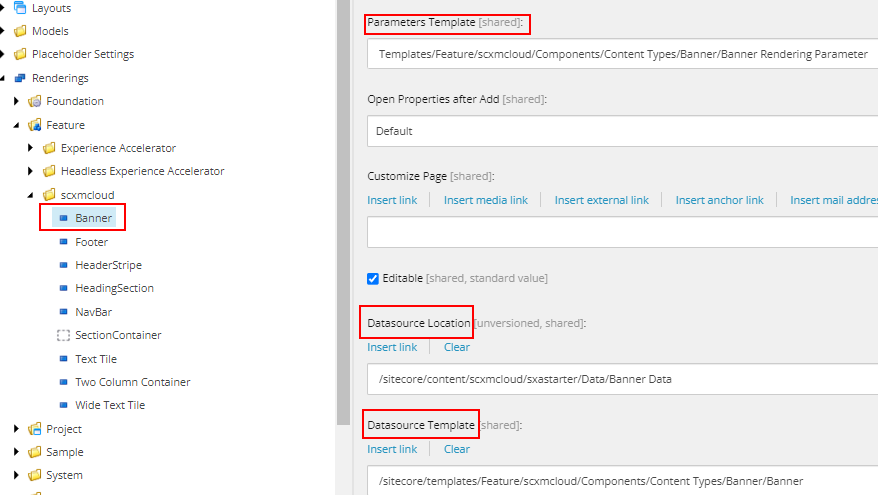
Create a template for your component. Here I am creating a Banner component-
Inherit _Background Image from /sitecore/templates/Foundation/Experience Accelerator/Presentation/_Background Image
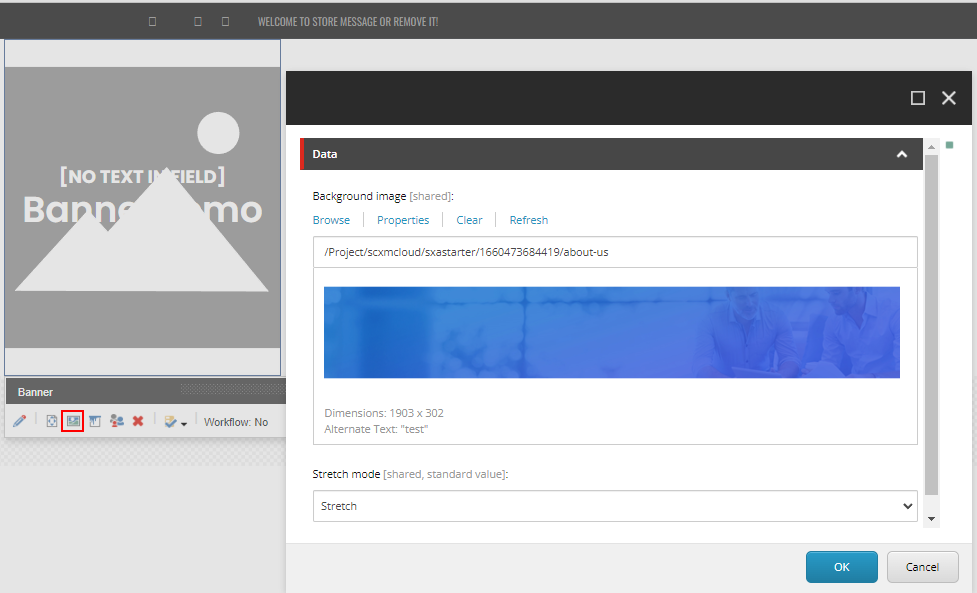
_Background Image has “Background Image” and “Stretch mode” field.
Note that there is a space between the field names, although not recommended but this comes OOTB.
Create a “Banner” JSON Rendering and provide the “Parameters Template”, “Datasource Location” and “Datasource Template” as per your requirement and add this rendering to the “Available Renderings”
Create a Nextjs component in sxastarter project
Note below how the “Background Image” field is set. This is due to the same in field name. Not recommended but this is OOTB.
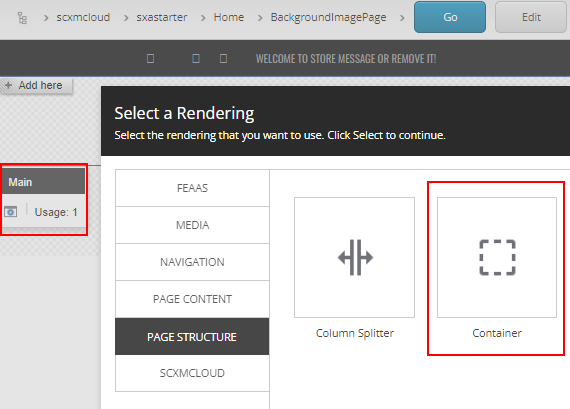
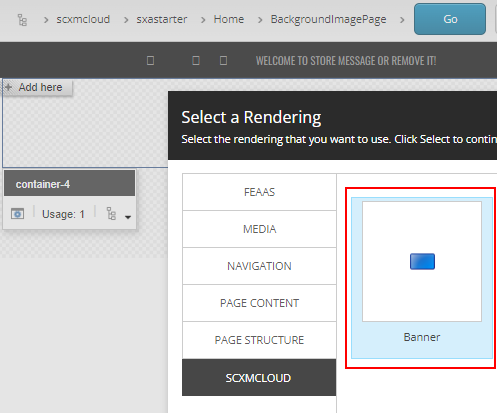
Add a newly created component (Banner) in Container placeholder-
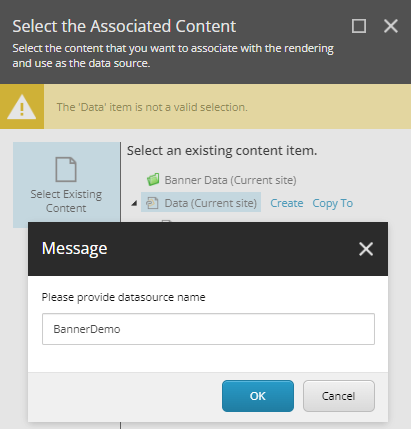
Create or select associated content
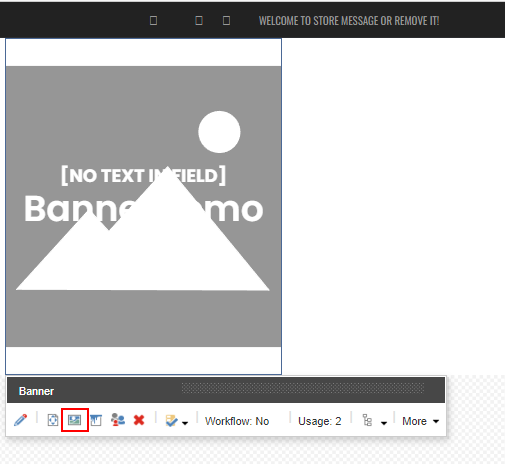
Once the component is added you should see the button to Add Background Image ( ths is added when the template inherits from _Background Image template.
Select the Background Image and Save-
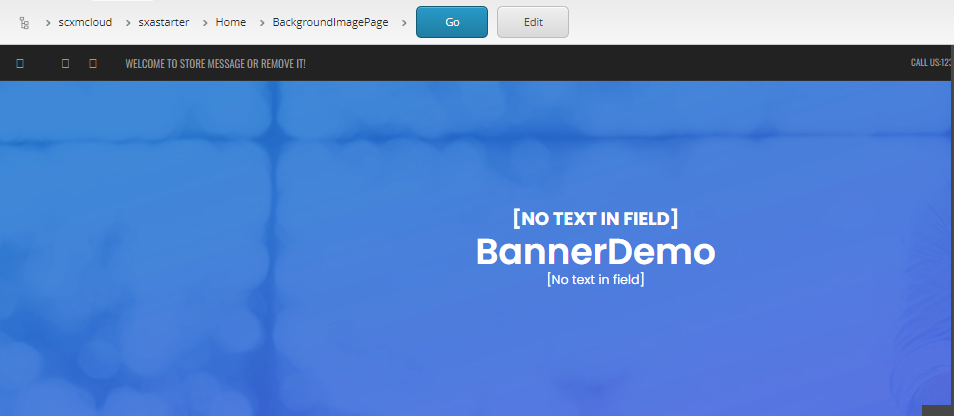
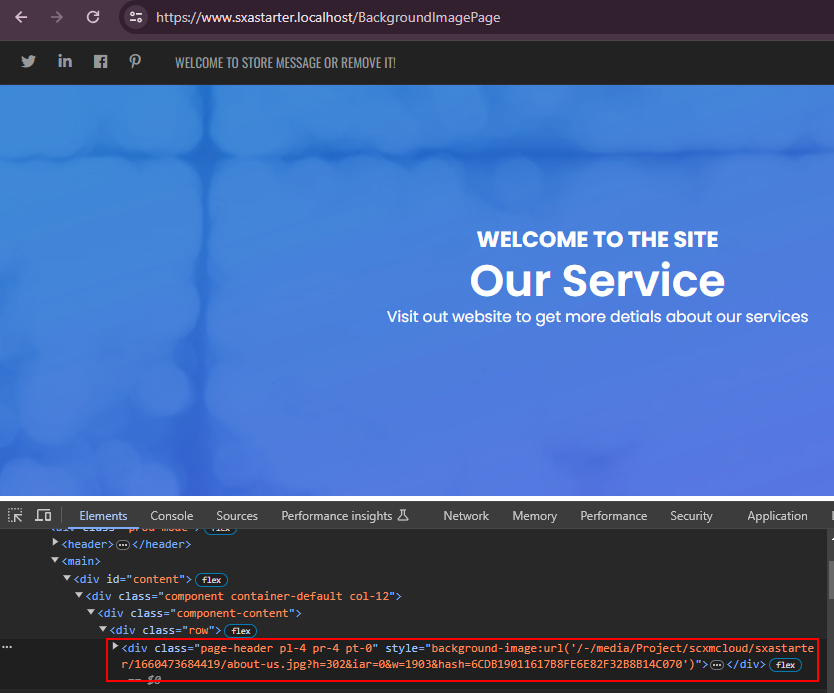
You should now able to see the background image to component-
To install Rust on Windows subsystem for Linux, use this shell command-
curl --proto '=https' --tlsv1.2 -sSf https://sh.rustup.rs | sh
Check the version of Rust-
rustup --version
Check the version of Rust compiler
rustc --version
To update the Rust, use following command-
rustup update
Create a main.rs file and add code to print a string
fun main(){
    println!("Hello World!")
}
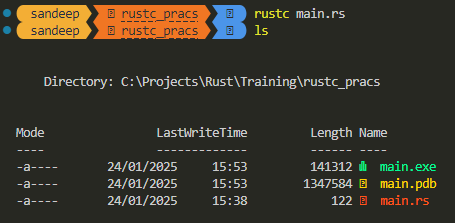
Compile using rust compiler
rustc main.rs
This should create a pdb and exe file
Execute the main.exe file and this should print the string
Create a Rust project using Cargo
Cargo is a build and package manager.
Helps to manage dependecies for repetable builds
Downloads and builds external libraries
calls rustc with correct parameters
Included with standard rustup installation
For creating a new Rust project using Cargo package manager-
cargo new first_rust_prj
Tip – The name of the project should be snake case. Example this will give a warning. Atlhough this will create a project.
cargo new FirstRustPrj //Warning

Creating binary (application) `FirstRustPrj` package
warning: the name `FirstRustPrj` is not snake_case or kebab-case which is recommended for package names, consider `firstrustprj`
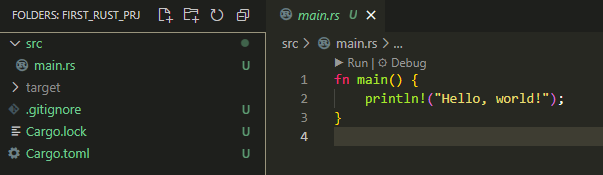
This should create following folder structure with main.rs and Cargo.toml (configuration) file.
TOML – Tom’s Obvoius Minimal Language.
Alternatively, you can create a project without using Cargo. Create a src directory and create appropriate Cargo.toml namually. To create toml file use init command
cargo init
Building and Running Cargo project
Build the Cargo project using following command-
cargo build
To compile and run directly from the project folder, use following command-
cargo run
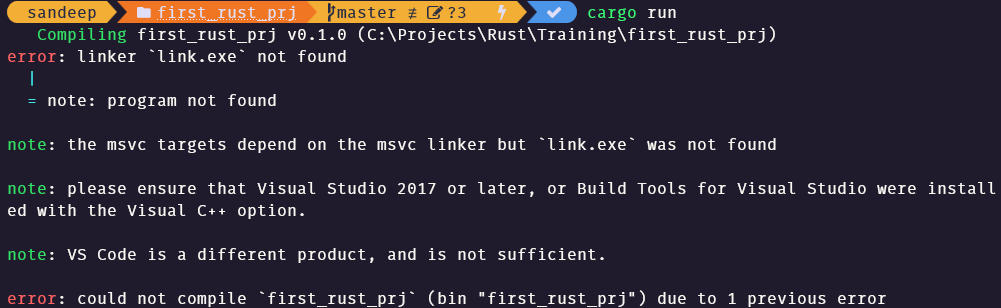
Error compiling the project-
error: linker link.exe not found
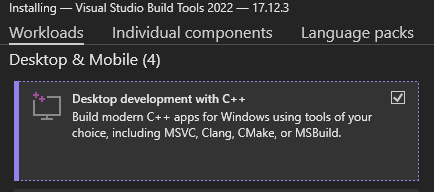
So the pre-requisite for windows machine is to have MS C++ build tools. Install the smae from here. It should be around 5 GB.