Problem-
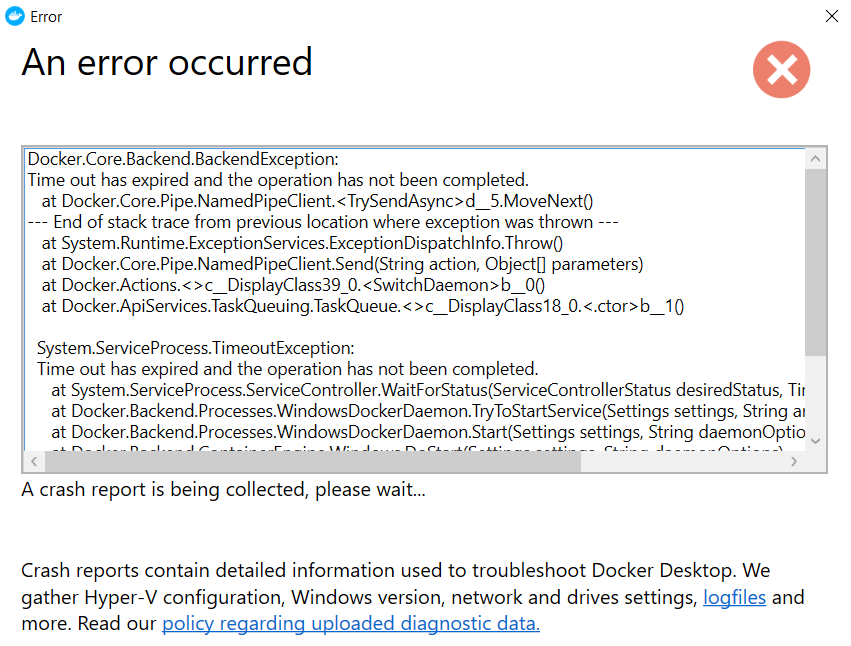
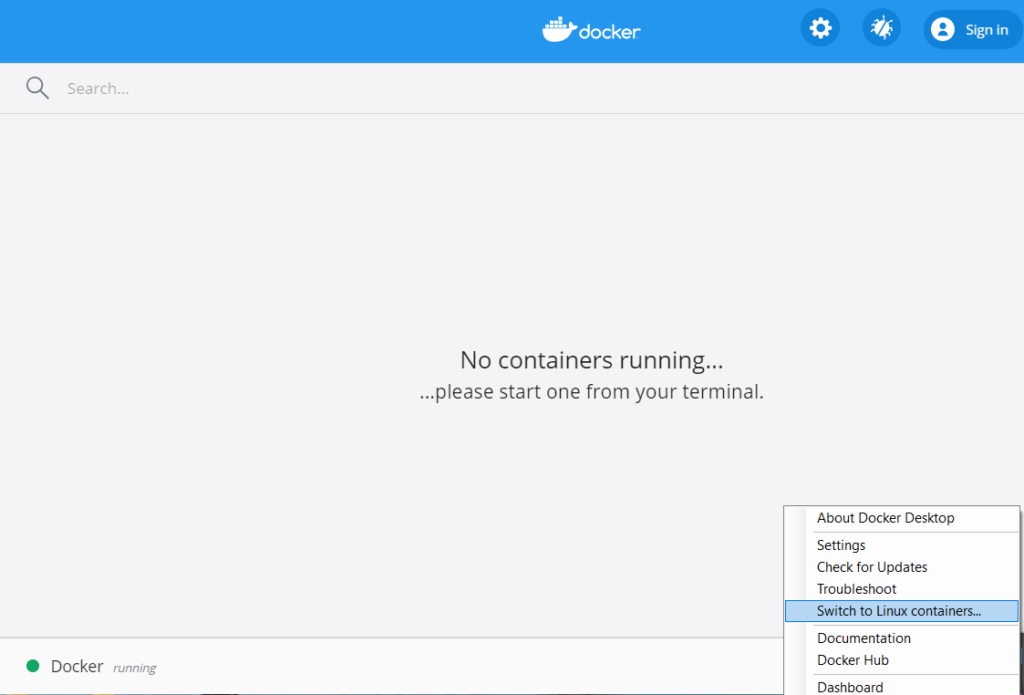
Time out error when switching to Docker Desktop Windows Containers.
Solution-
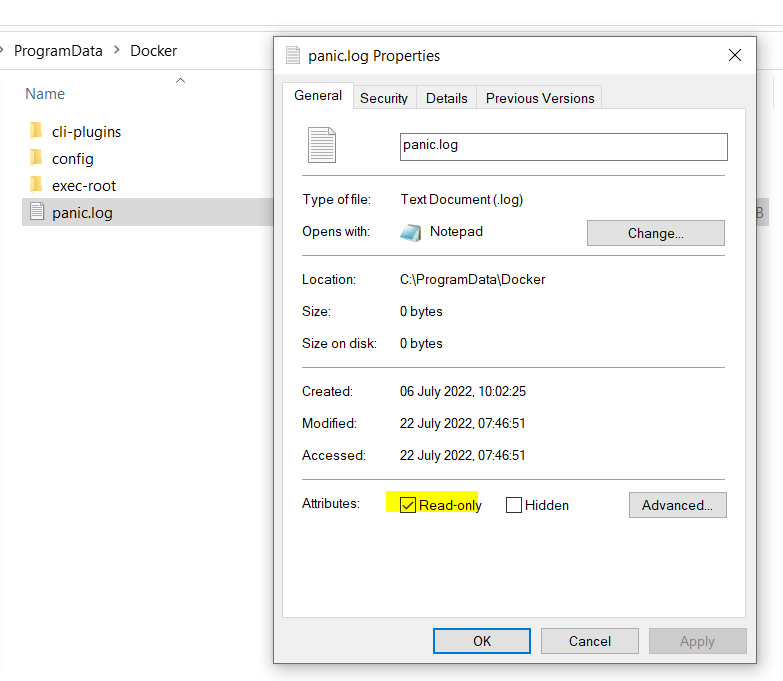
If you see this error whilst switching to the Windows Continaners. Head to the C:\ProgramData\Docker folder and remove the readonly access of panic.log file.

Sitecore Consultant. Sitecore MVP 2021 - 2026


Problem-
Time out error when switching to Docker Desktop Windows Containers.
Solution-
If you see this error whilst switching to the Windows Continaners. Head to the C:\ProgramData\Docker folder and remove the readonly access of panic.log file.

Build Modular Images i.e. Decouple applications
Create a seperate image for each application. Containers can talk to each other and can form a single large application and helps to scale each application
Don’t sotre data in Images
Images are read-only layer. When a container or image is deleted the data is lost
Use Cache Busting strategy
Install the repositories and packages together. As the docker file ises layered architecture having a seperate command for updating repositories and packages may not gurantee the repsoitories will be upto date and may result in dependency issue.
Use Version Pinning
When installing packages specifiy which version you want to install as everytime the image is build it will install the latest package where a application may not be compatible. Version pinning will always ensure the image will have specific version which your application supports.
Create slim images
This will help pull the images from which ever repository you are using quickly
Install only necessary or required packages
This will make image slim or with minimal packages and no unwanted packages are installed so every time image is build with minimal packages the build is fast and light weight. Also the containers created from such images are light weight and fast.
Maintain different images for different environements
Development images may contain debug tools and temprorary files required for debugging and bulding your application. However there tools are not required for production images. Hence remvoe any temporary files/folder and such tools for prodcution by creating a seperate image for different environments.
Use multi-stage builds to create images
Multi-stage build helps to or uses multiple FROM statements where each FROM instruction can use a different base, and each of them begins with new stage of the build and everything that is required for application is in the final image leaving behind unwanted files. This will avoid executing any script that was done traditionaly.
Exclude any unwanted files and folders using .dockerignore file
Use .dockerignore to exlcude any unwanted files and folders e.g.:- temp folder etc. this make the image lighter.
Use CMD instructions to run software in Image
Use CMD instructions to run the software contained in your image along with arguments. CMD should be used in JSON format that is the command and parameters should be seperated by comma.
Minimize build times
By avoiding to send unwanted files to the build context using .dockerengine
References –
https://docs.docker.com/develop/develop-images/multistage-build/
https://docs.docker.com/develop/develop-images/dockerfile_best-practices/

Linux basic commands (Ubuntu)
Linux Package Management for Ubuntu
Linux User Management commands
Linux Networking commands
How to check the file size in Linux
Compressing and Uncompressing Files in Linux
Searching files and directories in Linux
Search content with pattern in the file in Linux
Search content with pattern in the file in Linux
File Permissions in Linux
Check running services in Linux
DOCKER–
Install Docker using install script on Ubuntu
Setup a Docker Swarm
Cache Busting and Version Pinning when building Docker images
How to start docker in debug mode in Ubuntu
Use Docker image offline with Save and Load command in Ubuntu
Export Container and Import as Image using Docker in Ubuntu
Create a custom network in docker for communication between containers
At times if you dont want to always pull the image from image registry which takes time to pull if the image’s are heavy, it makes sense to save the image and use it offline. This avoids to always pull the image from the registry.
Save the image once into tar file and reuse the images.
To Save image use follwoing command
First pull the image from repository
docker pull httpddocker image save httpd -o httpdimage.tar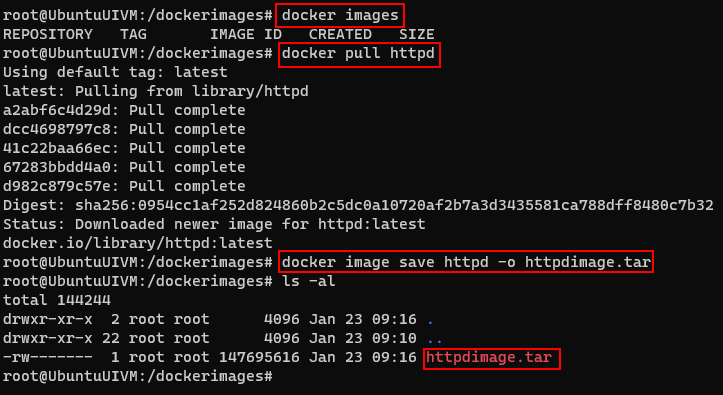
Get the image from the tar file instead pulling it from the registry
docker image load -i httpdimage.tar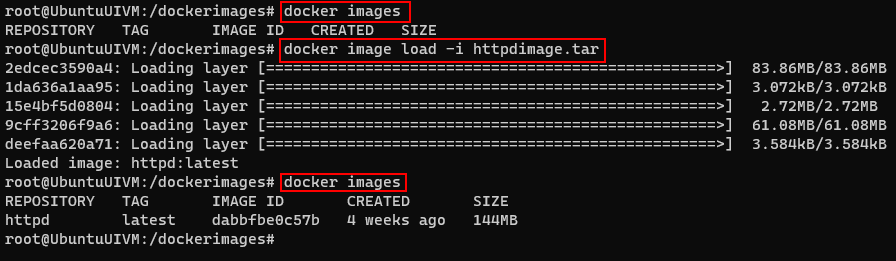
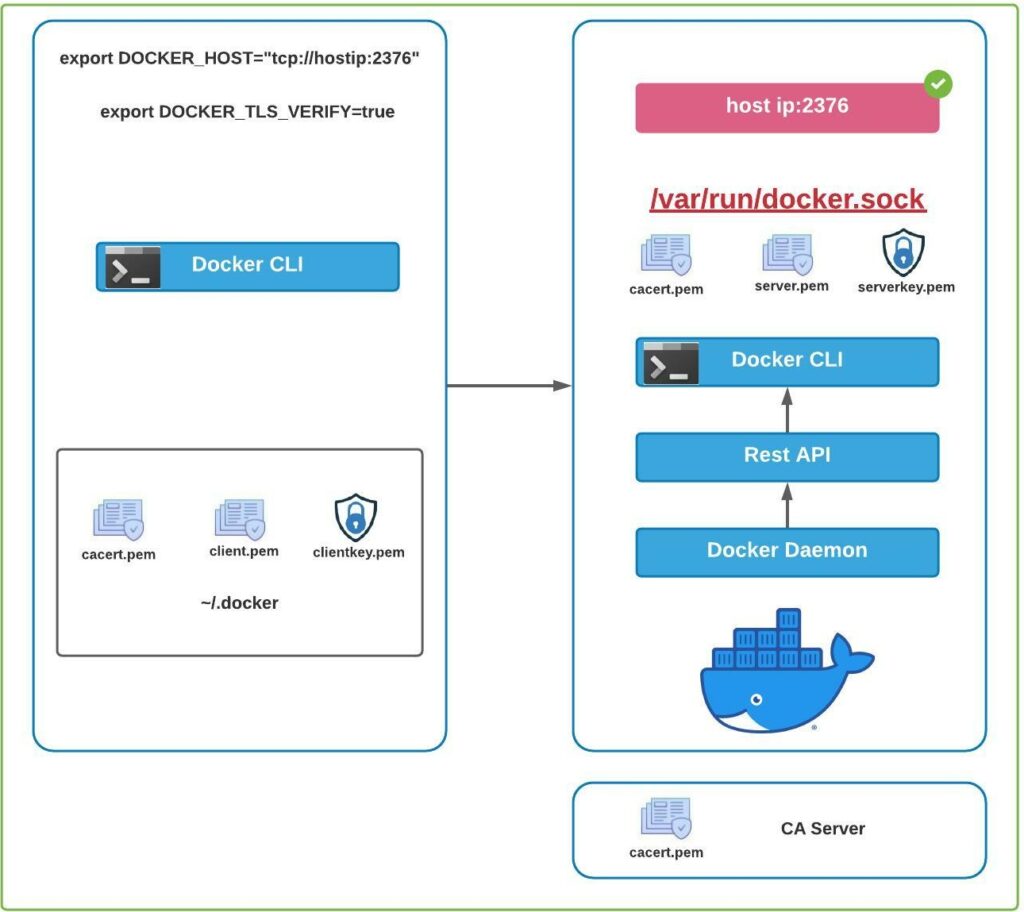
Docker engine consists of Docker Daemon, Rest API and Docker CLI
To access the containers through Docker CLI the request is sent to Rest API and then to Docker Daemon to serve the request.
Docker Daemon service is accessible from within the host using unix socket which located in /var/run/docker.sock file
Applications can access the Docker daemon service from outside the host.
For accessing the docker daemon from outside the host securely configure /etc/docker/daemon.json when it is absolutely necessary
Setup the following in daemon.json file
{
   "hosts": ["tcp://hostip:2376"],
   "tls": "true",
   "tlscert": "/var/docker/server.pem",
   "tlskey": "/var/docker/serverkey.pem"
}
The above configuration help to connect to the Docker Daemon securely and in encrypted manner. On client run the docker command with tls set to true
docker --tls=true
OR
export DOCKER_TLS=true
export DOCKER_HOST="tcp://hostip:2376"
Port 2376 allows to connect securely to Docker Daemon service.
But the above can be connected without authentication.
Access Docker Daemon using Certificate based Authentication
To access the Docker Daemon with certificate based authentication use following configuration-
{
   "hosts": ["tcp://hostip:2376"],
   "tls": "true",
   "tlscert": "/var/docker/server.pem",
   "tlskey": "/var/docker/serverkey.pem"
   "tlsverify": true,
   "tlscacert": "/var/docker/caserver.pem"
}
Here the tls_verify option enables certificate authentication based connection.
–tls will enable the connection with encryption
Clients with signed certificate will be able to access the host.
Client need to connect using following-
docker --tlsverify --tlscert=<<client.pem>> --tlskey=<<clientkey.pem>> --tlscacert=<<cacert.pem>>Above can be also configured in ~/.docker file

When docker is installed it creates 3 networks. The default network is bridge.
To check the networks installed on host use following command-
docker network ls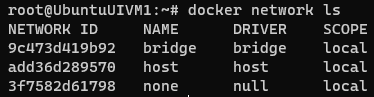
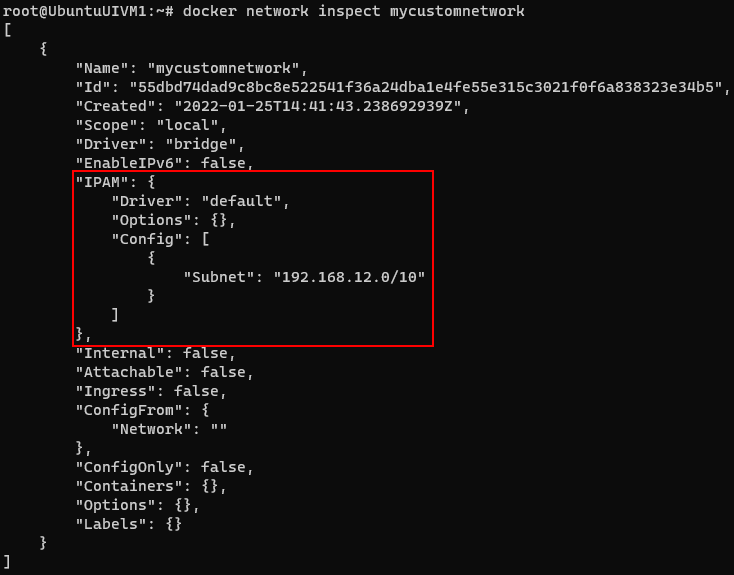
To get the details of the network use inspect command
docker network inspect bridge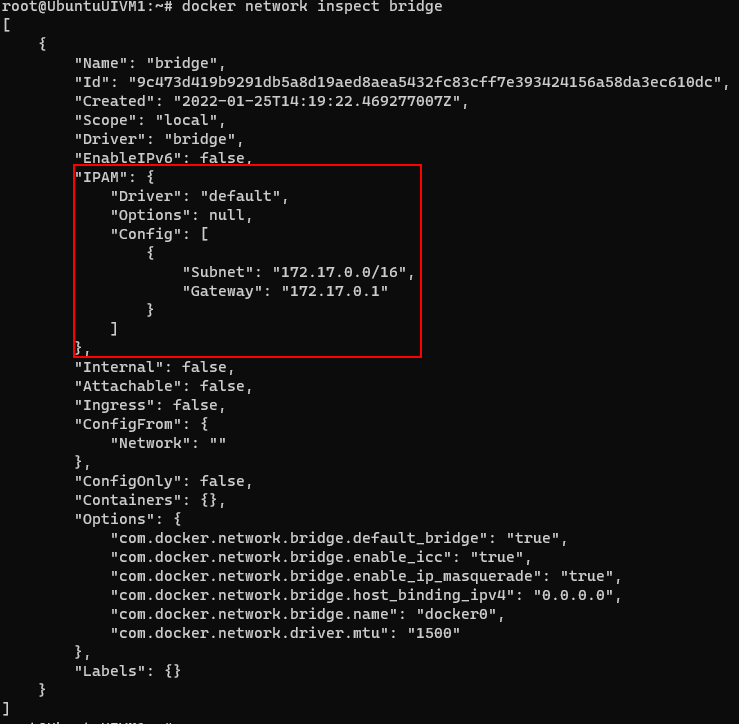
Now lets create a custom network for check the communication between the various containers
docker network create --driver=bridge --subnet=192.168.12.0/10 mycustomnetwork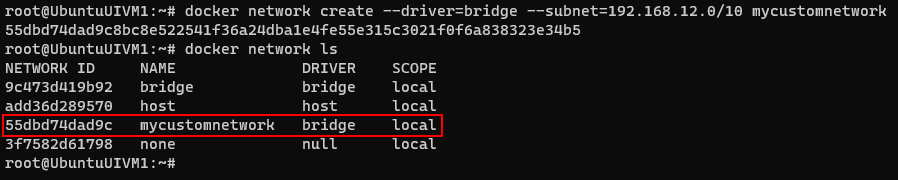
Now lets create a container with the newly created network
docker container run -itd --net mycustomnetwork --name ubuntuone ubuntu

docker container run -itd --net mycustomnetwork --name ubuntutwo ubuntu
Here I have create 2 containers ubuntone and ubuntutwo
Inspect the containers to see the network details-

Lets ping the container e.g.- ubunttwo from ubuntuone-
docker exec -itd ubuntuone ping ubuntutwo

Error response from daemon: OCI runtime exec failed: exec failed: container_linux.go:380: starting container process caused: exec: "ping": executable file not found in $PATH: unknown
If you receive above error you have to update repository and install ping utility
Install ping utility by interactively connecting to container and running the bash command
docker exec -it ubuntuone bash
apt-get udpate
apt-get install inetutils-ping

Execute the same for other container i.e. ubuntutwo
Now try to ping from ubuntuone to unbuntutwo
Here you should see the container is able to conect another-
docker exec -it ubuntuone ping ubuntutwo
For existing running container, you can use following command to connect to the network
docker network connect <<network name>> <<container name>>Or if you want to move the container out of the network use network disconnect command-
docker network disconnect <<network name>> <<container name>>To remove network – user rm command
docker network rm <<network name>>To remove all unused network use prun command-
Prune will not remove OOTB network and will only remove user defined networks.
docker network prune
To setup restart policy to the container, use following command-
docker run --restart=<<policy option>> <<container>>Following are the options for the container restart-
Following is the matrix for the restart policies-

* – this will start when the Docker daemon is started
Above is applicable if the container starts successfully
Live Restore
If you want to keep container running if the Docker daemon crashes or stops use the live restore option. This reeduces the container downtime due to daemon crashes or planned outages or upgrades.
Update the /etc/docker/daemon.json in Ubuntu system and add option live-restore:true

Docker Engine and Architecture FAQ’s
Components of the Docker Engine – Docker Daemon, Rest API and Docker Cli
Component that manages Images, Containers, Volumes and Network – Docker Daemon
Component that manages containers in Docker Engine – LibContainer
Container can run with Docker – Yes
Component keeps alive container even if Docker Daemon is not working – Containerd-Shim
Docker engine objects- Images, Container, Volume and Network
In Container data is writable but not persistable – Yes
Dcoker looks for images in docker hub by default- Yes
Readonly component in Docker engine – Docker Images
Default directory where Docker data is stored (Ubuntu) – /var/lib/docker
Directory where the Docker config is stored(Ubuntu)- /etc/docker
OCI stands for – Open Container Initiative
OCI specification – runtime-spec and image-spec
View version of Docker engine – docker version
Stop the Docker service – systemctl stop docker or/and systemctl stop docker.socket
Start the Docker service – systemctl start docker.socket or/and systemctl start docker
Check Status of Docker service – systemctl status docker
Debug docker whilst starting the service – dockerd –debug
Where is the Daemon file located (Ubuntu) – /etc/docker/daemon.json
Where is the daemon socket located (Ubuntu) – /var/run/docker.sock
Port to connect the docker externaly with encrypted trafic – 2376
Port to connect the docker externaly with unencrypted trafic – 2375
Start the docker daemon manually – dockerd
Default docker daemon interface – Unix Socket
Default network driver – bridge
Stop Command signals running container on STOP command – SIGTERM followed by SIGKILL
Restart policies – no, on-failure, always and unless-stopped
Reduce container downtime due to daemon failure or restart- Enable Live Restore
Docker Images FAQ’s
Default Docker Image Registry – Docker Hub
Various Image Registry –
Types of Images in Docker Hub
Base vs Parent Image –
Base Image are creatged from scratch, which means its empty. You cannot create a scratch image as it is always to be used. Any other images created from Base Image but used as parent to custom images are Parent Image. e.g. Ubuntu which is made from debian image. Here debian image is a Parent Image
Docker Swarm
What is the maximum and recommended number of mananger a swarm cluste can have? There is no max limit but recommended is 7 managers in swarm cluster
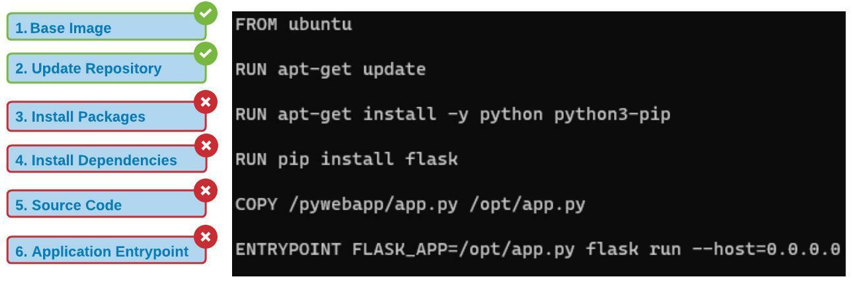
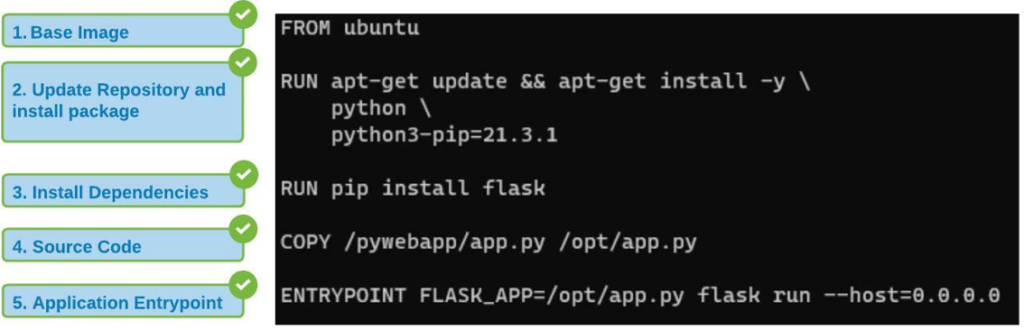
Docker uses Layered Architecture. When using Docker files it creates a new layer in the image which adds additional space to the image based on the instructions for that layer.
When a Docker build command is run it proceeds from the first instruction in Docker file to the last while caching each stage so as if the build fails next time build uses cache until it ran succesully and invalidated the stage that failed and the following stage. Layers repurpose the previous layers and don’t have to build all of them again.
In below example Docker file has 6 stages. Each stage will be cached when build command is ran.
Suppose a build fails at Stage 3 due to some reason or new package has to be added the Docker will invalidate the Stage 3 and the following stages
Next time when a issue is rectified the build command will repurpose the previuos layers and build the failed stages
But in this case the repository will not be update, so how to resolve or update the repository with the packages-
Cache Busting
In this case we can to combine the instructions so the repository is updated along with packages as below
Merging Stage 2 and Stage 3 from the previous docker file in to single instruction will ensure the repository is first udpated and pakages are installed
Merging these stages is called as Cache Busting
Version Pinning
You can also explicity mention the version of package to be installed
In stage 2 docker file is instrcuting to install python3-pip 21.3.1 version
Best Practice-
Instructions which are most frequently modified should be at the bottom of the file and the instructions which are least modified should be at the top of the docker file
Docker uses storage drivers to store the read-only images and writable containers
It basically has 6 layers
Read-only/Image Layers
Writable Layer
6. Container Layer

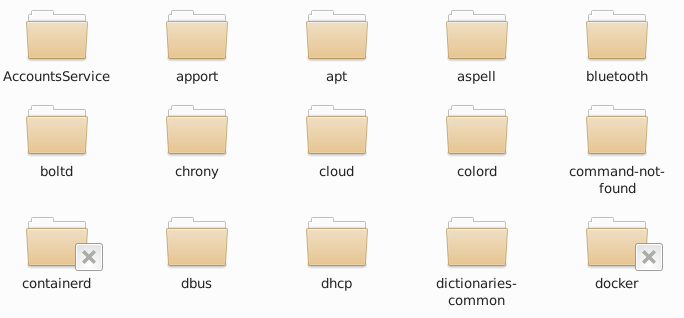
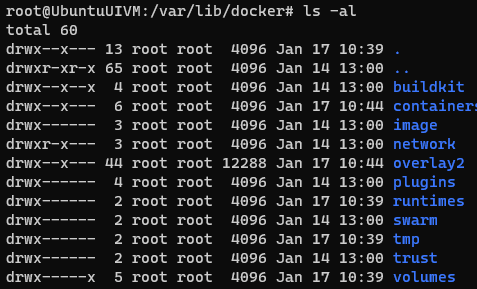
Data and files related to images and containers are store in /var/lib/docker folder in Ubuntu
To check the storage driver used by the docker, use following command-
docker info | moreIm my case it is overlay2
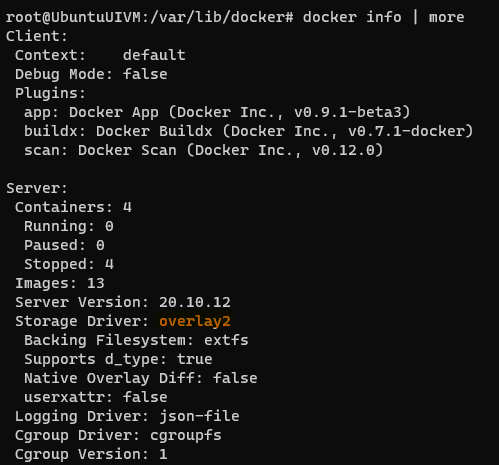
You can also use this command to get the storage driver
docker info | grep "Storage Driver"
How to change the storage driver
Stop the Docker service
systemctl stop docker.socket
systemctl stop docker
Check the docker service status
service docker statusBackup the docker folder
cp -au /var/lib/dovker /var/lib/docker.bkChange the storage driver
echo '{ "storage-driver": "aufs" }' | sudo tee /etc/docker/dameon.jsonservice docker startImage credit and reference links –
https://docs.docker.com/storage/storagedriver/
https://docs.docker.com/storage/storagedriver/overlayfs-driver/