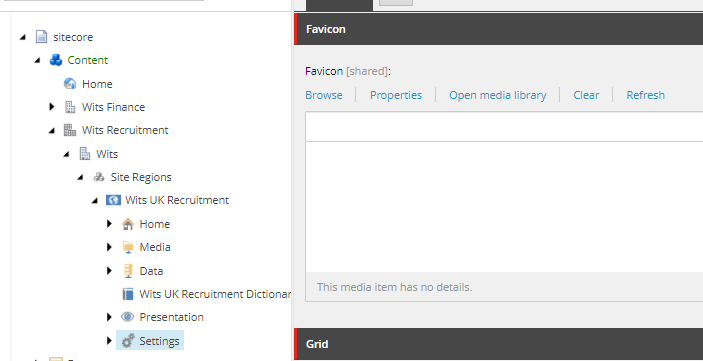
To add Favicon to the site, navigate to the site settings-
/sitecore/content/<<Tenant>>/<<Site>>/Settings
Select the icon for your site in Favicon field.
Sitecore Consultant. Sitecore MVP 2021 - 2026



To add Favicon to the site, navigate to the site settings-
/sitecore/content/<<Tenant>>/<<Site>>/Settings
Select the icon for your site in Favicon field.
Sitecore uses placeholders to render components which allows to dynamically assemble the page layout. This allows the content editors to design specific pages.
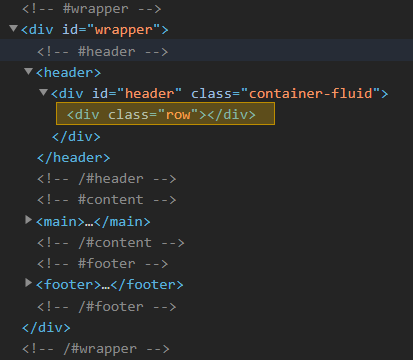
When using MVC layout and BootStrap grid, SXA adds additional DIV when a placeholder is used.
For e.g. if you see the views/sxalayout/Bootstrap4Body.cshtml file. If has a placeholders header, main and footer.

Page is rendered with the header, main and footer tags having placeholders within.
These placeholders is wrapped with a div tag when rendered with class row.

Problem– Extra div tag with class row might not be required or if you don’t to have this as part of your markup. How to remove div tag?
Solution –
The configuration to exclude the placeholder wrappers is in Sitecore.XA.Foundation.Grid.config

Any custom or OOTB placeholders can be added to placeholderWrapper/exlcudedPlaceholders list
Best Practice – Never modify the OOTB config’s as this can be changed in the future releases and upgrades. Patch the config instead.
Patch file should look something like this-

Resulting to the entry added in excludePlaceholders list and the div been not rendered-


Hope this helps

Asset optimizer helps improve the performance in production site by compressing/minifying the CSS and JS.
Minification of assets helps to cut the unnecessary portions of code and reduce the size of file to boost the performance by reducing amount of data over the internet.
Sitecore administrators can enable/disable optimizer globally of to a specific site.
Enable/Disable the Asset Optimizer globally
Enabling or disabling optimizer globally affects all the sites configured in the Sitecore instance.
To change the optimiser settings navigate to following location. This is accessible to Administrators-
/sitecore/system/Settings/Foundation/Experience Accelerator/Theming/Optimiser
You can also search “optimiser”-
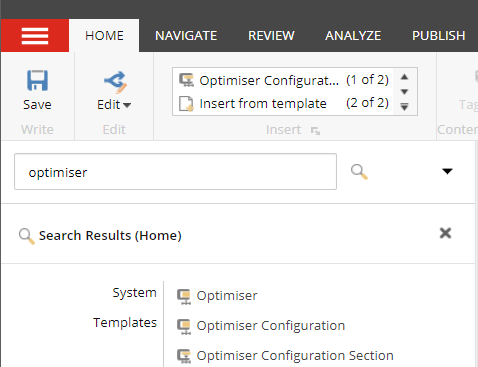
If you can’t find this you may have to re-index master.
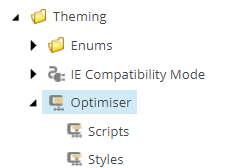
Select Scripts or Styles to change the settings
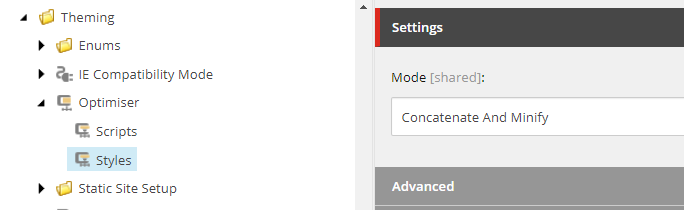
Modes of Optimizations
Concatenate And Minify Mode
When this option is selected. Sitecore will concatenate and minify the OOTB and Custom Scripts and Styles.
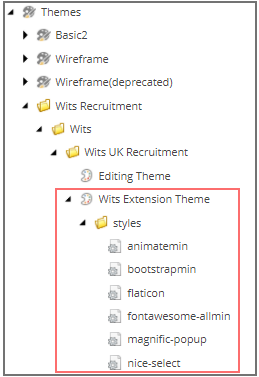
Example:- If you have a custom theme you can add the css files in your extension theme
This is in master database
Highlighted CSS is a extension to the base theme.
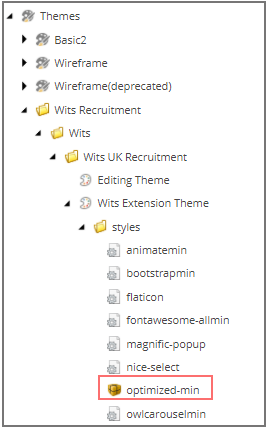
Web database when the page is first requested Sitecore will concat and minify all css in extension theme folder and create a optimised-min.css file
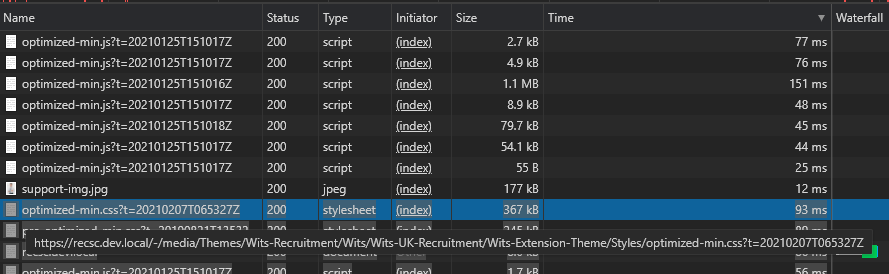
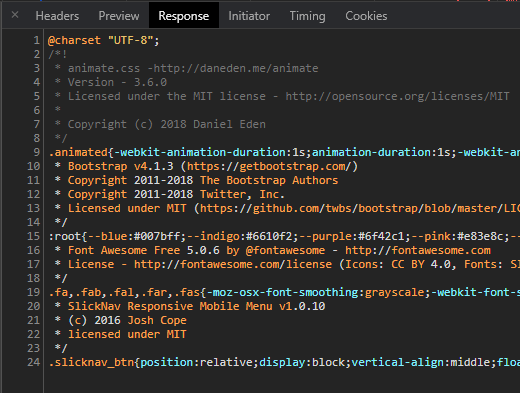
Styles loaded from the extension theme is concatenated and minified version with timestamp in query parameter (optimised-min.css)
Notice that the file name is optimised-min.css
Concatenate Mode
Change the mode of optimization to “Concatenate”.
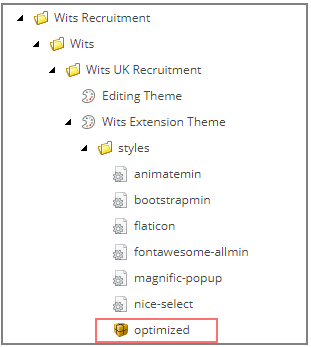
Web database now has optimized file created in extension theme
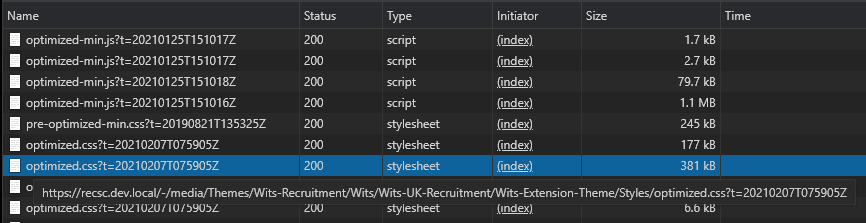
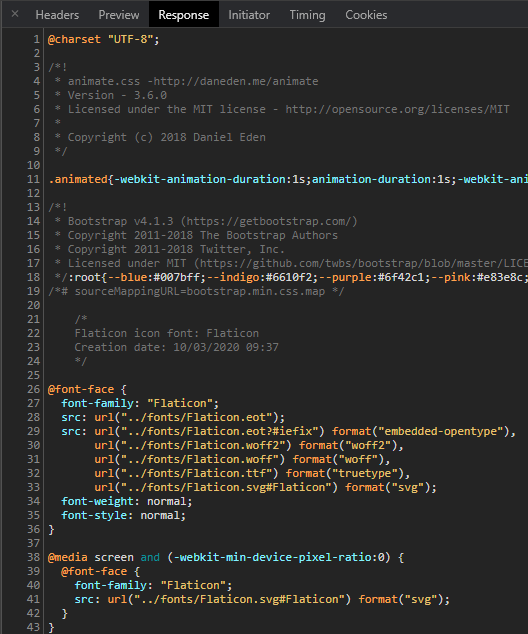
Styles loaded from the extension theme is concatenated version with timestamp in query parameter (optimised.css)
Notice that the reference to file is changed to optimised.css
Disabled Mode
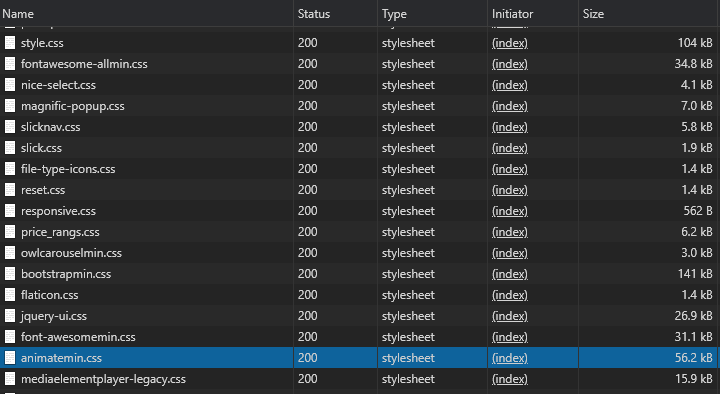
Change the mode to “Disabled” and should see all the files loaded separately. Disabled mode is good for debugging but should not be used for production as it will give a performance hit.
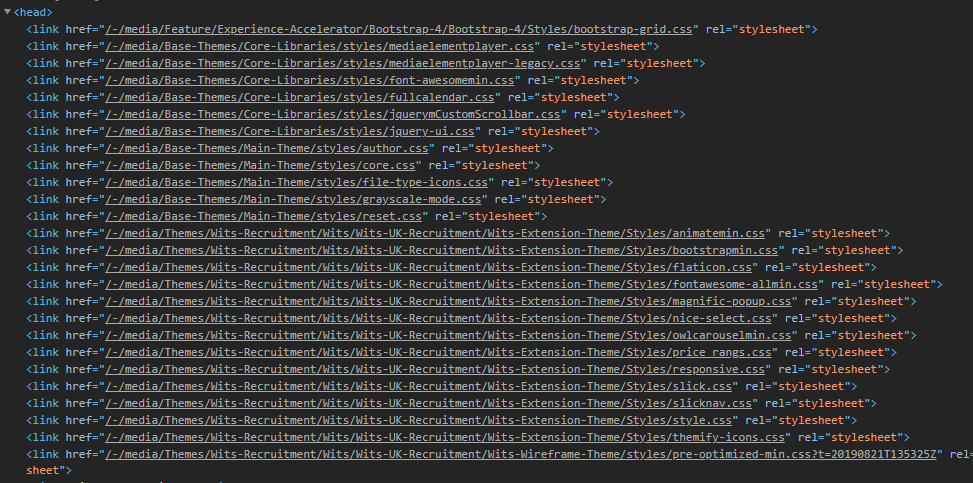
Best Practice – Enable Asset Optimizer in production environments
The same can be applied to the Scripts.
You have set the optimizer to concatenate and minify globally to your Sitecore instance but still don’t see the site been optimized.
Previous post I described how to create a new module
In this blog lets install and use the newly created module
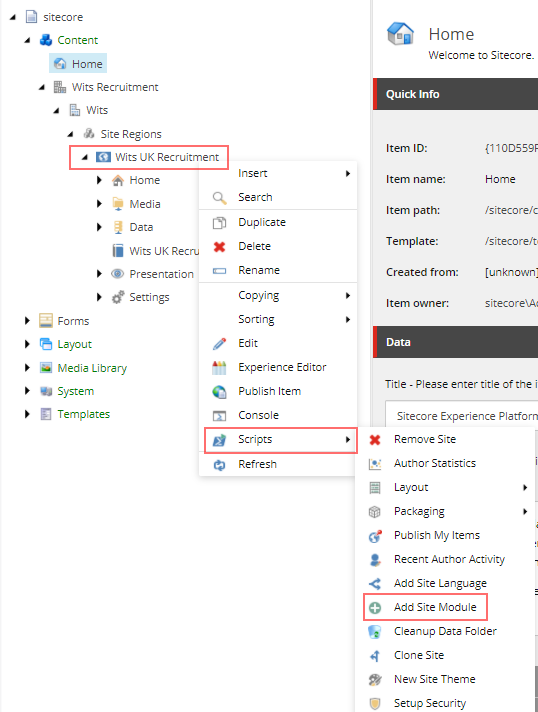
Right click on Site and select option Scripts and “Add Site Module“
Overlay to select modules is displayed-
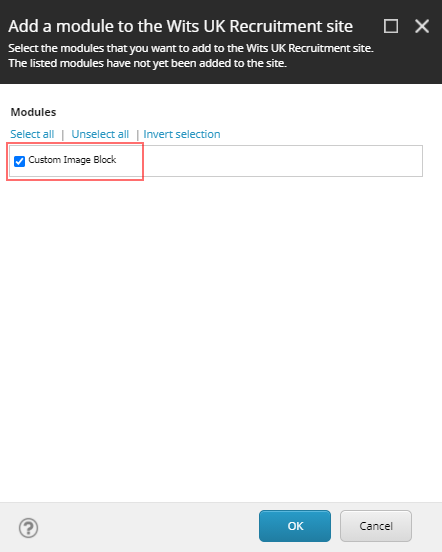
Select the newly created module and click Ok

Sitecore SXA module contains templates, Renderings, Layouts, Placeholder Settings, branch etc. It helps structure the SXA site by scaffolding items required to setup the component.
In this blog post I will walkthrough the steps to create a module manually to have a better understanding and helps specially to debug when there are issues with the existing modules.
Create Module (Part 1)
Navigate to – /sitecore/system/Settings/Feature
Right click Featur folder to create module
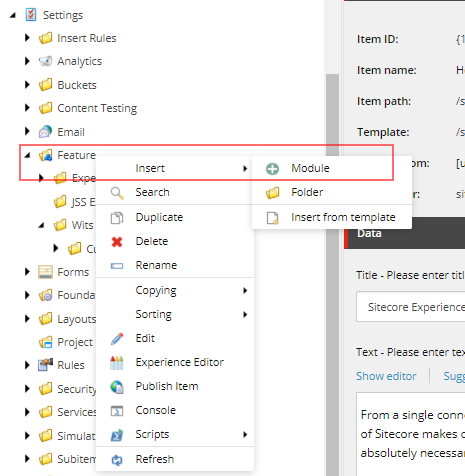
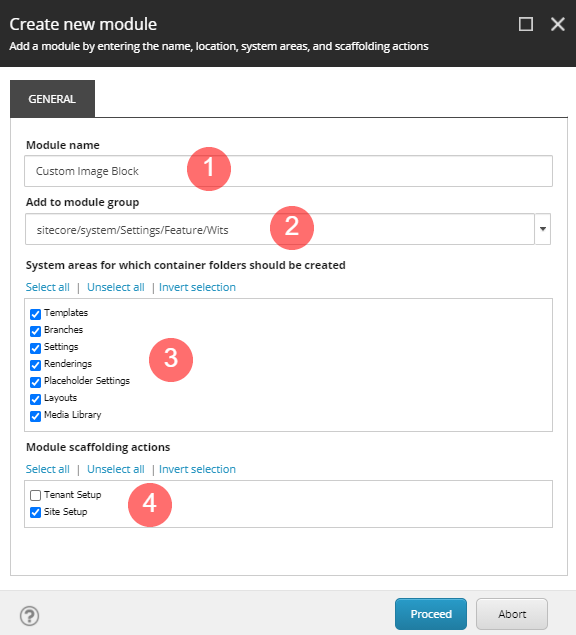
Create new module overlay will open.
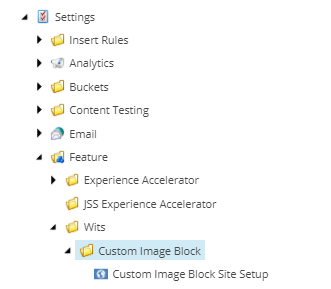
When module is created should be able to see the folder with the Site Setup Root item
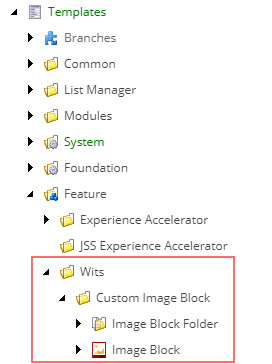
Once the Site Setup Root is created you should be able to see folders with name “Custom Image Block” will be created in Branch, Template, Renderings, Placeholder Settings, Layouts and Media Library or the system areas selected.
Create template required for creating Branch
For creating a branch you will need a template and rendering. Create a template in “Custom Image Block” folder. For now you don’t have to add fields. See blog the fields that were created for component.
Create “Image Block Folder” Template
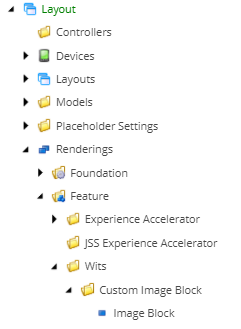
Create rendering required for creating Branch
Create controller rendering with name “Image Block” in – /sitecore/layout/Renderings/Feature/Wits/Custom Image Block.
For now don’t setup anything in rendering. See blog for the configuration required in rendering-
Create Branch
Navigate to /sitecore/templates/Branches/Feature
Create a new branch. Right click on the folder “Custom Image Block” and insert new branch option
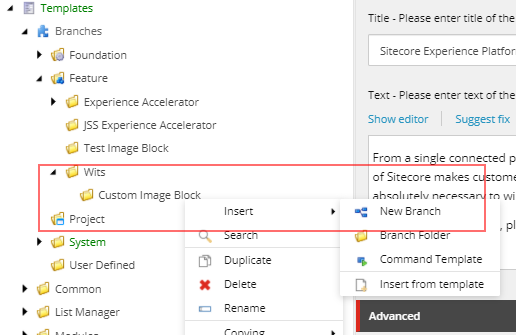
Select the template earlier created-
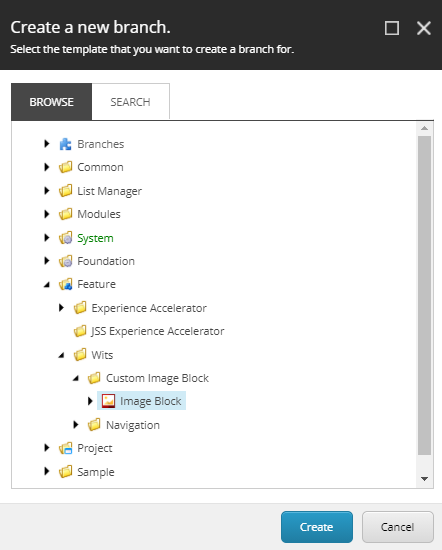
Branch with name “Image Block” will be created.
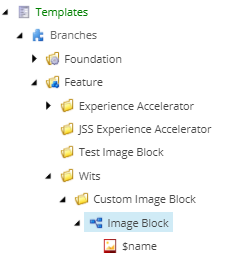
Delete $name item in the branch
Rename the Image Block to “Available Image Block Renderings”.
Right click branch and insert item from template-
/sitecore/templates/Foundation/Experience Accelerator/Presentation/Available Renderings/Available Renderings
Give it a name $name as this will create a item in “Available Renderings” folder in site with the component name
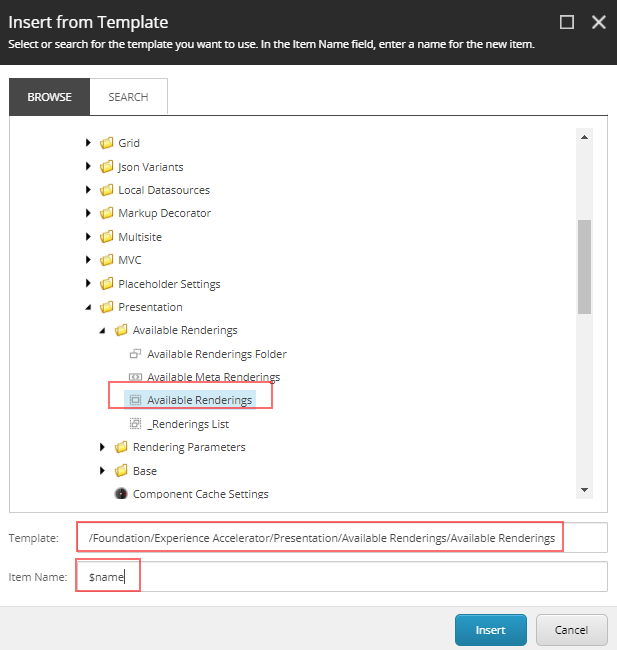
Select $name and select the newly created rendering-
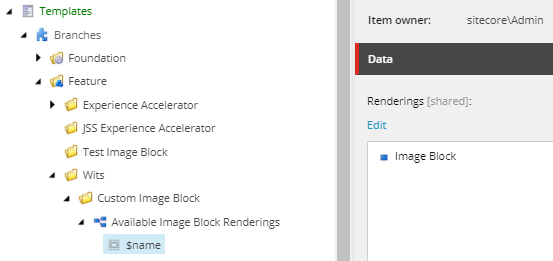
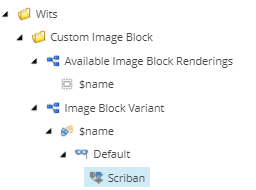
Create or Copy the existing branch and name it as “Image Block Variant”
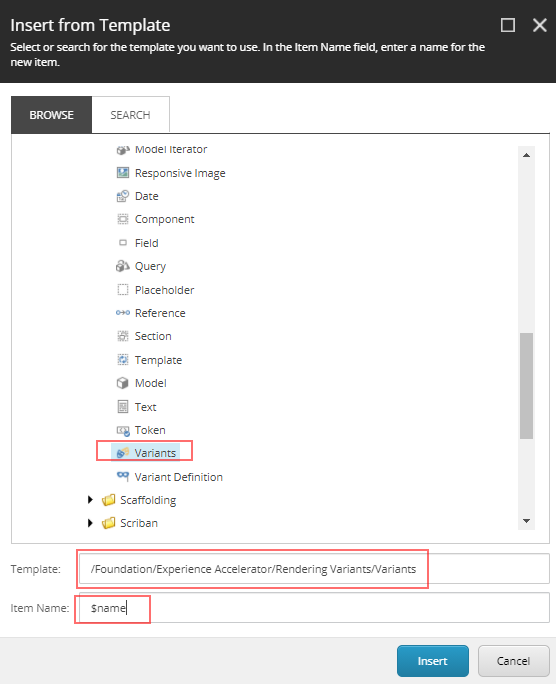
Create a variant, name it as “$name” from template – /sitecore/templates/Foundation/Experience Accelerator/Rendering Variants/Variants
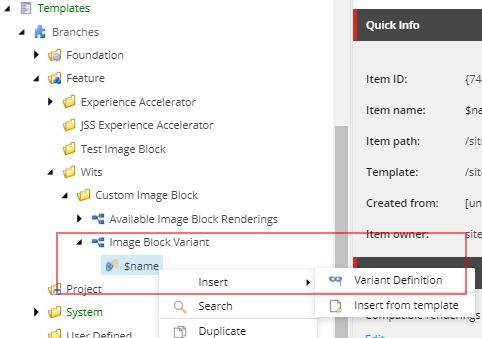
Create Variant Definition under Variant name it as “Default” from template
Path of the variant definition- /sitecore/templates/Foundation/Experience Accelerator/Rendering Variants/Variant Definition
Create Scriban Variant named “Scriban” from template – /sitecore/templates/Foundation/Experience Accelerator/Scriban/Scriban
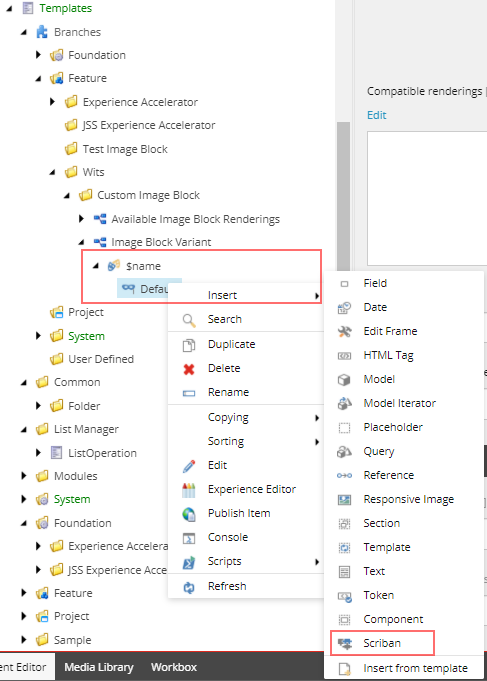
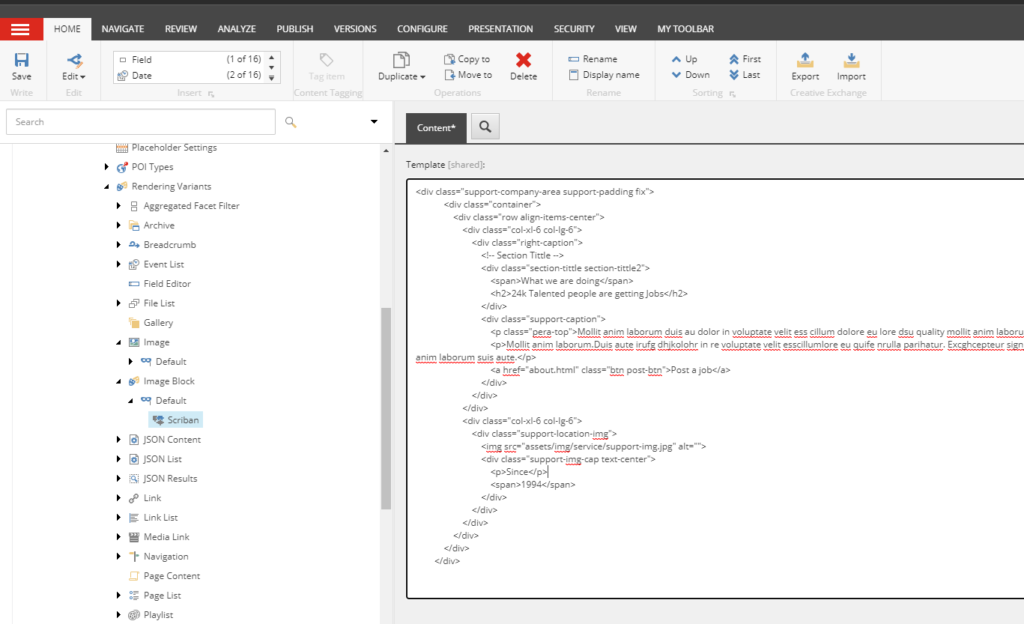
Add markup in template field or the same can be added when the module is installed on the site – if the markup is specific to the site.
Branch structure should like this-
Create Module (Part 2)
Add Site Item to add Available rendering to the site module is installed
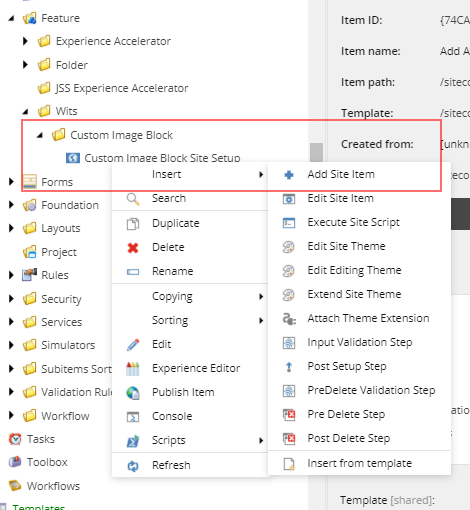
Name it “Add Available Renderings”
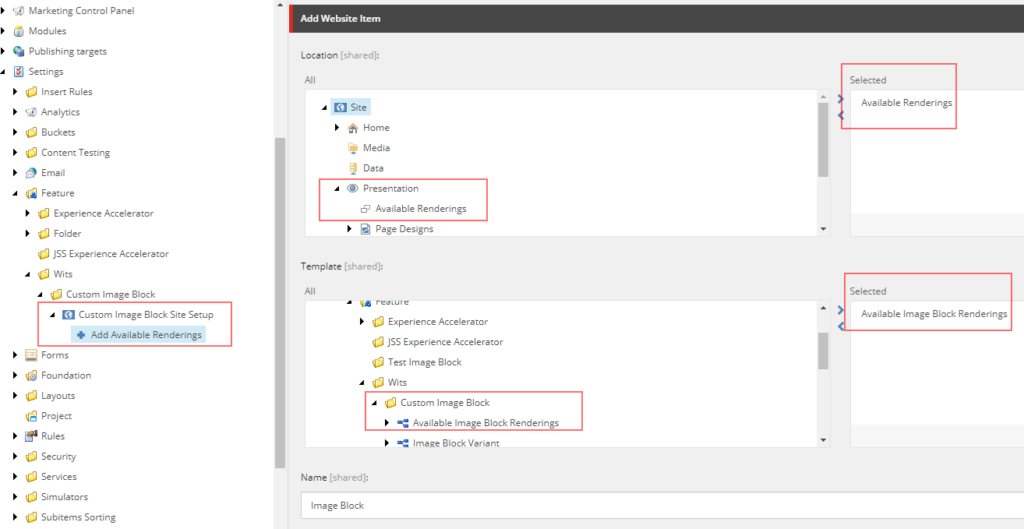
Select the Location from the Site>>Presentation>>Available Renderings
In Template field select the “Available Image Block Renderings” from the newly created branch.
Provide the Name
Add Site Item to add rendering variant to the site module is installed
Add another site item, name it “Add Image Block Variant”
Select “Rendering Variant” in Location and “Image Block Variant” created in branch
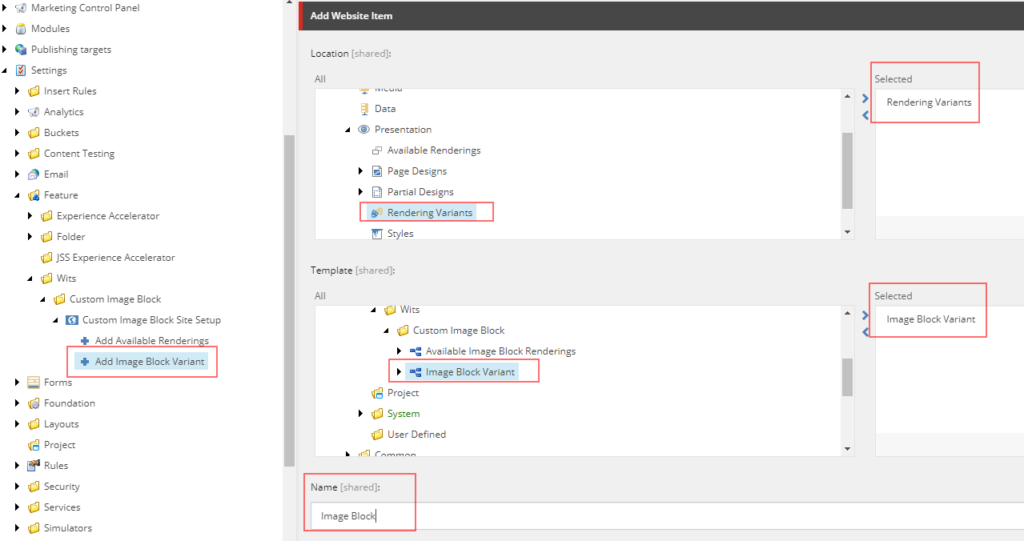
This will create a “Image Block” in the “Rendering Variant” folder in the site where the module will be installed
Add Site Item to add data folder to the site module is installed
Add another site item, name it “Add Image Block Data Item”
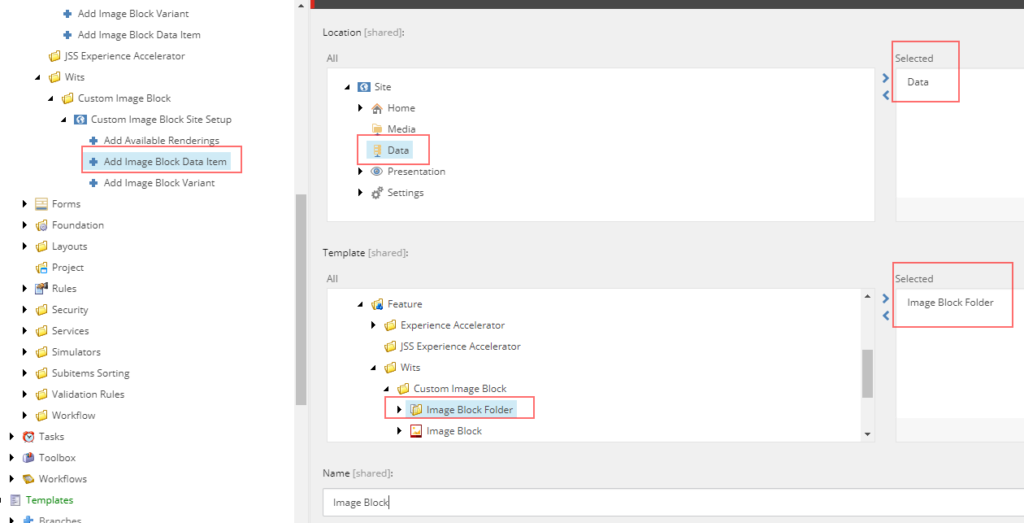
This will create a “Image Block Folder” in “Data” folder in the site where the module will be installed
That’s it you are good to install “Image Block” module.

Often you see examples for creating a new Sitecore SXA component is suggested to be cloned from the Promo component which helps developers to quick start the development.
But its always good to know the process and supporting items that are created to support he component.
In this blog post I will walk through the steps required to create a SXA component using Scriban from scratch. This post is not about how to use Scriban, will cover that in another post.
This post assumes the SXA Site is configured with the custom theme. See links to create Tenants/Sites/Themes –
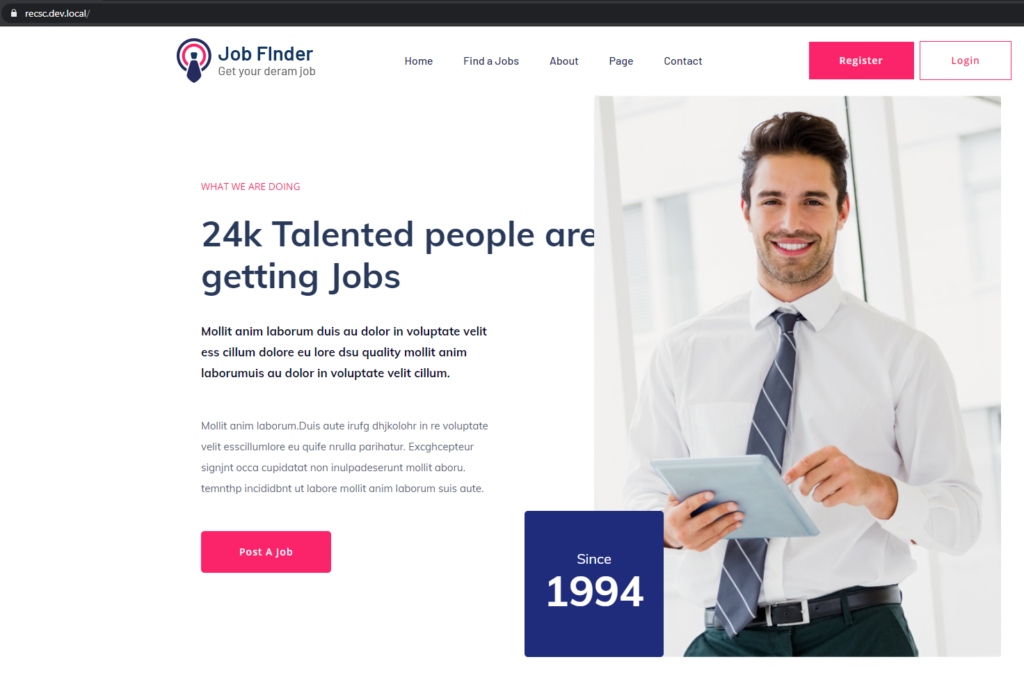
The component contains images and text and should look like this-

Step 1 – Create Templates –
Lets start creating a template first. Lets give it a name ImageBlock
Template Name – Image Block
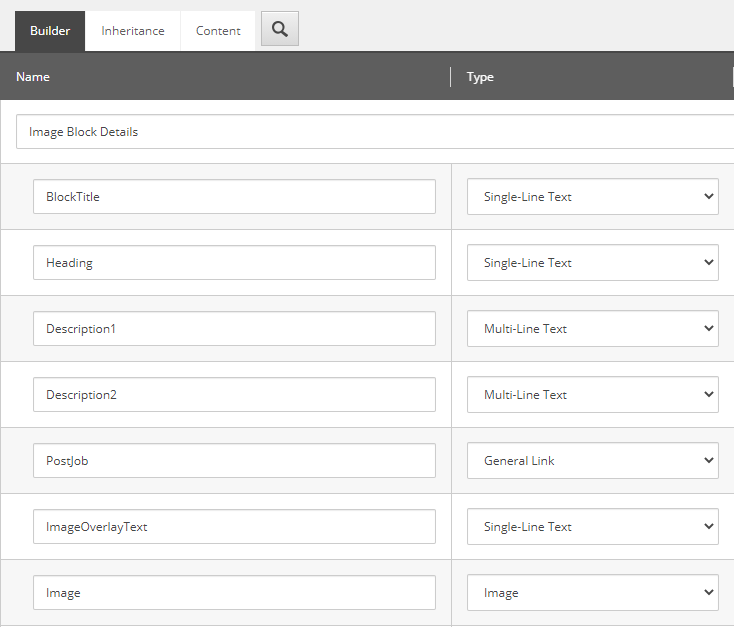
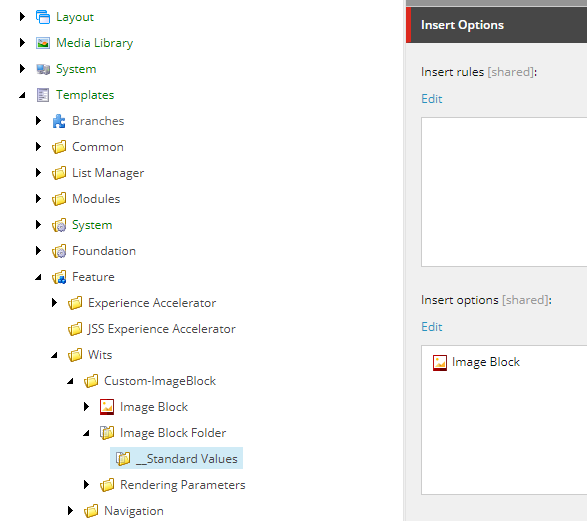
Template Name – Image Block Folder
Set the Image Block as Insert Options so Image Blocks can be created under Image Block Folder
Template Name- Image Block (Rendering Parameter)
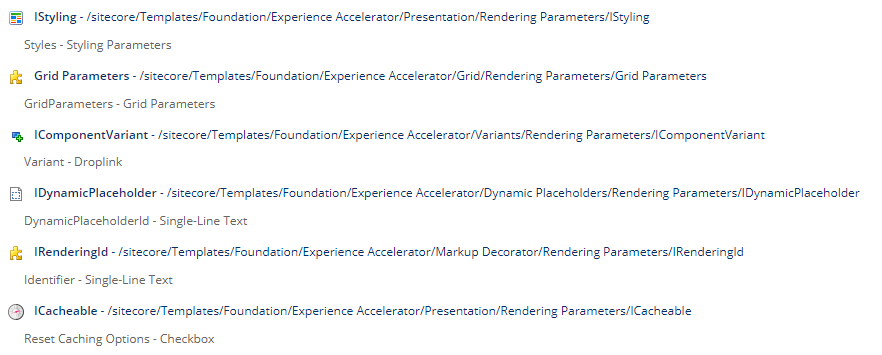
The below inheritance is required to style, cache and attach a rendering variant.
This template should inherit following-
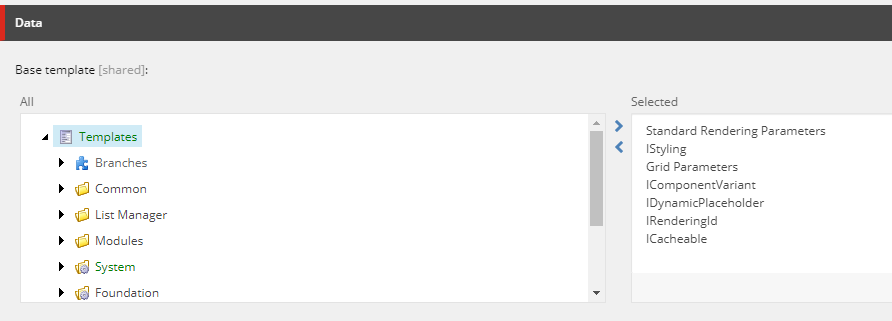
Inherited template paths-
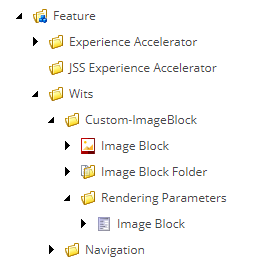
Template structure for Image Block component looks like this-
Step 2 – Create Rendering for Image Block component
Before you could start creating rendering, its good to have content as the rendering will require the Datasource location and the view.
Content–
IMPORTANT– Data folders for component can be configured using modules. For this post will create it manually.
Navigate to the Site -Data folder and create a Image Block Folder
Example at this location-
/sitecore/content/Wits Recruitment/Wits/Site Regions/Wits UK Recruitment/Data
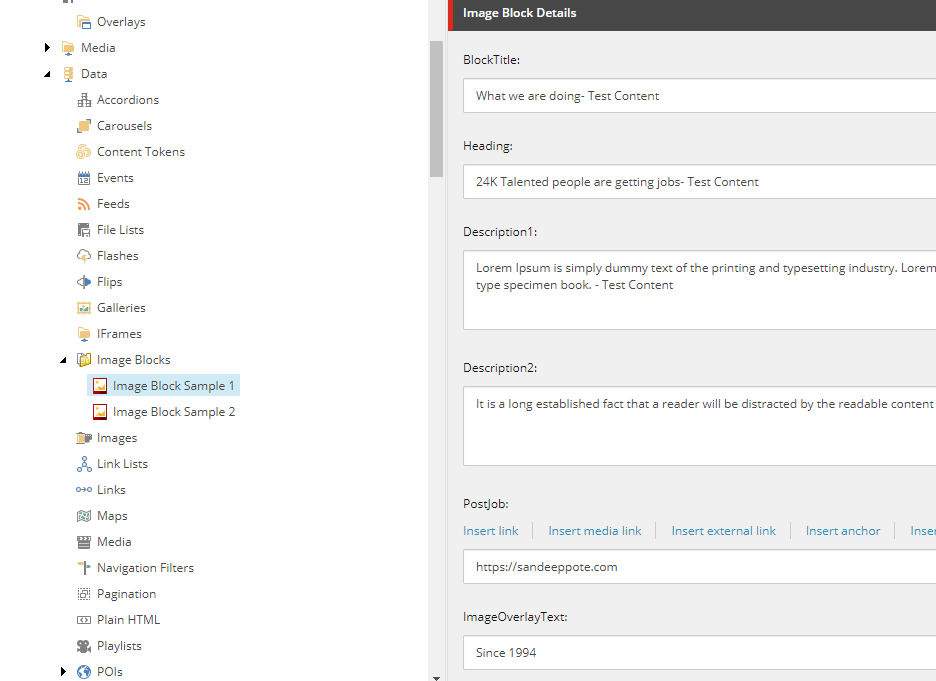
I have named it Image Blocks and enter content for the template-
View–
Create a view. Place following markup in cshtml. Place this in your custom folder in Sitecore instance view folder
@using Sitecore.XA.Foundation.RenderingVariants.Extensions
@using Sitecore.XA.Foundation.SitecoreExtensions.Extensions
@using Sitecore.XA.Foundation.Variants.Abstractions.Fields
@model Sitecore.XA.Foundation.Variants.Abstractions.Models.VariantsRenderingModel

@if (Model.DataSourceItem != null || Html.Sxa().IsEdit)
{
    if (Model.DataSourceItem == null)
    {
        @Model.MessageIsEmpty
    }
    else
    {
        foreach (BaseVariantField variantField in Model.VariantFields)
        {
            @Html.RenderingVariants().RenderVariant(variantField, Model.Item, Model.RenderingWebEditingParams, Model)
        }
    }
}
Rendering–
Create controller rendering for Image Block Controller
Controller– Sitecore.XA.Foundation.RenderingVariants.Controllers.VariantsController, Sitecore.XA.Foundation.RenderingVariants
Controller Action- Index
Parameter Templates – Select the Rendering Parameter template created in previous step.
Example – /sitecore/templates/Feature/Wits/PageContent/Rendering Parameters/Image Block
Datasource Location – Query to the Site data location. You may also have to consider same for shared sites
Sample- query:$site/[@@name=’Data’]/[@@templatename=’Image Block Folder’] | query:$sharedSites/[@@name=’Data’]/ [@@templatename=’Image Block Folder’]
Datasource Template– Location of the template (Image Block)
Example- /sitecore/templates/Feature/Wits/PageContent/Image Block
Rendering view path– provide the path of your custom view
Example- ~/Views/Wits/ImageBlock.cshtml
Step 3 – Create Rendering Variant
Create a rendering variant i.e. items from templates-
/sitecore/templates/Foundation/Experience Accelerator/Rendering Variants/Variants
/sitecore/templates/Foundation/Experience Accelerator/Rendering Variants/Variant Definition
/sitecore/templates/Foundation/Experience Accelerator/Scriban/Scriban
Paste the markup to render
Step 4 – Add rendering to Page
Add rendering to the page. Ideally this can be done by creating a Branch and create a module which should allow to drag and drop the SXA component to the page using experience editor.
Select Home page and select option Presentation ==> Details
Add the rendering “Image Block” in the placeholder “main”
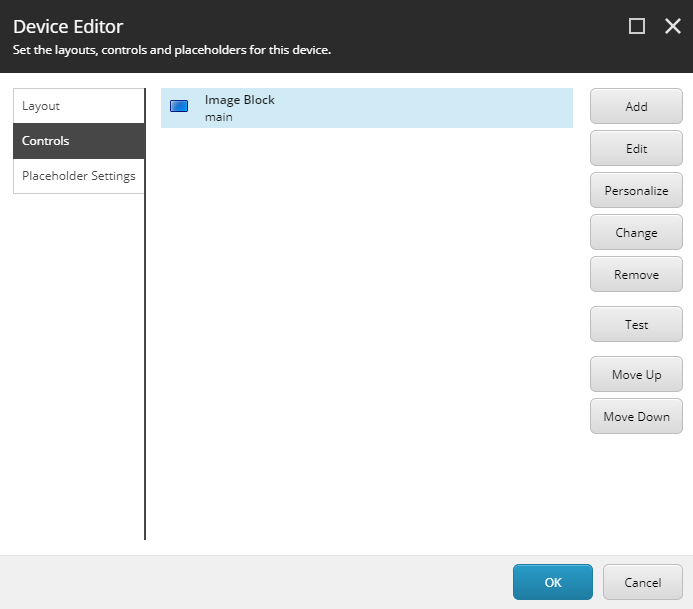
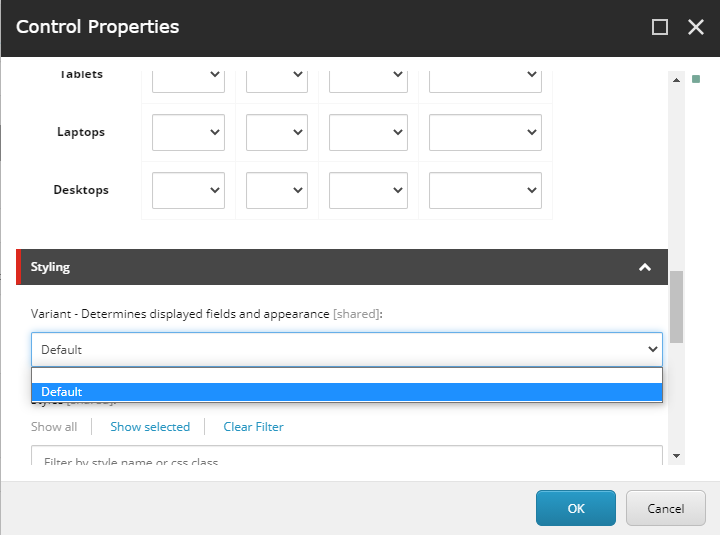
Edit the control and select the Variant “Default” in Styling section.
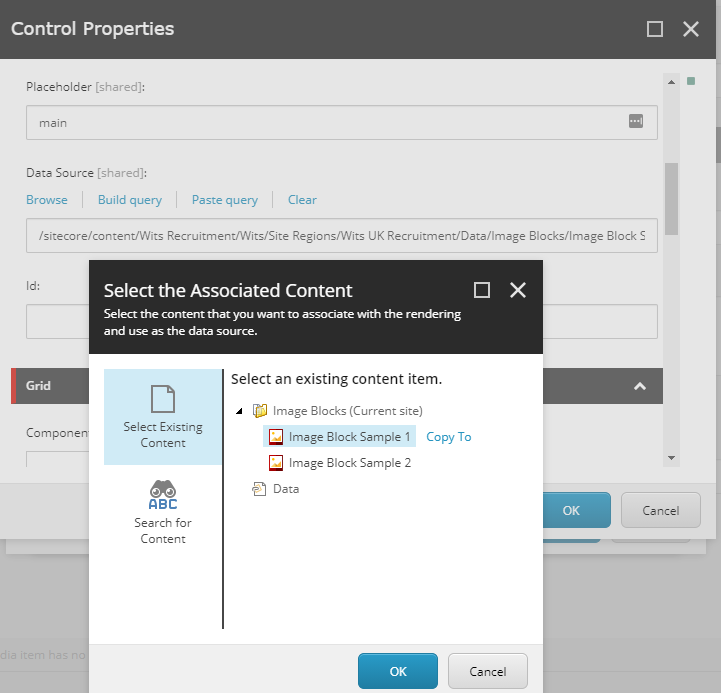
Remember we created a Rendering Variant “Image Block” in step Step 3 and the name of the variant was “Default”. This variant is listed in dropdown for selection. Also select the datasource
Select rendering variant-
Select the datasource-
Save and Publish and should be able to see the newly created component in Home page
Step 5- Update rendering variant to display content from Image Block item
In step-3 we added a static markup in rendering variant.
Use the following scriban changes to get the content from selected datasource. See BlockTitle, Heading and Description1 and Description2 to pull the content from item-
Example- {{sc_raw i_datasource ‘Description2’ }}
<div class="support-company-area support-padding fix">
            <div class="container">
                <div class="row align-items-center">
                    <div class="col-xl-6 col-lg-6">
                        <div class="right-caption">
                            <!-- Section Tittle -->
                            <div class="section-tittle section-tittle2">
                                <span>{{sc_raw i_datasource 'BlockTitle' }} </span>
                                <h2>{{sc_raw i_datasource 'Heading' }}</h2>
                            </div>
                            <div class="support-caption">
                                <p class="pera-top">{{sc_raw i_datasource 'Description1' }}</p>
                                <p>{{sc_raw i_datasource 'Description2' }}</p>
                                <a href="about.html" class="btn post-btn">Post a job</a>
                            </div>
                        </div>
                    </div>
                    <div class="col-xl-6 col-lg-6">
                        <div class="support-location-img">
                            <img src="assets/img/service/support-img.jpg" alt="">
                            <div class="support-img-cap text-center">
                                <p>Since</p>
                                <span>1994</span>
                            </div>
                        </div>
                    </div>
                </div>
            </div>
        </div>
Finally we have component been rendered and content pulled from item-

Hope this helps.

Once a tenant and site are created and/or a theme is manually created you may want to assign a theme to a site. A theme is automatically assigned when during a site creation but what if you want to assign a theme to already created site.
See this blog to create a tenant and site and different approaches of creating a theme.
Experience Editor
Select any Partial design and open experience editor select Experience Accelerator option.
Select Theme option. Change the theme.

This will also the change the theme in the selected site – /sitecore/content/<<tenant folder>>/<<tenant>>/<<site folder>>/<<site>>/Presentation/Page Designs
Content Editor
To change the theme for a specific site. Navigate to the site/Presentation/Page Designs
for e.g.:- /sitecore/content/<<tenant folder>>/<<tenant>>/<<site folder>>/<<site>>/Presentation/Page Designs
In the Styling section change the Theme field

Hope this helps.

Themes define the look and feel of a site and makes it flexible to change the layout and design of the website.
Themes help to customize the appearance of the site which includes layout, typography, color and other design elements.
SXA come with two types of themes- Site and Base themes. To add own/custom classes and assets, such as styles, scripts, images and fonts use Site theme.
There are multiple ways site theme cane be created-
Option 1 – Add custom theme when creating a Site
Check out this blog post for adding a theme when creating a site
Option 2 – Add theme to existing Site (create theme manually)
Right click on your site- click Scripts and click New Site Theme option

Provide the theme name and location.

Click OK and a theme should be created on specified location
Option 3 – Add a theme using SXA CLI
Will add the details shortly.
Hope this helps!

Previous blog shows how to create Tenant and SXA Site.
In this blog lets see what does the installation script adds to the SXA site.
Following is the site content structure-
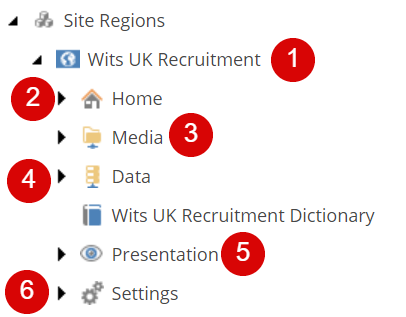
1. Site
SXA site is a container to the content that will be used as a output of the site. Site contains the settings to select the Site Media Library, Theme Folder and Modules.
2. Home Page
This is the home page of the site. All other pages in the site must be stored under the Home item.
3. Media Folder
Media Folder helps scope the part of media library is available to content editors on the images selection dialog.
You can change the scope by adding or removing the folder in “Virtual” section “Additional Children” field.
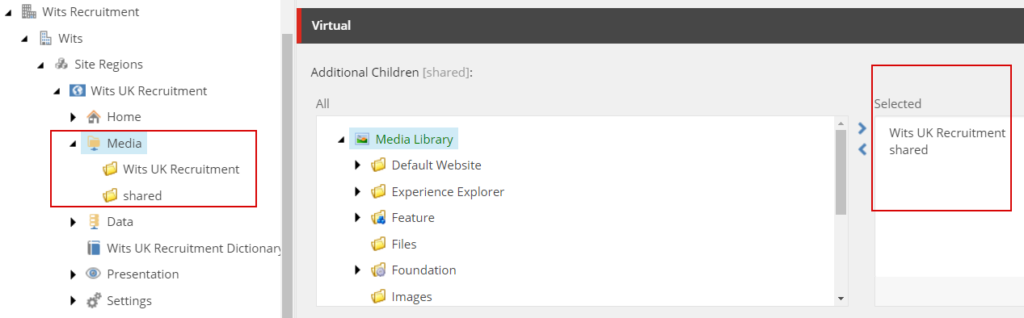
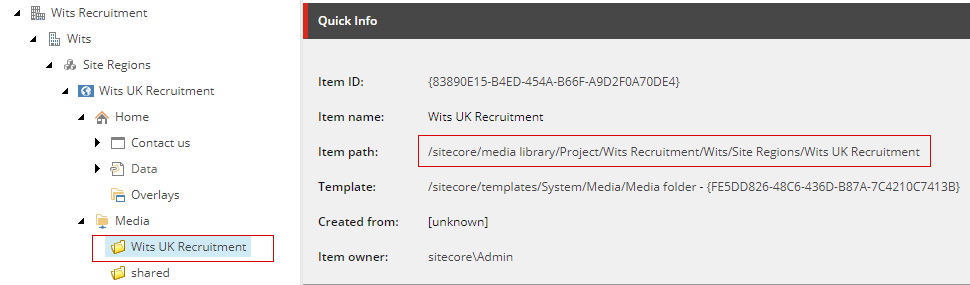
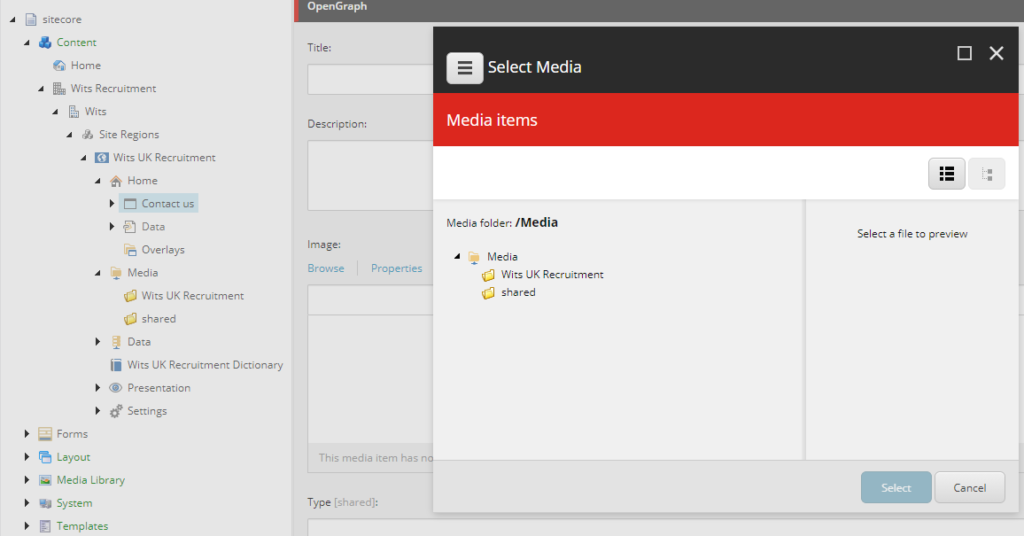
Best Practice – Do not put media items directly under the Media folder. Form SXA 1.7 and higher uploading items to media folder in the Site is not allowed.
4. Data Folder
Data Folder is the repository for storing all the data sources. These data sources can be reused across many pages scoped inside the Site. Data folder had component type folder and can be created manually or when the module is installed.
Data for each component can be created manually from the content tree or from experience editor by using the “Associated Content” option. Data folder is used as a source configured in rendering’s Data Source field in a form of query or directly mapped to the component folder.
Best Practice – Clean up unused data sources
Best Practice – Give Site data sources meaningful names
Best Practice – Organize site data sources in folders
Best Practice –Run source field reports to help set the data source context
5. Presentation
The presentation folder contains all the presentation related details and settings for the components selected while creating the site.
Presentation folder has list of components based on the modules selected while creating the site.
Presentation folder contains Page and Partial Designs, Layout Service , Available Renderings, Rendering Variants and Styles.
Rendering variant contains list of components on the site and can be customized using Variant Definition and Variant Fields. Also can use template based Variant like Scriban and Template
6. Settings
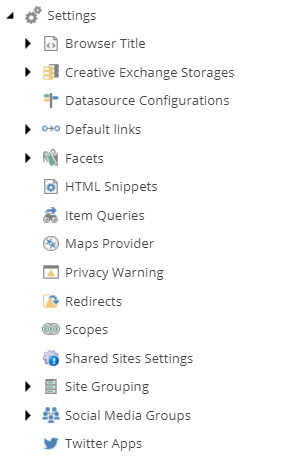
Settings folder contains site specific configuration. Site Grouping contains the Site Settings like site name, host name, database etc.
Settings also contains the Redirects, HTML snippets and Item Queries. Settings Folder contains options to select the Fav icon, error handling and other SEO related settings.

Tenant Folder
Sitecore supports multitenancy, which means you can have multiple sites running on a single Sitecore instance.
Tenant folder is just a container to hold multiple tenants you may have as a part of site structure. Inherited from _Base Tenant Folder. You may create a tenant folder to hold the multiple tenants of a Company.
A folder with provide tenant folder name is create here – /sitecore/templates/Project/<Tenant Folder Name>
Template Path – /sitecore/templates/Foundation/Experience Accelerator/Multisite/Tenant Folder

Tenant –
Tenant is a top-level container for the Sites underneath. Site in same tenant are related, that means they are able to share data and layouts. Creation of tenants comes with optional modules.
Template – /sitecore/templates/Project/<<Tenant Folder>>/<<Tenant>>/Tenant

Tenant been created successfully.

Creating Site–
Site is a collection of content and output with a common overall business objective sharing a common set of assets
To create site right click on Tenant and select an option to create Site or Site Folder

Site Folder –
Site folder is a container for multiple sites.
Template – /sitecore/templates/Foundation/Experience Accelerator/Multisite/Site Folder

Site
General tab- Provide Site name, host name and Virtual folder. You may keep this as default and change later based on the requirements.

Select the required modules as a part of Site creation.

Create a new theme or select existing. This will e your site theme and can be changed from Page Design –
Template – /sitecore/content/<<tenant folder>>/<<tenant>>/<<site folder>>/<<site>>/Presentation/Page Designs

Select a grid mainly Bootstrap 4


At this point we have SXA site been created-

Remove Site
To remove Site, right click on site, select scripts and Remove Site option.
