Tag: Linux OS

Setup Sitecore OrderCloud headstart with Angular in Ubuntu system the docker way

Working on Linux system after been worked on Windows for 2 decades is always fun.

This blog post is to setup the Sitecore OrderCloud Headstart on Ubuntu the Docker way. As all the images used for the Headstart is are Linux based, this I didn’t find major difference how this is been setup in Windows system apart from few changes while installing Storage Explorer and few other erros which I have noted in this blog post.

Note – use sudo for each command or “sudo i”to run as root.

Ensure node js is installed

This might be required for your local build.

sudo apt update

sudo apt install nodejs

Ensure npm is installed

sudo apt install npm

Ensure docker and docker -compose is installed

See this blog post Install Docker on Linux

sudo snap install docker

sudo apt install docker-compose

Docker Compose

Lets start composing and solve errros that might come ourr way-

sudo docker-compose up -d

npm needs TLS1.2

npm notice Beginning October 4, 2021, all connections to the npm registry – including for package installation – must use TLS 1.2 or higher. You are currently using plaintext http to connect. Please visit the GitHub blog for more information: https://github.blog/2021-08-23-npm-registry-deprecating-tls-1-0-tls-1-1/
npm WARN @ordercloud/headstart-sdk@0.0.0 No repository field.

https://stackoverflow.com/questions/69044064/npm-notice-beginning-october-4-2021-all-connections-to-the-npm-registry-incl

npm cache clear --force

npm set registry=https://registry.npmjs.org/

npm install -g https://tls-test.npmjs.com/tls-test-1.0.0.tgz

Install .Net SDK

Middleware runs on .Net. So this neds to be installed.

https://learn.microsoft.com/en-us/dotnet/core/install/linux-ubuntu

https://devblogs.microsoft.com/dotnet/dotnet-6-is-now-in-ubuntu-2204/

sudo apt-get update && \
sudo apt-get install -y dotnet-sdk-6.0
sudo apt-get update && \
sudo apt-get install -y aspnetcore-runtime-6.0
sudo apt install dotnet6

I found difficulties installing .Net on Ubuntu. You may have todo few restarts.

 docker compose up -d

This should start all the containers. Note- cosmos container takes time to start till then middleware waits and starts when comos is ready.

Comos should be available now –

Install Azure Storage- Explorer

Install Storage explorer in Ubuntu-

snapd should be already installed if you are using Ubuntu 16.04 LTS or later, you may have to update.

sudo apt update
sudo apt install snapd

Install Storage Explorer

sudo snap install storage-explorer

Open Azure Storage Explorer and follow the steps here –

Execute the command-

snap connect storage-explorer:password-manager-service :password-manager-service

Azure Storage Explorer should be able to open with above command.

Apply the same settings mentioned in this blog

Once you have followed and applied the settings mentioned in the blog, should be able to see the translation files in local storage and able to access the file.

We also have to set CQRS for blob container – lets do this later.

Middleware exited with errors-

Error –

See the resolution to this issue here – section – Unable to start Middleware container due to erros

Error – Connection refused (127.0.0.1:8081)

System.AggregateException: One or more errors occurred. (Connection refused (127.0.0.1:8081))
       ---> System.Net.Http.HttpRequestException: Connection refused (127.0.0.1:8081)

See the resolution to this issue here – section – Connection to Comos DB is failing

Error- Unsupported platform

0 18.52 npm ERR! code EBADPLATFORM
#0 18.53 npm ERR! notsup Unsupported platform for fsevents@2.3.2: wanted {"os":"darwin","arch":"any"} (current: {"os":"linux","arch":"x64"})
#0 18.53 npm ERR! notsup Valid OS:    darwin
#0 18.53 npm ERR! notsup Valid Arch:  any
#0 18.53 npm ERR! notsup Actual OS:   linux
#0 18.53 npm ERR! notsup Actual Arch: x64

Changed the node version- see the blog here

Also changed the nginx version – see Error 4 here

 => ERROR [headstart-seller:local-linux production 4/8] RUN apk add --update nodejs nodejs-npm && npm install -g json                                                                                 1.0s

see Error 4 here

Change from this  -
RUN apk add --update nodejs nodejs-npm && npm install -g json

to-
RUN apk add --update nodejs npm && npm install -g json
#0 51.97 npm ERR! npm ERR! Cannot read properties of null (reading 'pickAlgorithm')

See the resolution to this error here

Now you should have all containers up and running with

sudo docker compose up -d

If you see this error-

Check for Configure CORS to Blob Containers in this blog post

And here I have Seller, buyer and middleware working on Ubuntu system-
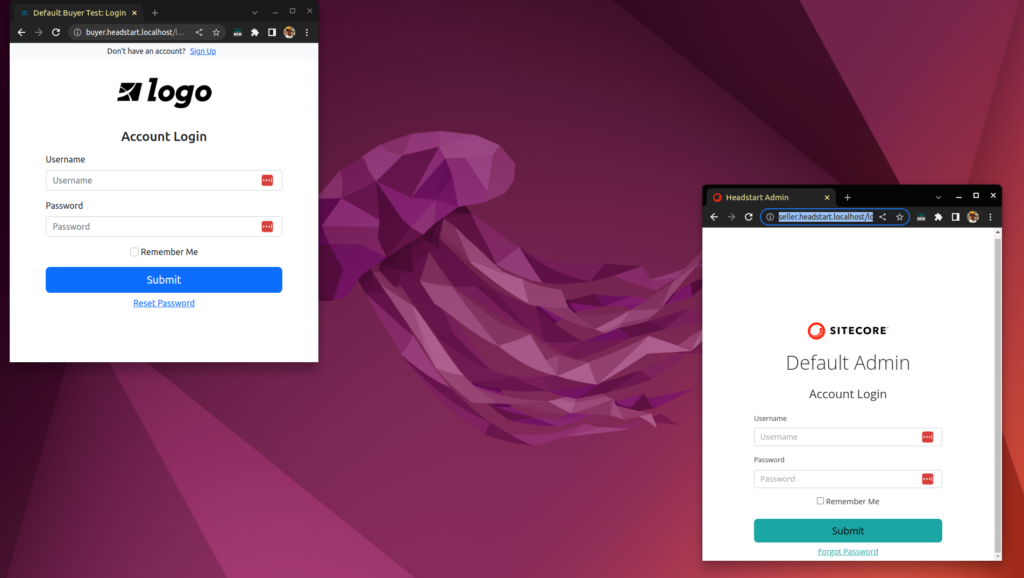
This has really opened the horizon to develop, deploy and maintain OrderCloud solution on a technology agnostic platform.

Loading

Kubernetes commands for managing Pods

To get the cluster info use-

kubectl cluster-info

To get list of nodes user-

kubectl get nodes

Creating Pod – imperative way

Create a POD with nginx image and name nginx in default namespace

// kubectl run <<pod name>> --image <<image in docker hub>> 
kubectl run nginx --image nginx

Create a POD with nginx image and name nginx in different namespace

// kubectl run <<pod name>> --image <<image in docker hub>> -n <<namespace name>>
kubectl run nginx --image nginx -n production

Get Pods and details

Get a list of POD’s in default namespace

kubectl get pods

Get a list of POD’s in other namespace

//kubectl get pods -n <<namespace name>>
kubectl get pods -n production

Check the node of the Pod it is created-

kubectl get pods -o wide

Create POD using yaml – declarative way

// file name- pod-definition.yaml
apiVersion: v1
kind: Pod
metadata:
  name: nginx-pod-yaml
spec:
  containers:
    - name: nginx-container-yaml
      image: nginx

Create a pod declarative way-

kubectl create -f pod-definition.yaml

Deleting Pod

Delete a pod in default namespace

// kubectl delete pod <<pod-name>>
kubectl delete pod nginx-pod-yaml

Delete all pods in default namespace

kubectl delete --all pods

Delete a pod in custom namespace

//kubectl delete pod <<pod-name>> -n <<namespace-name>>
kubectl delete pod nginx-pod-yaml -n development

Delete all pods in custom namespace

//kubectl delete --all pods -n <<namespace-name>>
kubectl delete --all pods -n development

Loading

Linux and Docker on Ubuntu Series

Linux basic commands (Ubuntu)

Linux Kernel and hardware

Linux Runlevels

Linux Package Management for Ubuntu

Linux User Management commands

Linux Networking commands

Install Docker on Linux

Linux File Types

Create a file in Linux

How to check the file size in Linux

Compressing and Uncompressing Files in Linux

Searching files and directories in Linux

Search content with pattern in the file in Linux

Search content with pattern in the file in Linux

File Permissions in Linux

Check running services in Linux

DOCKER

Docker FAQ’s

Install Docker on Ubuntu

Install Docker using install script on Ubuntu

Setup a Docker Swarm

Cache Busting and Version Pinning when building Docker images

Docker storage on Ubuntu

How to start docker in debug mode in Ubuntu

Docker Restart Policies

Use Docker image offline with Save and Load command in Ubuntu

Export Container and Import as Image using Docker in Ubuntu

Create a custom network in docker for communication between containers

Dcoker Security

Docker Best practice

Use Docker Image offline with Save and Load command in Ubuntu

Docker Save and Load command

At times if you dont want to always pull the image from image registry which takes time to pull if the image’s are heavy, it makes sense to save the image and use it offline. This avoids to always pull the image from the registry.

Save the image once into tar file and reuse the images.

To Save image use follwoing command

First pull the image from repository

docker pull httpd
docker image save httpd -o httpdimage.tar

Get the image from the tar file instead pulling it from the registry

docker image load -i httpdimage.tar

Docker Security

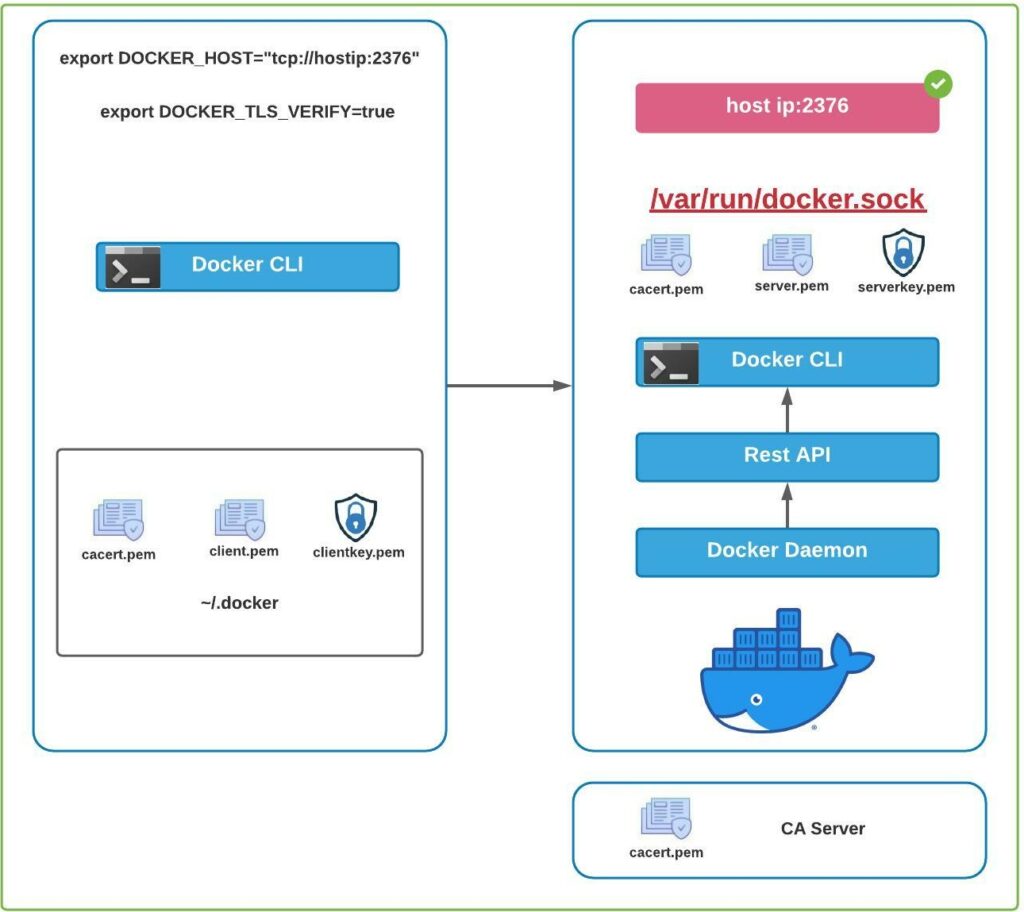
Docker engine consists of Docker Daemon, Rest API and Docker CLI

To access the containers through Docker CLI the request is sent to Rest API and then to Docker Daemon to serve the request.

Docker Daemon service is accessible from within the host using unix socket which located in /var/run/docker.sock file

Applications can access the Docker daemon service from outside the host.

For accessing the docker daemon from outside the host securely configure /etc/docker/daemon.json when it is absolutely necessary

Setup the following in daemon.json file

{
   "hosts": ["tcp://hostip:2376"],
   "tls": "true",
   "tlscert": "/var/docker/server.pem",
   "tlskey": "/var/docker/serverkey.pem"
}

The above configuration help to connect to the Docker Daemon securely and in encrypted manner. On client run the docker command with tls set to true

docker --tls=true
OR 
export DOCKER_TLS=true
export DOCKER_HOST="tcp://hostip:2376"

Port 2376 allows to connect securely to Docker Daemon service.

But the above can be connected without authentication.

Access Docker Daemon using Certificate based Authentication

To access the Docker Daemon with certificate based authentication use following configuration-

{
   "hosts": ["tcp://hostip:2376"],
   "tls": "true",
   "tlscert": "/var/docker/server.pem",
   "tlskey": "/var/docker/serverkey.pem"
   "tlsverify": true,
   "tlscacert": "/var/docker/caserver.pem"
}

Here the tls_verify option enables certificate authentication based connection.

–tls will enable the connection with encryption

Clients with signed certificate will be able to access the host.

Client need to connect using following-

docker --tlsverify --tlscert=<<client.pem>> --tlskey=<<clientkey.pem>> --tlscacert=<<cacert.pem>>

Above can be also configured in ~/.docker file

Docker Restart Policies

To setup restart policy to the container, use following command-

docker run --restart=<<policy option>> <<container>>

Following are the options for the container restart-

  1. no (default)
  2. on-failure
  3. always
  4. unless-specified

Following is the matrix for the restart policies-

* – this will start when the Docker daemon is started

Above is applicable if the container starts successfully

Live Restore

If you want to keep container running if the Docker daemon crashes or stops use the live restore option. This reeduces the container downtime due to daemon crashes or planned outages or upgrades.

Update the /etc/docker/daemon.json in Ubuntu system and add option live-restore:true

Docker storage for Ubuntu

Docker uses storage drivers to store the read-only images and writable containers

It basically has 6 layers

Read-only/Image Layers

  1. Base Image e.g. Ubuntu OS
  2. Packages/Repositories e.g. apt etc
  3. Dependencies e.g. pip etc
  4. Custom Code e.g. python code etc
  5. Enrtypoint or command i.e. excutes the program

Writable Layer

6. Container Layer

Layers of a container based on the Ubuntu image

Data and files related to images and containers are store in /var/lib/docker folder in Ubuntu

To check the storage driver used by the docker, use following command-

docker info | more

Im my case it is overlay2

You can also use this command to get the storage driver

docker info | grep "Storage Driver"

How to change the storage driver

Stop the Docker service

systemctl stop docker.socket
systemctl stop docker

Check the docker service status

service docker status

Backup the docker folder

cp -au /var/lib/dovker /var/lib/docker.bk

Change the storage driver

echo '{ "storage-driver": "aufs" }' | sudo tee /etc/docker/dameon.json
service docker start

Image credit and reference links –

https://docs.docker.com/storage/storagedriver/

https://docs.docker.com/storage/storagedriver/overlayfs-driver/

Create a file in Linux

Create a file with touch command

To create a new file, use touch command followed by the name of the file-

This should create a empty file.

touch thirdfile.txt

To create multiple files using touch command-

touch thirdfile-1.txt thirdfile-2.txt

Create a file with cat command

To create a new file with cat command use redirection operator followd by file name.

This will allow to add content to the file

cat > fourthfile.txt

Cratea a file using echo command

To create a new file using echo command use redirection operator followed by file name will create empty file or add content before redirection operator to add content while creating a file.

echo "This is fifth file." > fifthfile.txt

Create a empty file with echo command

echo > sixthfile.txt

Ubuntu – Package Management

DPKG – Debian Package Manager used to install, uninstall, list and check the status of the package

It comes with .deb file.

DPKG does not honour dependecies hence we need to use APT for Ubuntu

APT stands for Advanced Packaging Tool and relies on DPKG

Use apt update command to refresh the repository-

sudo apt update

Use apt upgrade to upgrade exisitng package-

sudo apt upgrade

To install a package-

sudo apt install <package name>

To uninstall or remove package-

sudo apt remove <package name>

To search package e.g:- python-dev

sudo apt search python-dev

To list all the packages in repository-

sudo apt list

Linux File Types

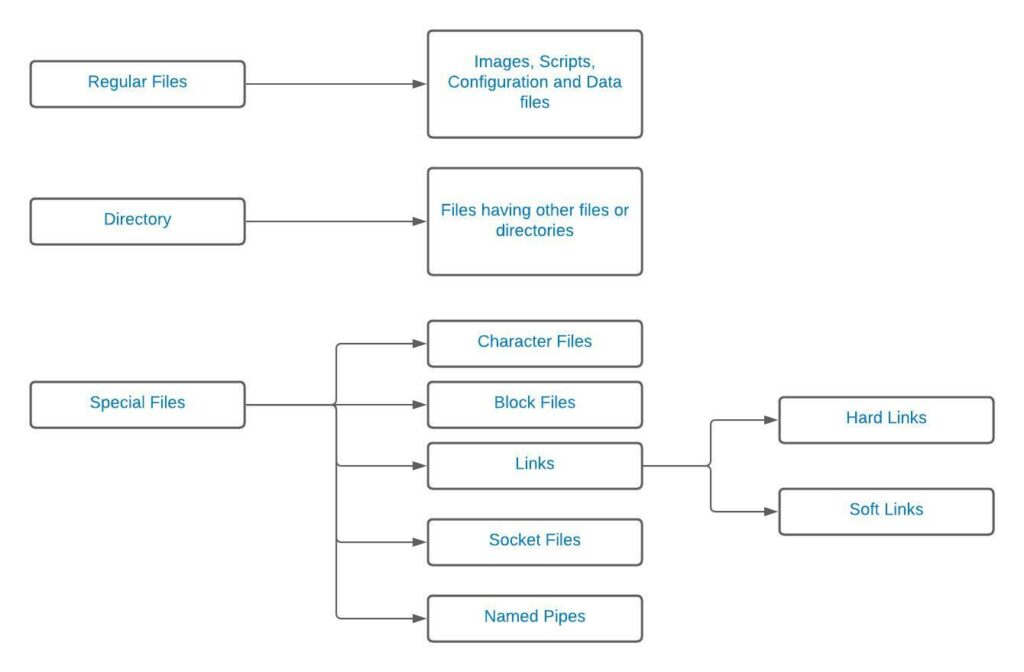
Everything in Linux is file

There are following type of files-

Regular files – Images/scripts/configuration and Data files

Directory – Type of files which saves other files and directories

Special files – have other types

  • Character Files – Represent devices – like Mouse and keyboards
  • Block Files – Represent block devices that writes data in chunk to the devices like HDD and RAM
  • Links – Hard links and Soft Links
  • Socket Files – enables the commnuication between 2 process
  • Named Pipes – passes data from one process to another

Use file command to get the file type-

file <<filename>>

Use ls -ld command to get the file type-

ls -ld firstfile.txt

First character represents the file type

IdentifierFile Type
dDirectory
Regular File
cCharacter Device
lLin
sSocket File
pPipe
bBlock Device

Filesystem Hierarchy

/- Root Partition

/opt – any third party program should be put in this directory

/mnt- mounts the file system from external network temporary to this folder

/tmp- copy any temporary files to this location

/media – copy any media files in this folder

/dev – contains the file character device file like external devices like mouse and keyboard

/bin – basic programs and binaries are located in this directory

/etc – configuration files

/lib and /lib64 – contains shared libraries

/usr – user related data reside in this folder

/var – system writes data such as logs