


Page 22 of 24

Git- undo working directory and amend commits

Undo working directory

If you want to undo any changes to working directory, user following command-

git checkout -- file.txt

Use — to undo a file in a current branch.

You may checkout specific commit or old version, use following command.

To see the commit user-

git log

Copy the first 10 characters of SHA and use following command to checkout a specific commit-

git checkout sha121212 -- file.txt

Where sha121212 is a SHA of the specific commit.

Amend commits

If you want to amend the commit i.e. something in the repository, you may do that using amend command. Note only the last/recent commit i.e. the HEAD point to can be amended and in this case date and SHA will be changes along with message, use following command-

git commit --amend -m "message goes here"

You may check the commit changes in log-

 git log

If you want to revert the current commit use following command-

git revert SHA21121

SHA21121 is the SHA for that commit.

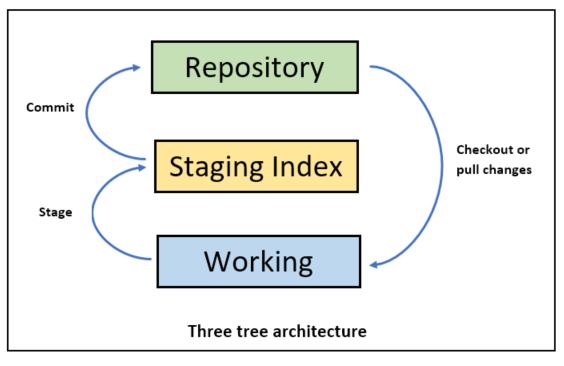
Git workflow or three tree architecture

Git follows following three tree architecture.

Working – is the working directory where the file changes are made. For the first time you either push the changes to the repository and following changes you may pull the repository copy to your working directory

Staging – before the work is been committed to repository the changes are prepared for commit and sits in a staging index.

Repository – once the changes are staged these can be committed to repository.

gitarch

Git- add (stage), commit and unstage changes

Before this if you want to see Git workflow/ three tree architecture

Stage changed files
To add the changes to the staging index from working directory use following command-

 git add .

This will stage all changed files (.) in working directory
To add specific file to staging index-

 git add filename.txt

Stage and commit at once

Per above this is 2 stage process to commit changes to repository. If you have all files that are ONLY modified use following command to directly commit from working repository. This command can also be used for renamed file.

 git commit -am "provide a message here"

So no need to explicitly add to the staging index, instead the above command shall update repository.

Commit changes

Going back to committing changes, use following command-

 git commit -m "message goes here"

Please note the best practice to put the message on what is this commit about and the message to be in the present tense.

Unstage changes

 git reset HEAD fiel.txt

If you put something in staging directory and don’t want there, then use reset head.

GIT – diff, remove and rename

Before this if you want to see Git workflow/ three tree architecture

To check the difference between Repository and working directory using following command-

git diff

To get the difference in words instead  of whole statement highlighted with diff, use following command-

git diff --color-words

To check  staged changes difference, use following command-

git diff --staged

To delete file from working directory and from repo, use following command-

git rm file-to-delete.txt

The file will be staged with this command so you dont need to explicitly stage the deleted file.

Commit this file-

git commit -m "file deleted."

Please note while doing so the files will be permanently deleted and not found in thrash to recover. So use this command wisely if the file is not in the repo for you to pull back.

Rename file in repository and working folder, use following command-

 git mv filebeforerenaming.txt fileafterrenaming.txt

This shall rename file and stage the changes. So this is not required to manually staged.

Sitecore MediaFolder VS Media.FileFolder

Sitecore has 2 settings in the config named MediaFolder and Media.FileFolder, both has a different functionality.

MediaFolder – path used in this setting, Sitecore shall watch this folder for the files that need to be automatically uploaded to Sitecore media library. The path in this setting can be a Site path (e.g. /folder/) or a absolute path(e.g. C:\folder). The file path should be different from Media.FileFolder. By default it is set to /upload. So any files moved to this folder will be watched by Sitecore and uploaded media library.

Disable file watcher
There is a security aspect here, if you want to only enable the file upload using Sitecore client then disable the file upload watcher.

To ensure that only way to upload file is through Media Library disable the file watcher by removing the following line in web.config in

[code language=”xml”]

[/code]

Media.FileFolder – path used in the settings can be a Site path (e.g. /folder/) or a absolute path(e.g. C:\folder)

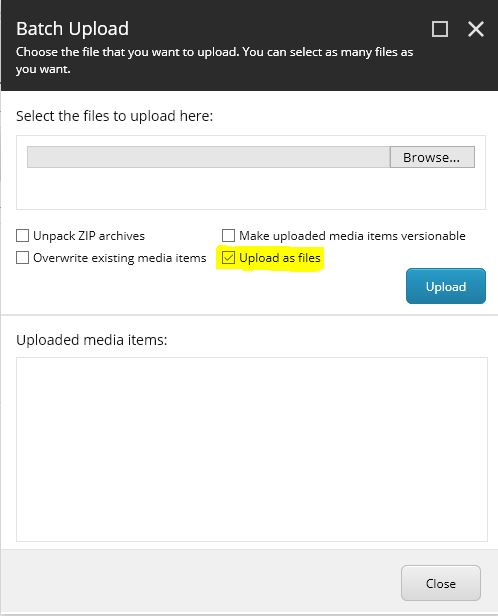
When media files are uploaded from Media Library as a file, the files are been uploaded into configured path in this settings. So this files are not saved in database instead reside in as a physical file on server or computer.

MediaAsFile

Sitecore media items vs media files

In Sitecore there is a difference between media item and media file.
A media item can be a image, a document or a video.
Media files are kept in a computer. Its when the file is uploaded to Sitecore a media item is created where the file is associated to the media item.

Media item can be –
1. Images
2. Videos
3. Documents including PDF
4. Audio files

The media item can be managed from the Media Library.

Sitecore LiveMode.config

Sitecore Live Mode allows to run the site on content database i.e. master db rather then a web database or published content. This is useful for developers who tend to test the code without publishing Sitecore items every time it is changes in dev or local machine.

Live mode can be set in 2 ways-

  • Directly changing in Sitecore.config or config where Site settings are patched. Set your site database element value to master.
  •  Set the LiveMode.config in /App_Config/Include folder

To setup the Sitecore.config, update following-

[code language=”xml”]
<sitecore>
<sites>
<site name="yoursitename" databasename="master" …></site>
</sites>
</sitecore>
[/code]

To setup LiveMode.config, update following-

[code language=”xml”]
<sitecore>
<sites>
<site name="yoursitename">
<patch:attribute name="database">master</patch:attribute>
<patch:attribute name="filterItems">true</patch:attribute>
<patch:attribute name="enableWorkflow">true</patch:attribute>
</site>
</sites>
</sitecore>
[/code]

database attribute to master for you site.

filteritems is set to true which means that items which has publishing restrictions will be filtered out. This is recommended to be true.

enableWorkflow – set this to false if the items that are in workflow and if you want to be seen in live mode.