Tag: Sitecore SXA

Setup Sitecore Headless SXA with Next js

Pre-requisite-

Install Sitecore 10.3 XP0 on local machine – see this blog to install the SIF way

Install Powersehll Extensions

Sitecore PowerShell Extension for Sitecore on your local Sitecore instance

Sitecore Headless Rendering 21.0.0

Install Sitecore Headless Services for Sitecore XP on your local Sitecore instance

See the Sitecore Headless Rendering 21.0.0 download page

Install SXA module –

Sitecore Experience Accelerator on your local Sitecore instance

See the Sitecore Experience Accelerator 10.3.0 dowload page

Once you have the above installed the local instance should have options to create a Headless Tenant and Folder

Ensure all the search index and rebuilt-

Install Node js Download | Node.js (nodejs.org). Latest whilst writing this blog was v18.14.0

Create a Headless Tenant

Select the Headless Tenant

Enter a valid tenant Name and the modules to install –

Should create a tenant successfully-

Create a Headless Site

Now create a Headless Site

Provide a valid Site name and other options-

Select the modules to install-

Keep the Site settings as is for now and will generate the deployment secret later-

Site should be crated within the tenant-

Setup the rendering host

Site Settings – Check for the rendering host- should have set to Default

/sitecore/content/mycompany/retail/Settings/Site Grouping/retail

Find the Default rendering host on this location-

/sitecore/system/Settings/Services/Rendering Hosts/Default

Server side rendering engine endpoint URL:- http://localhost:3000/api/editing/render

Server side rendering engine application URL:- http://localhost:3000

Application name:- e.g.:- retail-app

Where is the above value coming from – when a next js app is created by default it is hosted on port 3000. Please see section below- NEXT STEPS

Create JSS Api key

Navigate to this location to create API key- /sitecore/system/Settings/Services/API Keys

Provide a valid name-

Set the CORS and Allowed Controllers to all domains. Set this to *

Will need API key while setting up the next js app.

Install JSS globally

https://doc.sitecore.com/xp/en/developers/hd/200/sitecore-headless-development/install-the-jss-cli-globally.html

npm install -g @sitecore-jss/sitecore-jss-cli

Initialise JSS App

Refer following for various options –https://doc.sitecore.com/xp/en/developers/hd/210/sitecore-headless-development/the-jss-app-initializer.html

Use following command-

npx create-sitecore-jss --templates nextjs,nextjs-sxa --appName retail-app --hostName xp103.sc --fetchWith GraphQL

Possible values for templates arguments-

Base templatesnextjs. Other possible values-

Other templates

appName – enter the app name provided in the rendering host. See Setup the rendering host section

hostname– enter the hostname of the Sitecore instance

While installing following questions are asked-

? Where would you like your new app created? – provide the location to create a next jss app

? How would you like to prerender your application? – Select SSG

Understand the pre-rendering to select. In this case I have selected SSG option.

https://doc.sitecore.com/xp/en/developers/hd/190/sitecore-headless-development/prerendering-methods-and-data-fetching-strategies-in-jss-next-js-apps.html

https://doc.sitecore.com/xp/en/developers/hd/210/sitecore-headless-development/switch-the-pre-rendering-method-in-a-jss-next-js-app.html

Following files will be created in a new folder (retail-app) –

Setup JSS app-

see this link- https://doc.sitecore.com/xp/en/developers/hd/190/sitecore-headless-development/start-a-jss-app-in-disconnected-mode.html

Setup the JSS app-

jss setup

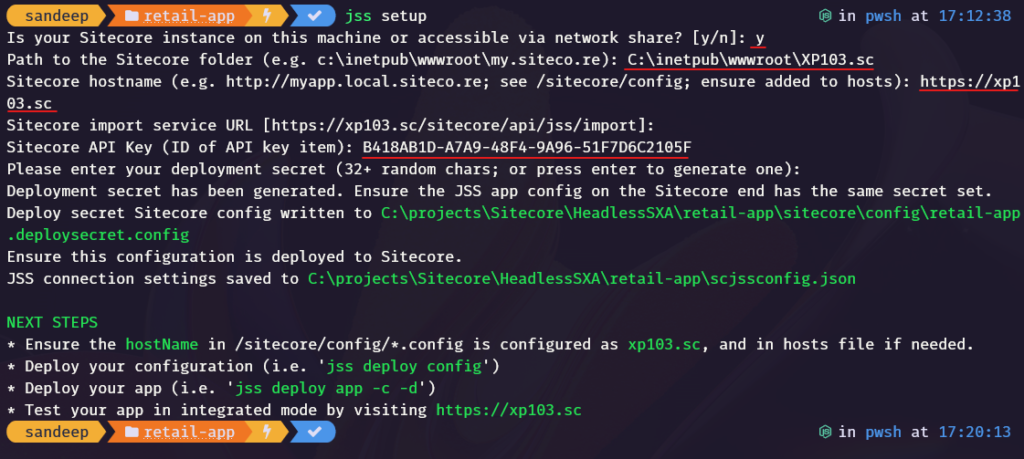
Following options are asked, provide the required details-

Is your Sitecore instance on this machine or accessible via network share? [y/n]: y

Path to the Sitecore folder (e.g. c:\inetpub\wwwroot\my.siteco.re): C:\inetpub\wwwroot\XP103.sc

Sitecore hostname (e.g. http://myapp.local.siteco.re; see /sitecore/config; ensure added to hosts): https://xp103.sc

Sitecore import service URL [https://xp103.sc/sitecore/api/jss/import]: [Leave blank]

Sitecore API Key (ID of API key item): B418AB1D-A7A9-48F4-9A96-51F7D6C2105F [enter the api key created earlier- see section Create JSS Api key ]

Please enter your deployment secret (32+ random chars; or press enter to generate one): [Leave this blank and it should create one or enter the value here]

See the highlighted values. Also note the where the deployment secret is written-C:\projects\Sitecore\HeadlessSXA\retail-app\sitecore\config\retail-app.deploysecret.config
NEXT STEPS

Remove/Comment the site definition in this case as opposed to JSS sites as this will be handled in Sitecore site settings-

Remove it from /sitecore/config/retail-app.config

Verify JSS app registration-

See the values of Endpoint Url and Application URL. The same url was configured in rendering host.

Set JSS Editing Secret in .env file- Use the deployment secret from the /sitecore/config/app-name.deploysecret.config

Deploy config

jss deploy config

Note the config was deployed to C:\inetpub\wwwroot\XP103.sc\App_Config\Include\zzz folder in the Sitecore instance

Start Application in connected mode

jss start:connected

Application should listen to http://localhost:3000

Try accessing – http://localhost:3000

Errors:-

Solution

$env:NODE_TLS_REJECT_UNAUTHORIZED=0

Error-

Solution-

Search for root item in code- open \src\lib\dictionary-service-factory.ts

Error- Page not found

Solution – Ensute the site and the app name is same.

After all the above errors, it should show the blank page- Since there are no component s added.

Lets add some content, for this opne the Home page in experienec editor and see this error-

Error- Connection to your rendering host failed with an Unauthorized error. Ensure the JSS Editing Secret is configured.

Update the JSS Editing Secret in Sitecore instance at following path (best practice-you have to patch the config instead of updating the Sitecore configs directly)

App_Config\Sitecore\JavaScriptServices\Sitecore.JavaScriptServices.ViewEngine.Http.config

Update the value to the deployment secret used earlier in .env file-

After update-

Finally we can see the experience editor-
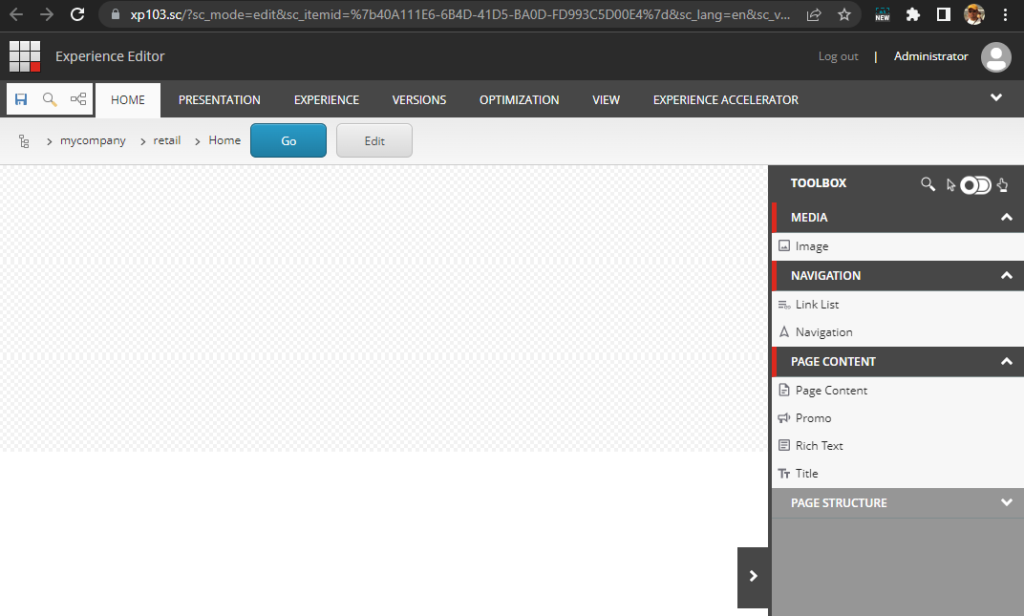
Add some content –
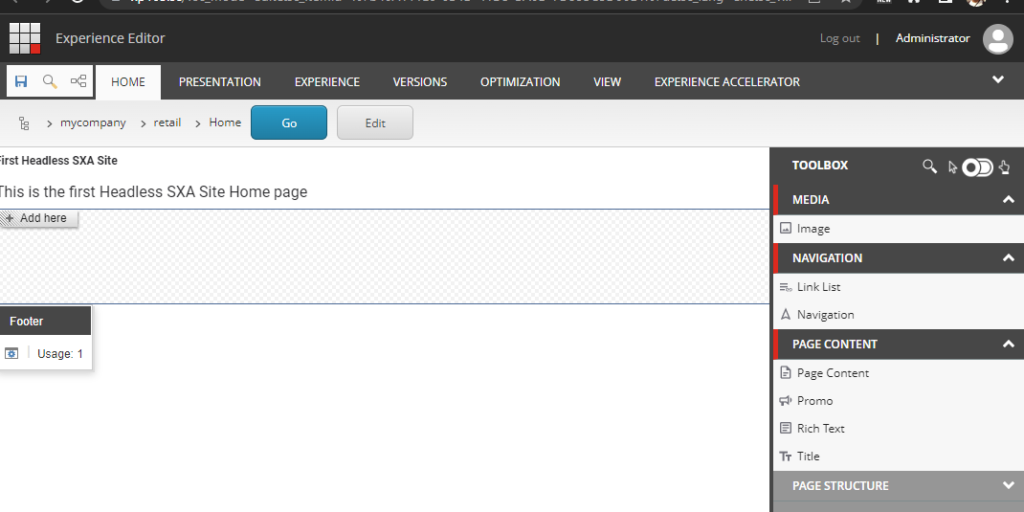
Save and Publish

Finally we have next js app showing the content- on localhost:3000

Layout Services

Lets check if the layout services are accessible-

Get Item data (home) and secret key-

https://xp103.sc/sitecore/api/layout/render/jss?item={40A111E6-6B4D-41D5-BA0D-FD993C5D00E4}&sc_apikey={B418AB1D-A7A9-48F4-9A96-51F7D6C2105F}

Graphql

https://xp103.sc/sitecore/api/graph/edge/ui?sc_apikey={B418AB1D-A7A9-48F4-9A96-51F7D6C2105F}

Loading

Step by step install Sitecore XC 10.2 using SIF on Windows 11

Follow these steps to install Sitecore Commerce 10.2 On Premise. To successfully install refer to Installation Guide provided by Sitecore.

Before installing Sitecore Commerce install Sitecore XP 10.2. See this blog to install Sitecore XP 10.2 using SIF. Say the XP site name is- xp0.sc

Download Installation Guide

Hosting Environment Requirements/ Download and Install following software-

  1. OS – Windows Server 2019/2016 or Windows 10 Pro(64-bit) or Windows 11 Pro(64-bit)
  2. Redis (Windows): 3.0.504 (or later)
  3. Database – Microsoft SQL Server 2017 Express Edition (This should be already installed as a part of XP 10)
  4. Install Microsoft Web Deploy 3.6 if not already installed
  5. Install URL Rewrite using Web Platform Installer
  6. SOLR 8.2.0 (This should have already installed as a part of XP 10 install)
  7. Install PowerShell 5.1 or later is not already installed
  8. Web Platform Transformer (Download nuget package)
  9. (Important) Install Web hosting- here

IMPORTANT – As per the release notes

The deployment of SXA has been removed from the Commerce installation, and instead installed as a Platform pre-requisite before installing Commerce packages.

Install Powershell Extension for Sitecore – Download Sitecore PowerShell Extension for Sitecore

Install Sitecore Experiemce Accelerator 10.2.0 – Download Sitecore Experience Accelerator 10.2.0

Also Commerce Ops service is removed from deployment configuration this will reduce deployment time and hosting cost.

Before starting the installation ensure XP 10.2 instance is working and indexed. If not indexed rebuild all search indexes-

Download Sitecore Experience Commerce 10.2

Step-by-step installation process-

  1. Create a installation folder for XC – xcinstall for e.g.- c:\scinstallation\xc

2. Copy and extract Sitecore.Commerce.WDP.2021.11-8.0.218.zip file to c:\scinstallation\xc folder

3. Copy Sitecore Experience Accelerator 10.2.0 rev. 04247.zip file c:\scinstallation\xc folder

4. Copy Sitecore.PowerShell.Extensions-6.3 – IAR.zip file to c:\scinstallation\xc folder

5. Extract Web Platform Transfomer nuget package and copy Microsoft.Web.XmlTransform.dll to c:\scinstallation\xc folder

6. Extract SIF.Sitecore.Commerce.7.0.37 to c:\scinstallation\xc folder. Rename this to SIF

7. Folder structure should look like this-

8. Install Sitecore.PowerShell.Extensions-6.3 – IAR.zip package in your earlier installed Sitecore instance

9. Install Sitecore Experience Accelerator 10.2.0 rev. 04247.zip pakcagein your earlier installed Sitecore instance

11. Open Deploy-Sitecore-Commerce.ps1 file in SIF folder to update the following-

  • $XCInstallRoot
  • $XCSIFInstallRoot = “$XCInstallRoot\SIF” or $PWD is fine – it is Present Working Directory,
  • $SiteNamePrefix
  • $SiteName
  • $SiteHostHeaderName [optional]
  • $MergeToolFullPath= “$XCInstallRoot\Microsoft.Web.XmlTransform.dll”
  • $CommerceServicesDbServer = “sc102comm\MSSQL2017”

12. Create Commerce Engine Connect Client Secret for the Sitecore Identity Server

  • Copy below script to file to scinstall/SIF.Sitecore.Commerce.5.0.49 folder example XC10SecretClientCertificate.ps1
  • Execute the script and copy secret key to $CommerceEngineConnectClientSecret
$bytes = New-Object Byte[] 32
$rand = [System.Security.Cryptography.RandomNumberGenerator]::Create()
$rand.GetBytes($bytes)
$rand.Dispose()
$newClientSecret = [System.Convert]::ToBase64String($bytes)
echo $newClientSecret

13. [Optional] Update Sitecore domain or keep it default

  • $SitecoreDomain
  • $SitecoreUsername
  • $SitecoreUserPassword
  • $UserName
  • $UserPassword

14. Update other DB related settings

  • $SqlUser
  • $SqlPass
  • $SitecoreDbServer
  • $CommerceServicesDbServer

15. Update SOLR details-

  • $SolrUrl
  • $SolrRoot
  • $SolrService

Execute Deploy-Sitecore-Commerce.ps1 script to install commerce

IMPORTANT – After deployment is complete Disable TLS 1.3 over TCP for all the sites and all bindings

Errors-

Error -The remote server returned an error: (400) Bad Request. on GetIdServerToken

Resolution – Check your admin credentials if correctly configured in installation script.

Error – Commerce roles site not reachable

Resolution- Check if the SSL certificate for Comerce Engine is in Trusted Root Certification Authorities. If not copy the relevant certs to same.

Sitecore SXA Series

Sharing my experience on developing and configuring a site using Sitecore SXA.

Topics-

  1. Creating a SXA tenant and site
  2. Know what is in your installed Tenant and Site
  3. Themes – Create and Assign themes
  4. Create Sitecore SXA module
  5. Create a SXA component form scratch using Scriban
    1. Create data and rendering templates
    2. Setup content and create renderings
    3. Create rendering variants using Scriban
    4. Add rendering to Page (Option 1)
    5. Setup page and partial design
  6. Install module to SXA Site
  7. Add rendering to Page using Toolbox (Option 2) – Coming Soon
  8. Setup custom domain for SXA site – Coming Soon
  9. Debug- Remove div row wrappers when using Sitecore placeholders
  10. Debug- Enable and configure the Asset optimizer
  11. Setup Favicon for your SXA site
  12. Configure settings for Error Handling SXA site- Coming Soon

Sitecore SXA- Remove div row wrappers when using Sitecore placeholders

This image has an empty alt attribute; its file name is image-50.png

Sitecore uses placeholders to render components which allows to dynamically assemble the page layout. This allows the content editors to design specific pages.

When using MVC layout and BootStrap grid, SXA adds additional DIV when a placeholder is used.

For e.g. if you see the views/sxalayout/Bootstrap4Body.cshtml file. If has a placeholders header, main and footer.

Page is rendered with the header, main and footer tags having placeholders within.

These placeholders is wrapped with a div tag when rendered with class row.

Problem– Extra div tag with class row might not be required or if you don’t to have this as part of your markup. How to remove div tag?

Solution

The configuration to exclude the placeholder wrappers is in Sitecore.XA.Foundation.Grid.config

Any custom or OOTB placeholders can be added to placeholderWrapper/exlcudedPlaceholders list

Best Practice – Never modify the OOTB config’s as this can be changed in the future releases and upgrades. Patch the config instead.

Patch file should look something like this-

Resulting to the entry added in excludePlaceholders list and the div been not rendered-

Hope this helps

Sitecore 10 SXA- Improve site performance by enabling Asset Optimizer

Asset optimizer helps improve the performance in production site by compressing/minifying the CSS and JS.

Minification of assets helps to cut the unnecessary portions of code and reduce the size of file to boost the performance by reducing amount of data over the internet.

Sitecore administrators can enable/disable optimizer globally of to a specific site.

Enable/Disable the Asset Optimizer globally

Enabling or disabling optimizer globally affects all the sites configured in the Sitecore instance.

To change the optimiser settings navigate to following location. This is accessible to Administrators-

/sitecore/system/Settings/Foundation/Experience Accelerator/Theming/Optimiser

You can also search “optimiser”-

If you can’t find this you may have to re-index master.

Select Scripts or Styles to change the settings

Modes of Optimizations

Concatenate And Minify Mode

When this option is selected. Sitecore will concatenate and minify the OOTB and Custom Scripts and Styles.

Example:- If you have a custom theme you can add the css files in your extension theme

This is in master database

Highlighted CSS is a extension to the base theme.

Web database when the page is first requested Sitecore will concat and minify all css in extension theme folder and create a optimised-min.css file

Styles loaded from the extension theme is concatenated and minified version with timestamp in query parameter (optimised-min.css)

Notice that the file name is optimised-min.css

Size of the optimized version is 367 KB
Concatenate and minified. Loads without comments

Concatenate Mode

Change the mode of optimization to “Concatenate”.

Web database now has optimized file created in extension theme

Styles loaded from the extension theme is concatenated version with timestamp in query parameter (optimised.css)

Notice that the reference to file is changed to optimised.css

Size of the optimized version is 381 KB
Concatenate but not minified. CSS loads with comments

Disabled Mode

Change the mode to “Disabled” and should see all the files loaded separately. Disabled mode is good for debugging but should not be used for production as it will give a performance hit.

CSS files are loaded separately and not concatenated nor minified

Best Practice – Enable Asset Optimizer in production environments

The same can be applied to the Scripts.

You have set the optimizer to concatenate and minify globally to your Sitecore instance but still don’t see the site been optimized.

Create a new Sitecore 10 SXA module

Sitecore SXA module contains templates, Renderings, Layouts, Placeholder Settings, branch etc. It helps structure the SXA site by scaffolding items required to setup the component.

In this blog post I will walkthrough the steps to create a module manually to have a better understanding and helps specially to debug when there are issues with the existing modules.

Create Module (Part 1)

Navigate to – /sitecore/system/Settings/Feature

Right click Featur folder to create module

Create new module overlay will open.

  1. Provide a Module name – i.e. Custom Image Block
  2. Choose the location where this module to be created.
  3. Select the system areas the module folders to be created
  4. Choose the module should be applied to tenant or site

When module is created should be able to see the folder with the Site Setup Root item

Once the Site Setup Root is created you should be able to see folders with name “Custom Image Block” will be created in Branch, Template, Renderings, Placeholder Settings, Layouts and Media Library or the system areas selected.

Create template required for creating Branch

For creating a branch you will need a template and rendering. Create a template in “Custom Image Block” folder. For now you don’t have to add fields. See blog the fields that were created for component.

Create “Image Block Folder” Template

Create rendering required for creating Branch

Create controller rendering with name “Image Block” in – /sitecore/layout/Renderings/Feature/Wits/Custom Image Block.

For now don’t setup anything in rendering. See blog for the configuration required in rendering-

Create Branch

Navigate to /sitecore/templates/Branches/Feature

Create a new branch. Right click on the folder “Custom Image Block” and insert new branch option

Select the template earlier created-

Branch with name “Image Block” will be created.

Delete $name item in the branch

Rename the Image Block to “Available Image Block Renderings”.

Right click branch and insert item from template-

/sitecore/templates/Foundation/Experience Accelerator/Presentation/Available Renderings/Available Renderings

Give it a name $name as this will create a item in “Available Renderings” folder in site with the component name

Select $name and select the newly created rendering-

Create or Copy the existing branch and name it as “Image Block Variant”

Create a variant, name it as “$name” from template – /sitecore/templates/Foundation/Experience Accelerator/Rendering Variants/Variants

Create Variant Definition under Variant name it as “Default” from template

Path of the variant definition- /sitecore/templates/Foundation/Experience Accelerator/Rendering Variants/Variant Definition

Create Scriban Variant named “Scriban” from template – /sitecore/templates/Foundation/Experience Accelerator/Scriban/Scriban

Add markup in template field or the same can be added when the module is installed on the site – if the markup is specific to the site.

Branch structure should like this-

Create Module (Part 2)

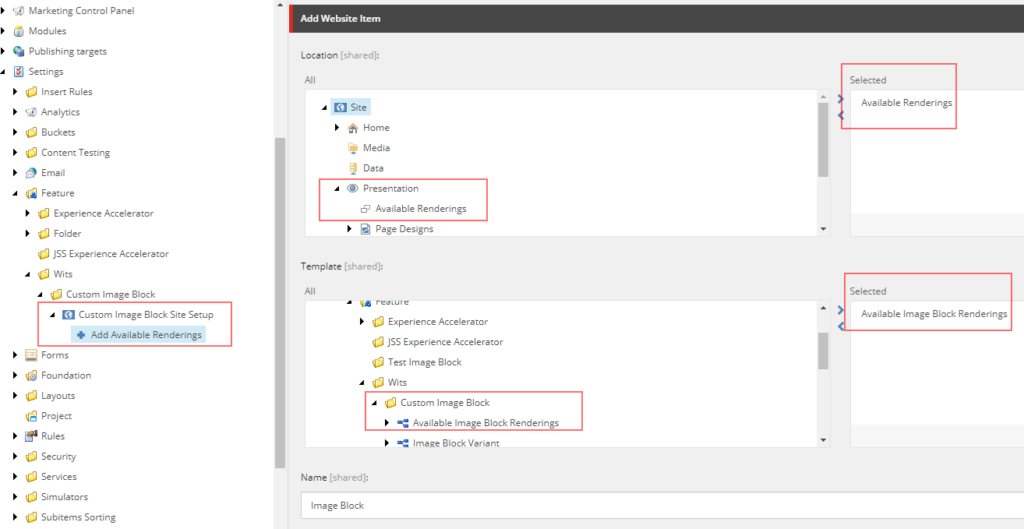
Add Site Item to add Available rendering to the site module is installed

Name it “Add Available Renderings”

Select the Location from the Site>>Presentation>>Available Renderings

In Template field select the “Available Image Block Renderings” from the newly created branch.

Provide the Name

Add Site Item to add rendering variant to the site module is installed

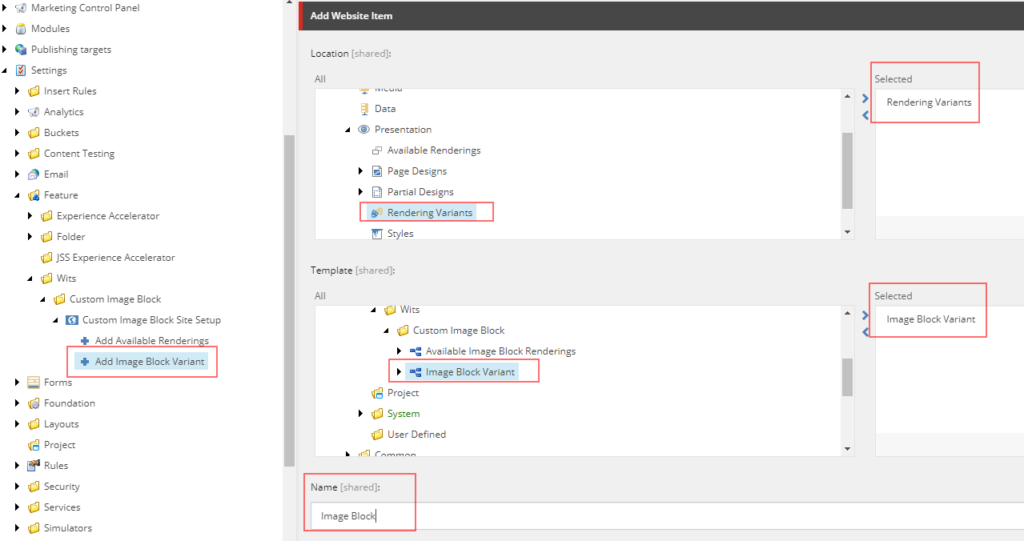
Add another site item, name it “Add Image Block Variant”

Select “Rendering Variant” in Location and “Image Block Variant” created in branch

This will create a “Image Block” in the “Rendering Variant” folder in the site where the module will be installed

Add Site Item to add data folder to the site module is installed

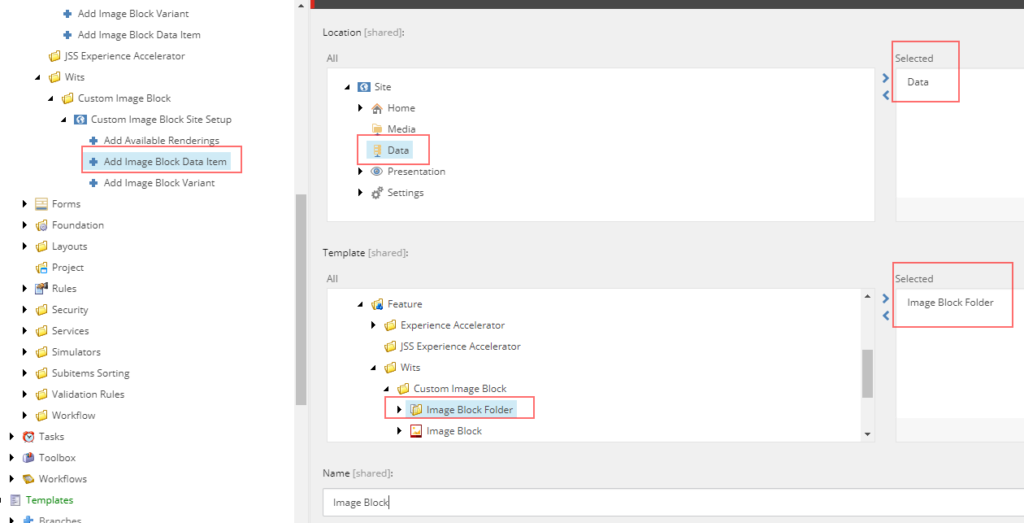
Add another site item, name it “Add Image Block Data Item”

This will create a “Image Block Folder” in “Data” folder in the site where the module will be installed

That’s it you are good to install “Image Block” module.

Different approaches to assign Sitecore SXA theme to a site

Once a tenant and site are created and/or a theme is manually created you may want to assign a theme to a site. A theme is automatically assigned when during a site creation but what if you want to assign a theme to already created site.

See this blog to create a tenant and site and different approaches of creating a theme.

Experience Editor

Select any Partial design and open experience editor select Experience Accelerator option.

Select Theme option. Change the theme.

This will also the change the theme in the selected site – /sitecore/content/<<tenant folder>>/<<tenant>>/<<site folder>>/<<site>>/Presentation/Page Designs

Content Editor

To change the theme for a specific site. Navigate to the site/Presentation/Page Designs

for e.g.:- /sitecore/content/<<tenant folder>>/<<tenant>>/<<site folder>>/<<site>>/Presentation/Page Designs

In the Styling section change the Theme field

Hope this helps.

Different approaches of creating Sitecore SXA themes

Themes define the look and feel of a site and makes it flexible to change the layout and design of the website.

Themes help to customize the appearance of the site which includes layout, typography, color and other design elements.

SXA come with two types of themes- Site and Base themes. To add own/custom classes and assets, such as styles, scripts, images and fonts use Site theme.

There are multiple ways site theme cane be created-

Option 1 – Add custom theme when creating a Site

Check out this blog post for adding a theme when creating a site

Option 2 – Add theme to existing Site (create theme manually)

Right click on your site- click Scripts and click New Site Theme option

Provide the theme name and location.

Click OK and a theme should be created on specified location

Option 3 – Add a theme using SXA CLI

Will add the details shortly.

Hope this helps!

Sitecore 10 SXA-Create a tenant and Site

Tenant Folder

Sitecore supports multitenancy, which means you can have multiple sites running on a single Sitecore instance.

Tenant folder is just a container to hold multiple tenants you may have as a part of site structure. Inherited from _Base Tenant Folder. You may create a tenant folder to hold the multiple tenants of a Company.

A folder with provide tenant folder name is create here – /sitecore/templates/Project/<Tenant Folder Name>

Template Path – /sitecore/templates/Foundation/Experience Accelerator/Multisite/Tenant Folder

Tenant

Tenant is a top-level container for the Sites underneath. Site in same tenant are related, that means they are able to share data and layouts. Creation of tenants comes with optional modules.

Template/sitecore/templates/Project/<<Tenant Folder>>/<<Tenant>>/Tenant

Tenant been created successfully.

Creating Site

Site is a collection of content and output with a common overall business objective sharing a common set of assets

To create site right click on Tenant and select an option to create Site or Site Folder

Site Folder –

Site folder is a container for multiple sites.

Template – /sitecore/templates/Foundation/Experience Accelerator/Multisite/Site Folder

Site

General tab- Provide Site name, host name and Virtual folder. You may keep this as default and change later based on the requirements.

Select the required modules as a part of Site creation.

Create a new theme or select existing. This will e your site theme and can be changed from Page Design –

Template – /sitecore/content/<<tenant folder>>/<<tenant>>/<<site folder>>/<<site>>/Presentation/Page Designs

Select a grid mainly Bootstrap 4

At this point we have SXA site been created-

Remove Site

To remove Site, right click on site, select scripts and Remove Site option.