Install Rust and setup development IDE with cargo
Loops and conditional statement in Rust
Ownership of resources in Rust
Borrowing, mutable and dangling references in Rust
String Type vs String literal in Rust
![]()
Sitecore Consultant. Sitecore MVP 2021 - 2026


A trait defines the functionality a particular type has and can share with other types. We can use traits to define shared behavior in an abstract way. We can use trait bounds to specify that a generic type can be any type that has certain behavior.
Traits are similar to a feature often called interfaces in other languages, although with some differences.
Struct
Define a struct – in this case Langauge struct with fields and data types
struct Language{
    name: String,
    stable_version: f32,
    launched_year: u32
}
Define Trait and implemenation
Define trait Description with represent method. Implement trait Description for Language struct.
trait Description{
    fn represent(&self) -> String;
}

impl Description for Language{
    fn represent(&self) -> String{
        format!("the language {} was lauched in {} year and current stable version is {}", self.name, self.launched_year, self.stable_version)
    }

}
Main Block
Instantiate Langauge and call the represent method implemented for Struct
{
    let pro_langauge_rust = Language{
        name: String::from("Rust"),
        stable_version: 1.84,
        launched_year: 2012
    };

    println!("Programming language is {}", pro_langauge_rust.represent())
}
Output
Programming language is the language Rust was lauched in 2012 year and current stable version is 1.84Default Trait
In the previous example Trait just has the definition but no implementation. Define a default implementation to the trait and no remove the implementaion for Langauge
trait Description{
    fn represent(&self) -> String{
        String::from("is the langauge you should learn.")
    }
}

impl Description for Language{
// No implementation
}

fn main{

   let pro_langauge_rust = Language{
        name: String::from("Rust"),
        stable_version: 1.84,
        launched_year: 2012
    };

    println!("{} {}", pro_langauge_rust.name,  pro_langauge_rust.represent());
}
Output
Rust is the langauge you should learn. ![]()
Struct group multiple items of mixed data types. Elements are named instead of order as defined in tuple.
Defining struct
struct Language{
    name: String,
    stable_version: f32,
    launched_year: i32
}

{
    let mut pro_langauge = Language{
        name: String::from("Rust"),
        stable_version: 1.84,
        launched_year: 2012
    };

    println!("Programming language {} current version is {} and launched on {}",
    pro_langauge.name,
    pro_langauge.stable_version,
    pro_langauge.launched_year);

    pro_langauge.name = String::from("java");
    println!("Programming language is {:?}", pro_langauge);
}
Output
Programming language Rust current version is 1.84 and launched on 2012
Programming language is Language { name: "java", stable_version: 1.84, launched_year: 2012 }
Struct managed in memory
Struct Clone
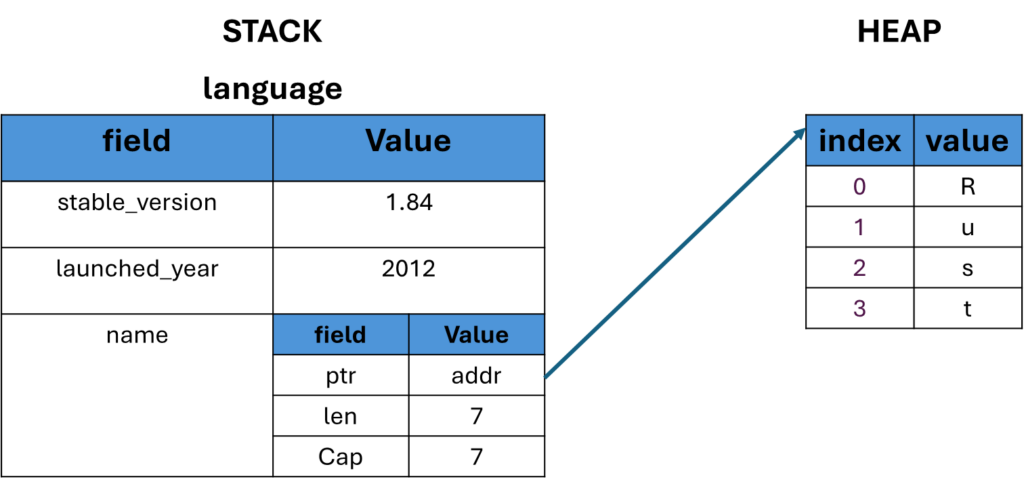
Struct clone is possible using clone() method. Will take the above example to clone the struct instance.
    let pro_langauge_rust = Language{
        name: String::from("Rust"),
        stable_version: 1.84,
        launched_year: 2012
    };

    let pro_langauge_java = Language{
        name: String::from("Java"),
        ..pro_langauge_rust
    };

    println!("Programming language {} current version is {} and launched on {}",
    pro_langauge_rust.name,
    pro_langauge_rust.stable_version,
    pro_langauge_rust.launched_year);

    println!("Programming language is {:?}", pro_langauge_java);
Here some of the fields are copied from the other instance using .. notation and the name for the new instance is different.
Output
Programming language Rust current version is 1.84 and launched on 2012
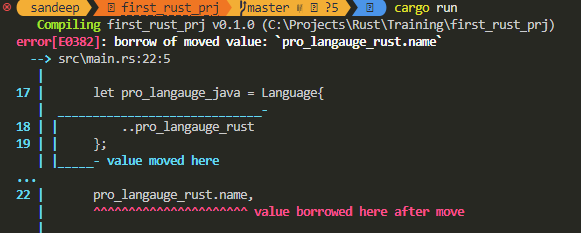
Programming language is Language { name: "Java", stable_version: 1.84, launched_year: 2012 }You cannot copy eveything from the previous instance to the new instance as this breaks the rule oif Rust of having a single variable with same data. For this a clone() method is used.
let pro_langauge_rust = Language{
        name: String::from("Rust"),
        stable_version: 1.84,
        launched_year: 2012
    };
 let pro_langauge_java = Language{
        ..pro_langauge_rust
    };
Here all the data of the variable pro_langauge_rust is trying to copy to pro_langauge_java gives an error.
Use clone method
let pro_langauge_rust = Language{
        name: String::from("Rust"),
        stable_version: 1.84,
        launched_year: 2012
    };

    let pro_langauge_java = Language{
        ..pro_langauge_rust.clone()
    };

    println!("Programming language {} current version is {} and launched on {}",
    pro_langauge_rust.name,
    pro_langauge_rust.stable_version,
    pro_langauge_rust.launched_year);

    println!("Programming language is {:?}", pro_langauge_java);
Output
Programming language Rust current version is 1.84 and launched on 2012
Programming language is Language { name: "Rust", stable_version: 1.84, launched_year: 2012 }
Struct Methods
Subroutine associated with a struct and the first parameter is a reference to the struct instance. It is declared same as funciton using fn keyword.
In the below example the struct method is implemeted using imp keyword. The method takes the reference to the instance i.e. self. This method is called on the Struct instance in main block.
// Implementation of Struct
impl Language{
    fn get_name(&self) -> &str
    {
        &self.name
    }
}

fn main() {
    let pro_langauge_rust = Language{
        name: String::from("Rust"),
        stable_version: 1.84,
        launched_year: 2012
    };

    let pro_langauge_java = Language{
        ..pro_langauge_rust.clone()
    };

    let language_name = pro_langauge_rust.get_name();
    println!("Language name is {:?}", language_name);
}
Update the Struct instance
To update make the struct instance mutable with mut keyword. Implement the method to update in Struct implementaion.
See the update_version method and how is called from the main block
impl Language{
    fn get_name(&self) -> &str
    {
        &self.name
    }

    fn update_version(&mut self, version: f32){
        self.stable_version = version;
    }
}

 let mut pro_langauge_rust = Language{
        name: String::from("Rust"),
        stable_version: 1.84,
        launched_year: 2012
};

let language_name = pro_langauge_rust.get_name();
println!("Language name is {:?}", language_name);

pro_langauge_rust.update_version(1.85);
println!("Latest version {:?}", pro_langauge_rust.stable_version);
Output
Language name is "Rust"
Latest version 1.85
Associated Functions/Constructor
Functions associated with a struct data type. They are similar to methods but functions does not have a self input parameter. So we cannot use an associated function to reference the data from whithin a specific instance of a struct.
Mainly associated functions in Struct are used as a constructor to build a new instance of a Struct. See below example a new function with the name parameter and return the instance of Struct. The instance of Struct is created in main block.
impl Language{
    fn get_name(&self) -> &str
    {
        &self.name
    }

    fn update_version(&mut self, version: f32){
        self.stable_version = version;
    }

    fn new(name: &str) -> Language{
        Language { name: String::from(name), stable_version: 0.0, launched_year: 0000 }
    }
}

{
    let mut pro_langauge_rust = Language::new("Rust");

    let language_name = pro_langauge_rust.get_name();
    println!("Language name is {:?}", language_name);

    pro_langauge_rust.update_version(1.85);
    println!("Latest version {:?}", pro_langauge_rust.stable_version);
}
Output
Language name is "Rust"
Latest version 1.85
Tuple Structs
Tuple Structs – Store a collection of mixed data without named fields but just the datatype of the field. They are distinguished as a unique data type.
struct Color(u8,u8,u8);

{
    let color = Color(255,0,0,);
    println!("First value in tuple struct is {}", color.0);
}
Output
First value in tuple struct is 255 ![]()
Enum is a data type with mutiple possible variants. To declare an enum, write enum and use a code block with the options, separated by commas. These options are called as variants.
Define Enum
#[derive(Debug)]

enum PaymentStatus{
    Succeeded,
    Processing,
    Fail,
}
Main Block
fn main() {

    let payment_status = PaymentStatus::Processing;
    println!("Enum - {:?}", payment_status);
}
Output
Enum - ProcessingMatch Operator
Match operator compares a value to the series patterns to determine which code to execute.
fn main() {
     let payment_status = PaymentStatus::Processing;
    println!("Enum - {:?}", payment_status);

    //let status = {};
    match payment_status{
        PaymentStatus::Succeeded => println!("Payment compelte." ),
        PaymentStatus::Processing => println!("Payment processing."),
        PaymentStatus::Fail => println!("Payment failed! Please try again!"),
    }
}
Output
Enum - Processing
Payment processing.
Enum Methods
Enum methods are plaved in the enum implementation i.e. imp <<Enum>>
Here we use wild card case ie. _ or the default match case.
Similar to a switch statement, Match operator compares a given value to a series of patterns to determine which code to execute.
impl PaymentStatus {
    fn after_payment_action(&self) -> &str{
        match *self {
            PaymentStatus::Succeeded => "UpdateERP",
            PaymentStatus::Processing => "Wait",
            PaymentStatus::Fail => "Block",
            _ => "NoChange"
        }
    }
}

fn main() {

    let payment_status = PaymentStatus::Processing;
    println!("Enum - {:?}", payment_status);

    let action = payment_status.after_payment_action();

    println!("After payment request action --> {}", action )

}
Output
Enum - Processing
After payment request action --> Wait ![]()

Conditional Statement
An if expression is used to control which code gets executed based on conditions the program can evaluate at runtime.
Short hand to use if condition.
let y =true;
let x = if y {1} else {0};
println!("x is {}", x)
Output-
x is 1Loop
Rust provides a loop keyword to indicate an infinite loop. Unless stopped manually or with a break staement, loop can go infinitely.
Infinite loop example. Manually stop the program
let mut count=0;

loop{
   count += 1;
   println!("count is {}", count)
}
break keyword
Immediately exit the loop and continue execution forward. The break statement can be used to prematurely exit all types of loop constructs.
Here once loop is at 10 it breaks the loop and continues further execution
let mut count=0;

loop{
   if count == 10{
      println!("breaking the loop on count  {}", count);
      break;
    }
    count += 1;
    println!("count is {}", count);
}
println!("Continues execution.");
Output-
count is 1
count is 2
count is 3
count is 4
count is 5
count is 6
count is 7
count is 8
count is 9
count is 10
breaking the loop on count  10
Continues execution.
break with return
In the below code break can return the result or the reason the loop is stopped to the execution program.
let mut count=0;

let result = loop{
    if count == 10{
        println!("breaking the loop on count  {}", count);
        break count * 5
     }
     count += 1;
     println!("count is {}", count);
};

println!("Count result is - {} * 5 = {}", count, result);
Output-
count is 1
count is 2
count is 3
count is 4
count is 5
count is 6
count is 7
count is 8
count is 9
count is 10
breaking the loop on count  10
Count result is - 10 * 5 = 50
Predicate (while) loop
Predicate loop that repeats a block of code while the condition is true. Begins by evaluating a boolean condition and breaks/completes when the condition is false. A while-loop repeats a block of code while a condition is true.
Here break statement can be used to terminate the loop but it doesnot return the value as comapred to loop
let mut count=0;
while count < 5 {
   count += 1;
   println!("count is {}", count);
}
Output
count is 1
count is 2
count is 3
count is 4
count is 5
Iterator for loop
The for in construct can be used to iterate through an Iterator. One of the easiest ways to create an iterator is to use the range notation a..b. This yields values from a (inclusive) to b (exclusive) in steps of one.
For loops are mainly used to iterate over the items in a collection, and execute some code for each one so that you can process each item in the collection individually. If you need to repeat a block of code for a specific number of times that you know before starting the loop, you can use a ‘for’ loop to iterate over the range from zero to that value.
for n in 1..5{
   print!("{}\t", n)
}
loop 1..5, here 1 is inclusive while 5 is exclusive. Print! won;t print in new line.
Output
1 2 3 4user iter() methodto iterate over the list-
let message= ['r','u','s','t'];

for msg in message.iter(){
    print!("{}\t", msg)
}
Output-
r u s tIterator with index
At times apart from the element in the array or list and index is required. This can be achieved by using enumerate() method
let message= ['r','u','s','t'];

for (index,msg) in message.iter().enumerate(){
     println!("item {} is {}", index, msg)
}
Output-
item 0 is r
item 1 is u
item 2 is s
item 3 is t
Nested loops
Example here taking row and columns and printing those values in a nested loop i.e. for loop(rows) wthin for loop(columns)
let matrix = [[1,2,3],[10,20,30], [100,200,300]];

for row in matrix.iter(){
    for col in row.iter(){
        print!("{}\t", col);
     }
     println!();
}
Output-
All the columsn are printed in same line while row in new line.
variable.iter() is used to iterate between rows and columns
1       2       3
10      20      30
100     200     300
Modify the value in for loop using iter_mut()
Sometimes value in the collection needs to be updated. This can be done by iterating and updating the values. To do so use iter_mut() function as follows-
let mut matrix = [[1,2,3],[10,20,30], [100,200,300]];

for row in matrix.iter_mut(){
   for col in row.iter_mut(){
         *col += 5;
         print!("{}\t", col);
    }
    println!();
 }
Reference – https://dhghomon.github.io/easy_rust/Chapter_17.html
Notice here the iter_mut() method is used which give a reference to the mmeory allocated for the collection. In the next line *col is used to deference so that a addition operation can be performed.
Using * is called “dereferencing”.
Output-
6       7       8
15      25      35
105     205     305
Rust has two rules for mutable and immutable references. They are very important, but also easy to remember because they make sense.
![]()
This blog post will guide you through the local environment setup for XM Cloud. You may refer this documentation to do this your own way. Althoug the documentation covers most of the setup, this blog post provides visual on the steps and errors with the resolution.
Once the Foundation Head from Sitecore Labs is forked s(se more details here) clone the copy to the local machine for creating a local instance required for XM Cloud development.
Pre-requisite –
You can find the pre-requisite in this documentation. Ensure your machine has this before setting the local development environment. Just noting down here-
dotnet --version command).Also make sure you are using Docker v.2, as explained here.
Access to XM Cloud – This blog post assumes you have admin access to XM Cloud where you should be able to craete/update/delete projects environments and deployment in your organisation.
I have this ready on my machine.
1. Clone the forked Foundation head repo.
I named the folder same as the repo on my local machine i.e. xmcloud-foundation-head. the same will be refered thoruhg this post.
Will see the following folder structure after cloned.
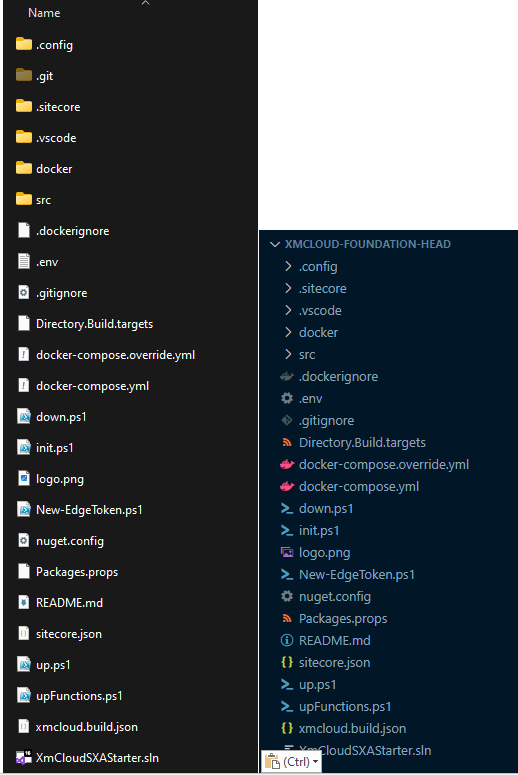
I use Visual Studio Code to make any environment related changes. You may use either Visual Studio 2022 or your choice of editor.
2. Open the .env at the root folder and you will see REPORTING_API_KEY, TELERIK_ENCRYPTION_KEY etc. empty.
3. Start the containers.
Prepare the environment
Before doing so make sure you stop the IIS and check if the port 443 (IIS Website) and 8984 (Solr service)is not used and the docker is running in Windows Containers mode. If not switch to Windows cotainers.
iisreset /stop
Get-Process -Id (Get-NetTCPConnection -LocalPort 443).OwningProcess
Get-Process -Id (Get-NetTCPConnection -LocalPort 8984).OwningProcess

Stop-Service -Name "<the name of your service>"
Copy the license file to c:\license folder. If you wish to have this in other folder you also have to change the HOST_LICENSE_FOLDER in .env(root folder) with the path where the license resides.

To prepare the Sitecore container environment, run the script init.ps1 from the root directory of the project along with the license path and desired passowrd for your instance. this form the root folder from the downloaded the repo.
.\init.ps1 -InitEnv -LicenseXmlPath "C:\license\license.xml" -AdminPassword "b"
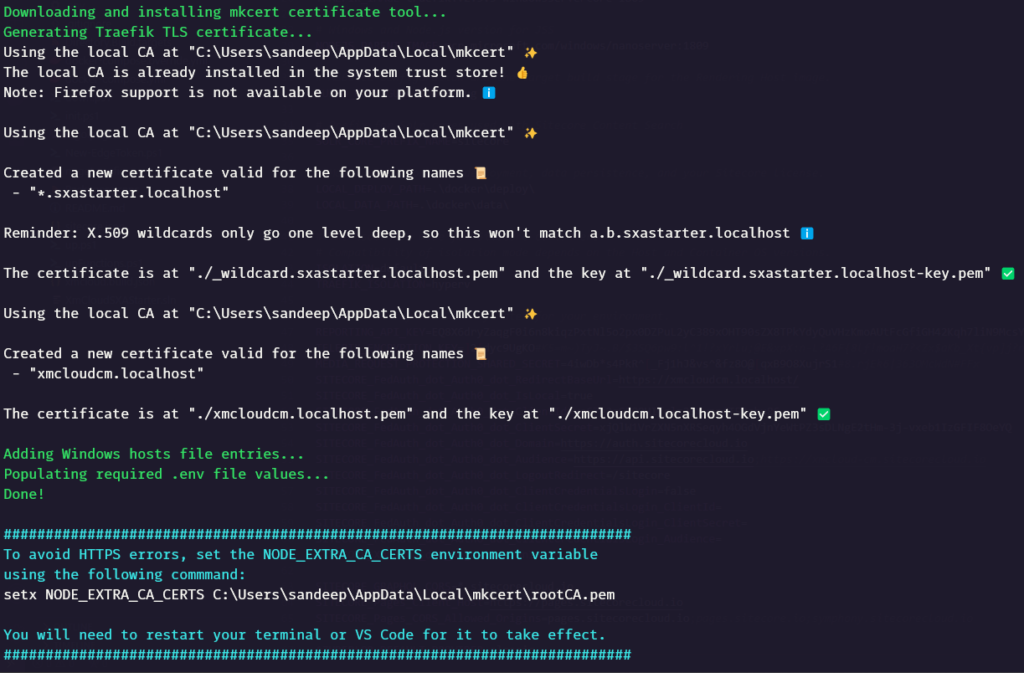
Required certificates added.
You may also noticed .env in root folder have added values in REPORTING_API_KEY, TELERIK_ENCRYPTION_KEY and MEDIA_REQUEST_PROTECTION_SHARED_SECRET, which was earlier empty.

Download the Sitecore Docker images, install and configure the containers and client application
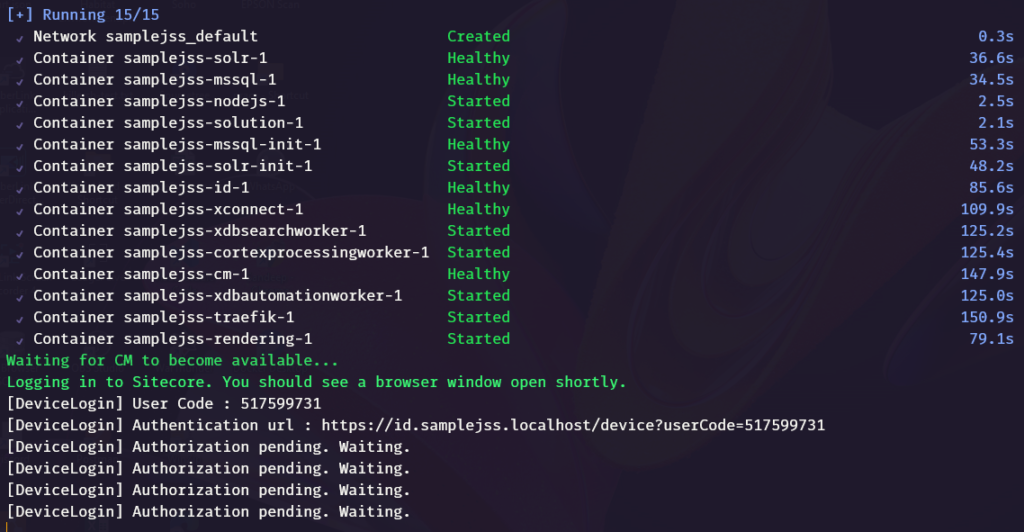
Run the up.ps1 to download and install containers and client application
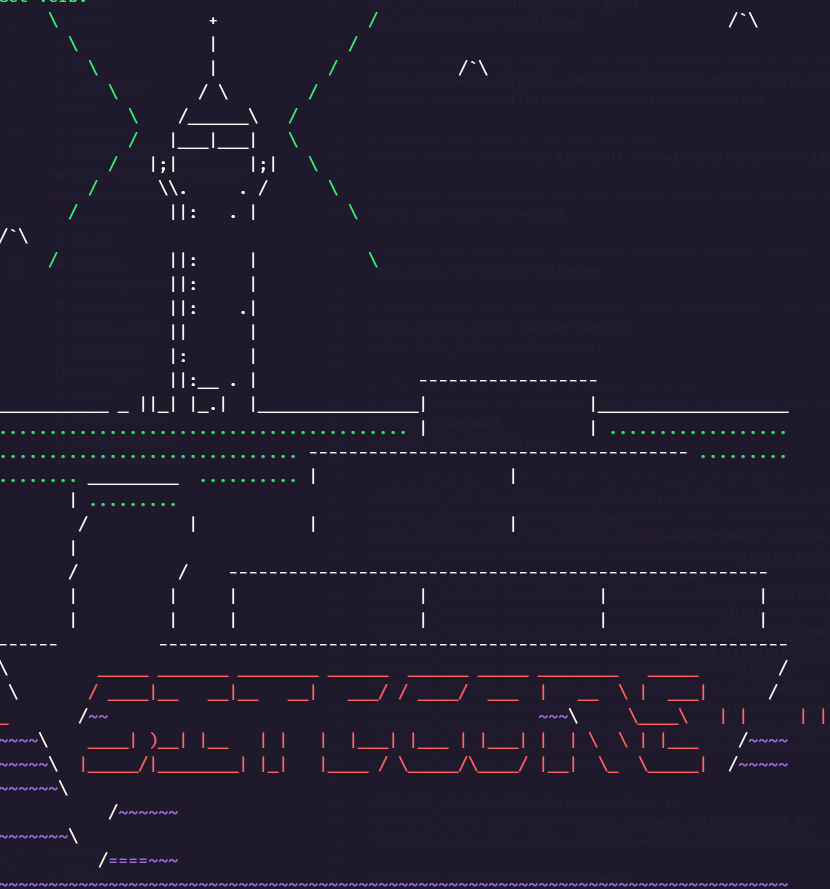
.\up.ps1This is should download the images and start the containers
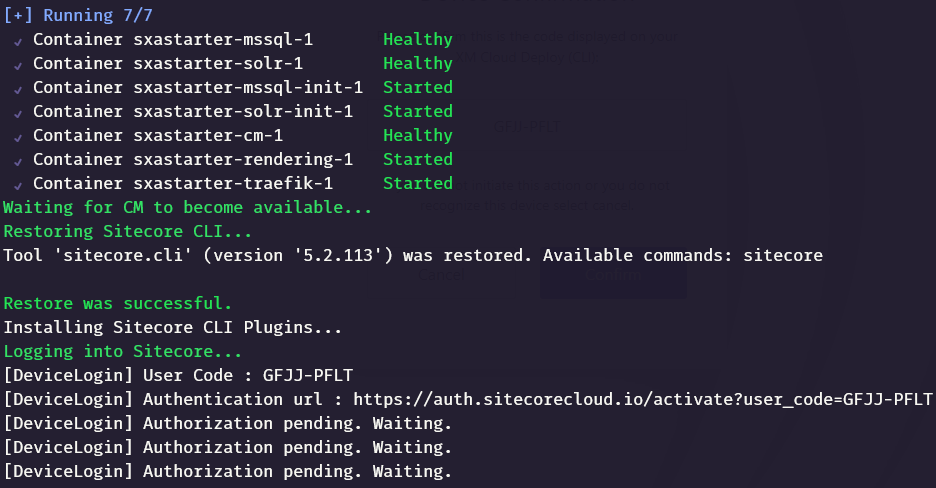
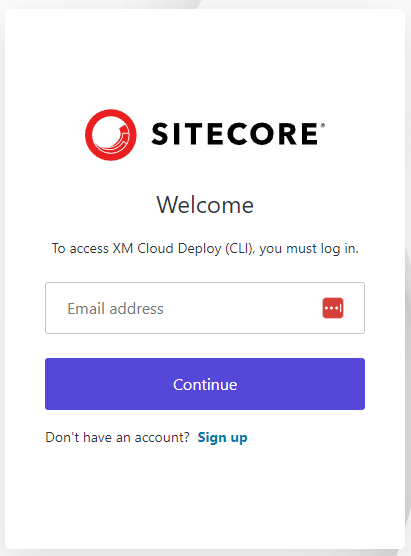
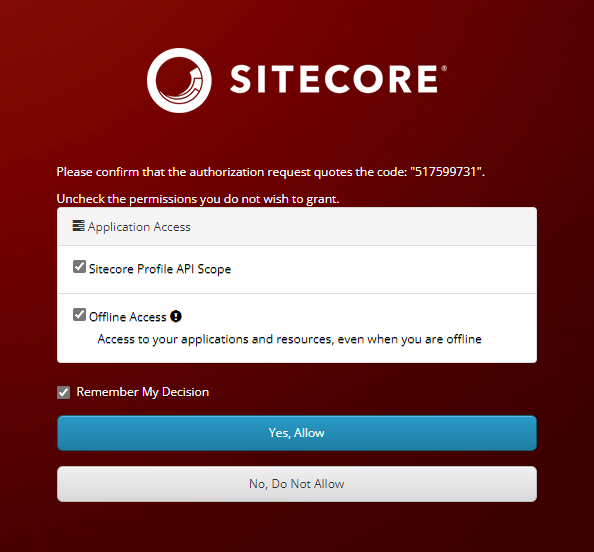
Once the containers are started, it should ask to confirm to login to Sitecore with the Device confirmation code. Confirm if this matches. It should also ask to login to XM Cloud isntance and confirm.


One this is done indexes will be rebuilt and the Sitecore instance should be up and running.
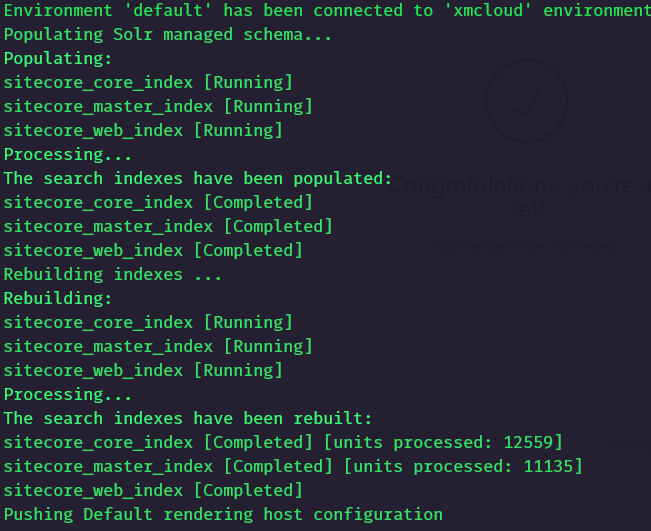
Also notice that any items in this case none is pushed to Sitecore instance and an api key is genereated with the name xmcloudpreview-

You may also notice a jss editing secret and SITECORE_API_KEY_xmcloudpreview are updated in .env fiel in root folder along with the Sitecore Admin password which was set whilst initialising the environment.


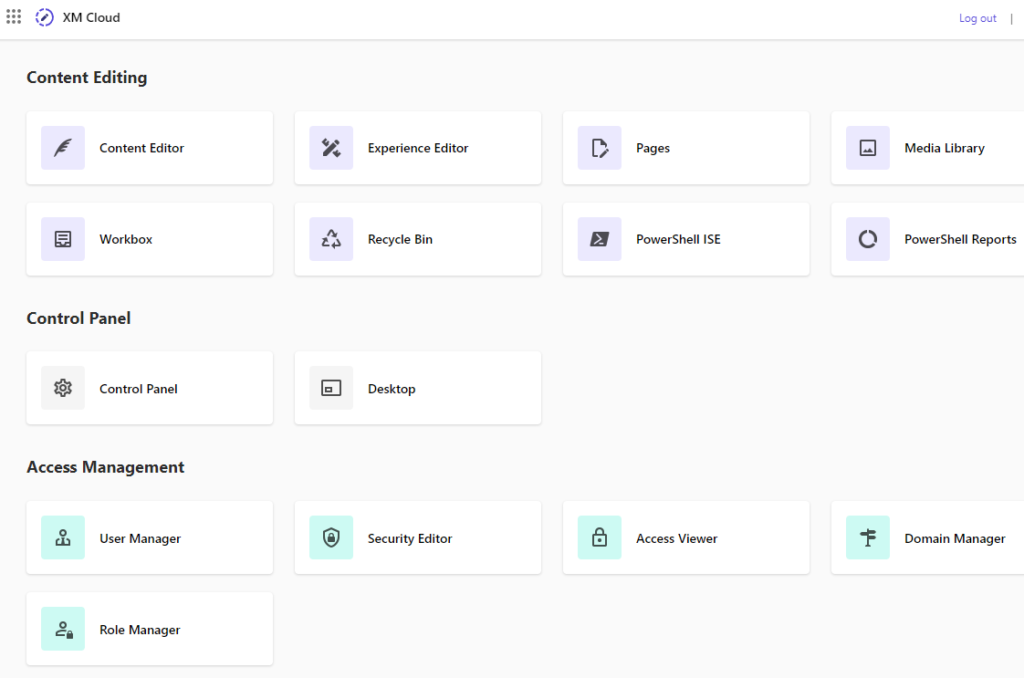
Your local instance should now be up and running-
https://xmcloudcm.localhost/sitecore/
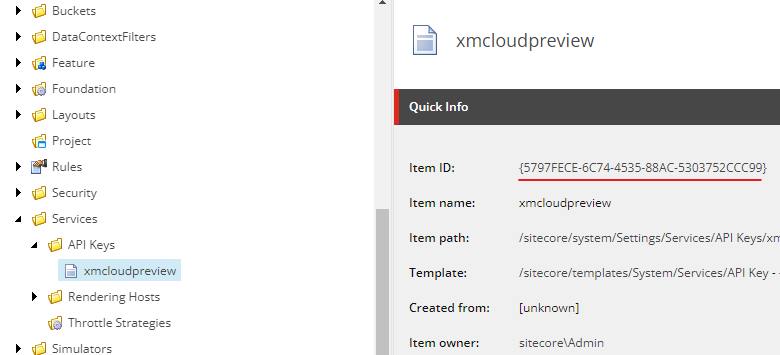
The highlighted key shoulld match the key while spinning up the containers.
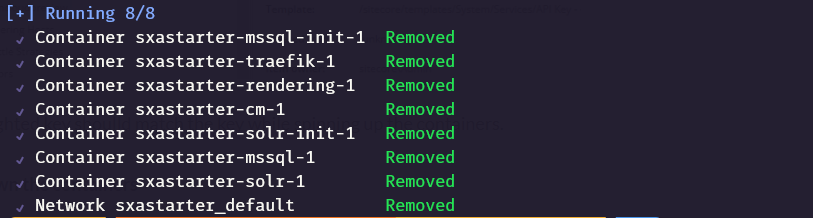
Taking down the containers
To take down the containers run the down.ps1 from the root folder.
.\down.ps1
Errors
Invoke-RestMethod : Unable to connect to the remote server
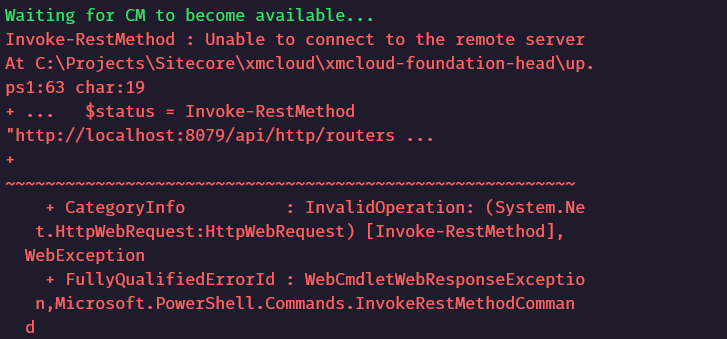
This should be ideally staright forward but if you see any issues whilst getting CM instance up and runing. take down the container with down.ps1 command and delete any docker network.
docker network prune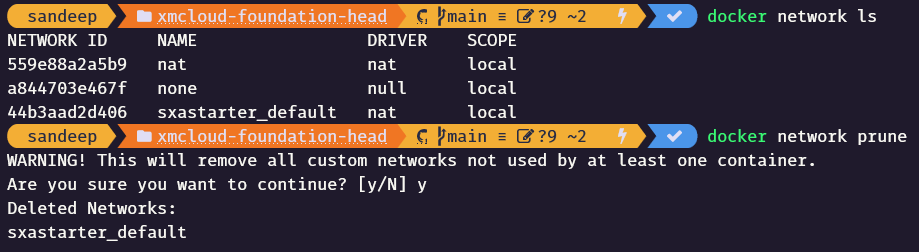
Hope this helps to setup local Sitecore instance for XM Cloud development.
![]()
Sitecore Webhooks allows to receive real-time notification about events to the web api that can handle these requests.
In this blog post will see how to debug such handlers in local environment, events triggered by XM Cloud or from the local instance using ngrok.
What is ngrok?
ngrok allows to connect external netwroks in a consistent, secure and repeatable manner without changing any network configurations.
Pre-requisite-
Sitecore Instance-
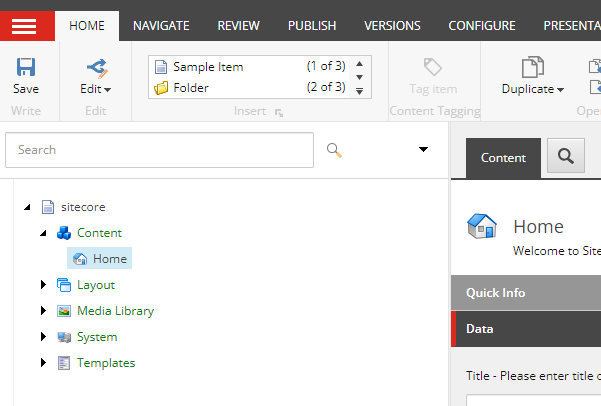
Either have a local Sitecore instance or XM Cloud instance. See how to setup local XM Cloud instance
Create a Webhook Handler(Web Api)
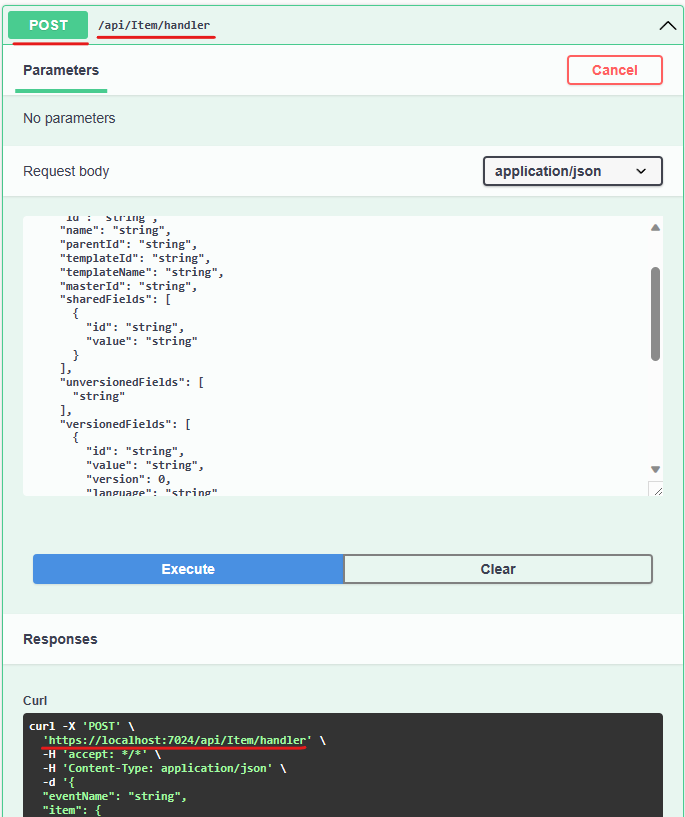
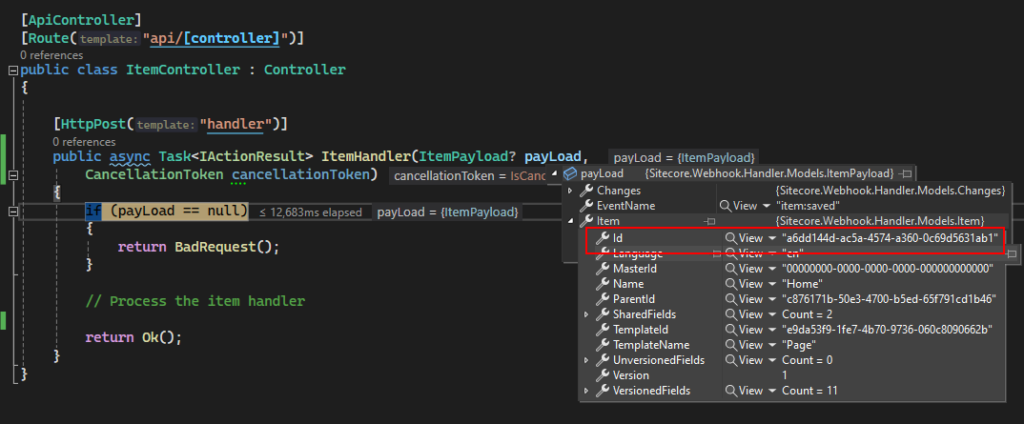
For this blog post I have created a simple Web Api with a endpoint /api/item/handler which receives POST requests with a Item payload and just return OK or Badrequest response.
We are going to create a Webhook with item:saved event in Sitecore.
using Microsoft.AspNetCore.Mvc;
using Sitecore.Webhook.Handler.Models;

namespace Sitecore.Webhook.Handler.Controllers;

[ApiController]
[Route("api/[controller]")]
public class ItemController : Controller
{
    [HttpPost("handler")]
    public async Task<IActionResult> ItemHandler(ItemPayload? payLoad,
        CancellationToken cancellationToken)
    {
        if (payLoad == null)
        {
            return BadRequest();
        }

        // Process the item handler
        return Ok();
    }
}
When I run this from VS the endpoint listens on the port 7024 for me.
Host Name:- https://localhost:7024/
Endpoint: /api/item/handler
Install ngrok on dev machine
Use choclatey to install ngrok on local machine
choco install ngrokCheck the ngrok once installed
ngrok -vIMP– Antivirus might block executing the ngrok. For me I had to turn off the real time scan. Do this at your own risk based on your antivirus software this might be different.
Execute ngrok http command to listen to the api endpoint-
ngrok http --host-header="localhost:7024" https://localhost:7024
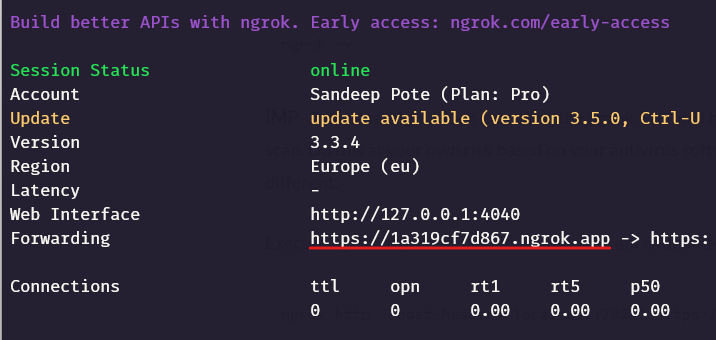
In this example https://1a319cf7d867.ngrok.app should forward request’s to https://localhost:7024 where the Web Api is running on my local machine.
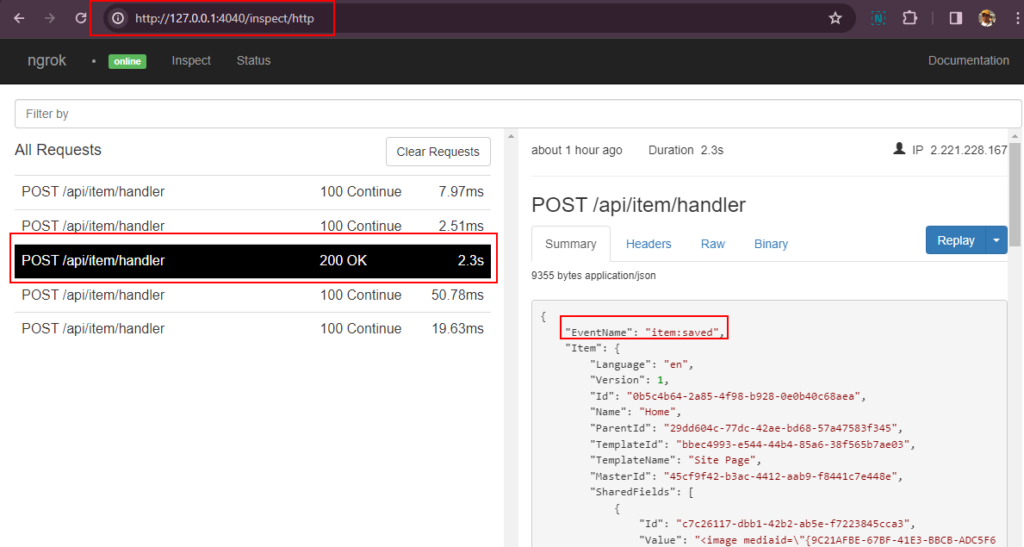
Also note the Web Interface – http://127.0.0.1:4040/
Create a Webhook Handler
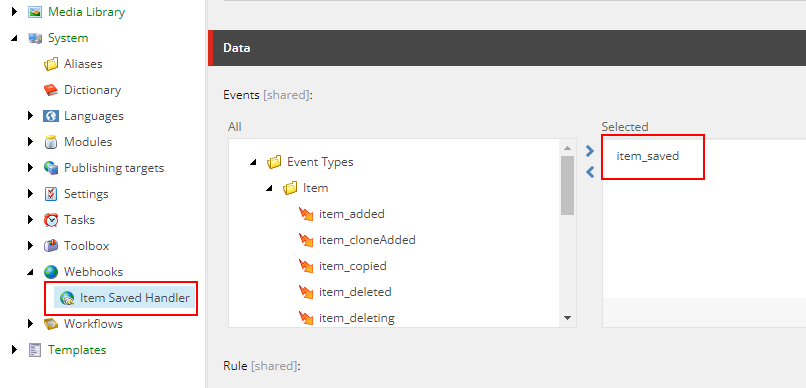
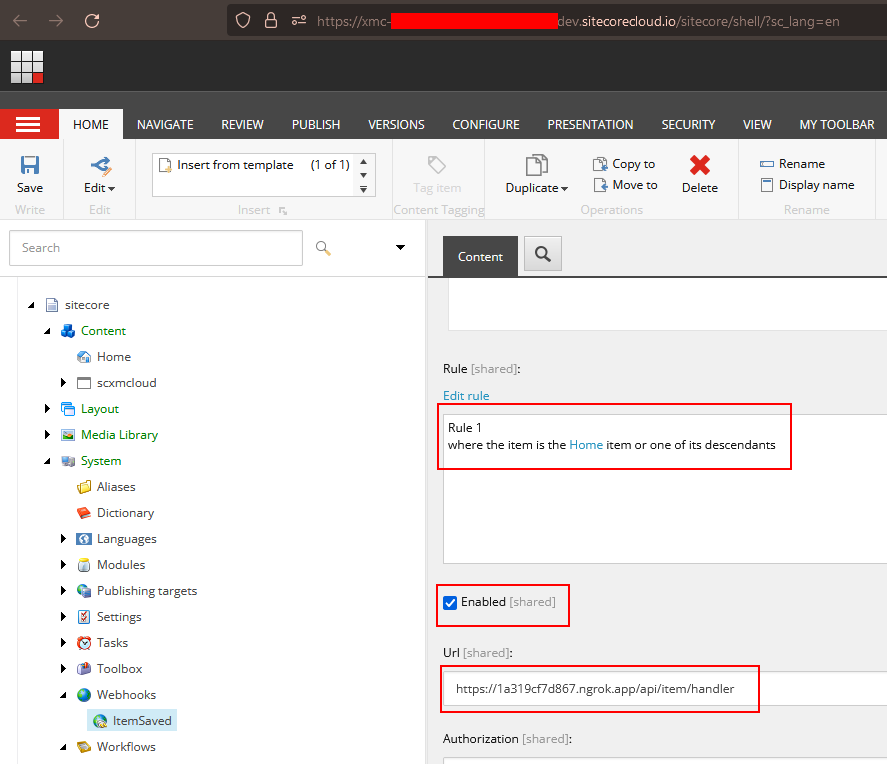
Navigate to /sitecore/system/Webhooks and create a webhook handler. In this case will create a item:saved handler.
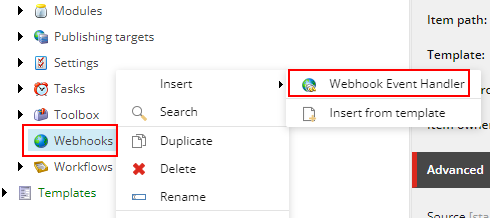
In the newly created handler select the event the webhook should trigger and call the endpoint created by nrgok (i.e. web api)
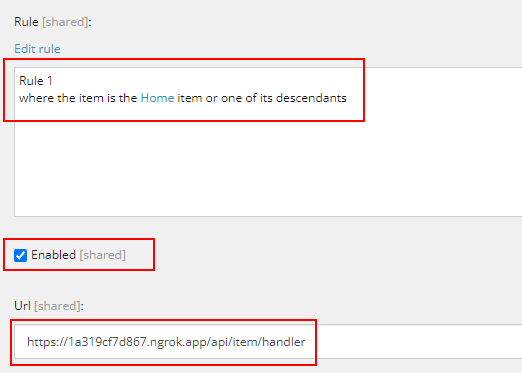
Setup the rule – “where the item is the Home item or onle of its descendants”
Means Home or any of its child items when saved this event will be triggered.
Also setup the Url the webhook should call when this event fires.
IMP – Ensure the handler is enabled or it won’t fire the event.
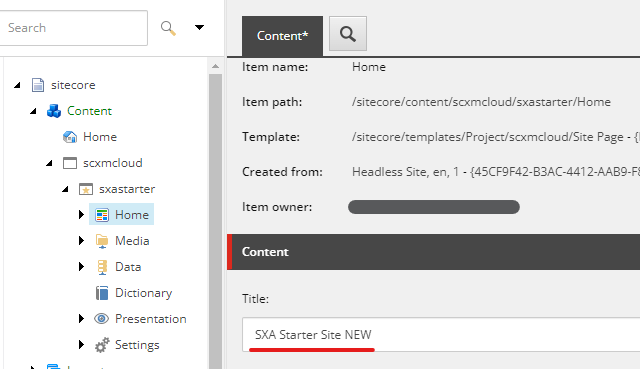
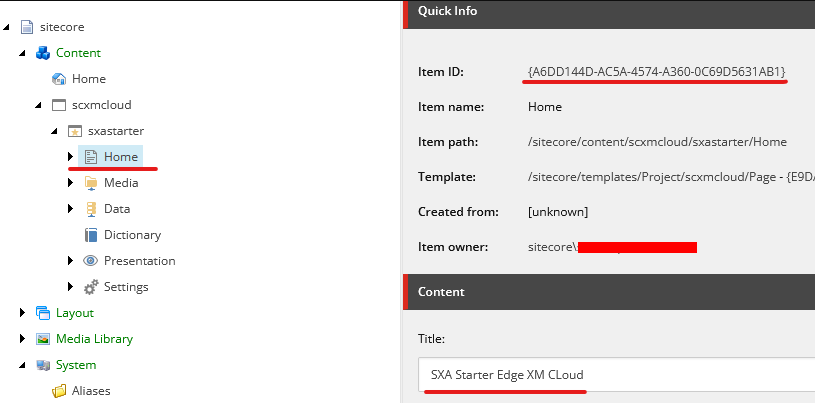
Save the Home or any of its child to fire the event
I changed a field in Home item and Saved the item-
Ensure your Web Api solution is running in debug mode.
And now you should be able to debug, inspect and test the handler. This was done in local Sitecore instance but can also be done in XM Cloud.
ngrok helps to forward the requests to the localy hosted web api running in debug mode.

Now you can handle what should happen on item:saved event.
XM Cloud
I did the same process in XM Cloud-
Updated the Home item and Saved. Note the item id
The event is fired and web api in my local machine is called-
Also the ngrok also shows the calls it is listening.
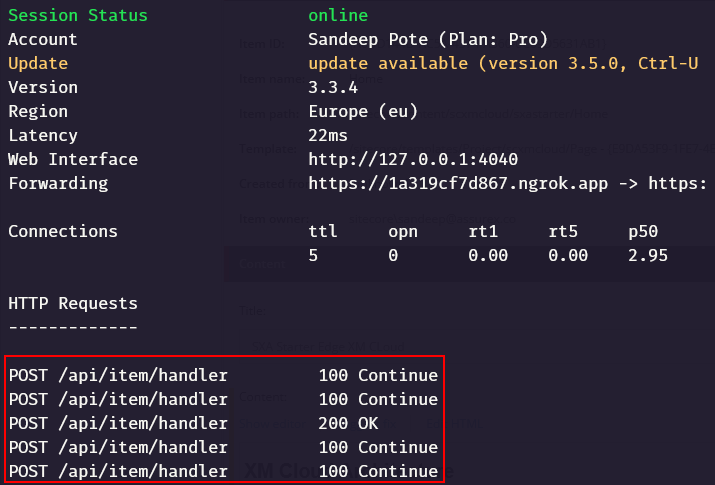
Web interface should also show the request and payload details-
Hope this helps debuging your Webhook requests fired from Sitecore local or XM Cloud.
If you want to see the webhook payload and perform further actions, like sending mails etc there are online tools availabl e-
Hope this helps.
![]()
This is first part for setting up the XM Cloud local environment. As a part of this we will first fork the foundation template from reporsitory. This will help you setup sitecore local instance and head your own copy without affecting the Foundation head from Sitecore labs. Note this repo keeps updating and the steps below may differ after any updates.
This post refers following documentation is you want to do your own way-
Fork the XM Cloud Foundation Template source for initial deployment from following git repo-
To fork the same you need to have first have git account.
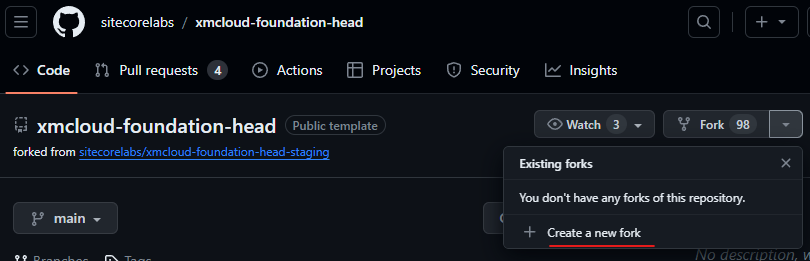
Follow the steps to fork the source code- https://github.com/sitecorelabs/xmcloud-foundation-head
Create a new fork –
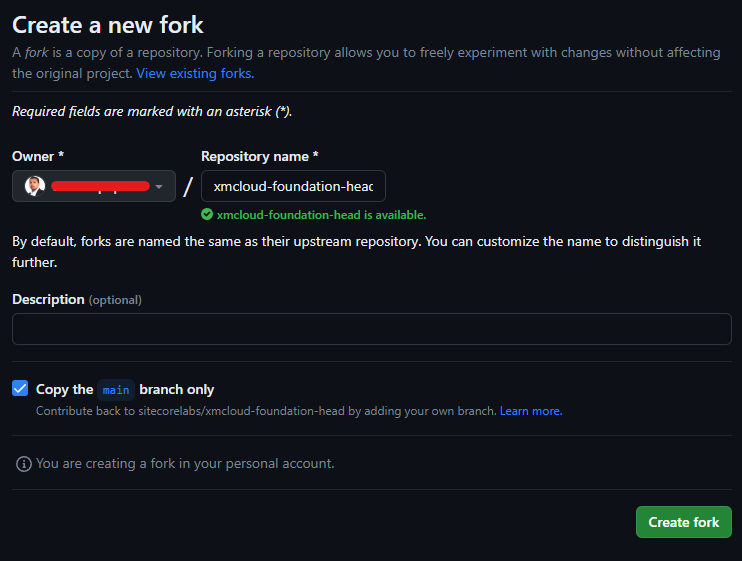
Provide a valid repo name and create fork-
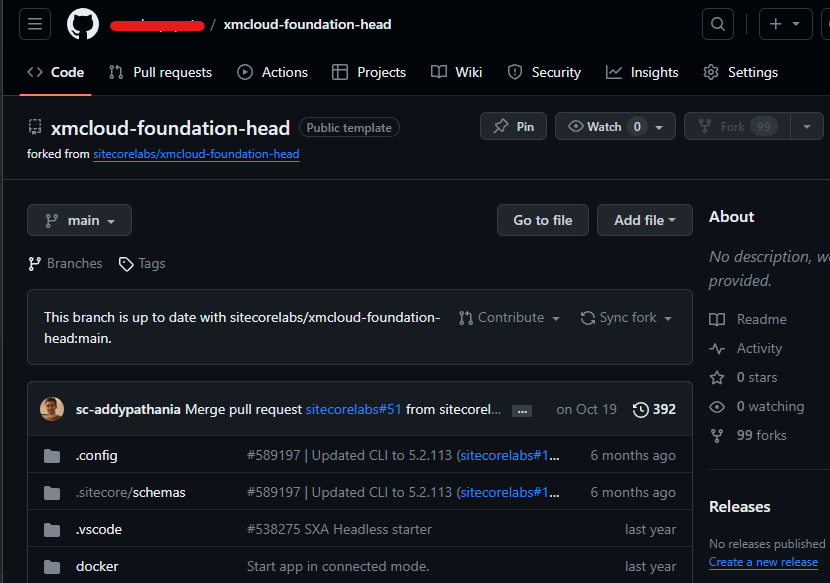
You should now a have a main branch forked in your account-
Follow steps in this link —
Following are thre pre-requisite for setting on your local machine-
dotnet --version command).Apart from this also install Sitecore JSS CLI-
npm install -g @sitecore-jss/sitecore-jss-cliInstall the template
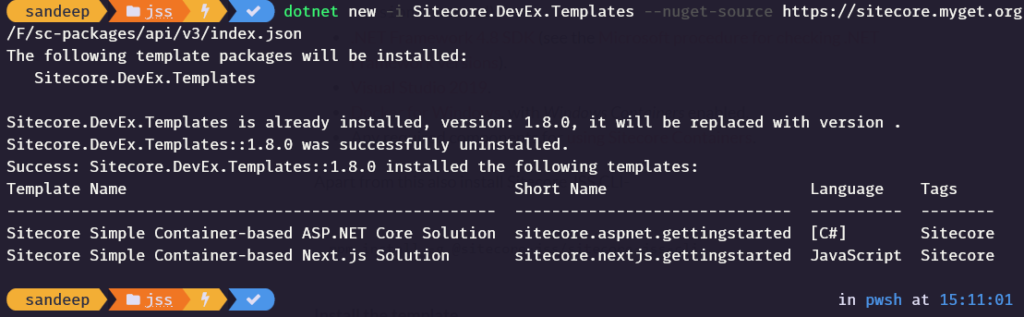
dotnet new -i Sitecore.DevEx.Templates --nuget-source https://sitecore.myget.org/F/sc-packages/api/v3/index.json
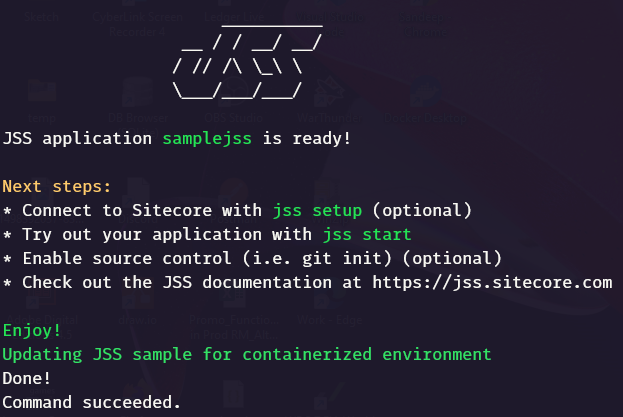
dotnet new sitecore.nextjs.gettingstarted -n samplejssShould first Restores dotnet local tools for the solution and Initializes the JSS project
What is your Sitecore hostname (used if deployed to Sitecore)? (samplejss.dev.local) << leave blank or provide the host name>>

How would you like to fetch Layout and Dictionary data?
GraphQL
REST

How would you like to prerender your application?
SSG
SSR

Which additional language do you want to support (en is already included and required)? << leave blank or type the language you want. should select da-DK by default and additional language>>
JSS application is now ready and updated for continerized environment.
Navigate to project folder and initialize the environment.
.\init.ps1 -InitEnv -LicenseXmlPath "<C:\path\to\license.xml>" -AdminPassword "<desired password>"

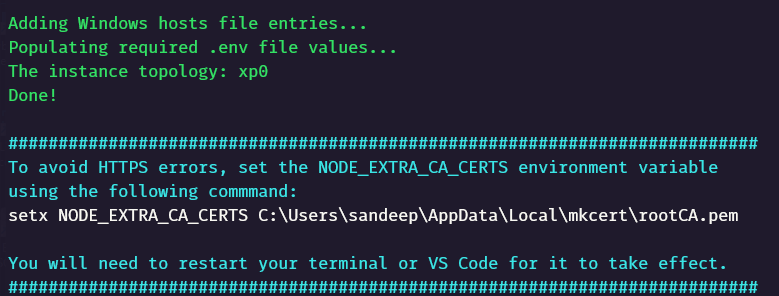
setx NODE_EXTRA_CA_CERTS C:\Users\sandeep\AppData\Local\mkcert\rootCA.pemExecute up.ps1 to create containers-
.\up.ps1Error-
CM is not coming up-
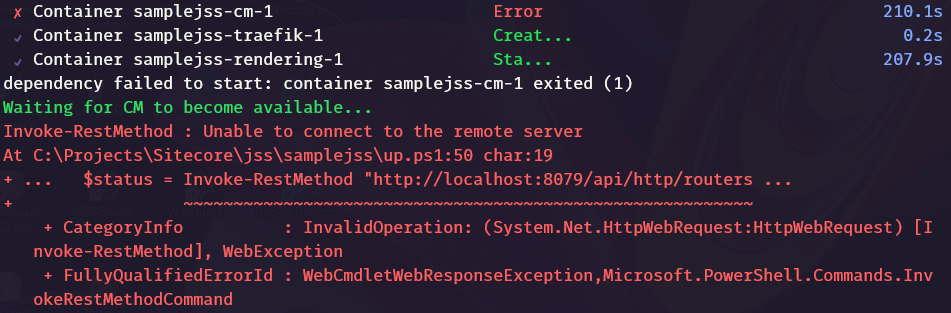
Checked the docker logs, and found this error-
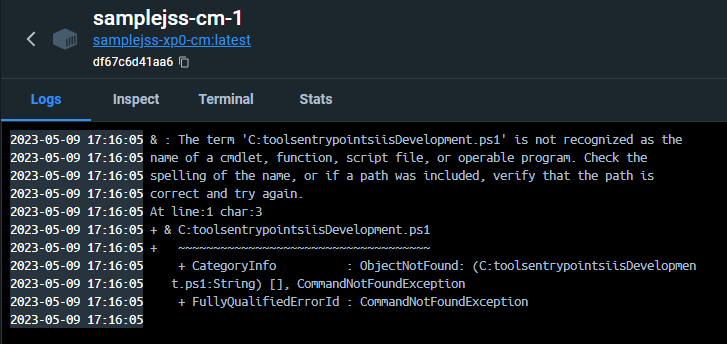
The path is not set correctly. Need to escape the characters-
Resolution-
Change – entrypoint: powershell.exe -Command “& C:\tools\entrypoints\iis\Development.ps1” to entrypoint: powershell.exe -Command “& C:\\tools\\entrypoints\\iis\\Development.ps1” in docker-compose.override.yml file for xm1, xp0 and xp1
Take down all the containers and build again.
Now this should look fine-
Enter CM admin credentials and allow the access-
CM and App should load –
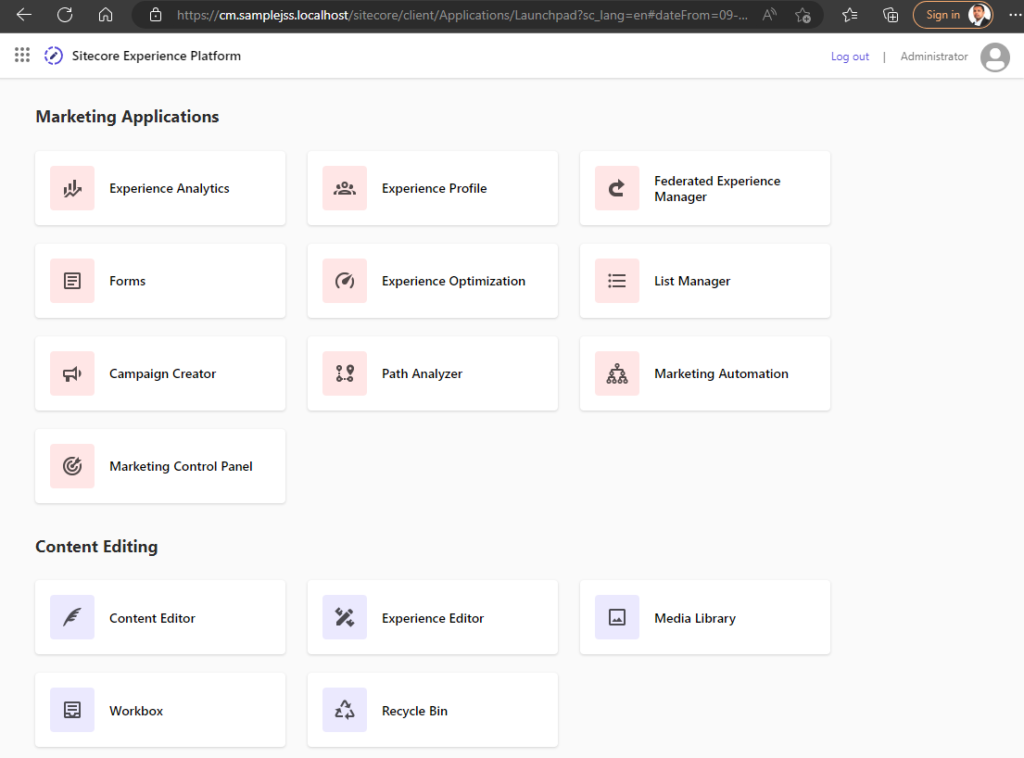

As of writing this post, this setup installed Sitecore 10.3.
![]()

In my previous post we saw how to create a simple rendering with data source.
For creating rendering using content resolver first follow the blog <<enter blog url here>>
Content resolvers help provice more complex data beyond the serialization of a component data source.
In this blog will list all the Articles on the page which are marked as Featured Article.
The custom logic for filtering will go in Content resolver.
Craete a project for Content Resolver(.net framework 4.8) . This framework is used just to follow with the exisitng content resolvers provided by Helix Examples Solution.
Content Resolver Project (BasicCompany.Feature.Articles.Platform)
Create a new .Net Framework project
Instead of creating new poroject I will copy the project from Navigation/Platform folder and rename it to BasicCompany.Feature.Articles.Platform.
Delete all the files from this project as it relates to Navigation. You may also want to change the AssemblyName and the AssemblyInfo file.
Create Models for Articles and Article
Create Models Folder and add below models
Articles.cs
using Sitecore.Data.Items;
using System.Collections.Generic;

namespace BasicCompany.Feature.Articles.Models
{
    public class Articles
    {
        public Item ArticlesPage { get; set; }

        public IList<Article> ArticleItems { get; set; }
    }
}
Article.cs
using Sitecore.Data.Items;

namespace BasicCompany.Feature.Articles.Models
{
    public class Article
    {
        public Item Item { get; set; }

        public Item ItemData { get; set; }
        public string Url { get; set; }
    }
}
Create Service for ArticleBuilder and ArticleRootResolver
Create a new folder Services and following-
//IArticleBuilder
 public interface IArticleBuilder
    {
        Articles.Models.Articles GetArticles(Item contextItem);
    }
//ArticleBuilder

 public class ArticleBuilder : IArticleBuilder
    {
        private readonly IArticleRootResolver _articleRootResolver;
        private readonly BaseLinkManager _linkManager;

        public ArticleBuilder(BaseLinkManager linkManager, IArticleRootResolver articleRootResolver)
        {
            _articleRootResolver = articleRootResolver;
            _linkManager = linkManager;
        }

        public Articles.Models.Articles GetArticles(Item contextItem)
        {
            var articleRoot = _articleRootResolver.GetArticleRoot(contextItem);
            if (articleRoot == null)
            {
                return new Articles.Models.Articles();
            }

            return new Articles.Models.Articles()
            {
                ArticlesPage = articleRoot,
                ArticleItems = GetArticleItems(articleRoot, contextItem)
            };
        }

        private IList<Article> GetArticleItems(Item articleRoot, Item contextItem)
        {
            var items = new List<Item>();

            items.AddRange(articleRoot.Children.Where(item => item.DescendsFrom(Templates.ArticleItem.Id)));

            var articleItems = items.Select(item => new Article()
            {
                Item = item,
                ItemData = item.Axes.GetDescendants().FirstOrDefault(itemData => itemData.DescendsFrom(Templates.ArticleItemData.Id)),
                Url = _linkManager.GetItemUrl(item)
            }).ToList();

            return articleItems;
        }
    }
//IArticleRootResolver
public interface IArticleRootResolver
{
Item GetArticleRoot(Item contextItem);
}
namespace BasicCompany.Feature.Articles.Services
{
public class ArticleRootResolver : IArticleRootResolver
{
public Item GetArticleRoot(Item contextItem)
{
if (contextItem == null)
{
return null;
}
return contextItem.DescendsFrom(Templates.ArticleRoot.Id)
? contextItem
: contextItem.Axes.GetAncestors().LastOrDefault(x => x.DescendsFrom(Templates.ArticleRoot.Id));
}
}
}Create Layout Service i.e. content resolver class
Create new folder LayoutServices and add following-
namespace BasicCompany.Feature.Articles.LayoutService
{
    public class ArticleContentResolver : Sitecore.LayoutService.ItemRendering.ContentsResolvers.RenderingContentsResolver
    {
        private readonly IArticleBuilder _articleBuilder;

        public ArticleContentResolver(IArticleBuilder articleBuilder)
        {
            _articleBuilder = articleBuilder;
        }

        public override object ResolveContents(Rendering rendering, IRenderingConfiguration renderingConfig)
        {
            var articles = _articleBuilder.GetArticles(this.GetContextItem(rendering, renderingConfig));

            var contents = new
            {
                ArticleItems = articles.ArticleItems.Select(item => new
                {
                    Item = item.Item,
                    ItemData = item.ItemData,
                    Serialized = base.ProcessItem(item.ItemData, rendering, renderingConfig)
                }).Select(article => new
                {
                    Url = LinkManager.GetItemUrl(article.Item),
                    Id = article.Item.ID,
                    Fields = new
                    {
                        Title = article.Serialized[article.ItemData.Fields["Title"].Name],
                        Description = article.Serialized[article.ItemData.Fields["Description"].Name],
                        ShortDescription = article.Serialized[article.ItemData.Fields["ShortDescription"].Name],
                    }
                })
            };

            return contents;
        }
    }
}
Create Service Configurator to register the services-
namespace BasicCompany.Feature.Articles
{
    public class ServicesConfigurator : IServicesConfigurator
    {
        public void Configure(IServiceCollection serviceCollection)
        {
            serviceCollection.AddTransient<Services.IArticleBuilder, Services.ArticleBuilder>();
            serviceCollection.AddTransient<Services.IArticleRootResolver, Services.ArticleRootResolver>();
        }
    }
}
Create Template Class
Change the Item ID’s as per your Sitecore Instance
namespace BasicCompany.Feature.Articles
{
  public static class Templates
  {
        public static class ArticleItem
        {
            public static readonly ID Id = new ID("{EE5CE126-890D-4F01-9DD5-3D81FC397A91}"); //
        }

        public static class ArticleItemData
        {
            public static readonly ID Id = new ID("{8AA19CA1-99A6-4588-B1D7-3FA9A8F6756A}"); //
        }

        public static class ArticleRoot
        {
            public static readonly ID Id = new ID("{A46A11C6-C7F9-4F61-BF0C-FFF060F0FECC}"); //
        }
  }
}
Create App Config to register the ServiceConfigurator-
Create Feature.Articles.config file in App_Config/Include/Feature folder
<?xml version="1.0"?>

<configuration xmlns:patch="http://www.sitecore.net/xmlconfig/">
  <sitecore>
    <services>
      <configurator type="BasicCompany.Feature.Navigation.ServicesConfigurator, BasicCompany.Feature.Navigation" />
    </services>
  </sitecore>
</configuration>
Create Templates for Article
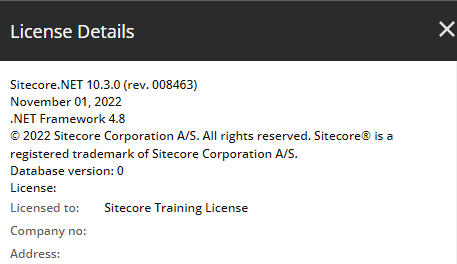
These templates are used to indicate the different level s of Article. i..e Article Page- will inherit from _ArticleRoot, ArticlePage will inherit from _ArticleItem and Article Content will inherit from _ArticleItemData
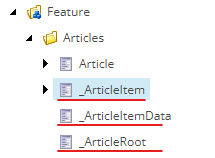
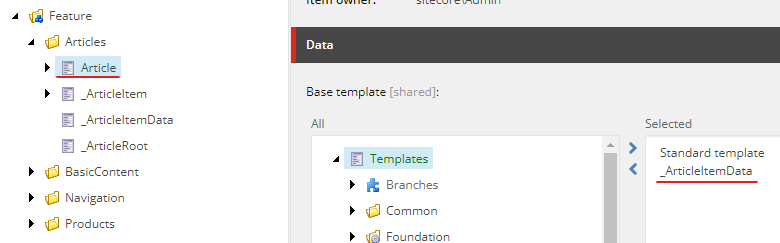
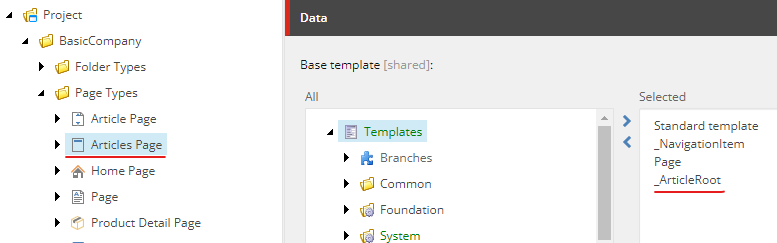
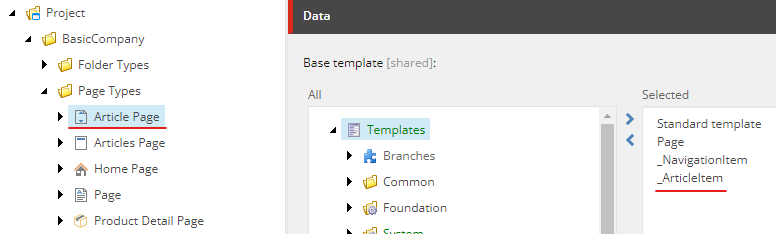
Sitecore Items
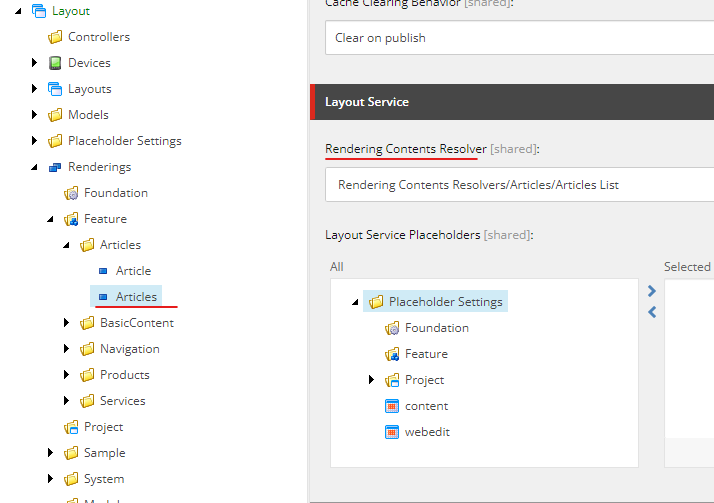
Create Rendering Content Resolver
Create a New “Rendering Contents Resolvers Folder” in /sitecore/system/Modules/Layout Service
Craete a New “Rendering Contents Resolver” in this folder.
Provide the type – BasicCompany.Feature.Articles.LayoutService.ArticleContentResolver, BasicCompany.Feature.Articles

Create Articles Json Rendering
Craete a neJson rendering name “Articles” and newly created content resolver in the “Rendering Contents Resolver” field.
Add the new rendering to the page
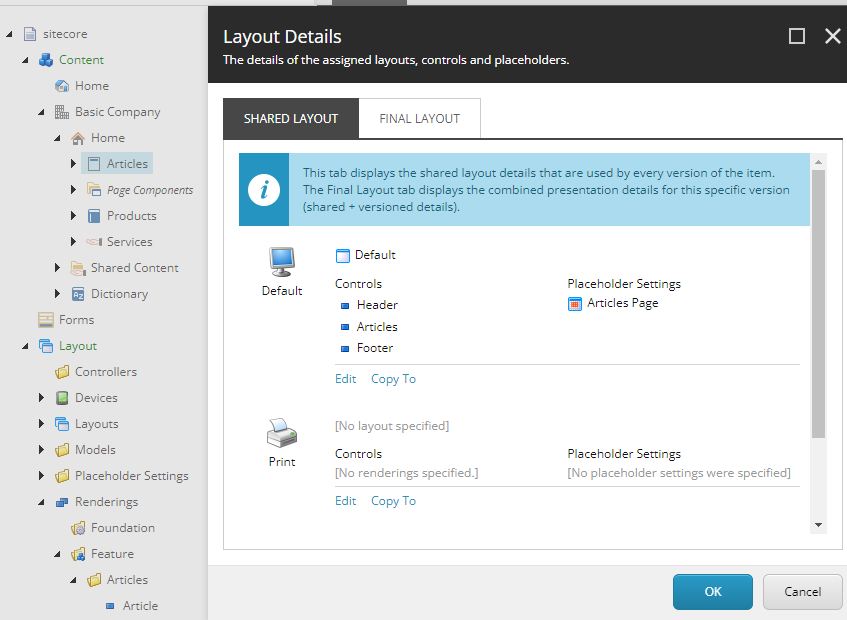
Publish items
Rendering Project
Create Models Articles.cs
using Sitecore.AspNet.RenderingEngine.Binding.Attributes;
using Sitecore.LayoutService.Client.Response.Model.Fields;

namespace BasicCompany.Feature.Articles.Models
{
    public class Articles
    {
        [SitecoreComponentField]
        public ContentListField<Article> ArticleItems { get; set; }
    }
}
Create new view Articles.cshtml in /Views/Shared/Components/SitecoreComponent
@using Sitecore.AspNet.RenderingEngine.Extensions
@model BasicCompany.Feature.Articles.Models.Articles


<div class="container">
    <div class="product-list-columns columns is-multiline">
        @foreach (var article in Model.ArticleItems)
        {
            <partial name="_ArticleList" model="article" />
        }
    </div>
</div>
Create _ArticleList.cshtml in Views/Shared folder
Note its using ItemLinkField
@model ItemLinkField<Article>

<a href="@Model.Url" class="column product-list-column is-4-desktop is-6-tablet">
    <div class="card">
        <div class="card-content">
            <div class="content">
                <h4 asp-for="@Model.Fields.Title"></h4>
                <p asp-for="@Model.Fields.ShortDescription"></p>
            </div>
        </div>
    </div>
</a>
Update the RenderingEngineOptionsExtensions
namespace BasicCompany.Feature.Articles.Extensions
{
    public  static class RenderingEngineOptionsExtensions
    {
        public static RenderingEngineOptions AddFeatureArticle(this RenderingEngineOptions options)
        {
            options

                .AddModelBoundView<Article>("Article")
                .AddModelBoundView<Models.Articles>("Articles");
            return options;
        }
    }
}
Update Articles.modules.json to serialiaze content resolver
{
  "namespace": "Feature.Articles",
  "items": {
    "includes": [
      {
        "name": "templates",
        "path": "/sitecore/templates/Feature/Articles"
      },
      {
        "name": "renderings",
        "path": "/sitecore/layout/Renderings/Feature/Articles"
      },
      {
        "name": "contents-resolvers",
        "path": "/sitecore/system/Modules/Layout Service/Rendering Contents Resolvers/Articles"
      }
    ]
  }
}
IMP – Ensure the Startup.cs has AddFeatureArticle() added in AddSitecoreRenderingEngine
Output–
List of Articles-
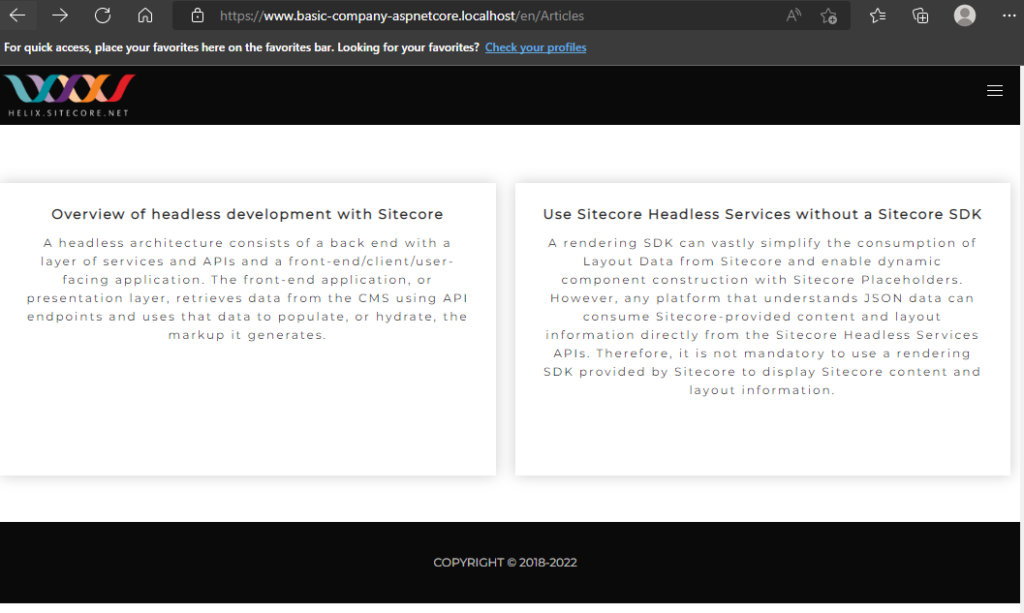
When we click on any of the Article take to the Article page-
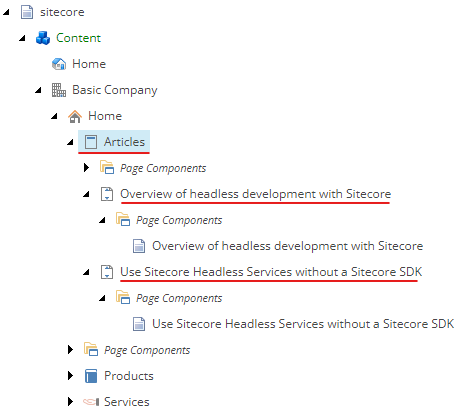
The above pages are shown as per this structure in Sitecore