Welcome! This is my personal blog about Web technologies, software development, open source and other related topics
The ideas and opinions expressed here are solely mine and don't represent those of others, either individuals or companies.The code snippets or references to software products or analogous are to be used without any warranty of any kind. If you enjoy the content, feel free to share it and re-use it as long as you provide a link to the original post.
The deployment of SXA has been removed from the Commerce installation, and instead installed as a Platform pre-requisite before installing Commerce packages.
13. [Optional] Update Sitecore domain or keep it default
$SitecoreDomain
$SitecoreUsername
$SitecoreUserPassword
$UserName
$UserPassword
14. Update other DB related settings
$SqlUser
$SqlPass
$SitecoreDbServer
$CommerceServicesDbServer
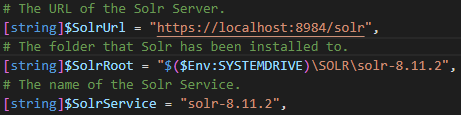
15. Update SOLR details-
$SolrUrl
$SolrRoot
$SolrService
Execute .\Deploy-Sitecore-Commerce.ps1
.\Deploy-Sitecore-Commerce.ps1
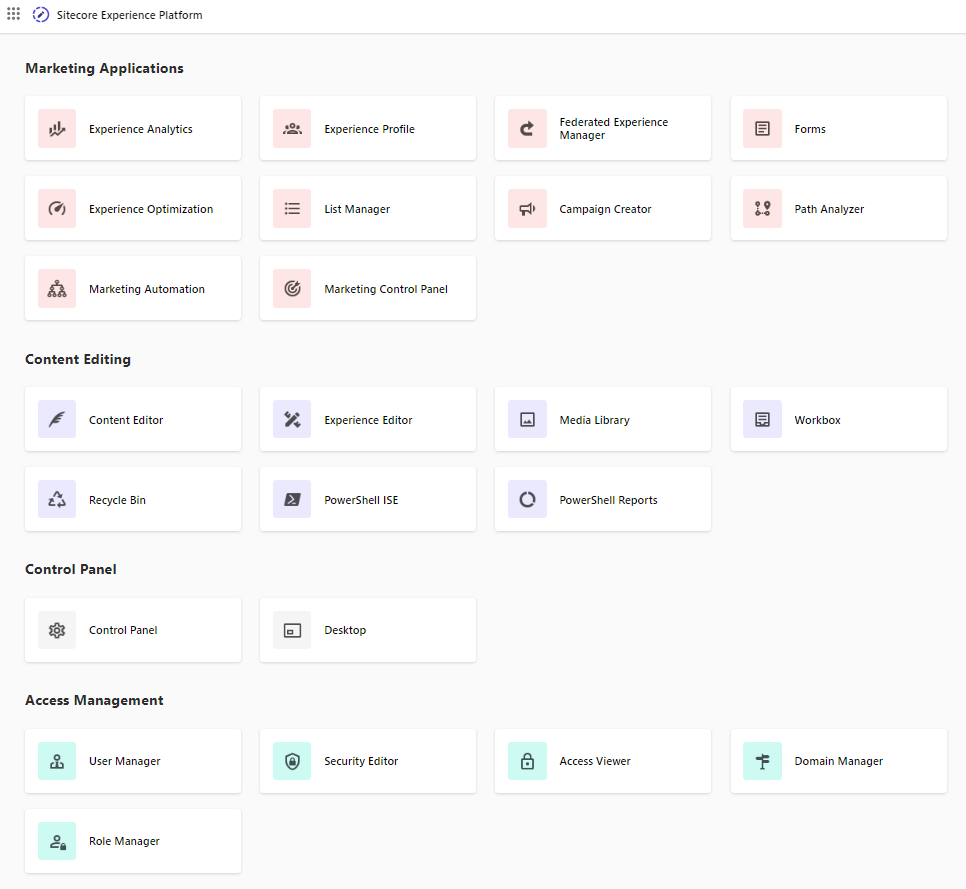
Storefront-
Business Tools-
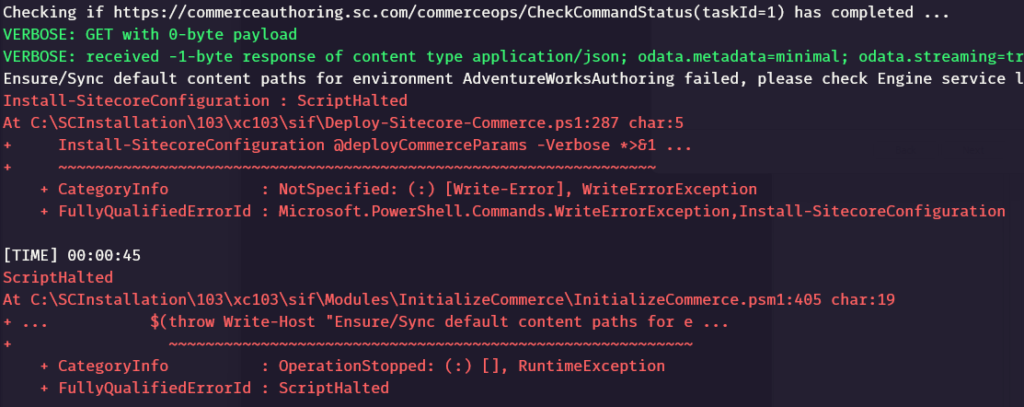
Highly recommended to install commerce on fresh VM or machine that don’t have previously installed Sitecore Commerce to avoid any errors during isntallation. If not then below are few of the errors you might see during installation.
00038 10:12:17 ERROR Management.block.getitembypath: Sitecore Item Service Get item failed, Item /sitecore/Commerce/Commerce Control Panel/Commerce Engine Settings/Commerce Terms/System Messages/ContentPathAlreadyExists not found.
Solution- see here – https://robearlam.com/blog/CtxMsg-Error-ContentPathAlreadyExists-error
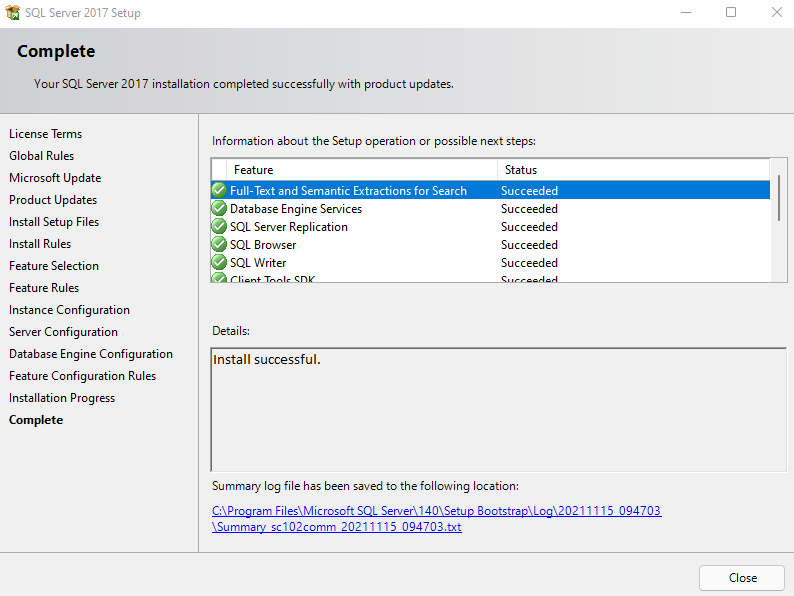
Most of the organisation now want to setup their development environment using docker but if you are currently not considering contanerisation this blog will help you install the Sitecore 10.3 in your local machine.
To install XP Single Developer(XP0) 10.3 on development machine, follow the steps in this blog post
Use the Sitecore Installation Guide for hardware, OS, database and other software requirements
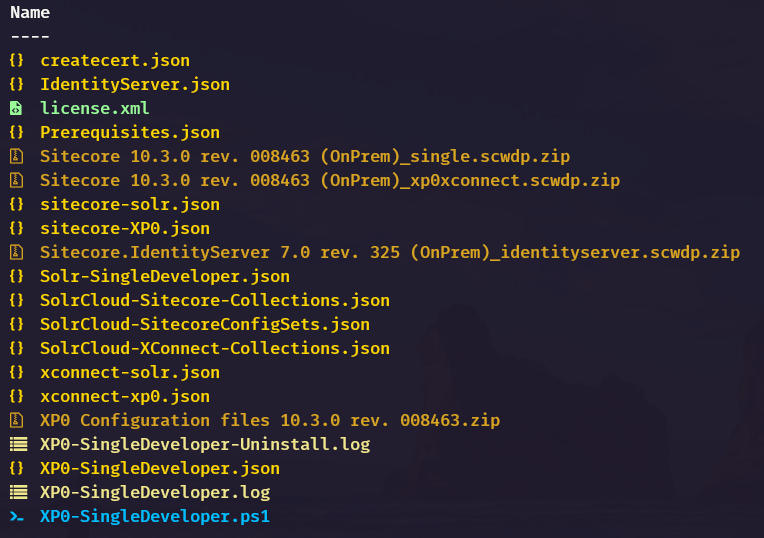
1. Extract downloaded XP Single Developer package to a folder e.g.:- C:\SCInstallation\XP103 2. Extract XP0 Configuration files 10.3.0 rev. 008463.zip in same folder
3. Copy license to the e.g. – C:\SCInstallation\XP103 folder
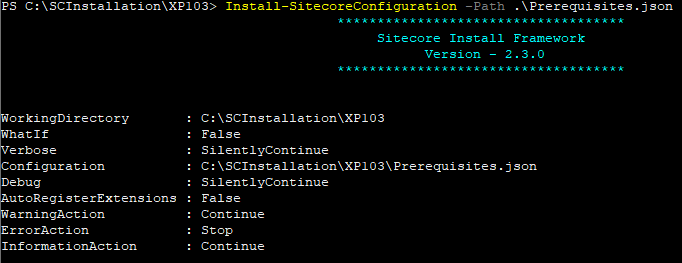
Install prerequisites before installing XP 10.3
Switch to the installable e.g.:- C:\SCInstallation\XP103 folder and execute following script
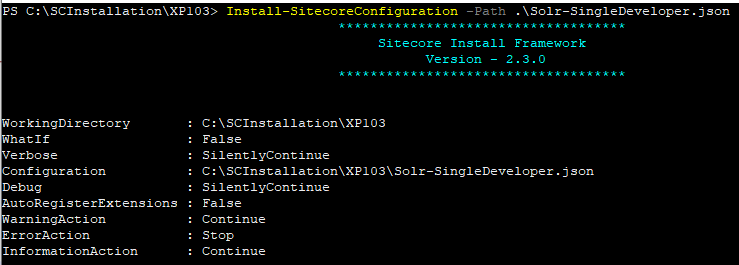
1. Create a SOLR folder e.g.:- C:\SOLR and switch to e.g.- C:\SCInstallation\XP103 folder. Open Solr-SingleDeveloper.json file.
2. Change the Install Root for SOLR in Solr-SingleDeveloper.json – DefaultValue if your SOLR installat location is different
  "SolrInstallRoot": {
            "Type": "String",
            "Description": "The file path to install Solr. This config will add the prefix and solr version e.g C:\\Solr becomes C:\\Solr\\[SolrServicePrefix]Solr-8.11.2",
            "DefaultValue": "C:\\SOLR"
        },
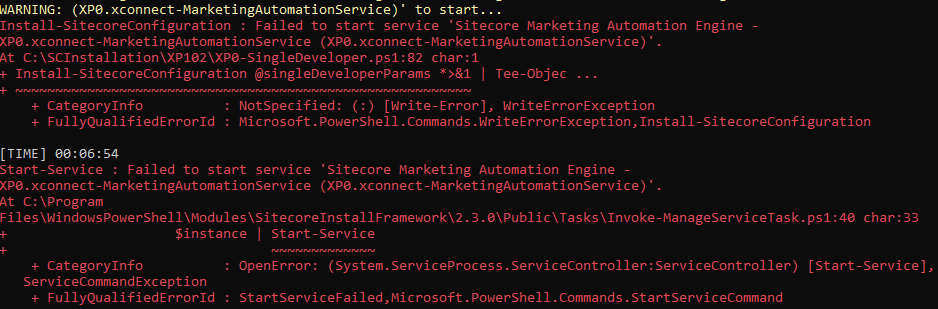
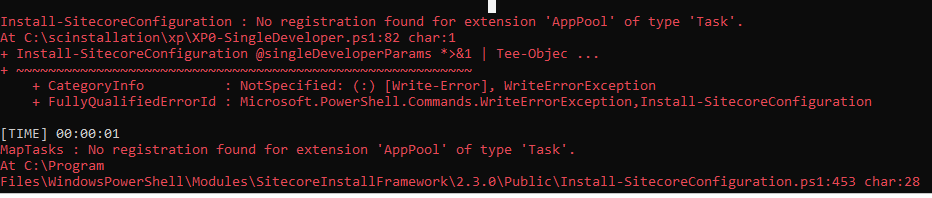
Hopefully this should install successfully on local machine. But if you see any errors below are resoultion to few of the issues I got during installation.
Error while installation
xconnect Marketing Automation fails to start-
Solution–
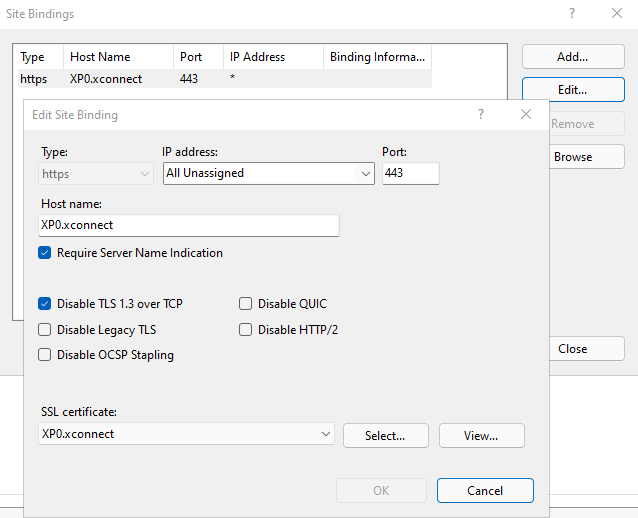
Disable TLS 1.3 over TCP for xconnect. Rerun the installation script or disable this as soon as the xconnect bindings are setup by script during installation.
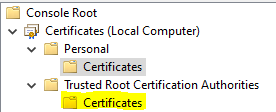
Copy the instance xconnect certificate to the “Trusted root..” folde. In my case this is the certificate
Check that trusted root does not contain non-self-signed certificates using the following PowerShell script:
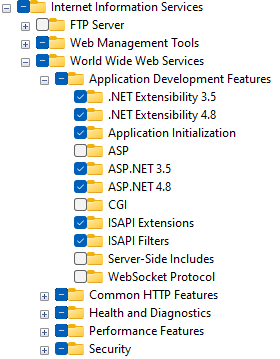
Check if the Asp.Net options in Windows features – Internet Information Services.
Error: .Net SqlClient Data Provider: Msg 12809, Level 16, State 1, Line 5 You must remove all users with password before setting the containment property to NONE.
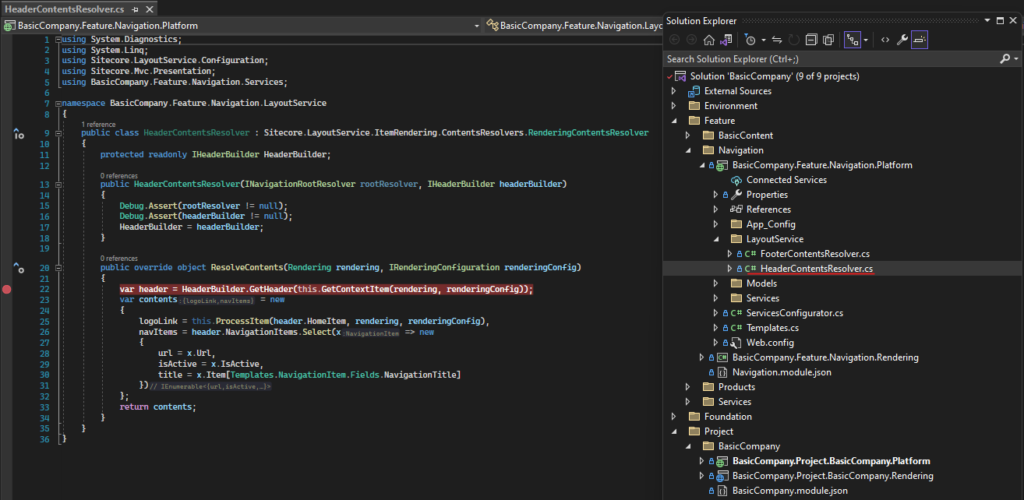
In my previous post we saw how to create a simple rendering with data source.
For creating rendering using content resolver first follow the blog <<enter blog url here>>
Content resolvers help provice more complex data beyond the serialization of a component data source.
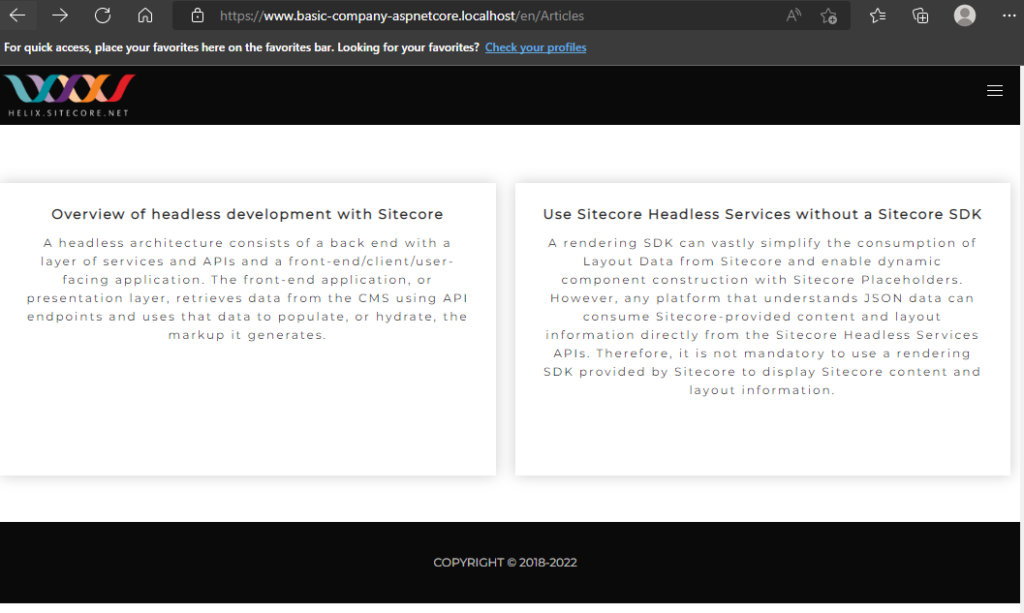
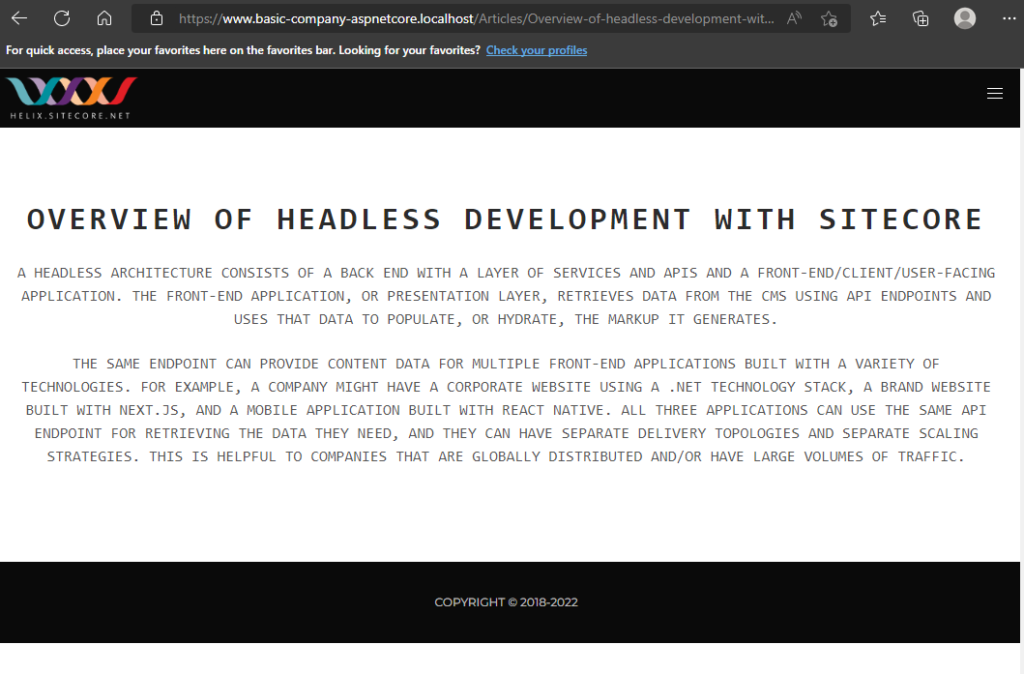
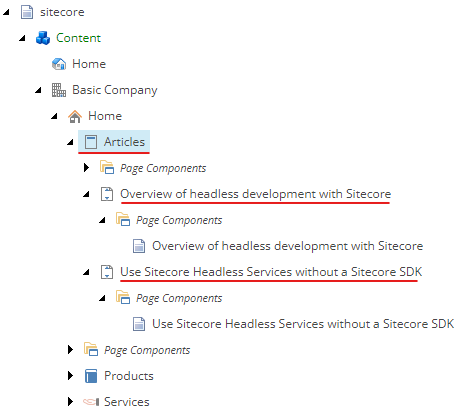
In this blog will list all the Articles on the page which are marked as Featured Article.
The custom logic for filtering will go in Content resolver.
Craete a project for Content Resolver(.net framework 4.8) . This framework is used just to follow with the exisitng content resolvers provided by Helix Examples Solution.
Instead of creating new poroject I will copy the project from Navigation/Platform folder and rename it to BasicCompany.Feature.Articles.Platform.
Delete all the files from this project as it relates to Navigation. You may also want to change the AssemblyName and the AssemblyInfo file.
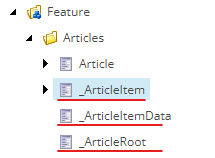
Create Models for Articles and Article
Create Models Folder and add below models
Articles.cs
using Sitecore.Data.Items;
using System.Collections.Generic;

namespace BasicCompany.Feature.Articles.Models
{
    public class Articles
    {
        public Item ArticlesPage { get; set; }

        public IList<Article> ArticleItems { get; set; }
    }
}
Article.cs
using Sitecore.Data.Items;

namespace BasicCompany.Feature.Articles.Models
{
    public class Article
    {
        public Item Item { get; set; }

        public Item ItemData { get; set; }
        public string Url { get; set; }
    }
}
Create Service for ArticleBuilder and ArticleRootResolver
Create a new folder Services and following-
//IArticleBuilder
 public interface IArticleBuilder
    {
        Articles.Models.Articles GetArticles(Item contextItem);
    }
//ArticleBuilder

 public class ArticleBuilder : IArticleBuilder
    {
        private readonly IArticleRootResolver _articleRootResolver;
        private readonly BaseLinkManager _linkManager;

        public ArticleBuilder(BaseLinkManager linkManager, IArticleRootResolver articleRootResolver)
        {
            _articleRootResolver = articleRootResolver;
            _linkManager = linkManager;
        }

        public Articles.Models.Articles GetArticles(Item contextItem)
        {
            var articleRoot = _articleRootResolver.GetArticleRoot(contextItem);
            if (articleRoot == null)
            {
                return new Articles.Models.Articles();
            }

            return new Articles.Models.Articles()
            {
                ArticlesPage = articleRoot,
                ArticleItems = GetArticleItems(articleRoot, contextItem)
            };
        }

        private IList<Article> GetArticleItems(Item articleRoot, Item contextItem)
        {
            var items = new List<Item>();

            items.AddRange(articleRoot.Children.Where(item => item.DescendsFrom(Templates.ArticleItem.Id)));

            var articleItems = items.Select(item => new Article()
            {
                Item = item,
                ItemData = item.Axes.GetDescendants().FirstOrDefault(itemData => itemData.DescendsFrom(Templates.ArticleItemData.Id)),
                Url = _linkManager.GetItemUrl(item)
            }).ToList();

            return articleItems;
        }
    }
//IArticleRootResolver

 public interface IArticleRootResolver
    {
        Item GetArticleRoot(Item contextItem);
    }

namespace BasicCompany.Feature.Articles.Services
{
    public class ArticleRootResolver : IArticleRootResolver
    {
        public Item GetArticleRoot(Item contextItem)
        {
            if (contextItem == null)
            {
                return null;
            }
            return contextItem.DescendsFrom(Templates.ArticleRoot.Id)
                ? contextItem
                : contextItem.Axes.GetAncestors().LastOrDefault(x => x.DescendsFrom(Templates.ArticleRoot.Id));
        }
    }
}
Create Layout Service i.e. content resolver class
Create new folder LayoutServices and add following-
namespace BasicCompany.Feature.Articles.LayoutService
{
    public class ArticleContentResolver : Sitecore.LayoutService.ItemRendering.ContentsResolvers.RenderingContentsResolver
    {
        private readonly IArticleBuilder _articleBuilder;

        public ArticleContentResolver(IArticleBuilder articleBuilder)
        {
            _articleBuilder = articleBuilder;
        }

        public override object ResolveContents(Rendering rendering, IRenderingConfiguration renderingConfig)
        {
            var articles = _articleBuilder.GetArticles(this.GetContextItem(rendering, renderingConfig));

            var contents = new
            {
                ArticleItems = articles.ArticleItems.Select(item => new
                {
                    Item = item.Item,
                    ItemData = item.ItemData,
                    Serialized = base.ProcessItem(item.ItemData, rendering, renderingConfig)
                }).Select(article => new
                {
                    Url = LinkManager.GetItemUrl(article.Item),
                    Id = article.Item.ID,
                    Fields = new
                    {
                        Title = article.Serialized[article.ItemData.Fields["Title"].Name],
                        Description = article.Serialized[article.ItemData.Fields["Description"].Name],
                        ShortDescription = article.Serialized[article.ItemData.Fields["ShortDescription"].Name],
                    }
                })
            };

            return contents;
        }
    }
}
Create Service Configurator to register the services-
namespace BasicCompany.Feature.Articles
{
    public class ServicesConfigurator : IServicesConfigurator
    {
        public void Configure(IServiceCollection serviceCollection)
        {
            serviceCollection.AddTransient<Services.IArticleBuilder, Services.ArticleBuilder>();
            serviceCollection.AddTransient<Services.IArticleRootResolver, Services.ArticleRootResolver>();
        }
    }
}
Create Template Class
Change the Item ID’s as per your Sitecore Instance
namespace BasicCompany.Feature.Articles
{
  public static class Templates
  {
        public static class ArticleItem
        {
            public static readonly ID Id = new ID("{EE5CE126-890D-4F01-9DD5-3D81FC397A91}"); //
        }

        public static class ArticleItemData
        {
            public static readonly ID Id = new ID("{8AA19CA1-99A6-4588-B1D7-3FA9A8F6756A}"); //
        }

        public static class ArticleRoot
        {
            public static readonly ID Id = new ID("{A46A11C6-C7F9-4F61-BF0C-FFF060F0FECC}"); //
        }
  }
}
Create App Config to register the ServiceConfigurator-
Create Feature.Articles.config file in App_Config/Include/Feature folder
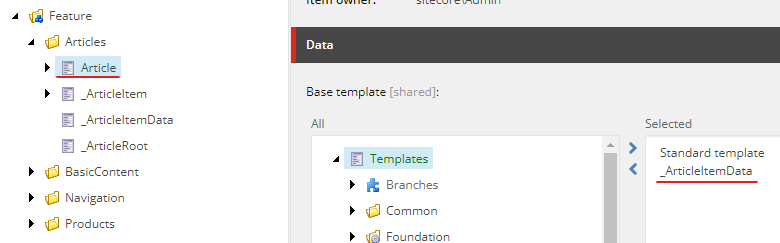
These templates are used to indicate the different level s of Article. i..e Article Page- will inherit from _ArticleRoot, ArticlePage will inherit from _ArticleItem and Article Content will inherit from _ArticleItemData
Sitecore Items
Create Rendering Content Resolver
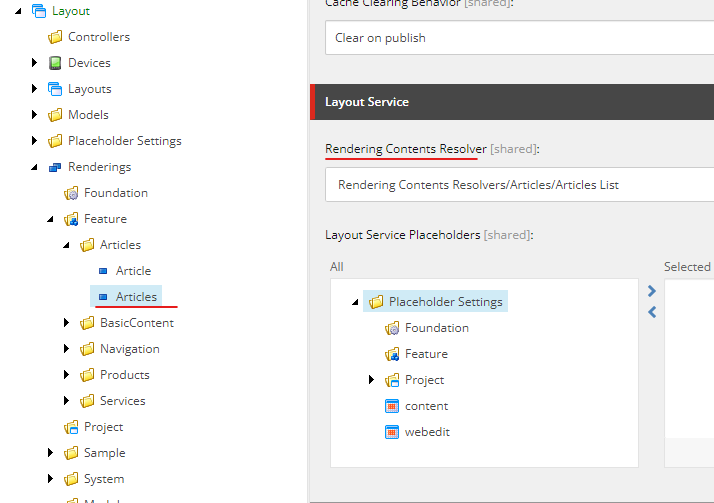
Create a New “Rendering Contents Resolvers Folder” in /sitecore/system/Modules/Layout Service
Craete a New “Rendering Contents Resolver” in this folder.
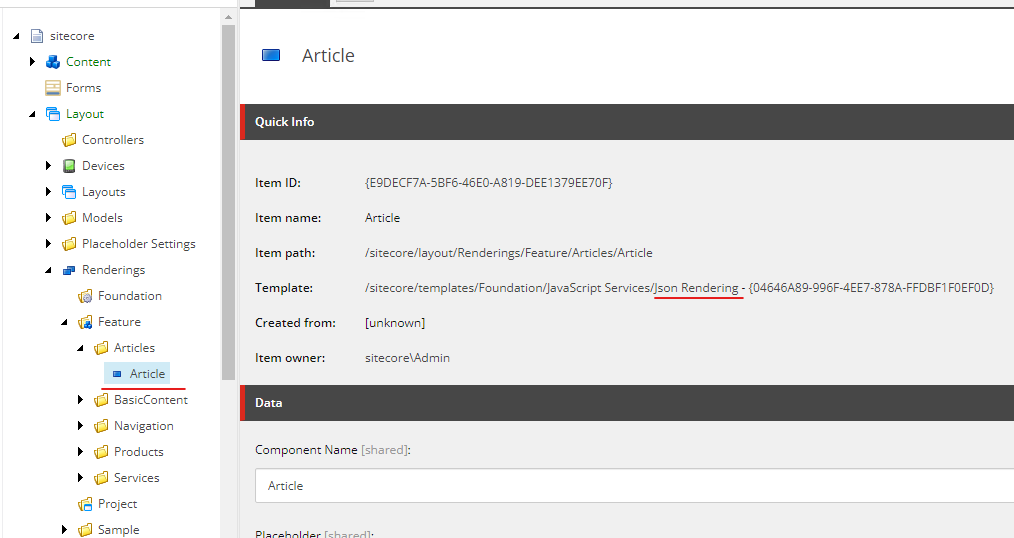
Provide the type – BasicCompany.Feature.Articles.LayoutService.ArticleContentResolver, BasicCompany.Feature.Articles
Create Articles Json Rendering
Craete a neJson rendering name “Articles” and newly created content resolver in the “Rendering Contents Resolver” field.
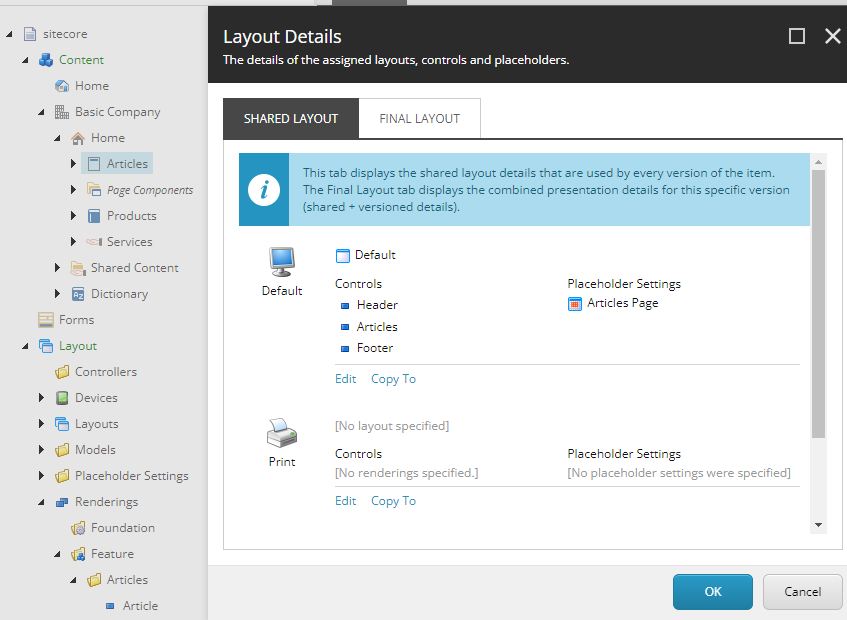
Add the new rendering to the page
Publish items
Rendering Project
Create Models Articles.cs
using Sitecore.AspNet.RenderingEngine.Binding.Attributes;
using Sitecore.LayoutService.Client.Response.Model.Fields;

namespace BasicCompany.Feature.Articles.Models
{
    public class Articles
    {
        [SitecoreComponentField]
        public ContentListField<Article> ArticleItems { get; set; }
    }
}
Create new view Articles.cshtml in /Views/Shared/Components/SitecoreComponent
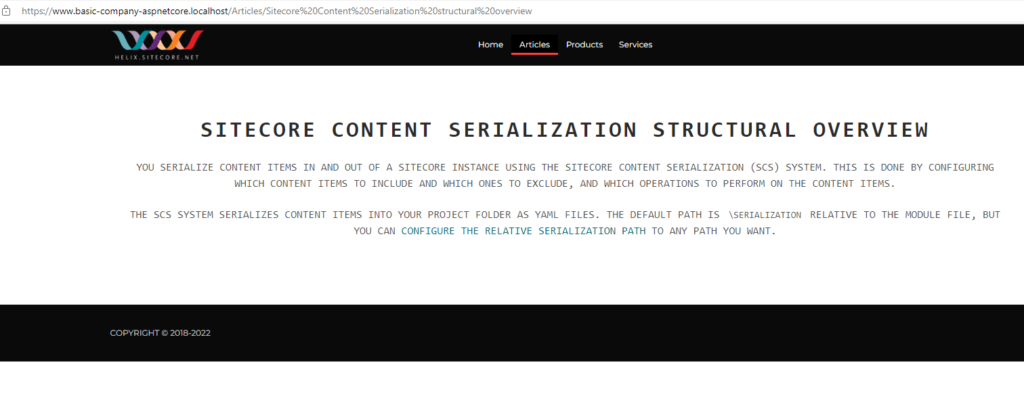
In this blog will creata a new component name Article in the Helix Examples Solution to demonstrate how to configure and use Sitecore Content Serlialization (SCS).
Assuming the Sitecore CLI is installed along with Sitecore.DevEx.Extensibility.Serialization, Sitecore.DevEx.Extensibility.Publishing plugins are installed.
For more details on the plugin installation please see this link- https://doc.sitecore.com/xp/en/developers/101/developer-tools/install-sitecore-command-line-interface.html
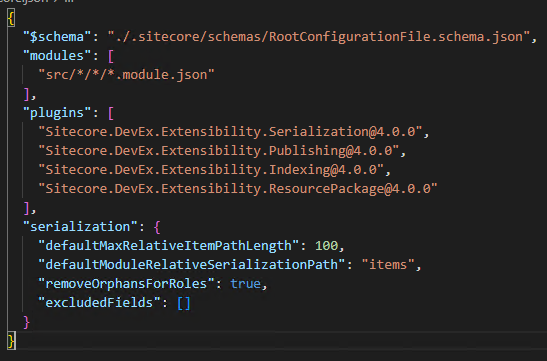
Open the helix-basic-aspnetcore folder in Visual Studio and see Sitecore.json file. This file has the configuration settings for SCS.
modules – willl look into the src folder for *.module.json file for any component specific configuration the items that need to be serialized.
So lets create a new module or rendering feature named “Articles”. Just a folder and not a project itself
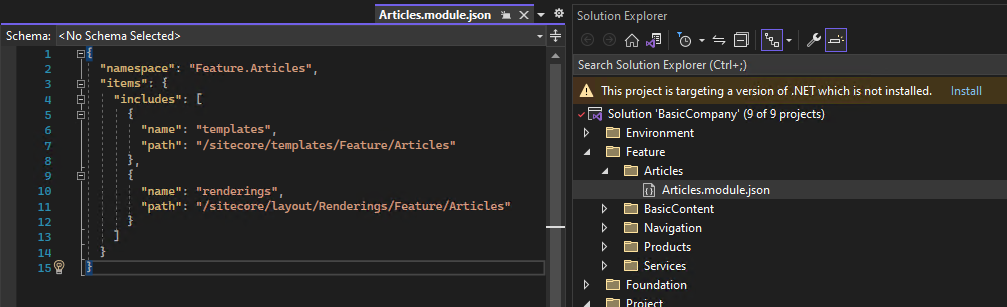
1. Create a module json for serlialization configuration
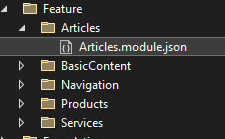
IMP – Create Articles.module.json file in the project root folder
Here the items that will be serliazed are templates and rendering from the given path in Sitecore to the local Solution Folder configured in Sitecore.json file the path mentioned in defaultModuleRelativeSerializationPath property. See step 1
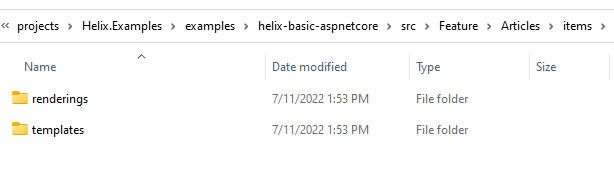
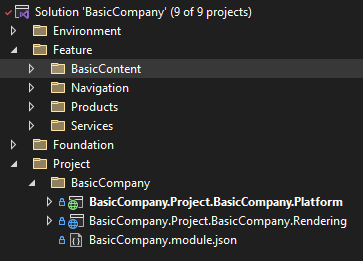
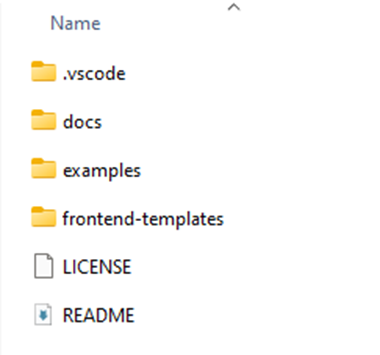
IMP- Ensure the module file is in Articles folder. Your project folder should looks like this-
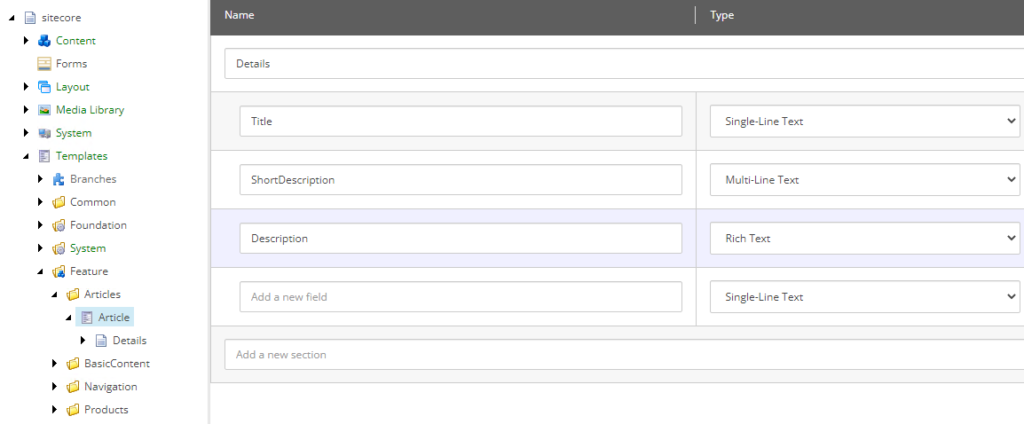
2. Create a Sitecore Template and Rendering for Articles
Create a Json Rendering for now(fill in the details later)
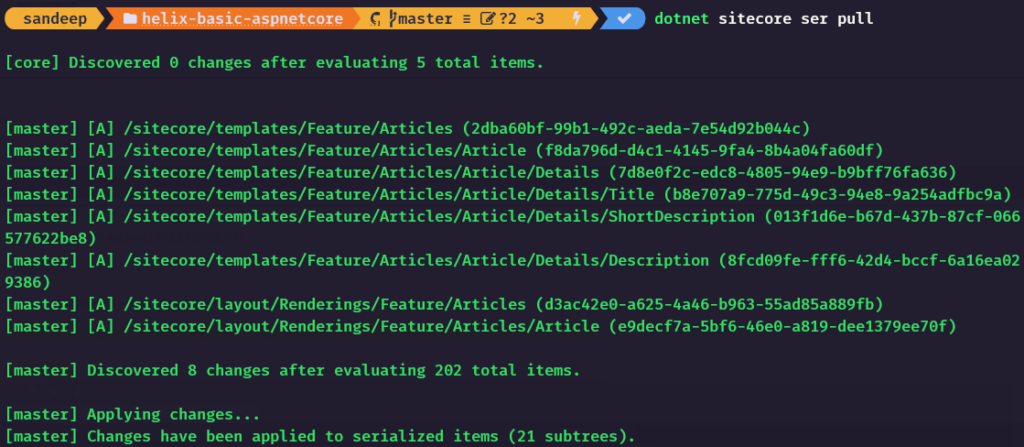
3. Sync the items(manual)
Execute following command to serlaize the items for Articles-
dotnet sitecore ser pull
Project folder should now have items folder with templates and rendering-
Thats it any Templates and rendering created for Articles (new component) should be serliazed.
Refer BasicCompany.module.json for any placeholders, layouts etc serlization at the project level.
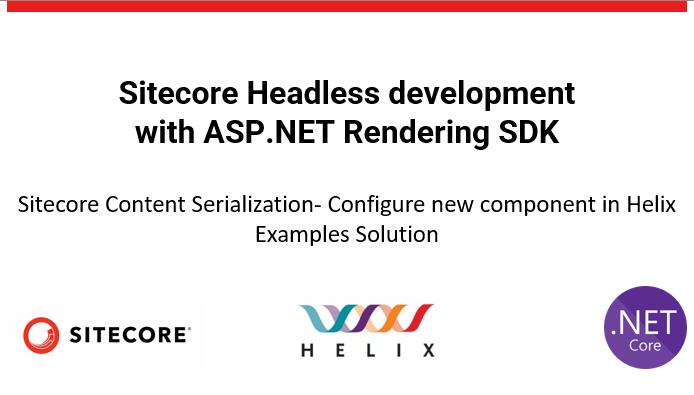
In this blog will create a simple rendering uing Asp.Net Rendering SDK in Helix Examples Solution
Please refer the blog to create a rendering folder and configure the SCS before proceeding this blog.
So lets create a new module or rendering feature named “Articles”.
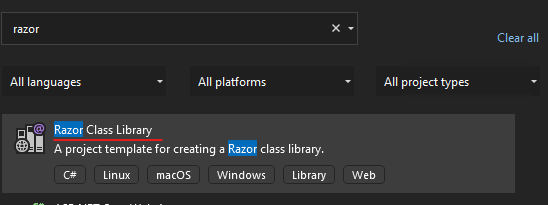
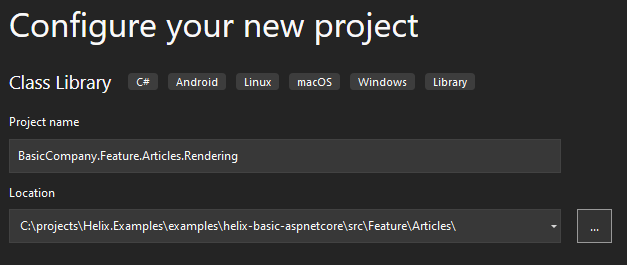
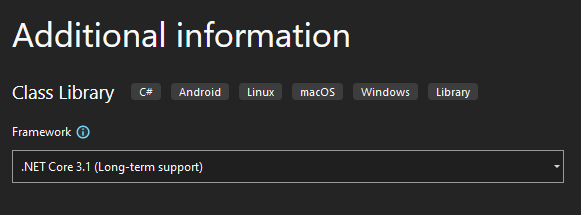
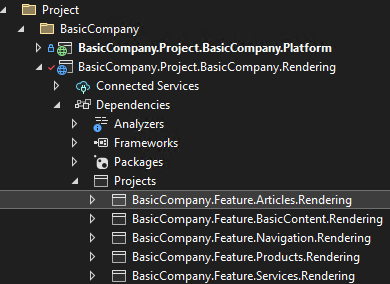
1. Create a Feature project using Razor Class Library
Project Name – BasicCompany.Feature.Articles.Rendering
Notice the project path
Choose .Net Core 3.1 Framework-
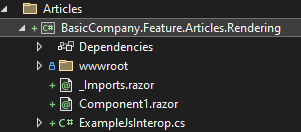
Delete any exisitng files and folders under this project-
Edit the project to use netcoreapp3.1 and AddRazorSupportForMvc to true
Rename helix-basic-aspnetcore\src\Feature\Articles\BasicCompany.Feature.Articles.Rendering to rendering. Just to follow other feature fodler structure.
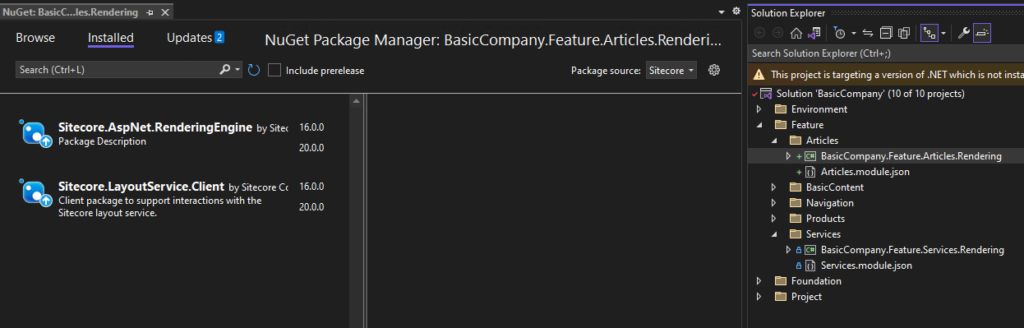
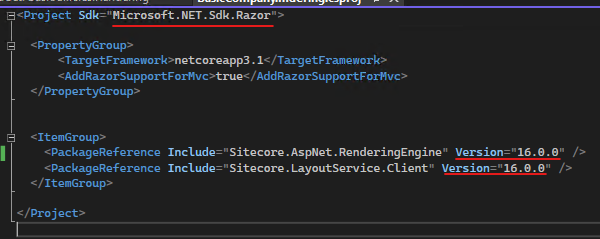
2. Install Sitecore packages
Sitecore.AspNet.RenderingEngine
Sitecore.LayoutService.Client
I have installed verions 16 just to be in sync with other projects. You may install the latest.
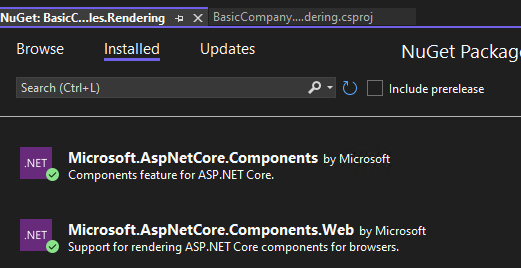
New rendering project should have these packages installed-
Remove these packages as this may be not required at thi point of time or downgrade this to 3.1.1
Refer the new created rendering project to BasicCompany.Project.BasicCompany.Rendering
When the solution is build you may see this error-
Severity Code Description Project File Line Suppression State Error The package reference ‘Sitecore.AspNet.RenderingEngine’ should not specify a version. Please specify the version in ‘C:\projects\Helix.Examples\examples\helix-basic-aspnetcore\Packages.props’ or set VersionOverride to override the centrally defined version. BasicCompany.Feature.Articles.Rendering C:\projects\Helix.Examples\examples\helix-basic-aspnetcore\src\Feature\Articles\rendering\BasicCompany.Feature.Articles.Rendering.csproj
Solution– Remove the version for the plugin fropm project file
Edit the project file and remove version from the PackageReference-
Solution should build successully.
3. Ensure Articles.modules.json file in Feature folder
Please see this blog <<Enter blog url here>> how to create a module.json file to serliaze the Sitecore items for new Feature.
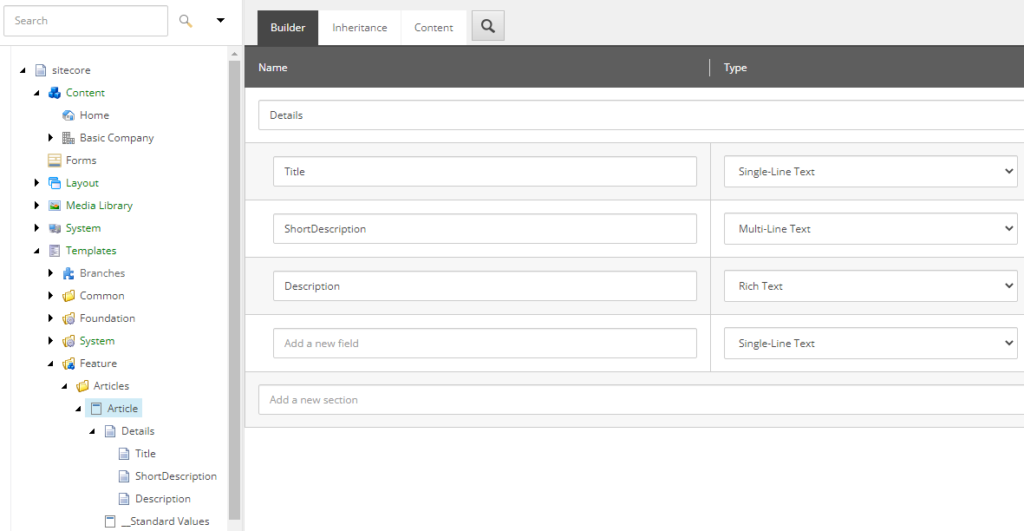
4. Create required Sitecore Templates, content, renderings and Placeholder Settings
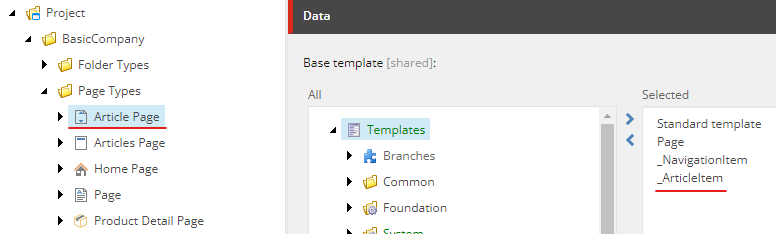
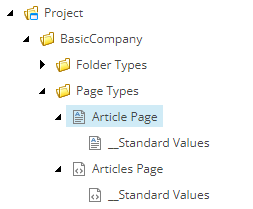
Template – Article in following path- /sitecore/templates/Feature/Articles
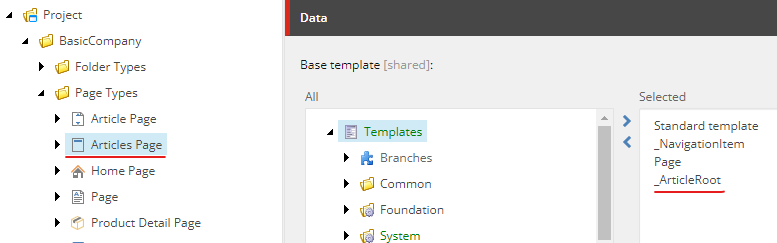
Page Type Template – Create 2 page type templates “Articles” and “Article” page as below.
Add any required Insert Options where necessary.
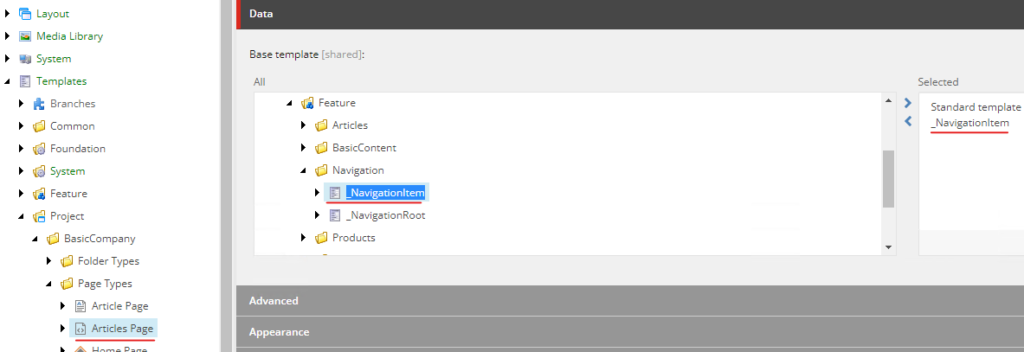
IMP- inherit from _NavigationItem to display the Articles as Navigation option
Enter Navigation Title for Articles page-
Content
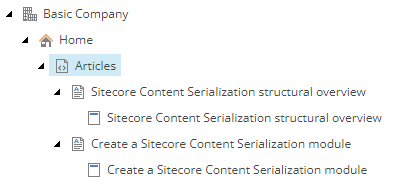
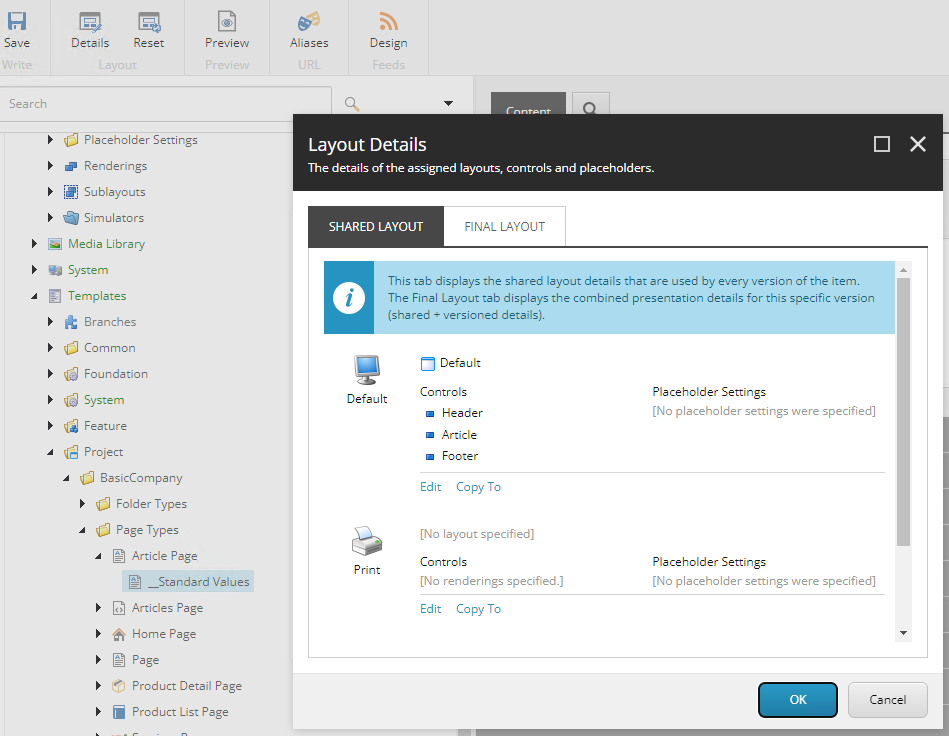
Create content in Home page based on the Article templates created.
Rendering
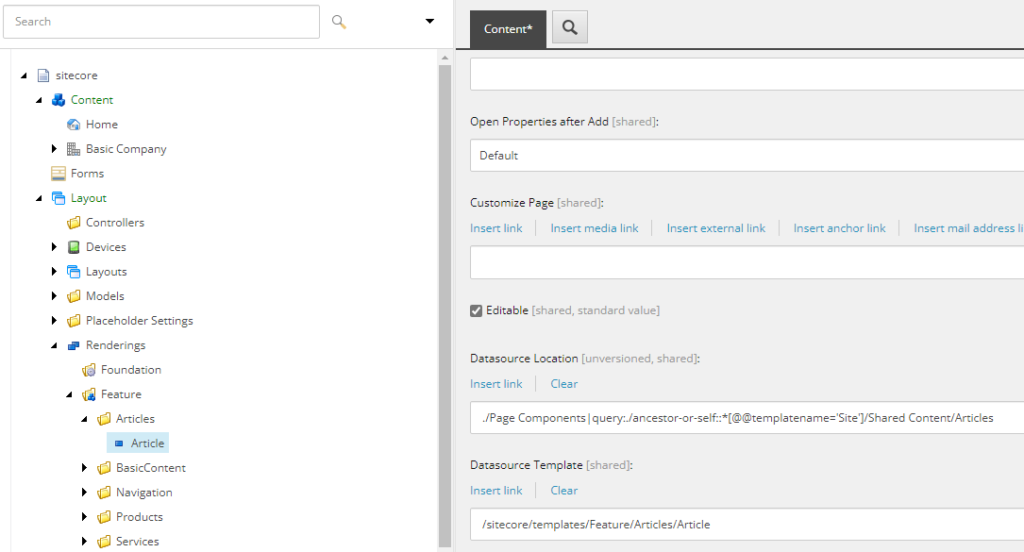
Create a new Json Rendering Article. See previous post
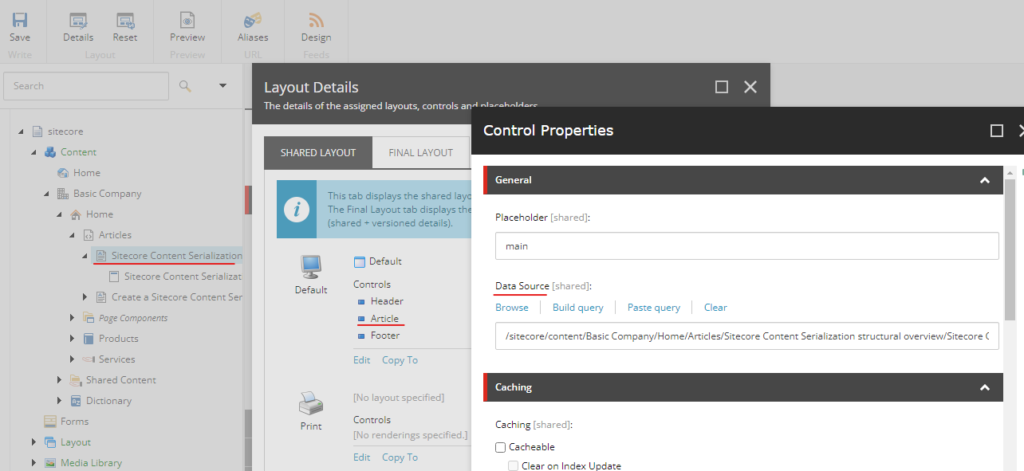
Set Datasource Location- ./Page Components|query:./ancestor-or-self::*[@@templatename=’Site’]/Shared Content/Articles
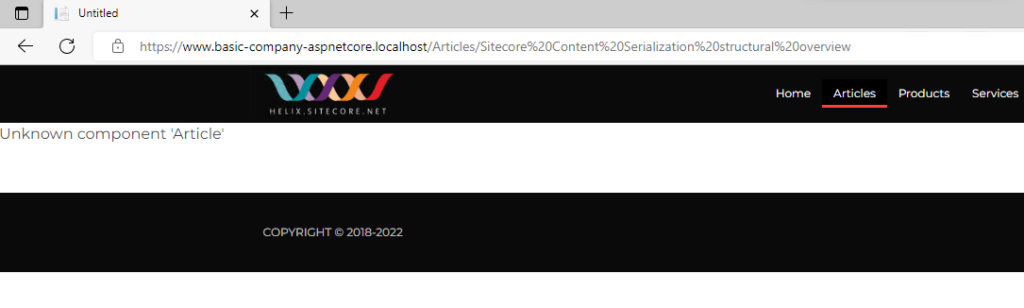
There is a error – “Unknown component ‘Article'”. This is because we havent yet created view for this component.
Create Model in BasicCompany.Feature.Articles.Rendering project for rendering Article component
Note the propeties are using Sitecore.LayoutService.Client.Response.Model.Fields
using Sitecore.LayoutService.Client.Response.Model.Fields;
using System;
using System.Collections.Generic;
using System.Text;

namespace BasicCompany.Feature.Articles.Rendering.Models
{
    public class Article
    {
        public TextField Title { get; set; }

        public RichTextField Description { get; set; }

        public TextField ShortDescription { get; set; }
    }
}
Create View in BasicCompany.Feature.Articles.Rendering project for rendering Article component
Create Article.cshtml file under Views/Shared/Components/SitecoreComponent
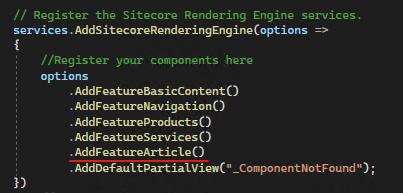
Add Extensions for registering the ModelBoundView. This is a static class and will be used in Project Rendering on application startup (BasicCompany.Project.BasicCompany.Rendering).
using BasicCompany.Feature.Articles.Rendering.Models;
using Sitecore.AspNet.RenderingEngine.Configuration;
using Sitecore.AspNet.RenderingEngine.Extensions;

namespace BasicCompany.Feature.Articles.Extensions
{
    public  static class RenderingEngineOptionsExtensions
    {
        public static RenderingEngineOptions AddFeatureArticle(this RenderingEngineOptions options)
        {
            options
                .AddModelBoundView<Article>("Article");
            return options;
        }
    }
}
In BasicCompany.Project.BasicCompany.Rendering project, Startup.cs register the component-
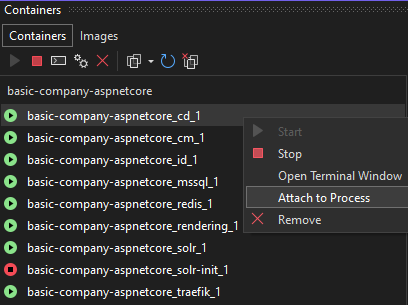
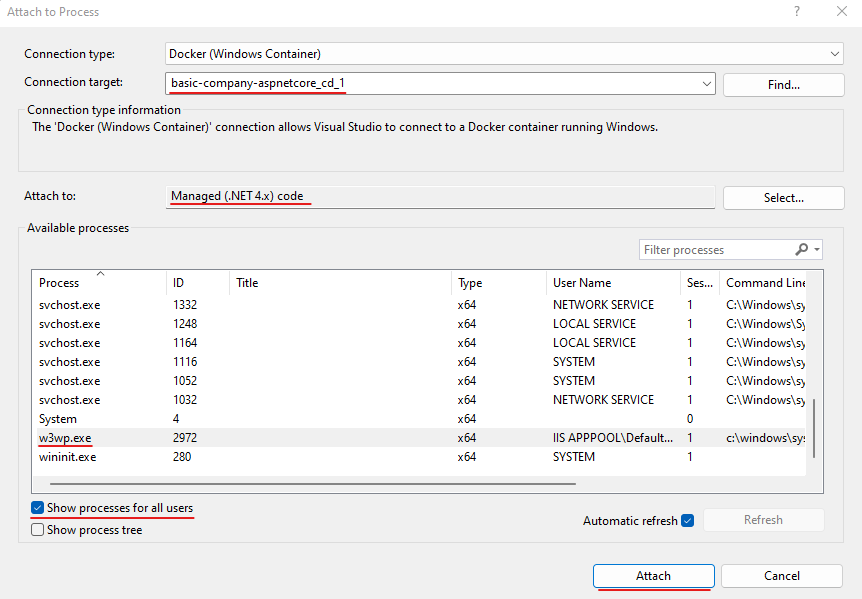
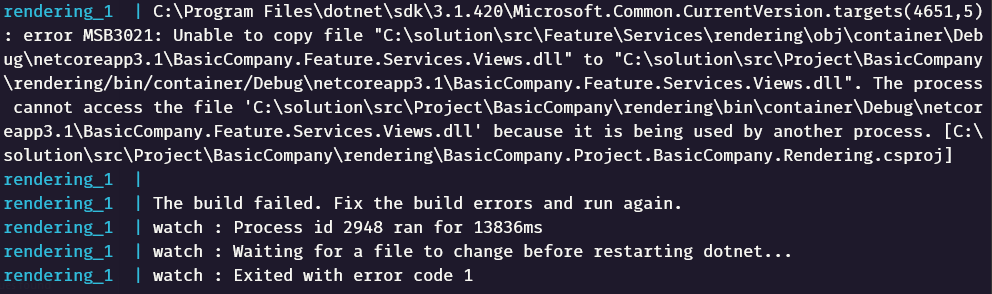
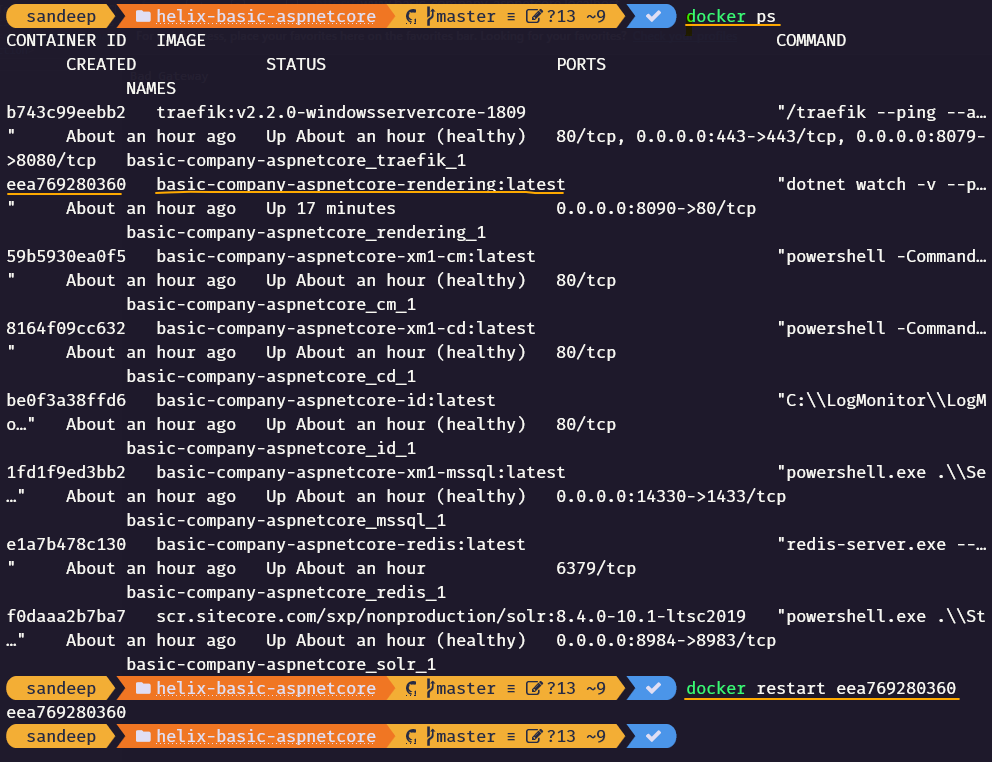
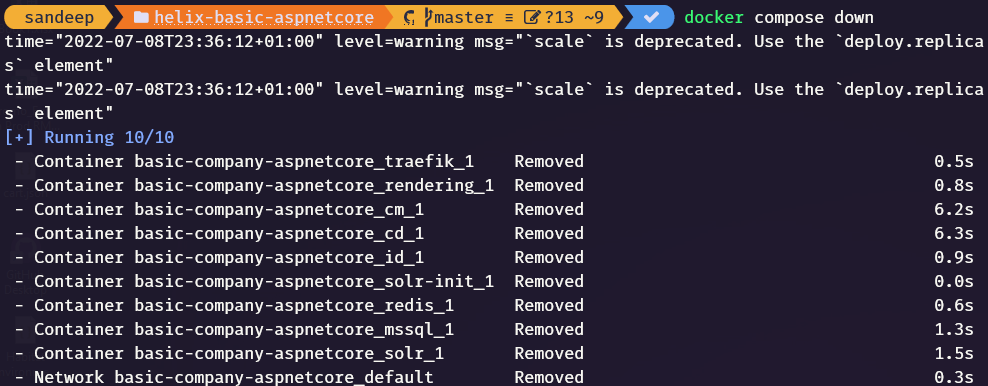
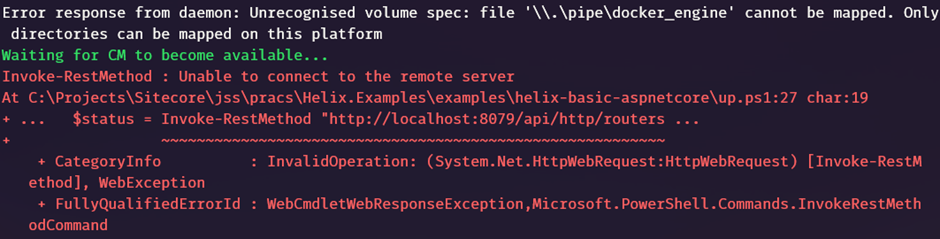
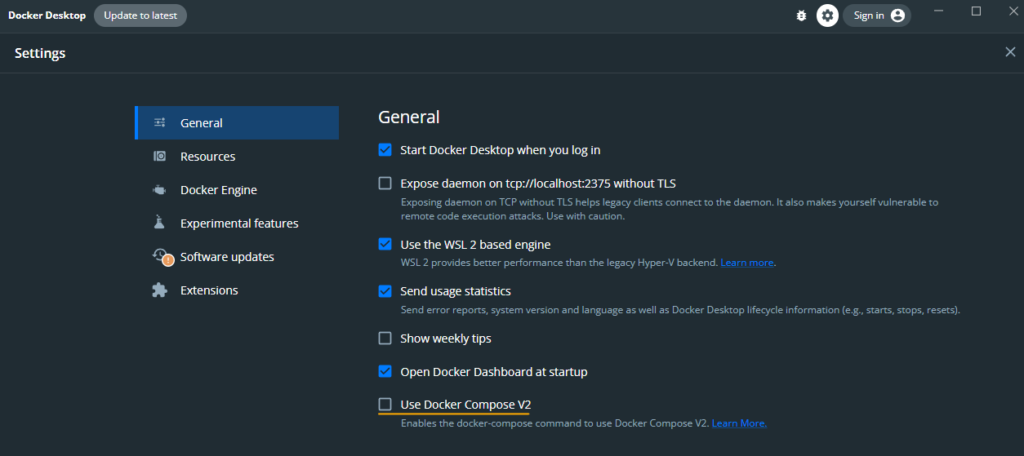
This blog will give a quick overview of setting development environment for Headless Development with ASP.Net Rendering SDK using the Helix Examples and the docker.
Although there are videos and blogs around same I will do a quick walk through on setting Helix Examples and any errors I faced whilst setting up the environment.
Refer the following for same – https://github.com/Sitecore/Helix.Examples/tree/master/examples/helix-basic-aspnetcore
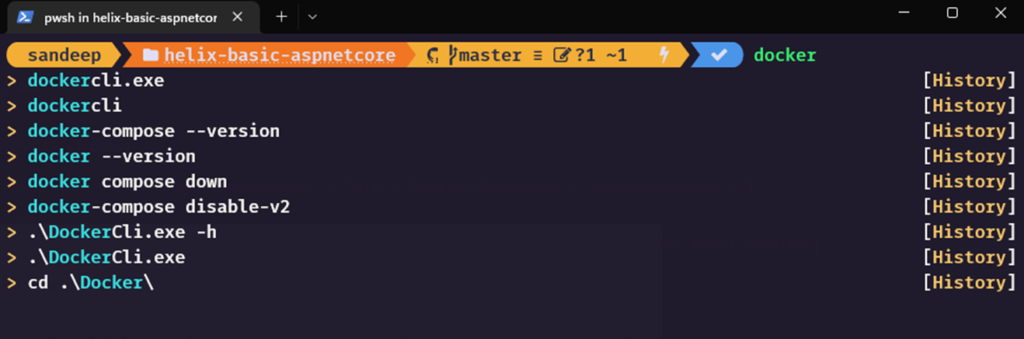
Install .Net core 3.1 on your machine and this is required to create any rendering or platform projects later to extend the Helix Examples Solution or compiling the existing code.
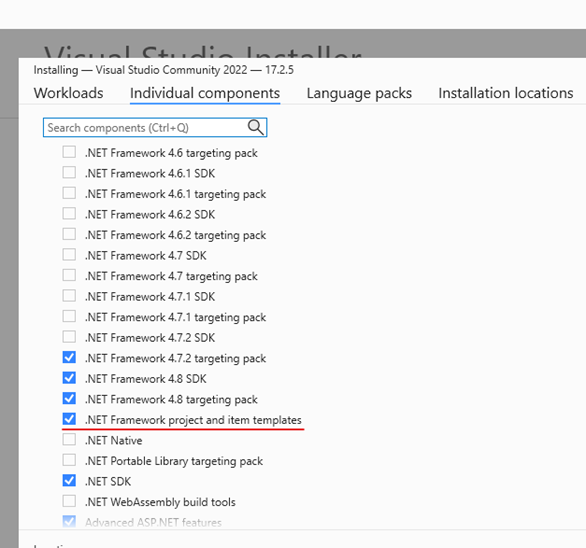
Whilst installing Visual Studio 2022 select the .Net Framework project and templates option as the platform projects uses .Net Framework 4.8 version. This will also help further if you want to extend the solution.
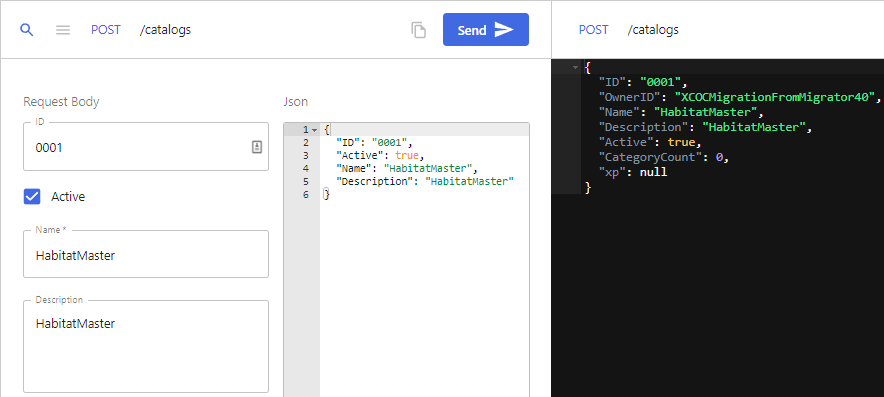
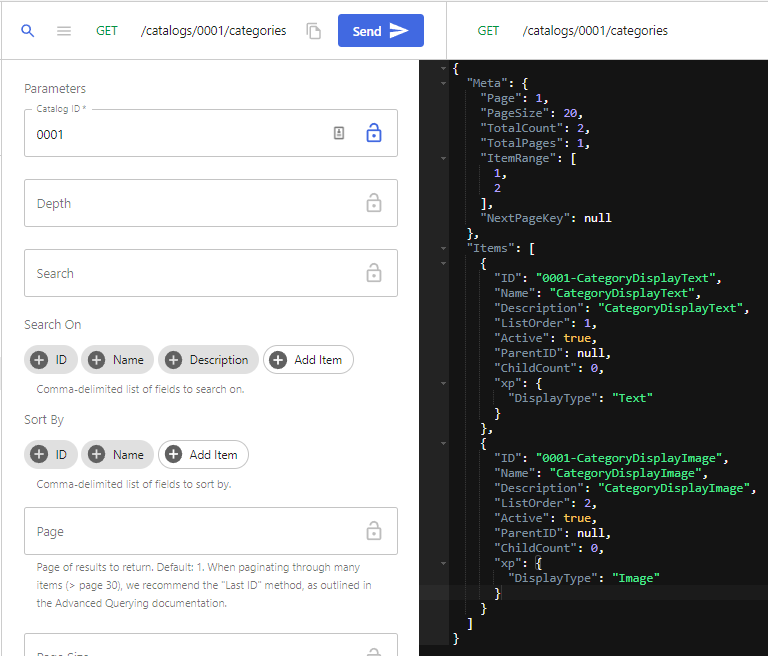
3. Search Category with newly created extended property i.e. DisplayType
First search all categories with Catalog Id “0001”. Following results will be shown-
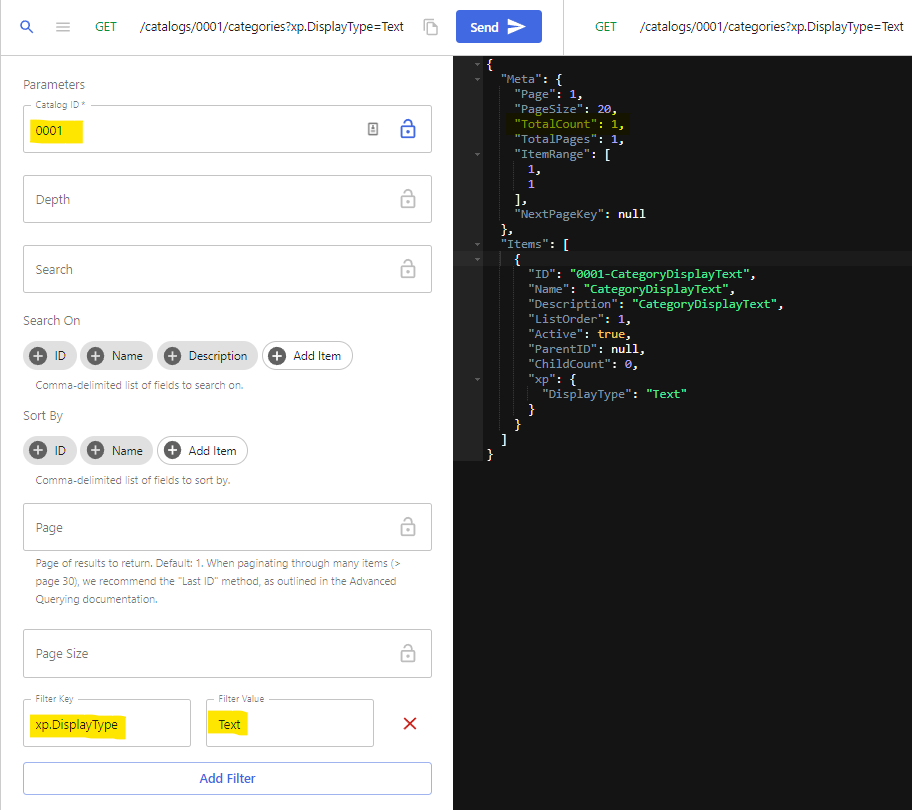
Now lets try and search with extended properties i.e. Catalog Id “0001” and DisplayType as Text. For this use “Add Filter” option and key as “xp.DisplayType” and Filter Value as “Text”.
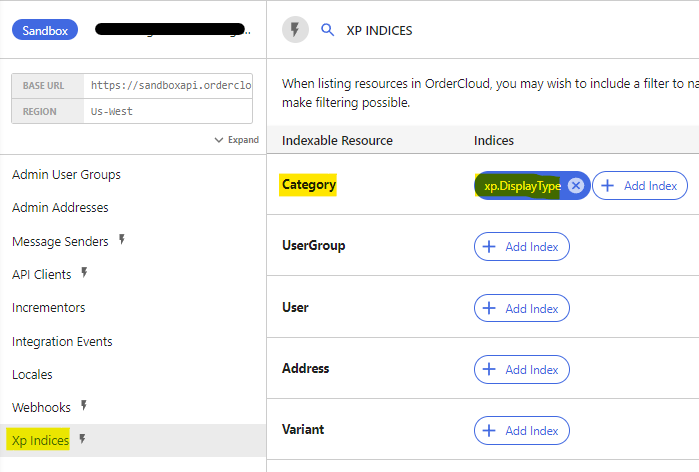
This request wont show any results and hence Xp Indices needs to created for Category
4. Create XP Indices
Navigate to Seller => Xp Indices
Indexable resources Catagory “Add Index” => “xp.DisplayType” and Save Changes
Now search the Catagories same as in Step 3 with Filter option and this time you should be able to see the results-