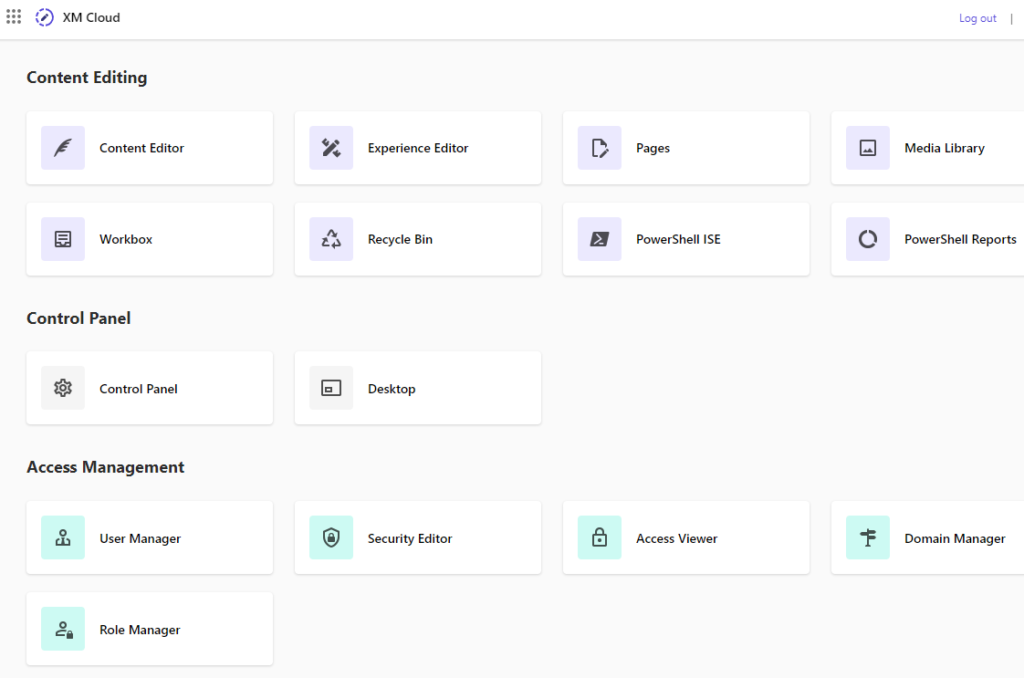
Welcome! This is my personal blog about Web technologies, software development, open source and other related topics
The ideas and opinions expressed here are solely mine and don't represent those of others, either individuals or companies.The code snippets or references to software products or analogous are to be used without any warranty of any kind. If you enjoy the content, feel free to share it and re-use it as long as you provide a link to the original post.
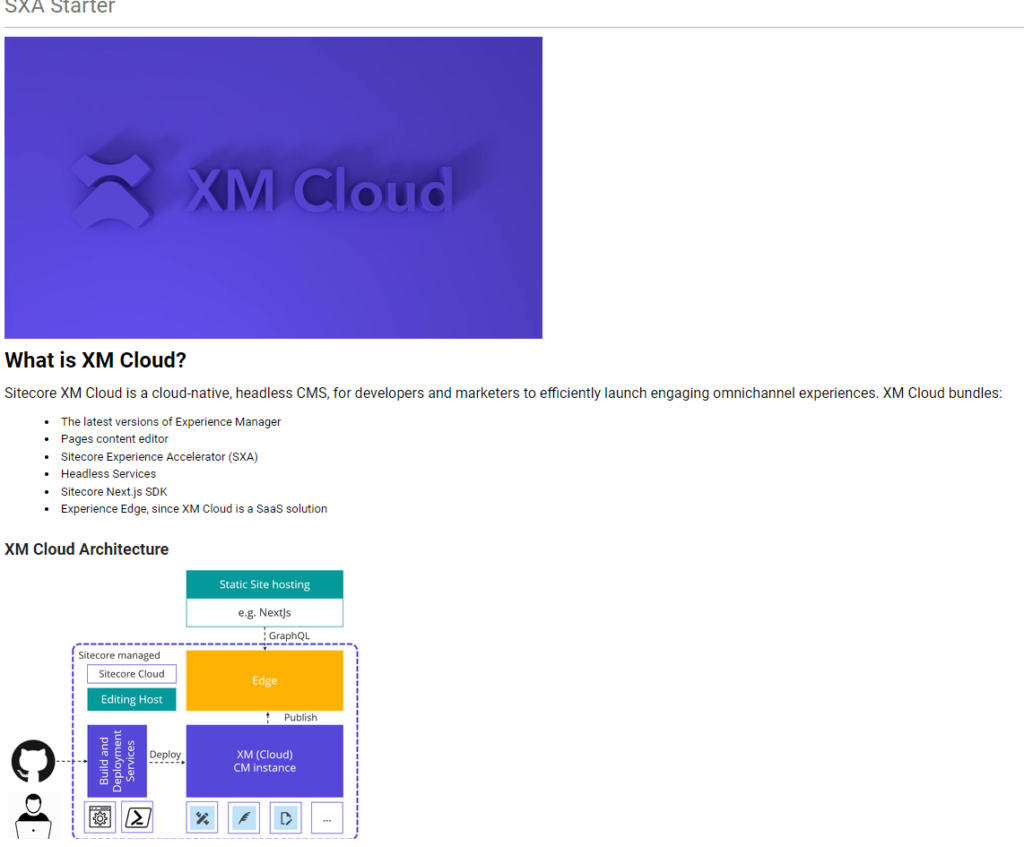
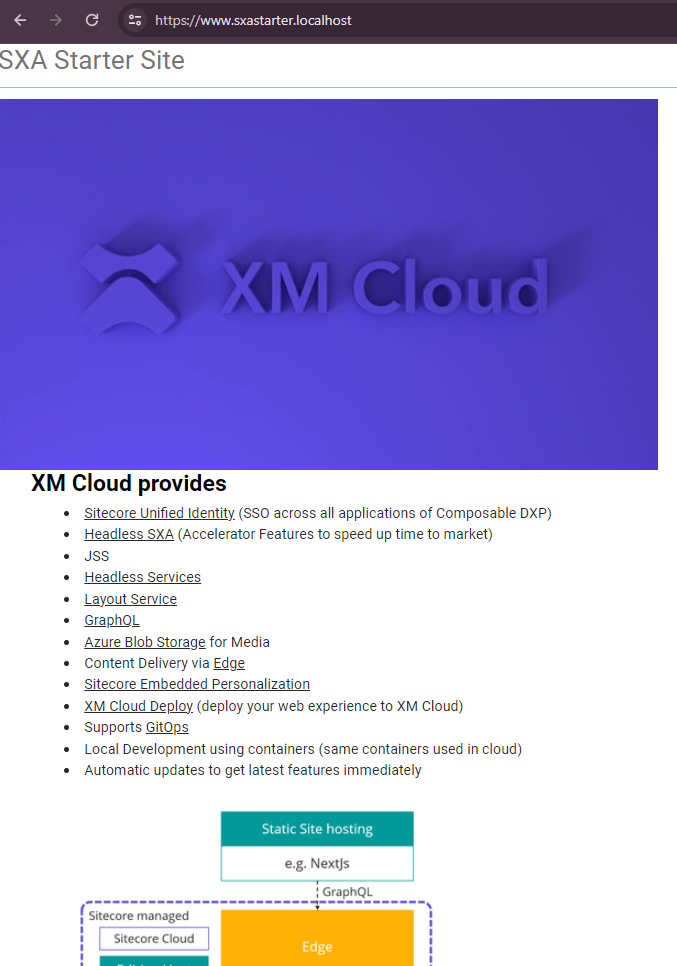
Assuming Sitecore local instnace is setup, lets look how to work on Graphql in local machine. See this blog post to setup the local machine for XM Cloud development.
<<Blog post url to setup local instance>>
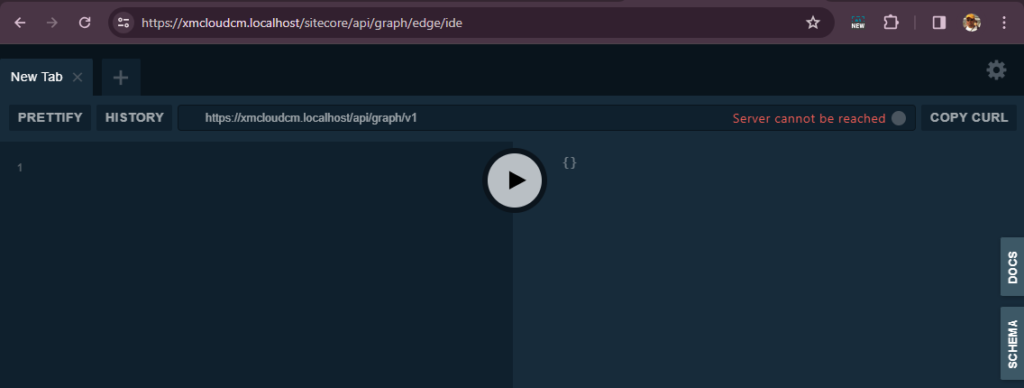
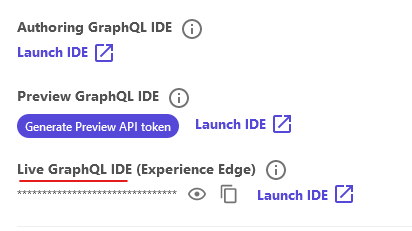
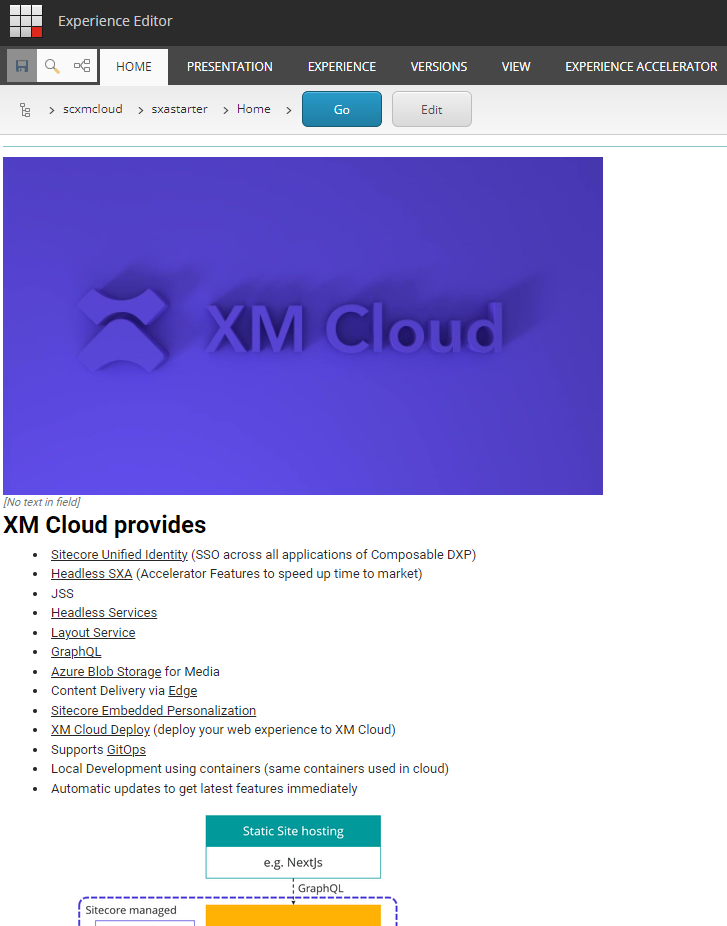
The GraphQL playground (also called the GraphQL IDE) helps you test GraphQL queries before you use them in your application.
For local instance use the following to open the GraphQL IDE- Assuming local host name is – xmcloudcm.localhost
In this blog post we wil setup nextjs application i.e. sxastarter assuming your local Sitecore instance is up and running.
We will create a Headless SXA site in Sitecore local instance and then setup the FE application. This is can also moved outside the Foundation Head repo so that FE devs can work on this spearately.
Setup JSS app to work with local Sitecore instance
Ensure you have Sitecore instance up and running see this blog << 2. XM CLoud for local env>> or you can also see this blog
1. Setup your JSS app
Ensure you execute this commands on FE folder i.e. /src/sxastarter
Ensure you have Sitecore JSS CLI installed on local machine
Once this is installed Setup the JSS app-
jss setup
Following is required to setup-
jss setup
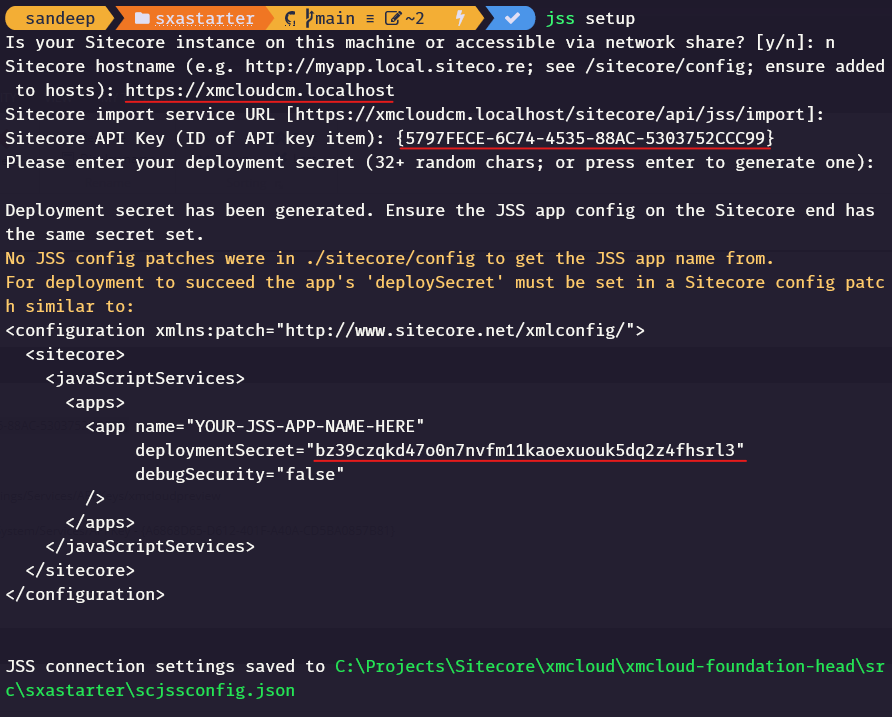
Is your Sitecore instance on this machine or accessible via network share? [y/n]: n
Sitecore hostname (e.g. http://myapp.local.siteco.re; see /sitecore/config; ensure added to hosts): https://xmcloudcm.localhost
Sitecore import service URL [https://xmcloudcm.localhost/sitecore/api/jss/import]:
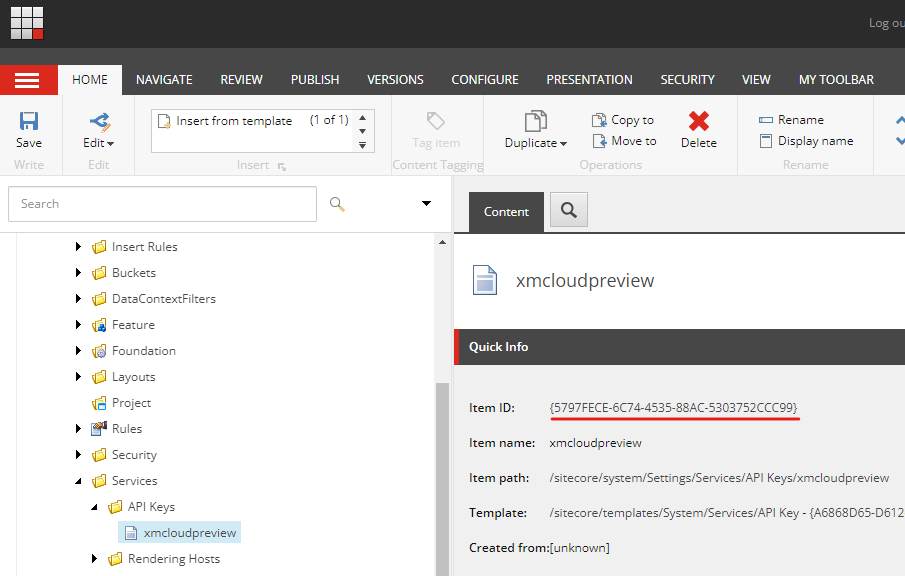
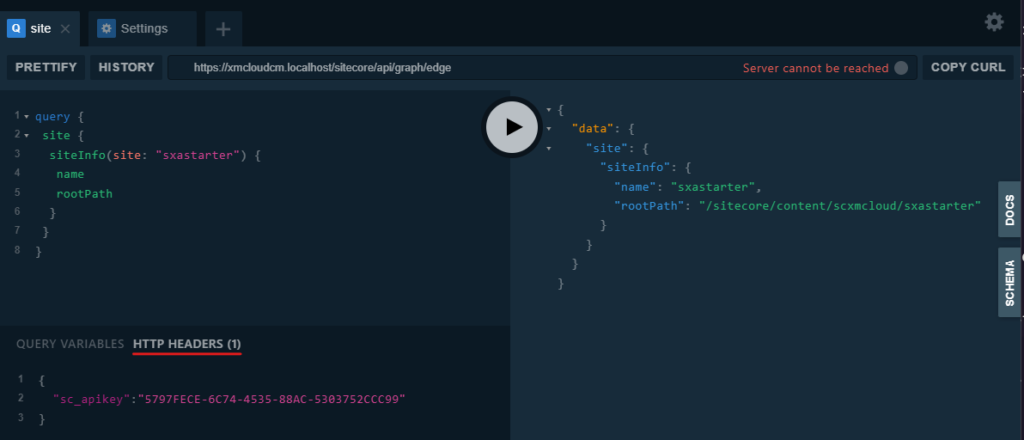
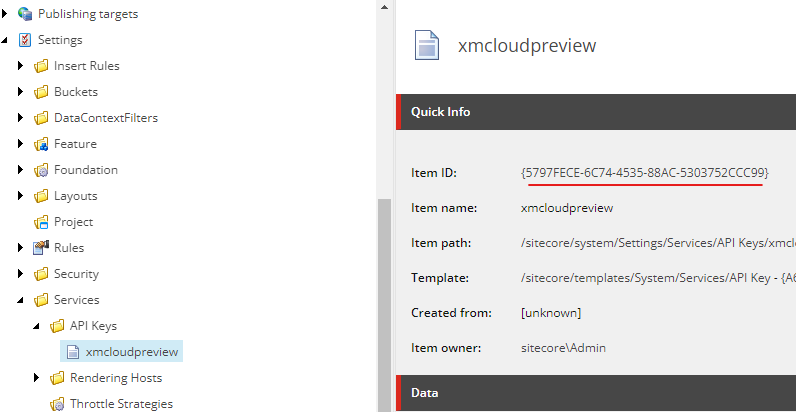
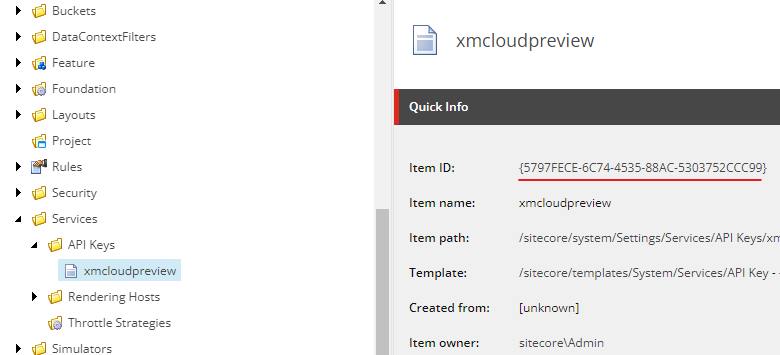
Sitecore API Key (ID of API key item): {5797FECE-6C74-4535-88AC-5303752CCC99}
Please enter your deployment secret (32+ random chars; or press enter to generate one):
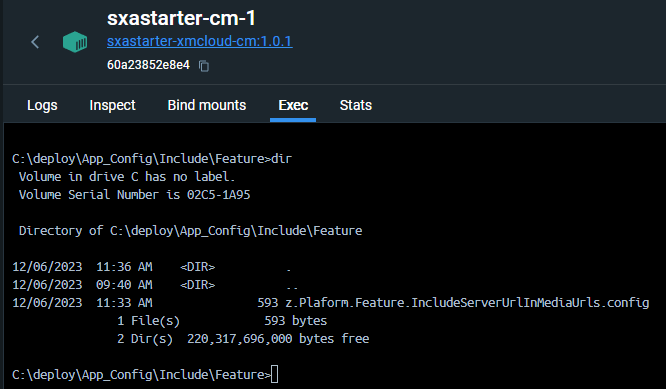
Provide the Sitecore hostname and the api secret, in this case xmcloudpreview item id at following location /sitecore/system/Settings/Services/API Keys/xmcloudpreview
Note the deployment secret. This is required to setup Headless Site, in this case it is bz39czqkd47o0n7nvfm11kaoexuouk5dq2z4fhsrl3
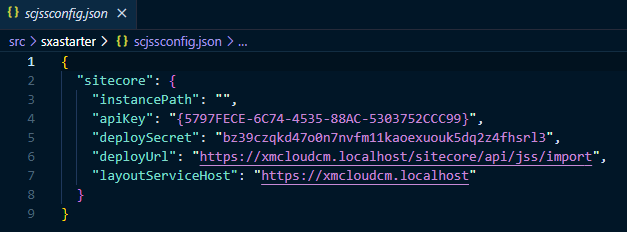
Also note the sscjssconfig.json file updated.
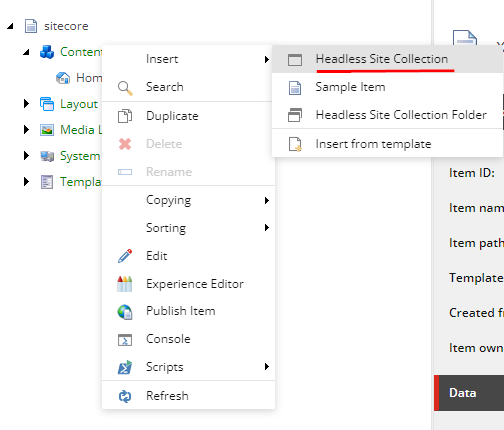
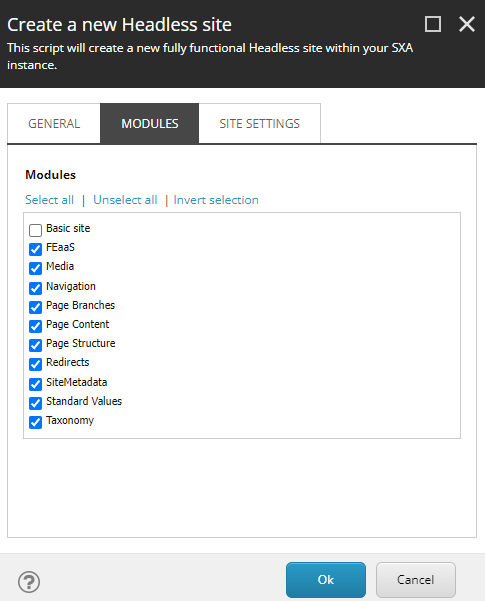
2 . Create a Healdess Tenant and Site
In your Sitecore instance create a Healdess Site Collection, you may create a folder Site Collection Folder if required-
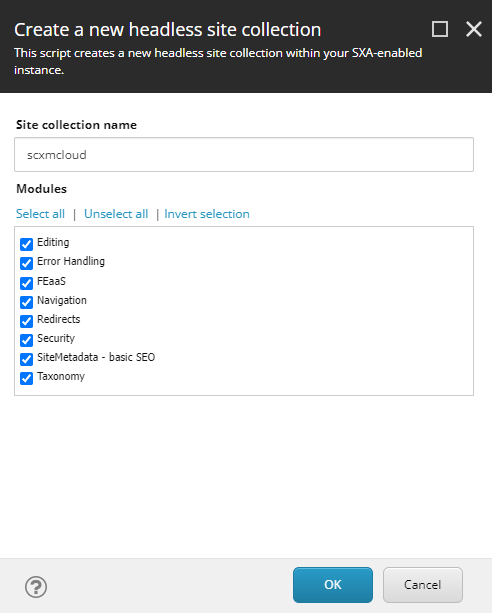
Next provide the Site collection name, in this case scxmcloud and select the required modules-
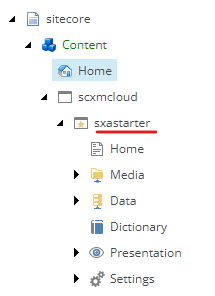
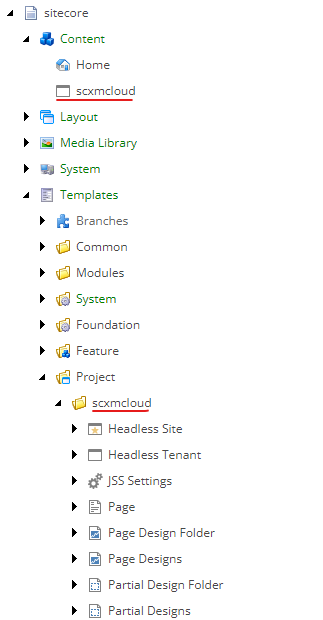
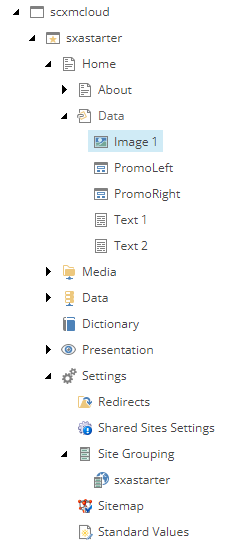
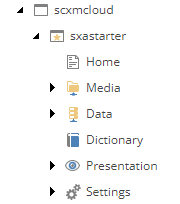
You should see the Site collection created along with the required templates in Project/scxmcloud folder.
Setup should create folders and required items in following location. Note this as this is required whilst setting the item sync using Sitecore SCS (Sitecore Content Serialization)
Media Library – /sitecore/media library/Project/scxmcloud
Templates – /sitecore/templates/Project/scxmcloud
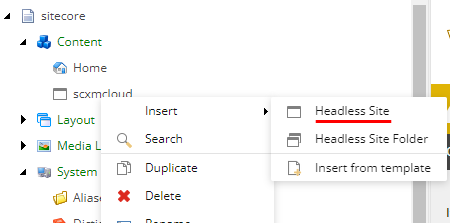
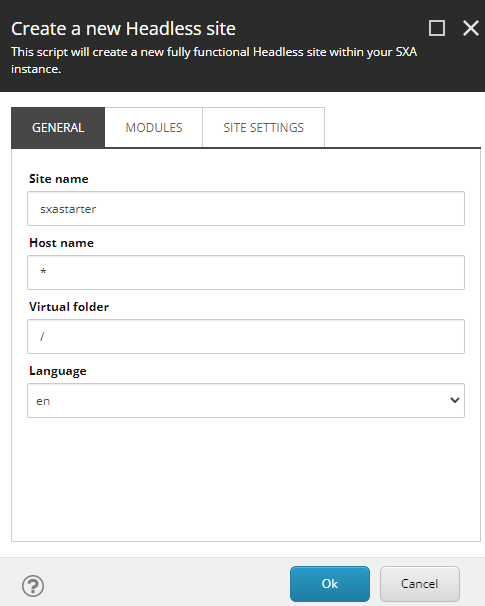
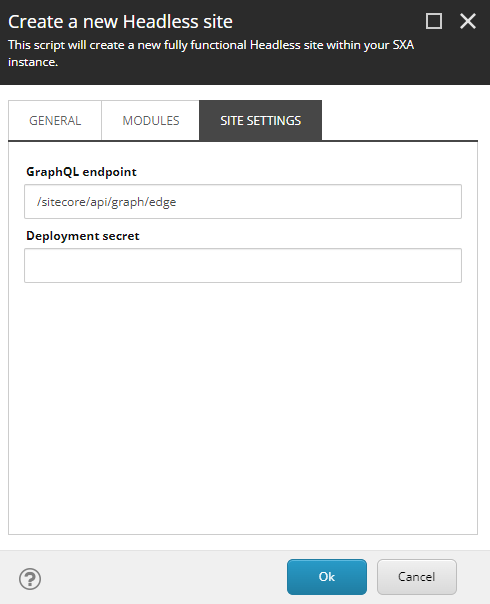
Create a Headless SXA Site
Create headless site under site collection-
Provide the name of the site- sxastarter
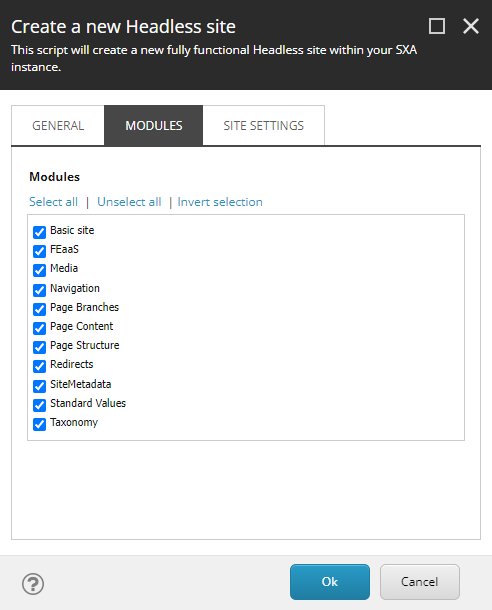
Select the modules- Note I selected the basic site module. This should add sample items to home page along with About page. You may choose not to select the basic site module.
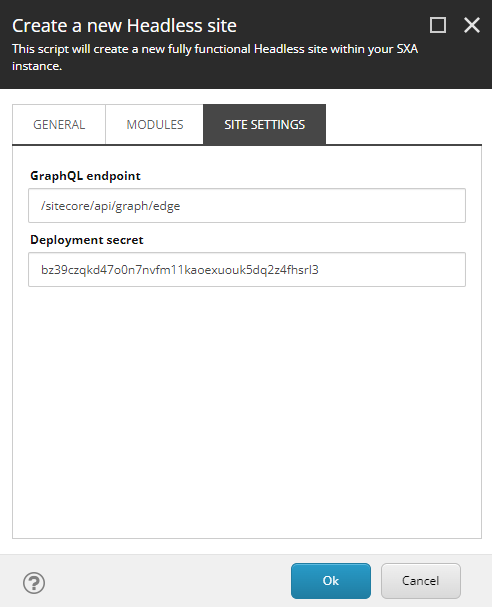
Enter the deployment secret created whilst setting up the JSS app
Site should now be created-
Site without Basic Site module-
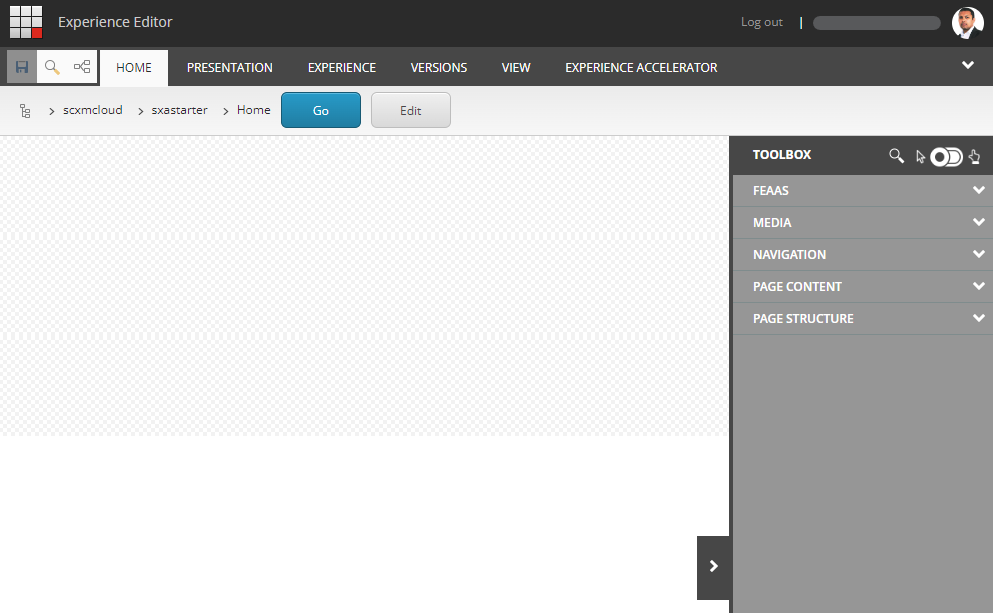
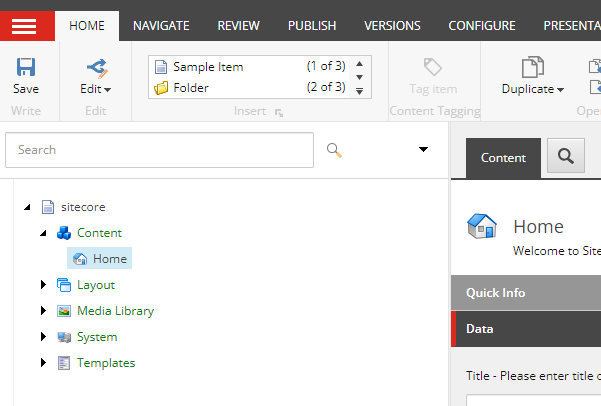
Open the experience editor and you should see the blank page-
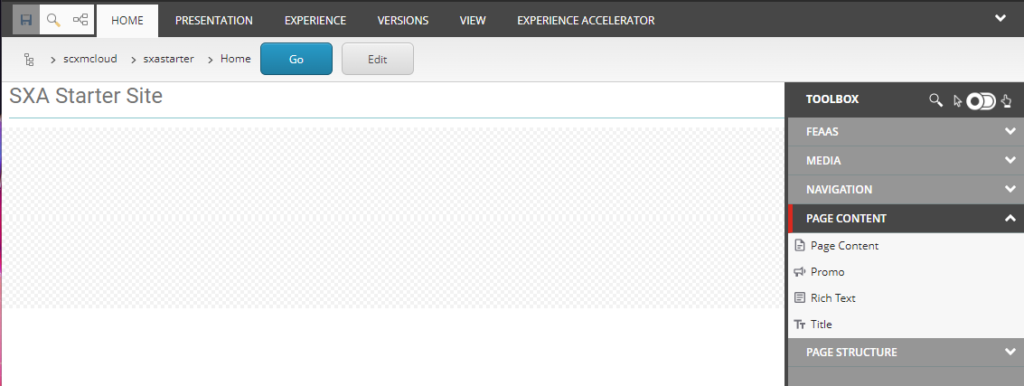
Lets add the Title component to see if the changes are reflecting in Experience Editor and FE.
We now have site ready to start developing components.
Run the FE site
On your root folder /src/sxastarter folder run following-
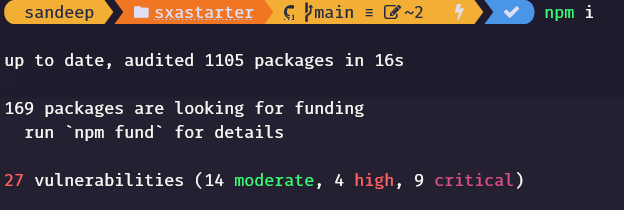
npm install
npm run start:connected
npm install – should download all the required dependencies
You may fix any vulnerabilities by running-
npm audit fix
OR
npm audit fix --force
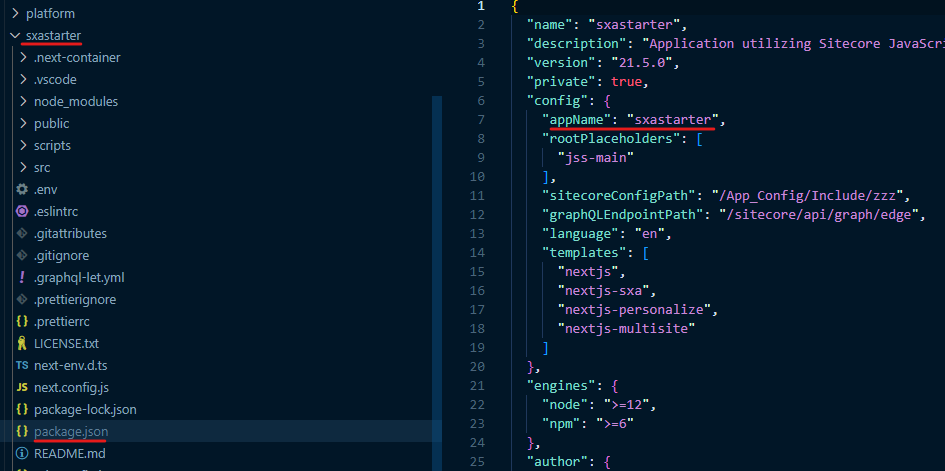
Before starting the jss app ensure the app name in Sitecore matches the app name in package.json file.
If you wish to change the app name you to make changes in Sitecore and package.json file.
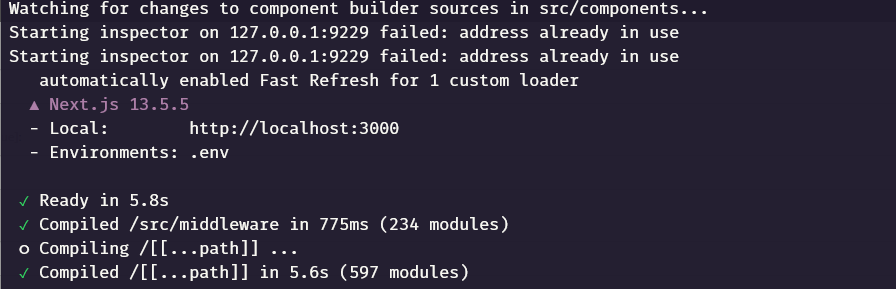
To start the sxastarter jss app run-
npm run start:connected
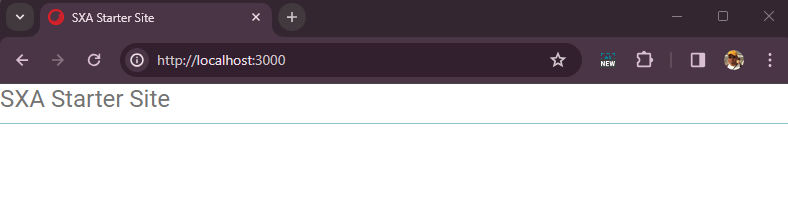
If no errors the app should be available on http://localhost:3000
The newly added title in header should also be displayed-
Managed to add inbuilt components to page-
This conculdes setting up the local environment with having Sitecore CM instance and the jss app (FE) running on localhost. Note JSS app is not runing on containers as we should not force FE devs to work on containers. This scenario is good for Sitecore developers for bulding and testing the components locally.
You may pull out the sxastarter folder outside this repo and FE devs should be good to develop on theri own. Although there is a dependency to have Sitecore instance hosted on local environment.
In next blog post we will how to setup the FE without having Sitecore local instance and connect to XM Cloud.
But before that we need to setup the XM Cloud project and environments, for that we will configure the Sietcore Content Serilization to push the changes made in local to XM Cloud. Coming in next blog.
Connect your local FE app to XM Cloud.
Although not recommended but if you want ot connect the XM Cloud instance to local FE app. Follow these steps.
I need to make changes in 2 places to get this working.
In this blog we will create a Headless SXA Site in local instance, setup and resolve any errors while running the rendering app (sxastarter)
We will create a Headless SXA site in Sitecore local instance and then setup the FE application.
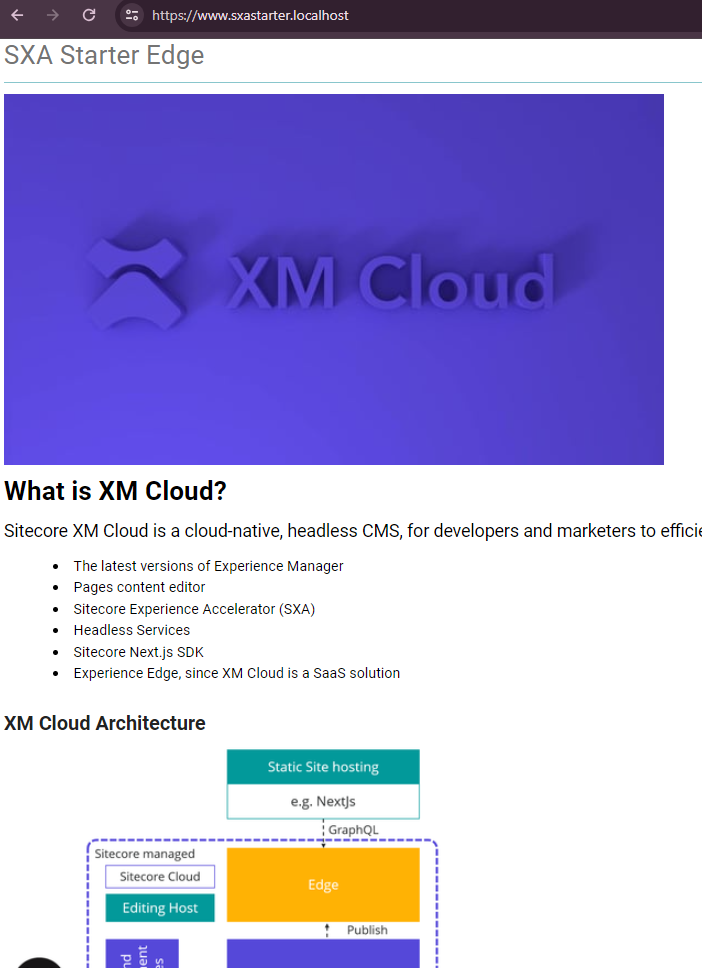
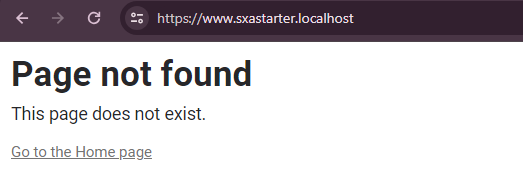
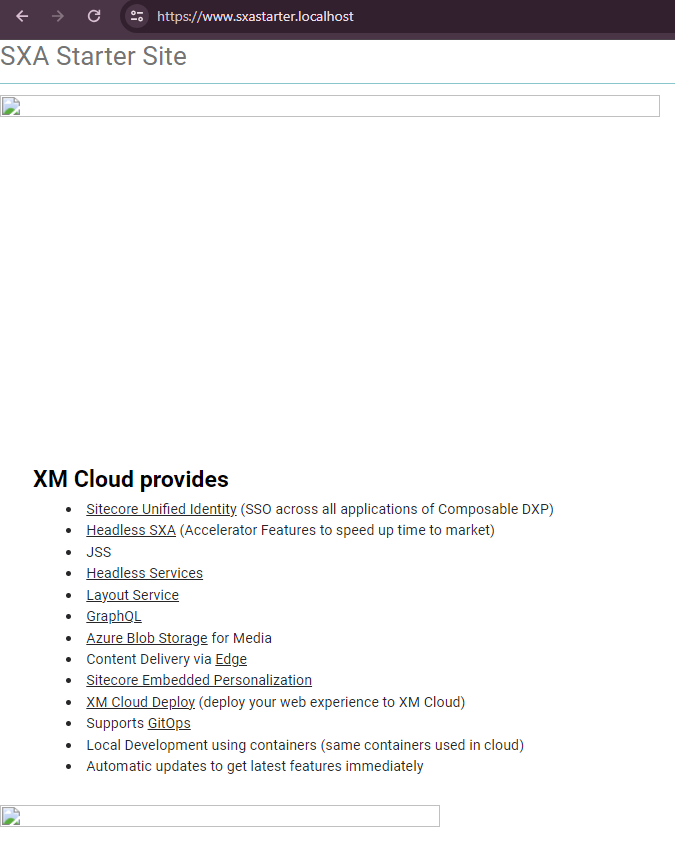
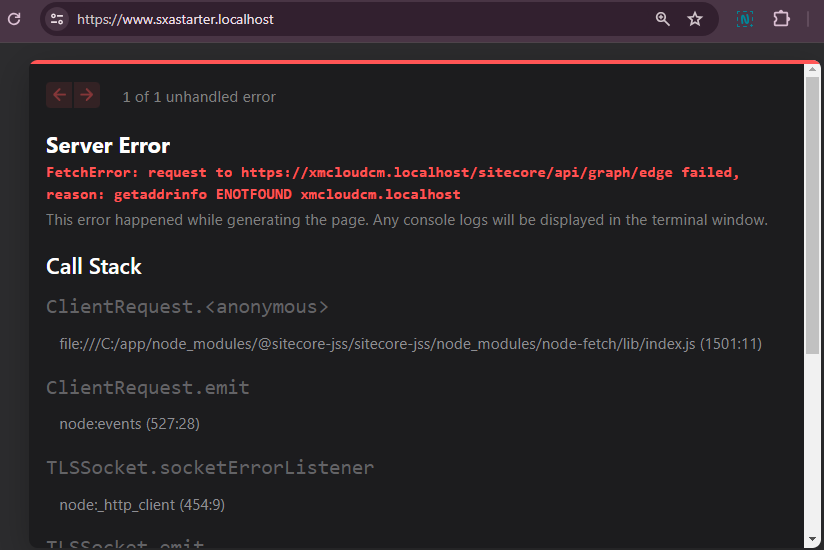
With the local Sitecore instance(CM) you should also see the rendering host is configured i.e. https://www.sxastarter.localhost/
While seting up the local instance we haven’t made any changes to docker compose or override files nor to the .env files manually, although while initalizing the app certian key values were updated in .env file.
Check the sxastarter rendering host- https://www.sxastarter.localhost/
At this point you might see the error since we haven;t created a sxastarter app in Sitecore.
This is because the no Site Collection or Headless Site exists in Sitecore. Lets create a Headless Tenant and Site.
2 . Create a Healdess Tenant and Site
In your Sitecore instance create a Healdess Site Collection, you may create a folder Site Collection Folder if required-
Next provide the Site collection name, in this case scxmcloud and select the required modules-
You should see the Site collection created along with the required templates in Project/scxmcloud folder.
Setup should create folders and required items in following location. Note this as this is required whilst setting the item sync using Sitecore SCS (Sitecore Content Serialization)
Media Library – /sitecore/media library/Project/scxmcloud
Templates – /sitecore/templates/Project/scxmcloud
Create a Headless SXA Site
Create headless site under site collection-
Provide the name of the site- sxastarter.
You may choose another name but ensure the package.json file is updated accordingly.
Select the modules- Note I selected the basic site module. This should add sample items to home page along with About page. You may choose not to select the basic site module.
Enter the deployment secret created whilst setting up the JSS app
Site should now be created-
Site without Basic Site module-
Keep the Site Settings as is-
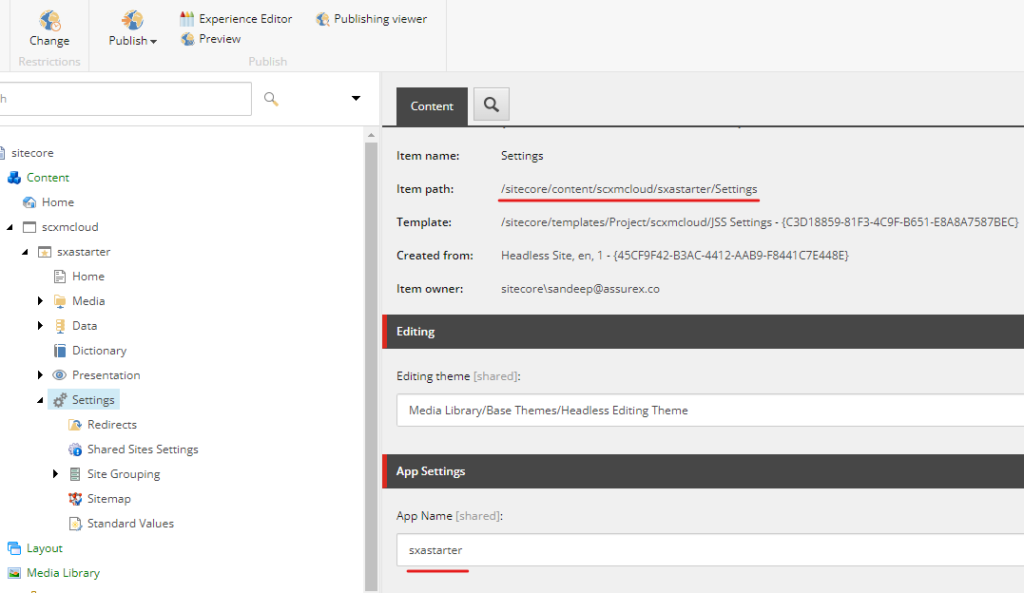
sxastarter site is created along with this the choosen mdoules are installed.
Once this is done ensure the app name in Settings is same as in package.config-
Open the experience editor and you should see the blank page-
Lets add the Title component and images to see if the changes are reflecting in Experience Editor and FE.
We now have site ready to start developing components.
The newly added title in header, images should also be displayed-
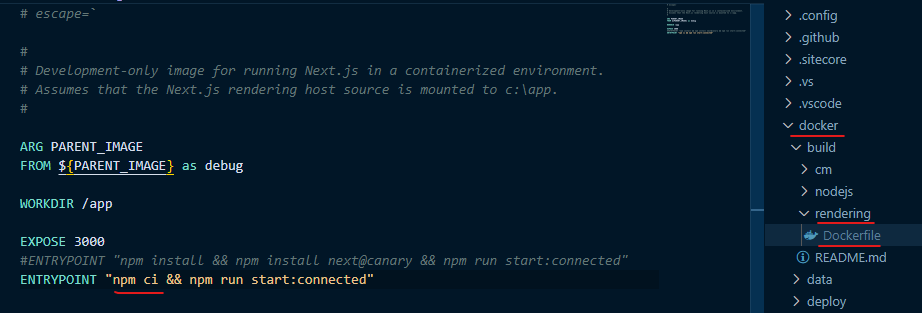
This conculdes setting up the local environment with having Sitecore CM instance and the jss app (FE) running in docker. JSS app is runing in container.
In next blog post we will how to setup the FE without having Sitecore local instance and connect to XM Cloud.
But before that we need to setup the XM Cloud project and environments, for that we will configure the Sietcore Content Serilization to push the changes made in local to XM Cloud. Coming in next blog.
Errors-
sxastarter site hosted in docker throws below error.
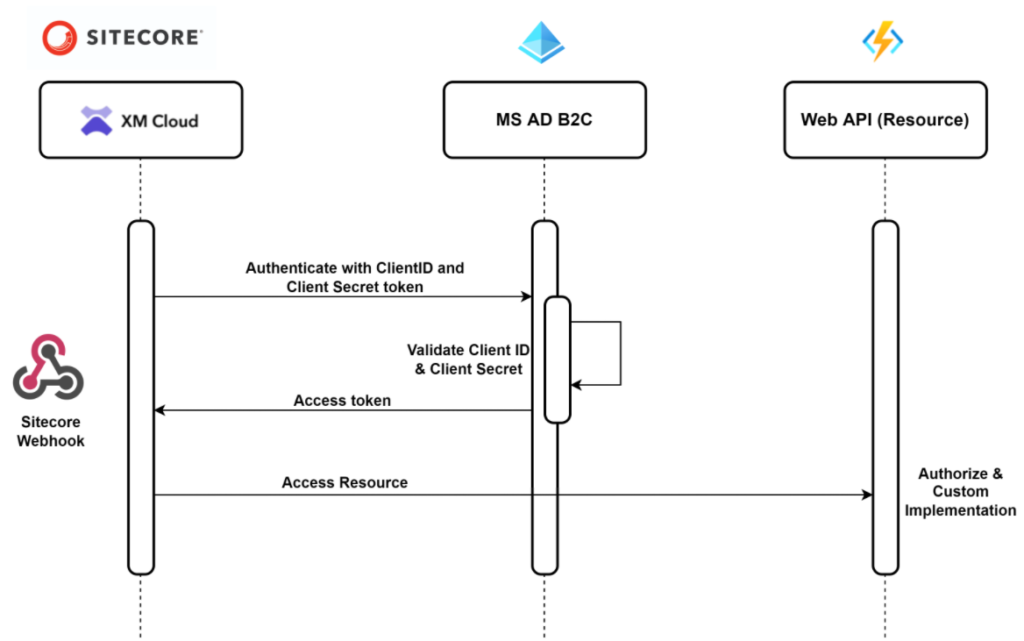
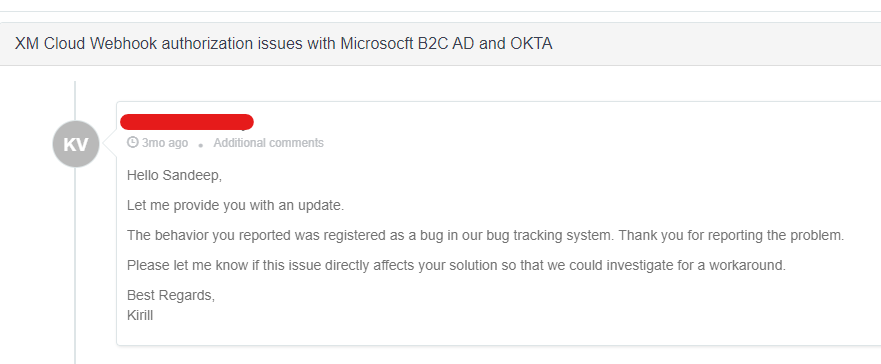
Few months back I was trying to Authorize Sietcore Webhooks using Microsoft Actice Directory B2C and found issue that it wasn’t working.
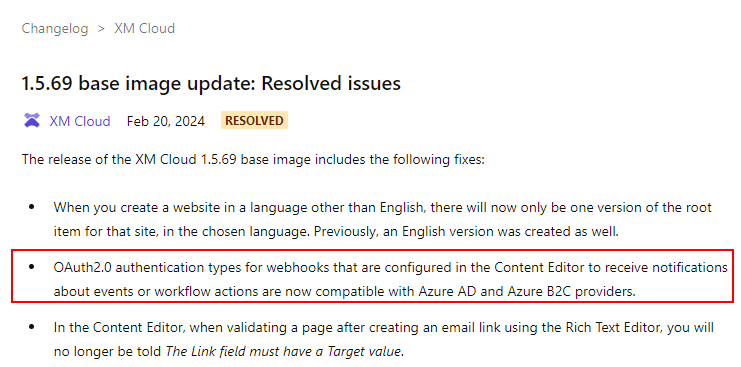
After creating a support ticket, Sitecore logged this as a bug.
This was resolved and release on 20th Feb 2024.
This blog helps on how to configure MS AD B2C and configure in Sitecore as Client Credential grant to generate an access token so the Event receiver can authorize and process the request.
Note- text highlighted in red is required later to configure in Sitecore.
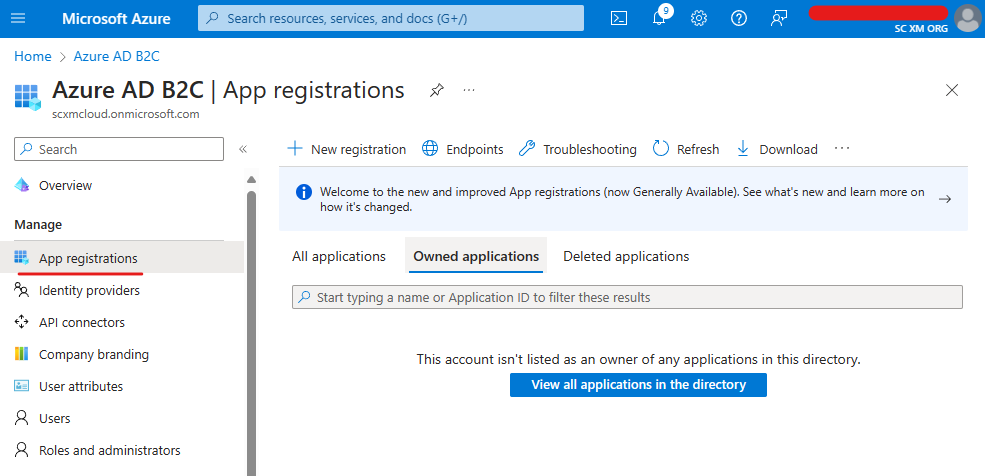
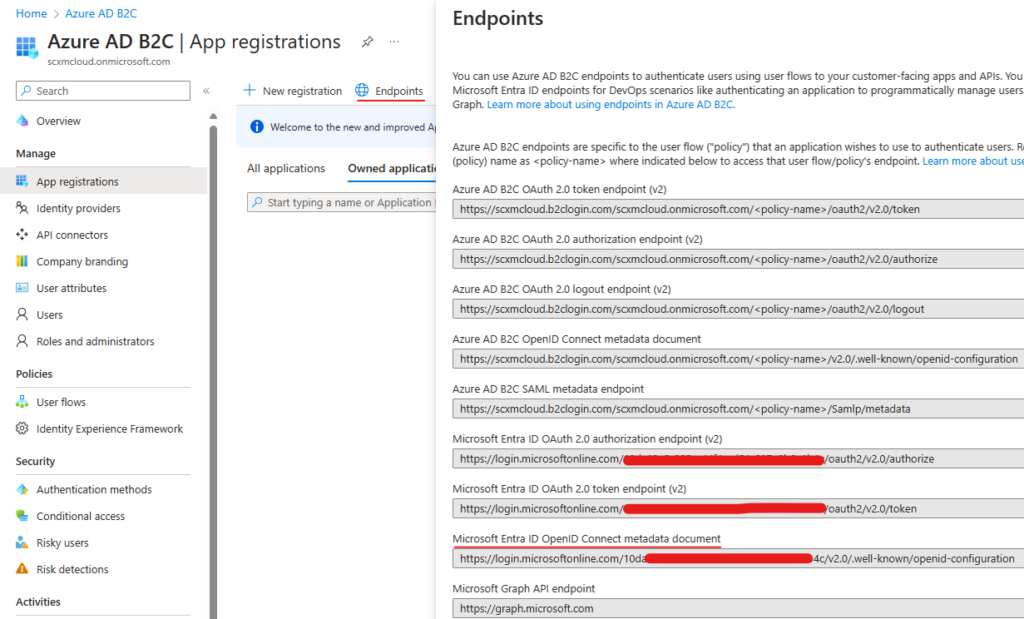
Once configured you see the options to register your app.
Before registering app note down the highlighted. This should be available as the part of Endpoint-
Microsoft Entra ID OpenID Connect metadata document.
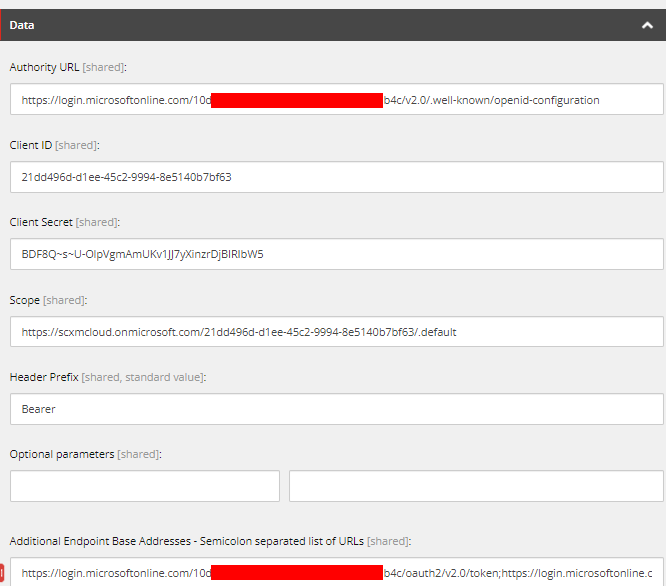
This is Authority URL in Sitecore Webhook.
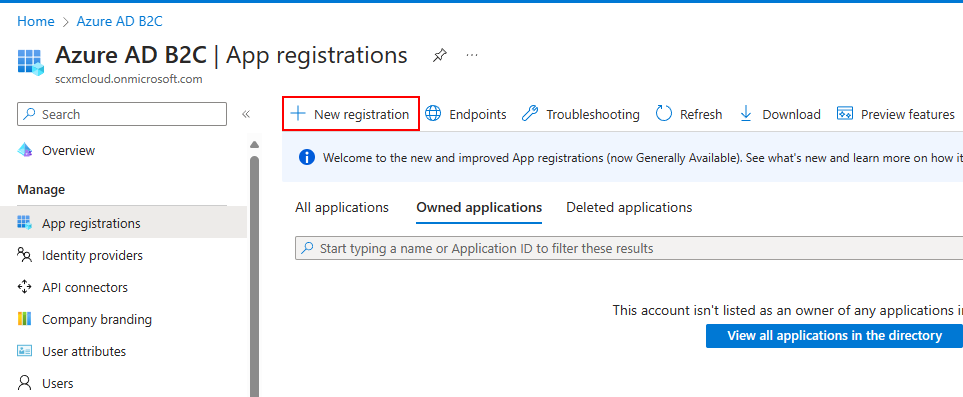
Step 1 – Register App
Click on New registration
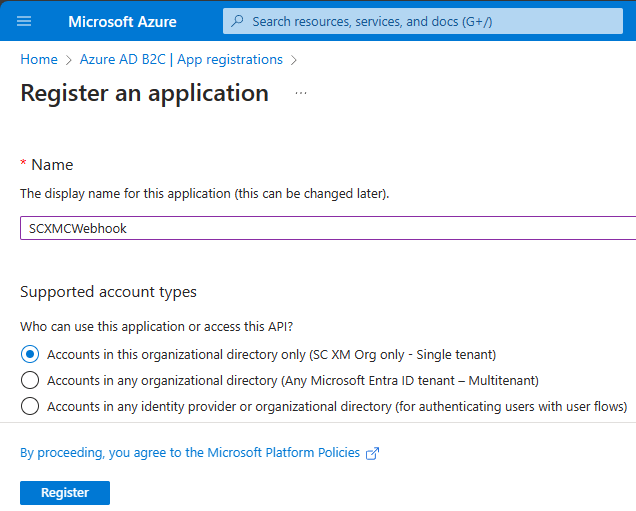
Provide the App registration name and selected supported account types. In this case I have given name – SCXMCWebhook and selected “Accounts in this organizational directory only (SC XM Org only – Single tenant)“
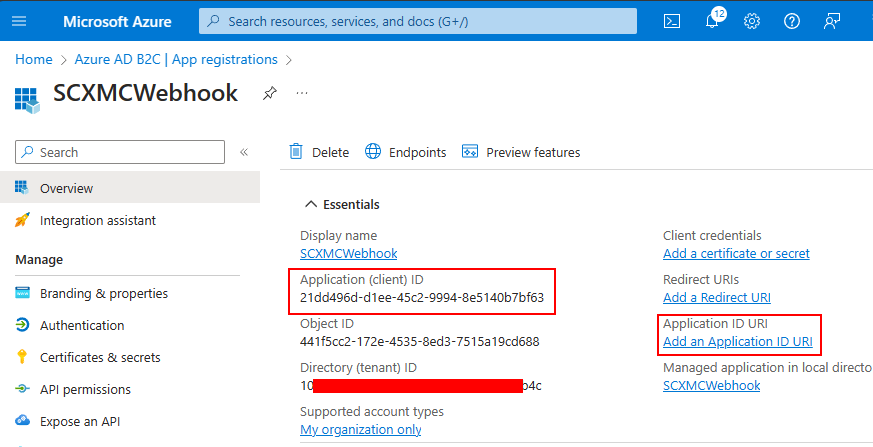
Register App and it should show the registered app-
Application (Client) ID – Required to configure in Sitecore
It should also list your newly created app-
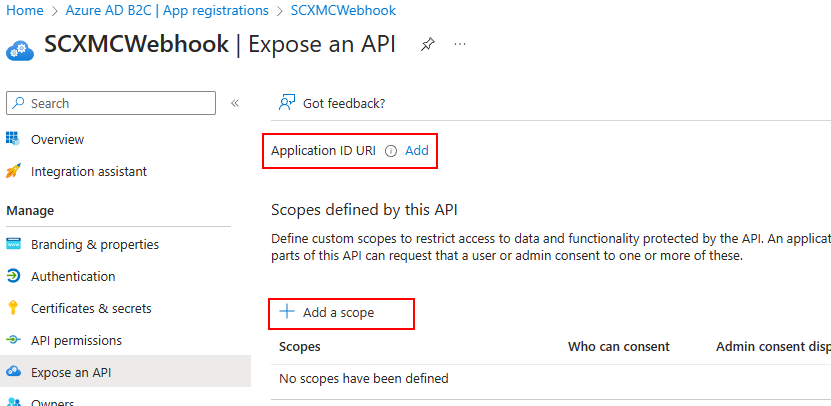
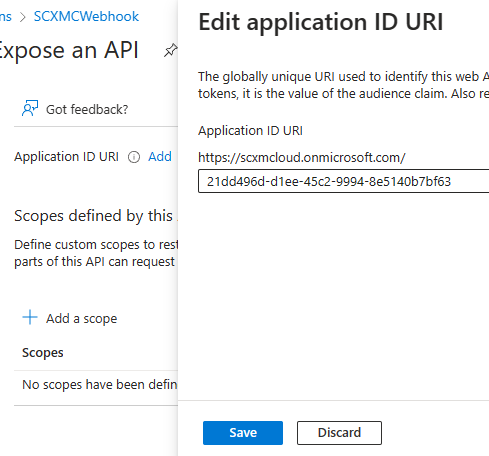
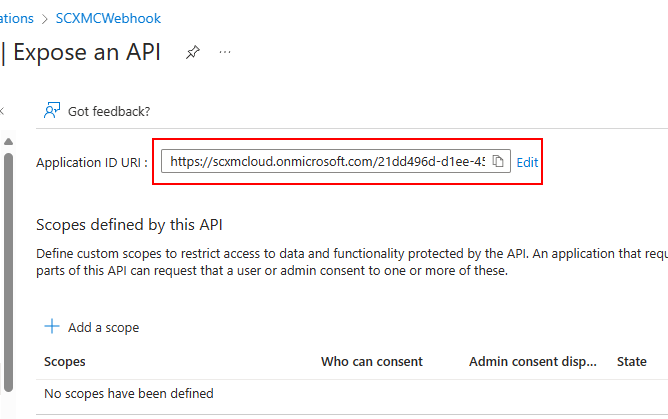
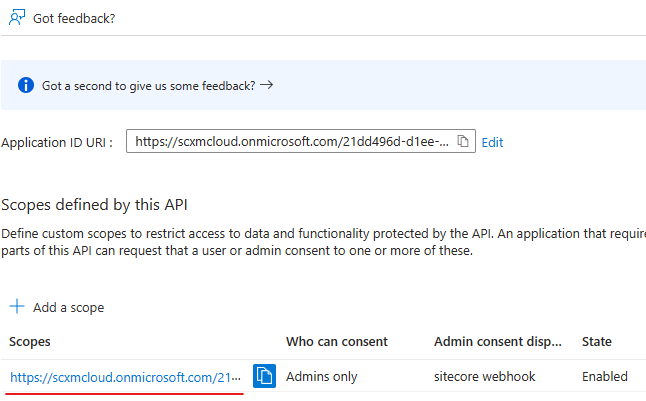
Step 2 – Add an Application URI
Click on Application ID URI “Add”link and then “Add a scope”
This should create a URI –
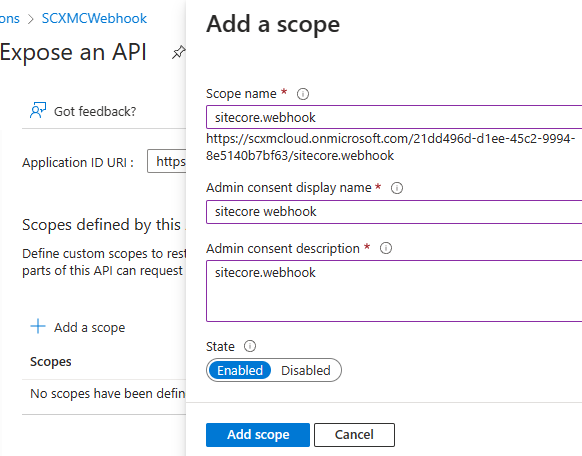
Step 3 – Add a scope
Now create a scope “Add a scope”. Enter scope name, admin consent and description. Ensure you enable the scope.
A new scope isadded . Copy the scope as highlighted –
required in Sitecore Auth Scope field
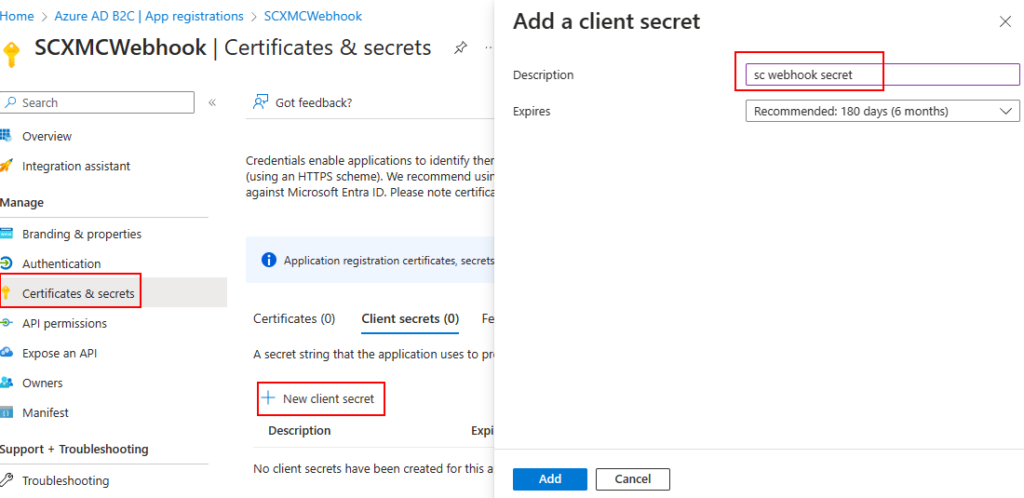
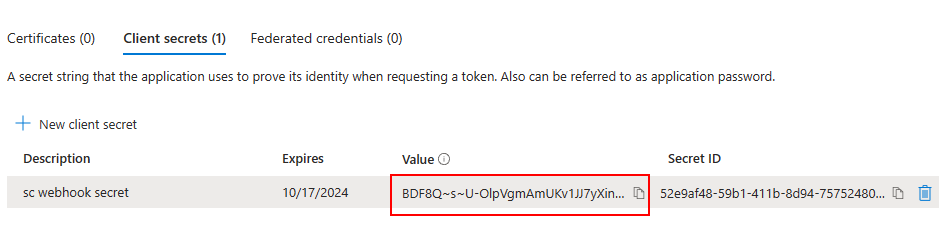
Step 4 – Create Secrets
Copy the secret value. This value won’t be shown again. This is required to configure in webhook Client Secret field
Navigate to Overview tab and you should see all the configured details.
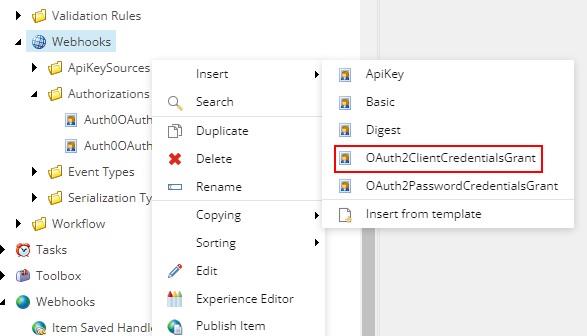
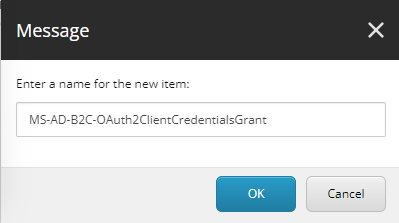
Step 5 – Create a Client Credential Grant Authorization in Sitecore
Sitecore Client Credential
Microsoft AD B2C
Authority URL
Microsoft Entra ID OpenID Connect metadata document. (Check Endpoints)
Client ID
Application (client) ID (Check Overview tab)
Client Secret
Client Secret Value (Check Certificates & Secrets tab)
Scope (Append /.default)
Application ID URI (Check Overview tab)
Header Prefix (Bearer)
Additional Endpoint Base Addresses (See Semicolon seperated values below)
Directory (tenant) ID (Part of the url- Check Overview tab) e.g.:- 10d**************1b4c
Client Credential Grant Authorization Item should look like this-
Please note Additional Endpoint Base Address are Semicolon seperated.
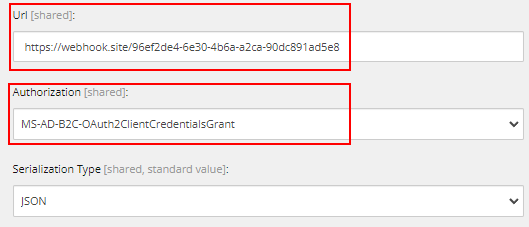
Step 6 – Create a Webhook Handler in Sitecore
Create Webhook handler at this location- /sitecore/system/Webhooks/
Provide the Description, Select the events the webhook should trigger, Add any rules as per your requirements, Ensure to Enable the Webhook, provide the Url the webhook should send the item data, select the newly created Authorization and Selrialization type (JSON).
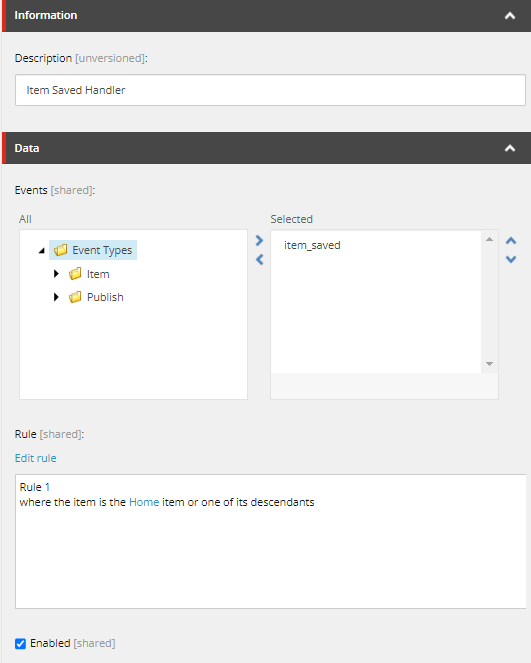
Step 7 – Save an Item in Sitecore
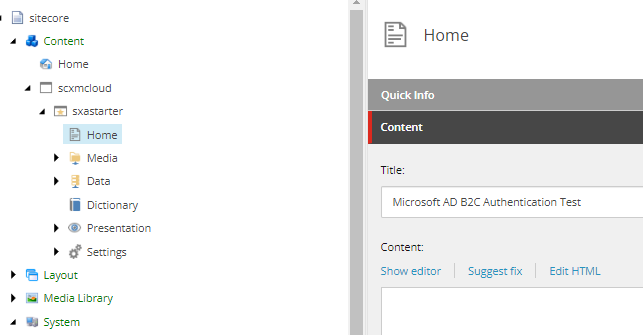
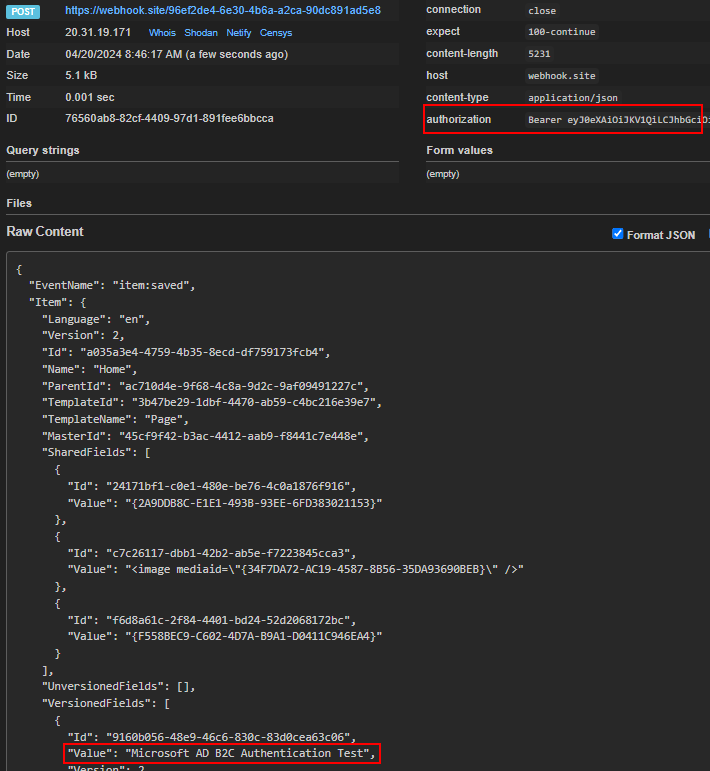
Update an Item, in this case I updated Home item
You should see the webhook sends the request to defined Url with Access Token, as highlighted below-
Hope this helps to cionfigure MS AD B2C in your Sitecore instance
This blog post will guide you through the local environment setup for XM Cloud. You may refer this documentation to do this your own way. Althoug the documentation covers most of the setup, this blog post provides visual on the steps and errors with the resolution.
Once the Foundation Head from Sitecore Labs is forked s(se more details here) clone the copy to the local machine for creating a local instance required for XM Cloud development.
Pre-requisite –
You can find the pre-requisite in this documentation. Ensure your machine has this before setting the local development environment. Just noting down here-
Also make sure you are using Docker v.2, as explained here.
Access to XM Cloud – This blog post assumes you have admin access to XM Cloud where you should be able to craete/update/delete projects environments and deployment in your organisation.
I have this ready on my machine.
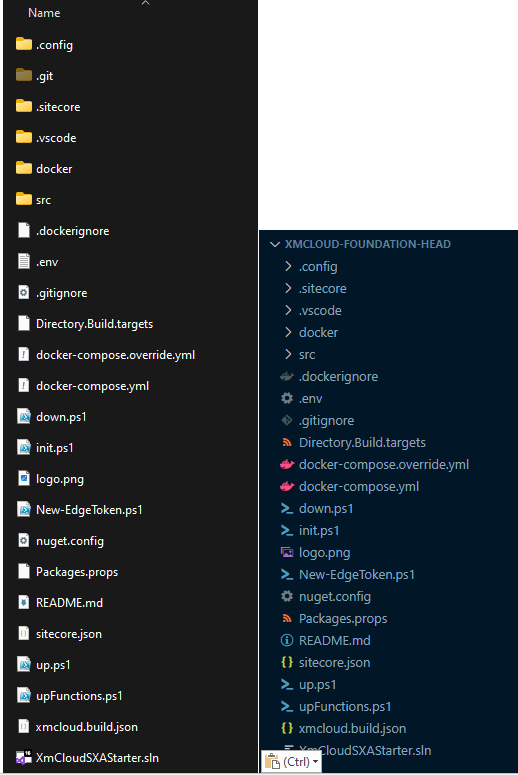
1. Clone the forked Foundation head repo.
I named the folder same as the repo on my local machine i.e. xmcloud-foundation-head. the same will be refered thoruhg this post.
Will see the following folder structure after cloned.
I use Visual Studio Code to make any environment related changes. You may use either Visual Studio 2022 or your choice of editor.
2. Open the .env at the root folder and you will see REPORTING_API_KEY, TELERIK_ENCRYPTION_KEY etc. empty.
3. Start the containers.
Prepare the environment
Before doing so make sure you stop the IIS and check if the port 443 (IIS Website) and 8984 (Solr service)is not used and the docker is running in Windows Containers mode. If not switch to Windows cotainers.
iisreset /stop
Get-Process -Id (Get-NetTCPConnection -LocalPort 443).OwningProcess
Get-Process -Id (Get-NetTCPConnection -LocalPort 8984).OwningProcess

Stop-Service -Name "<the name of your service>"
Copy the license file to c:\license folder. If you wish to have this in other folder you also have to change the HOST_LICENSE_FOLDER in .env(root folder) with the path where the license resides.
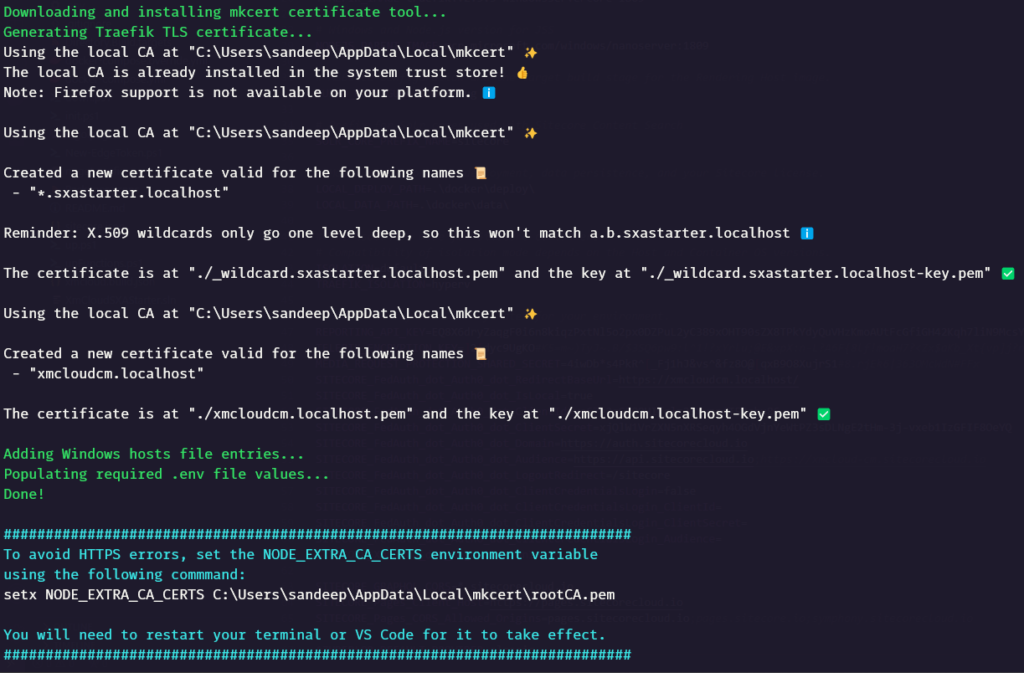
To prepare the Sitecore container environment, run the script init.ps1 from the root directory of the project along with the license path and desired passowrd for your instance. this form the root folder from the downloaded the repo.
You may also noticed .env in root folder have added values in REPORTING_API_KEY, TELERIK_ENCRYPTION_KEY and MEDIA_REQUEST_PROTECTION_SHARED_SECRET, which was earlier empty.
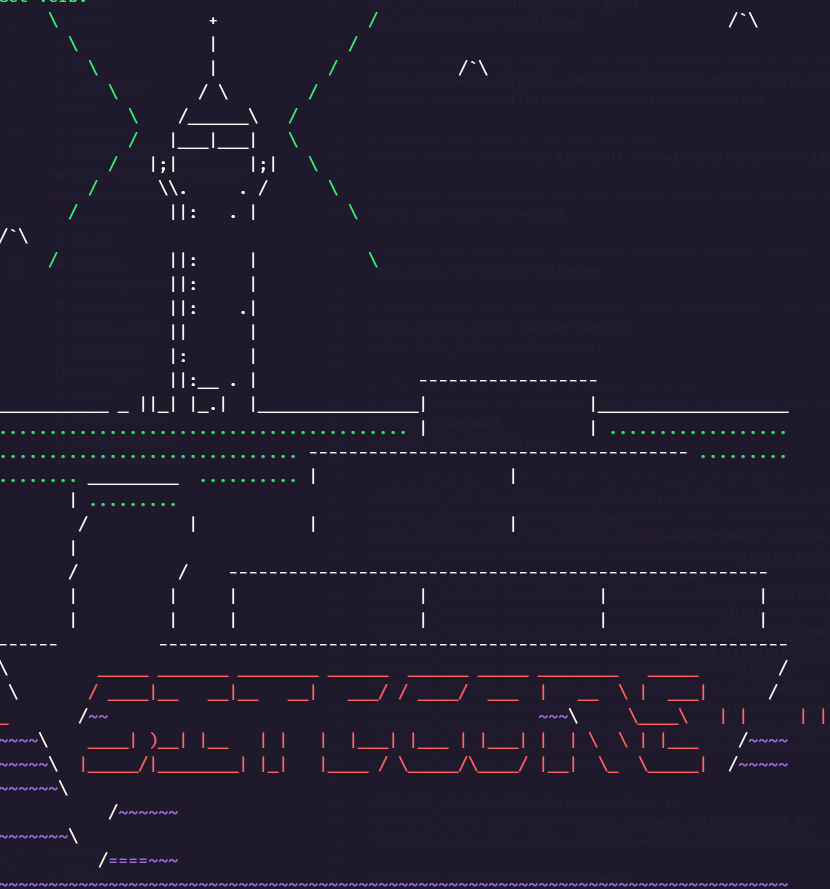
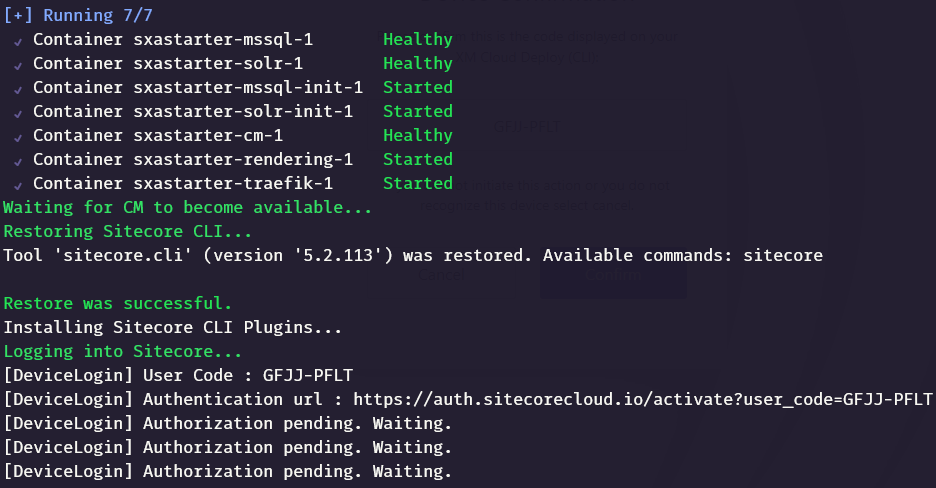
Download the Sitecore Docker images, install and configure the containers and client application
Run the up.ps1 to download and install containers and client application
.\up.ps1
This is should download the images and start the containers
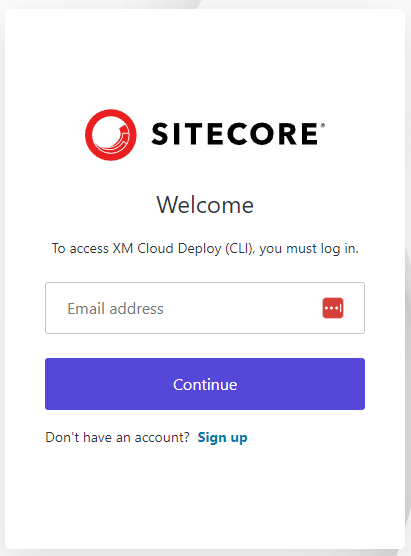
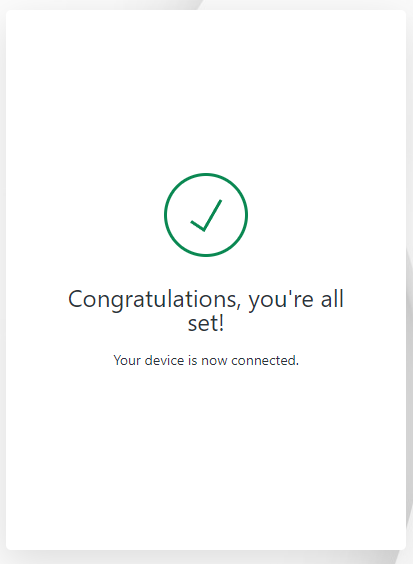
Once the containers are started, it should ask to confirm to login to Sitecore with the Device confirmation code. Confirm if this matches. It should also ask to login to XM Cloud isntance and confirm.
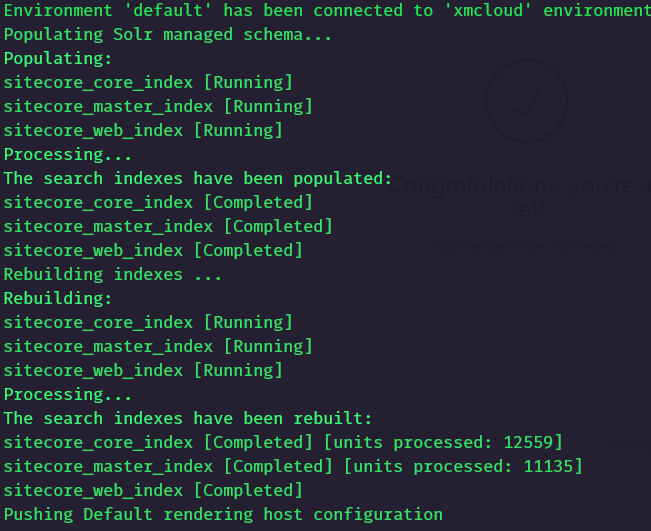
One this is done indexes will be rebuilt and the Sitecore instance should be up and running.
Also notice that any items in this case none is pushed to Sitecore instance and an api key is genereated with the name xmcloudpreview-
You may also notice a jss editing secret and SITECORE_API_KEY_xmcloudpreview are updated in .env fiel in root folder along with the Sitecore Admin password which was set whilst initialising the environment.
The highlighted key shoulld match the key while spinning up the containers.
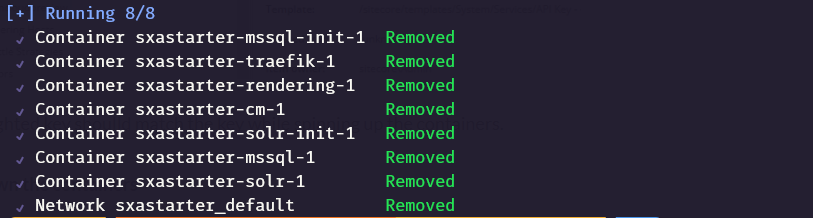
Taking down the containers
To take down the containers run the down.ps1 from the root folder.
.\down.ps1
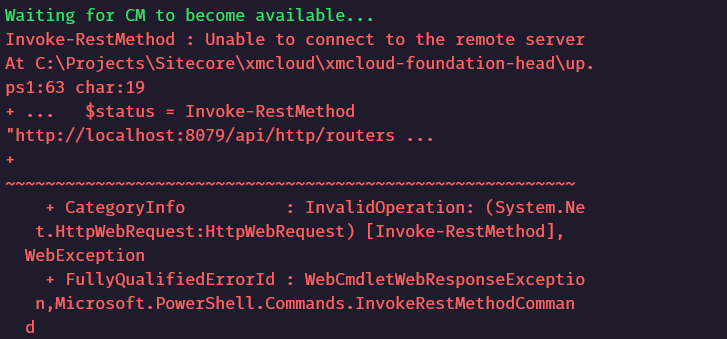
Errors
Invoke-RestMethod : Unable to connect to the remote server
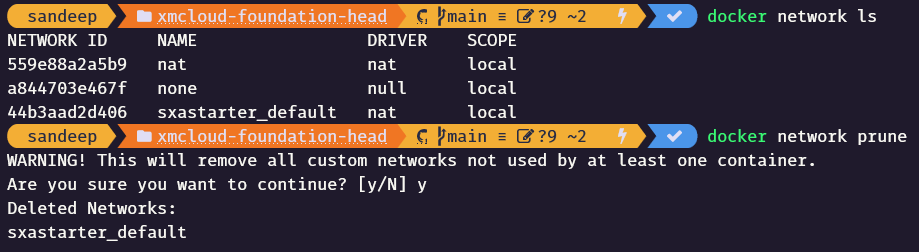
This should be ideally staright forward but if you see any issues whilst getting CM instance up and runing. take down the container with down.ps1 command and delete any docker network.
docker network prune
Hope this helps to setup local Sitecore instance for XM Cloud development.
Voluntarily contributing your time, energy and skills to the community and help customers succeed and be a part of their growth is all that matters. I believe going above and beyond to achieve expertise in whatever you are doing and giving back to community however small it may be is the key to grow together and when these efforts are recognized it inspires the community to continue their good work.
Happy to share that I have been recognized as 2024 Sitecore MVP.
Sitecore recognizes professionals who deliver outstanding customer experiences through shared expertise on Sitecore’s products, the 2024 MVP program draws from a community of 16,000 certified developers and over 30,000 active participants. This year’s 247 MVPs contributed invaluable knowledge to the community in 2023 and demonstrated true mastery of the Sitecore platform to support partners, customers and prospects.
With Zapier you can inspect and create customised workflow in munites without wirting any code. Its a good way to automate any actions required once the webhooks in Sitecore are triggered.
In this blog post will quickly create a workflow in Zapier to send mail when a webhook event is trigerred.
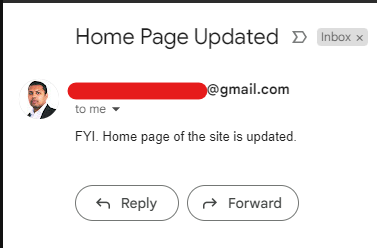
Will take a scenario when a Home page is updated, so that the concern team knows about this change.
This is not a fully customised solution but you can extend this as per your requirements.
Create a Zapier account
Create a Zapier account if you don’t have already. There is free subscription available to try out.
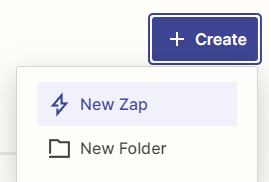
Login to Zapier and create a new Zap
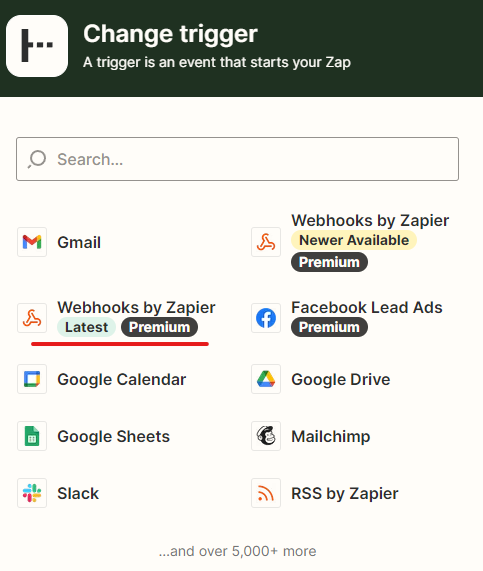
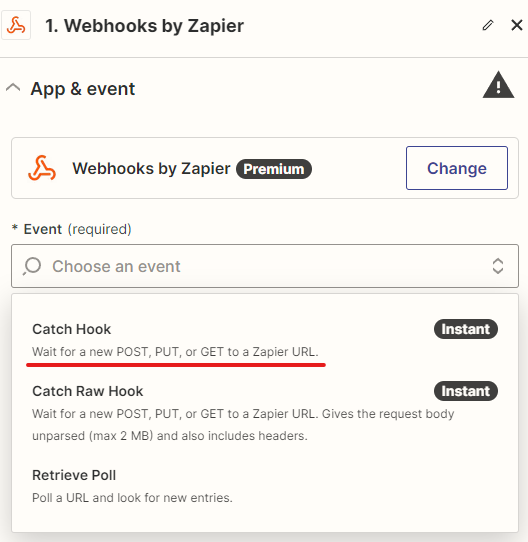
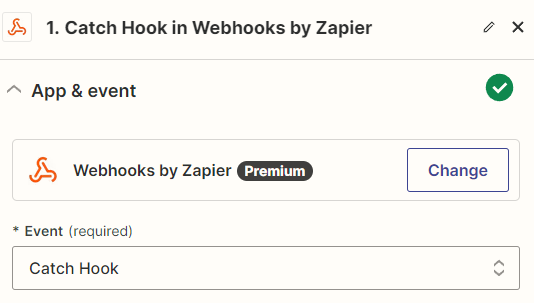
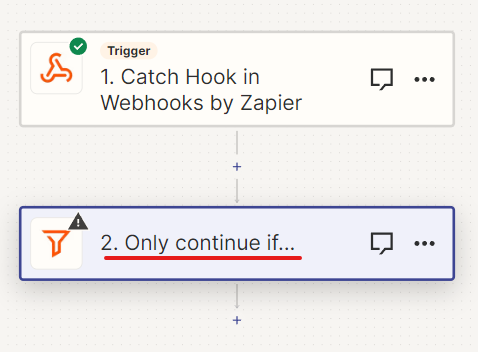
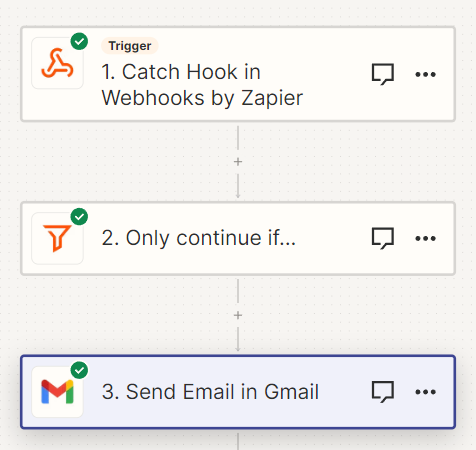
Configure a trigger- Select Webhook by Zappier
When a new zap is created select a Catch Hook event in App & Event section
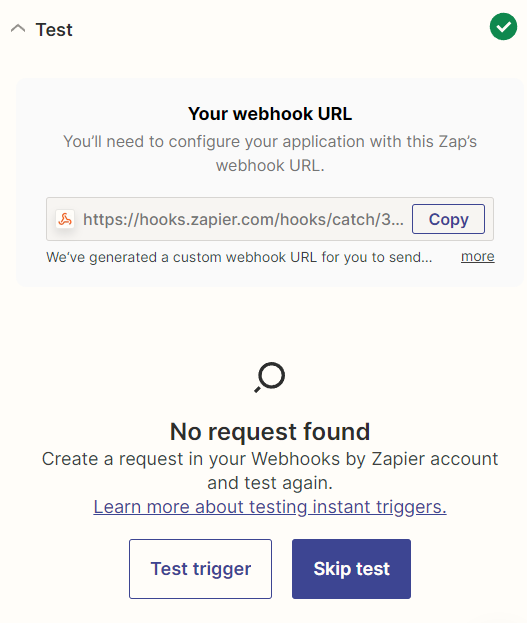
In the test section it should provide the URL its listening to execute any autmation if applicable.
Test the trigger by copying the s URL and setup the same in your Webhokk Handler in Sitecore XM CLoud or local instance. See this blog post on how to create a webhook handler.
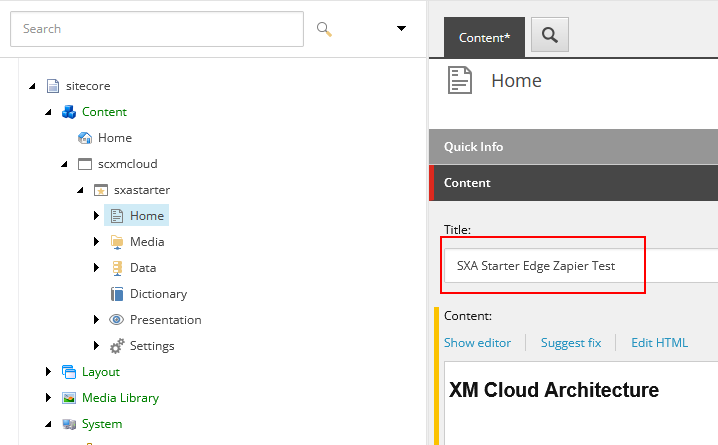
Update content in Home page and Save. This should triggere the webhook and call the Zapier endpoint configured in handler.
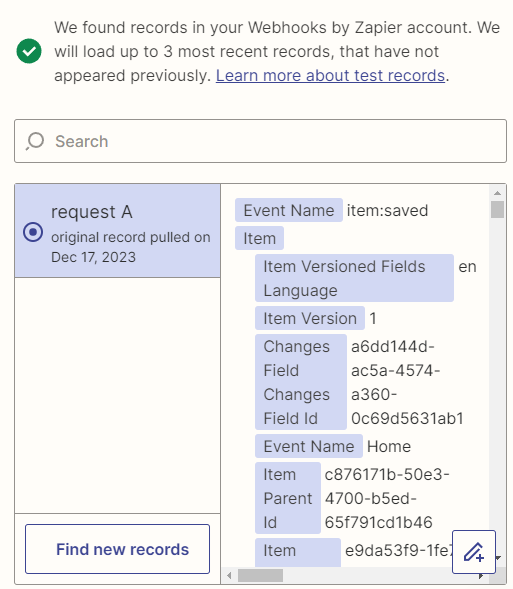
Test trigger and should see the request available to this endpoint-
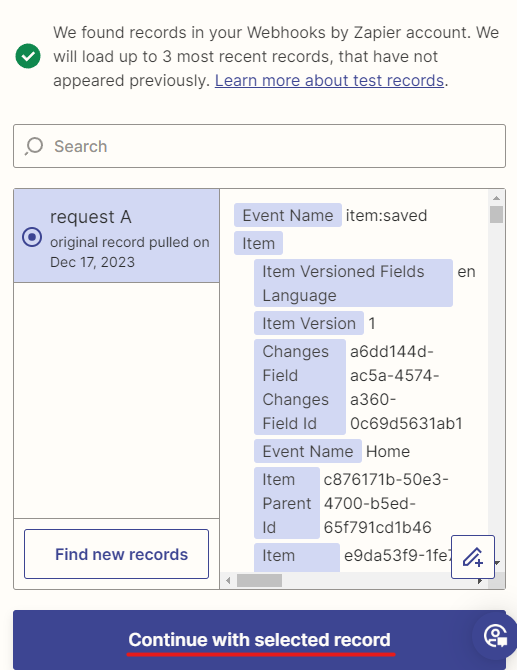
Continue with Selected Record if you are happy with the request-
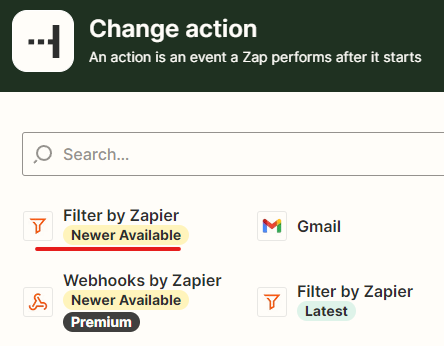
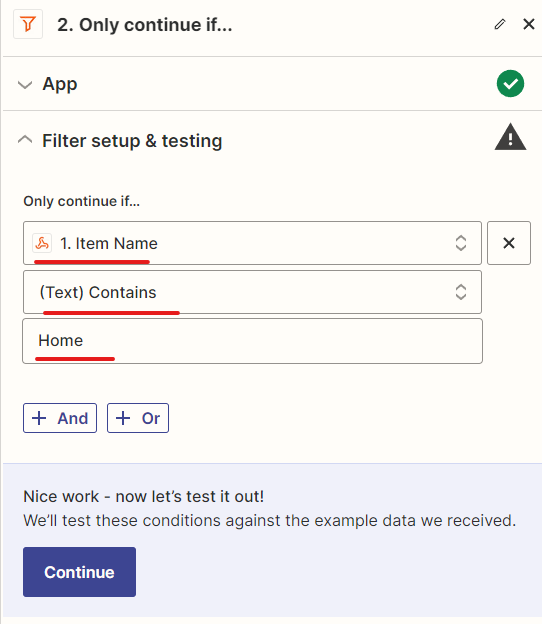
Apply Filter
We want to send mail only when Home page is changed, so lets apply filter
Configure the filter
Add the condition
Further action will be taken only if Item name is Home. This just an example you can select the list of action available.
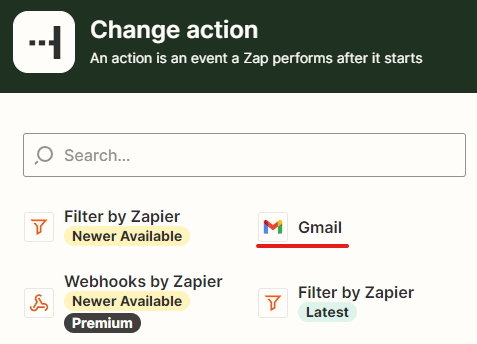
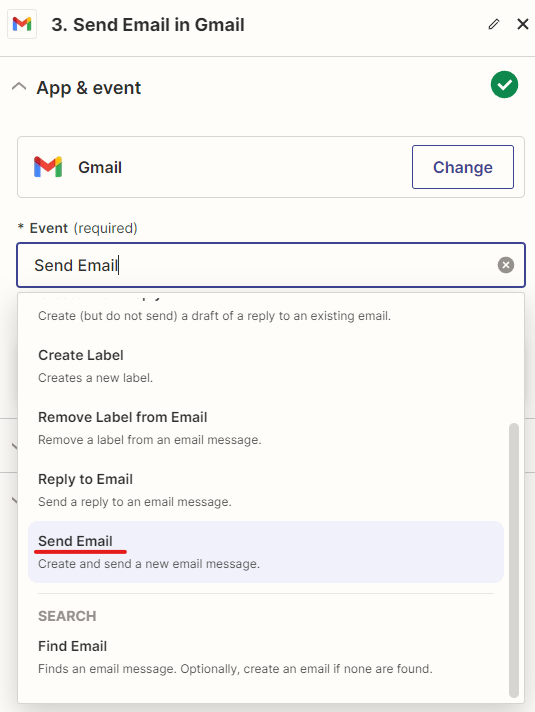
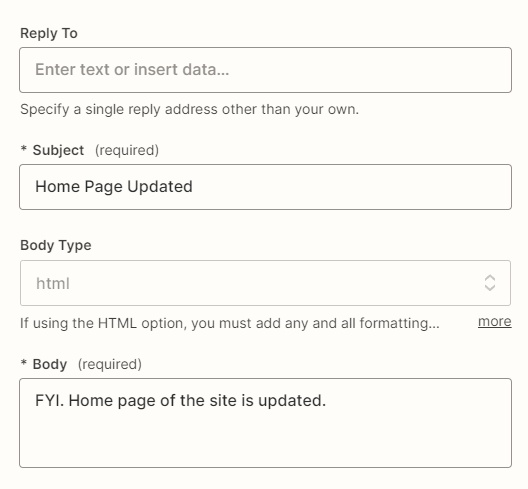
Continue and select next action and in this case I selected to send a mail to Gmail
Select the event “Send Mail”
Setup your account.
Setup the action to whom the mail should be sent and other information required for the mail
Continue and Test the Step
Now you should have the Zap configured-
Publish the Zap
Change the name of the Zap and should be available in Dashboard-
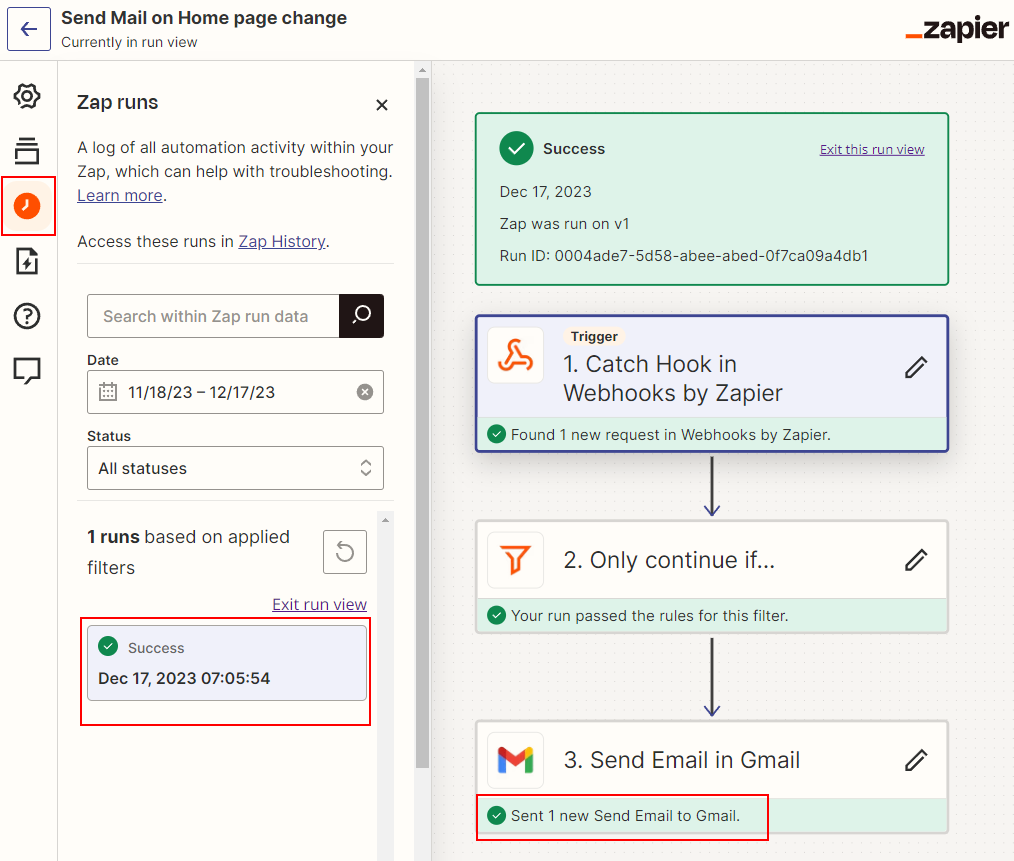
Change a home page content in Sitecore XM Cloud-
In the Zap runs you should be able to see a mail is triggered-
Thats it. This took me few minutes to configure and test the mail for a simple sceanrio.
Zapier gives you full flexibility to configure the triggers without writing any code based on the conditions to tak action when a Webhook event is triggered in Sitecore XM Cloud.
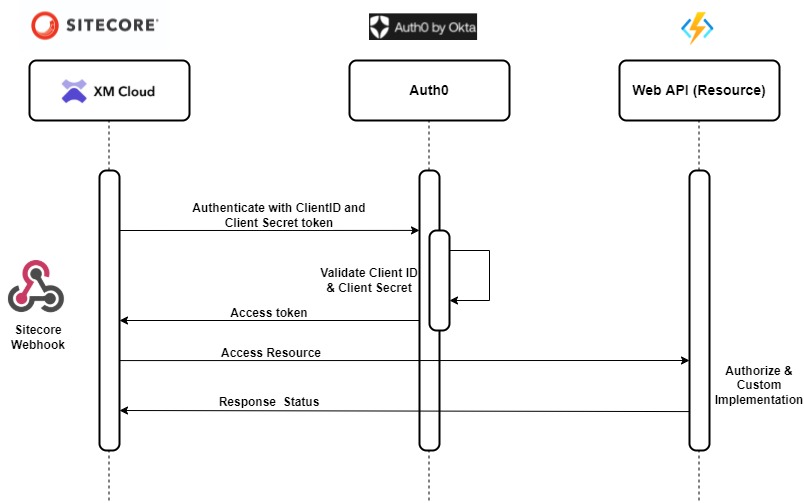
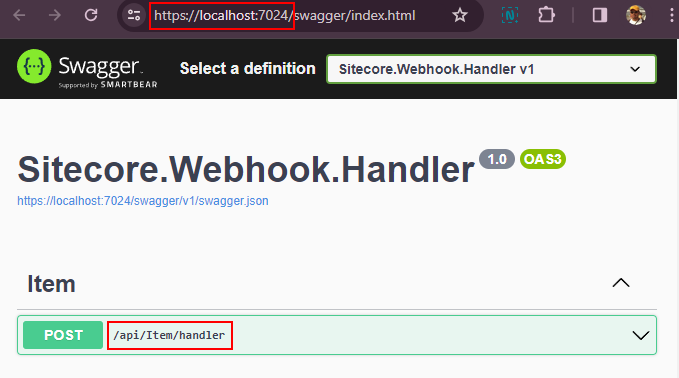
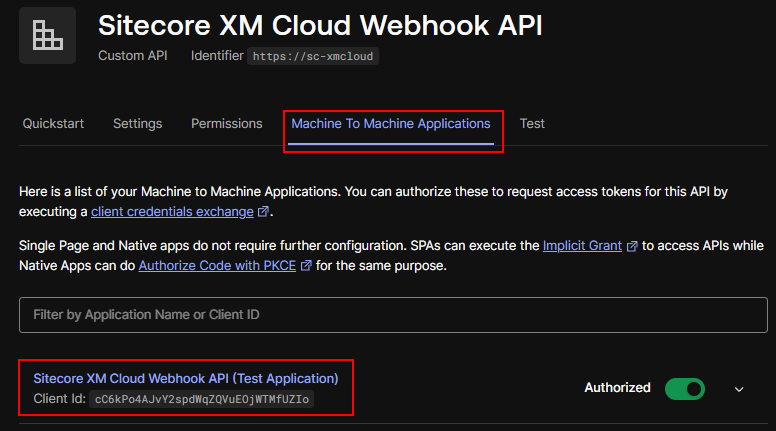
In the previous posts we saw how to setup the local environment or XM Cloud to debug Webhook handler event processing app i.e. web api using ngrok in this blog post and also checked how to configure the authorization using Auth0 by OKTA in this blog post using OAuth2ClientCredentialsGrant authorization.
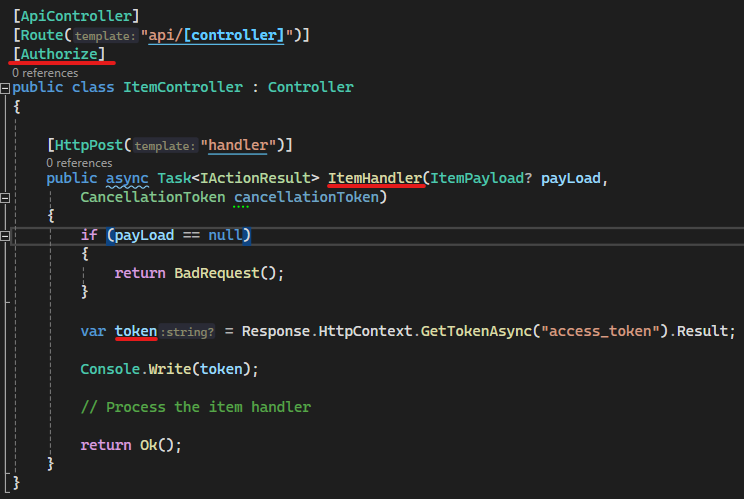
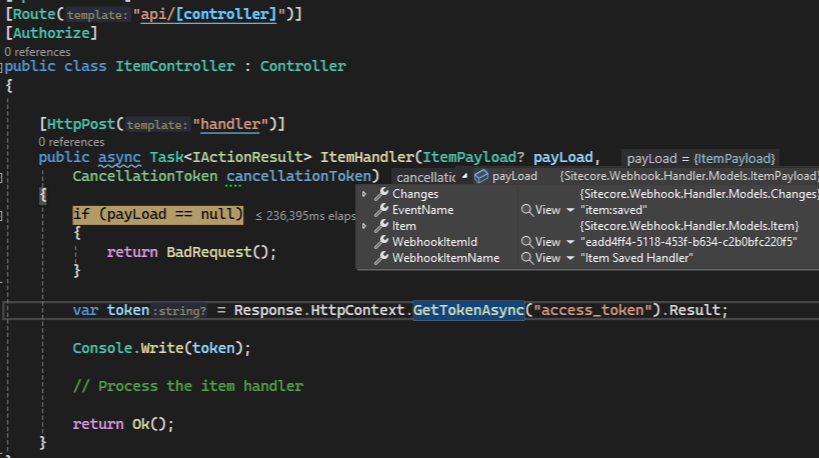
Continuation to this we will now extend the Web Api to authorize the endpoint called from the Sitecore Webhook handler.
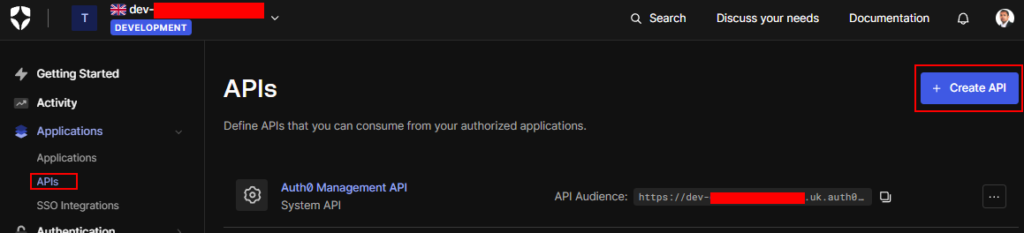
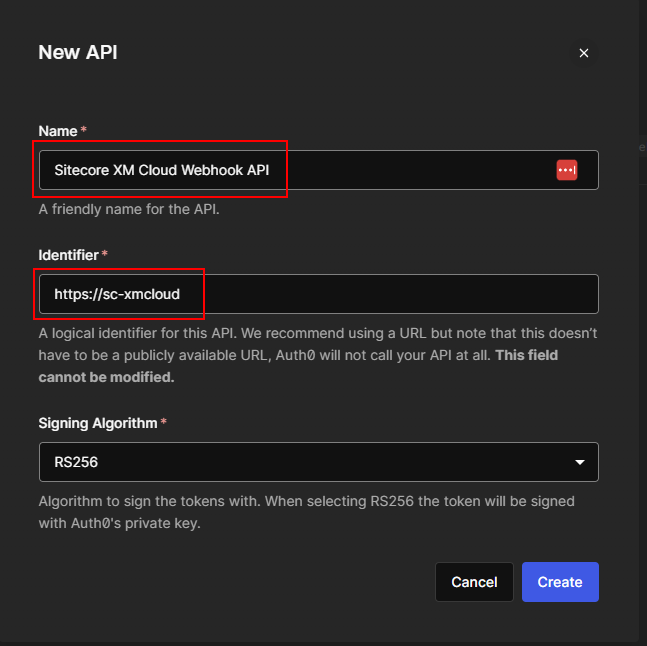
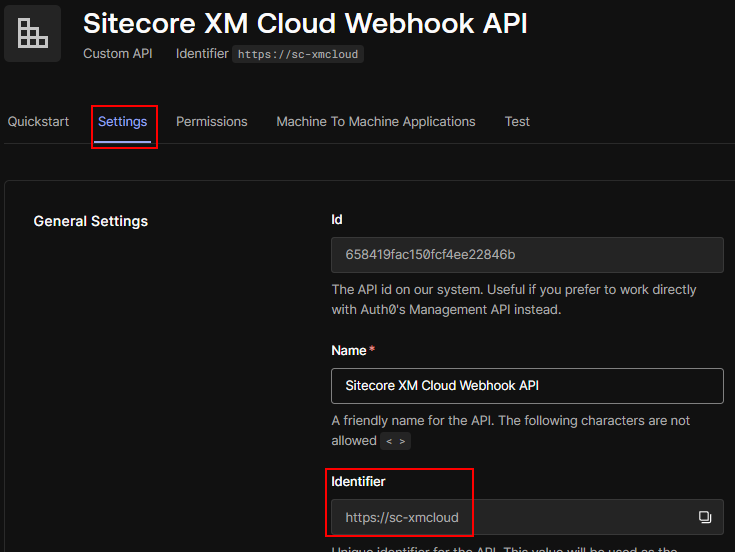
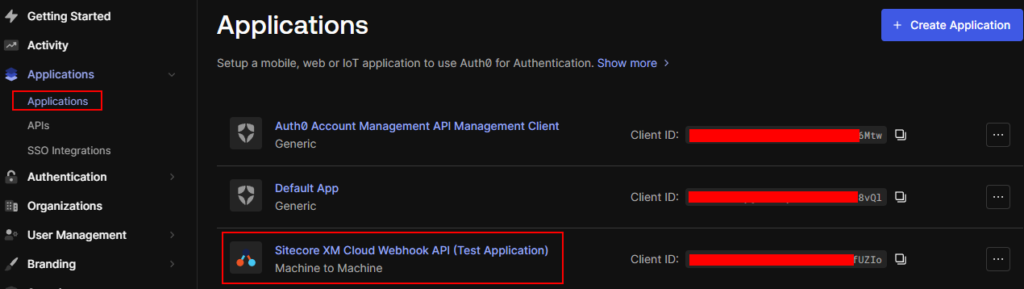
We already configured Auth0 to have API and Machine-to-Machine application we will configure this in Web API and setup the authorization.
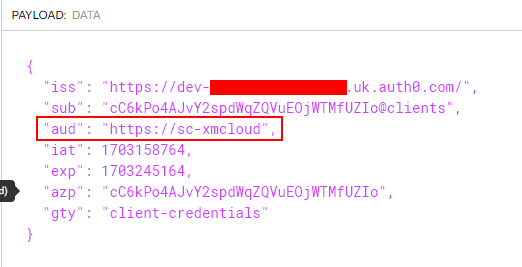
The authorization in Web API will be done to check of the request cam from the valid domain i.e. dev-your_dev_id.uk.auth0.com and valid audience i.e. https://sc-xmcloud which should be part of the token.
Lets configure Web API .env file. Create a .env file and add the following-
CLIENT_ORIGIN_URL can aslo be your XM Cloud instance.
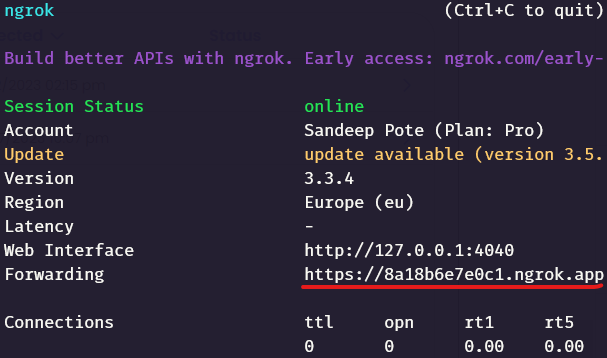
In previous blog post we saw how to create a Webhook and debug, inspect and test the Webhook handler using ngrok.
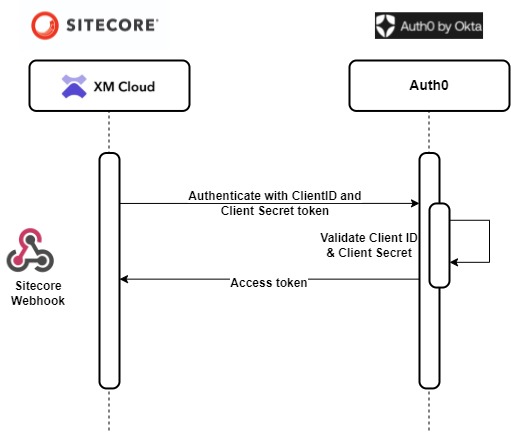
Continuation to the previous blog post lets see how to configure the Webhook to use Client Credential grant and secure the Webhook handler in this blog post with Auth0 by Okta.
Register and Login to Auth0
I used free (development) plan to register to Auth0 if you don’t have the account already. This should create a dev id based on the region you selected and should look like this – dev-your_dev_id
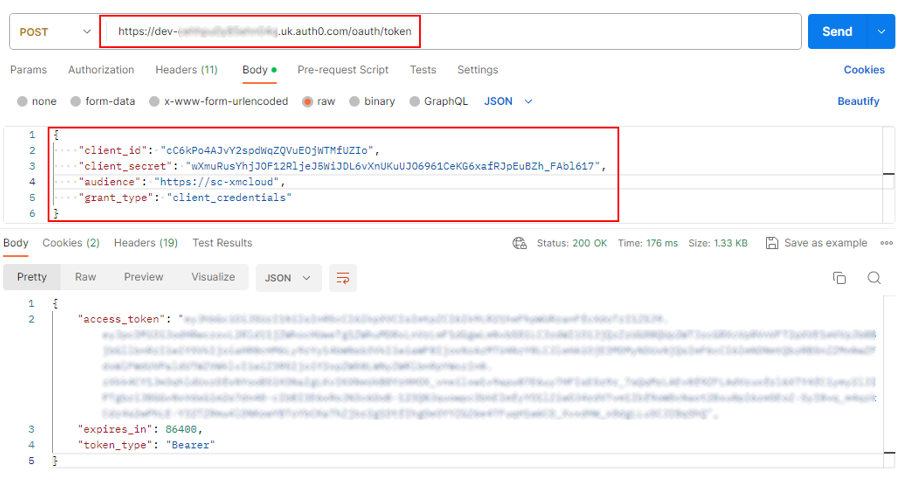
Post request to generate token – https://dev-your_dev_id.uk.auth0.com/oauth/token
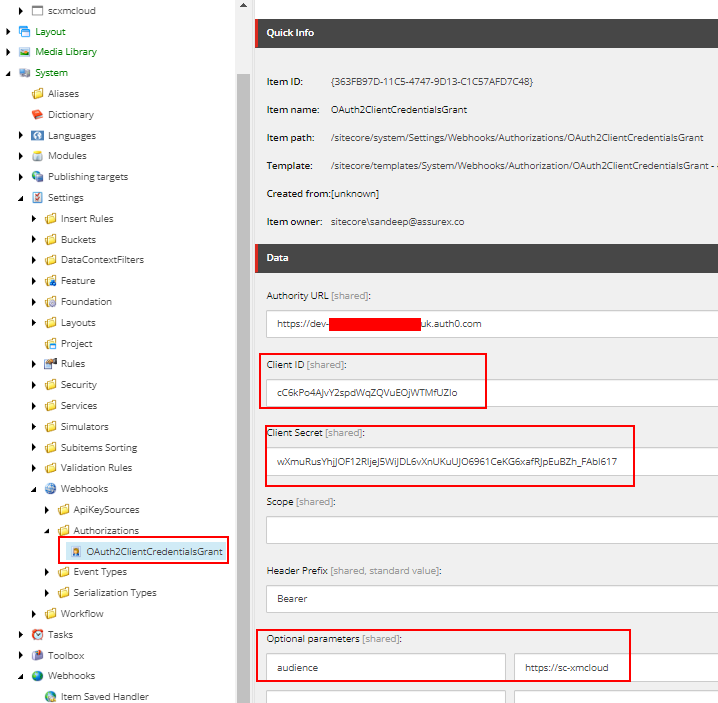
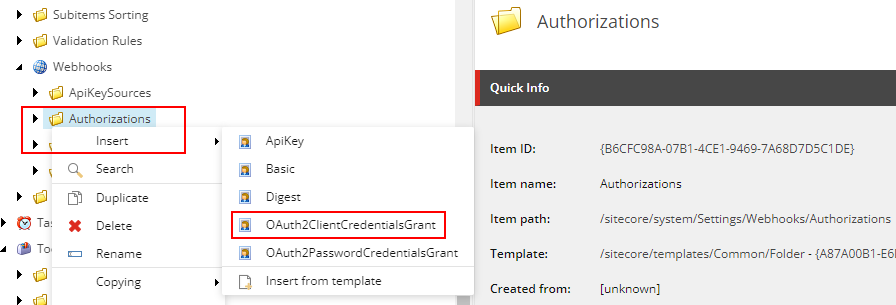
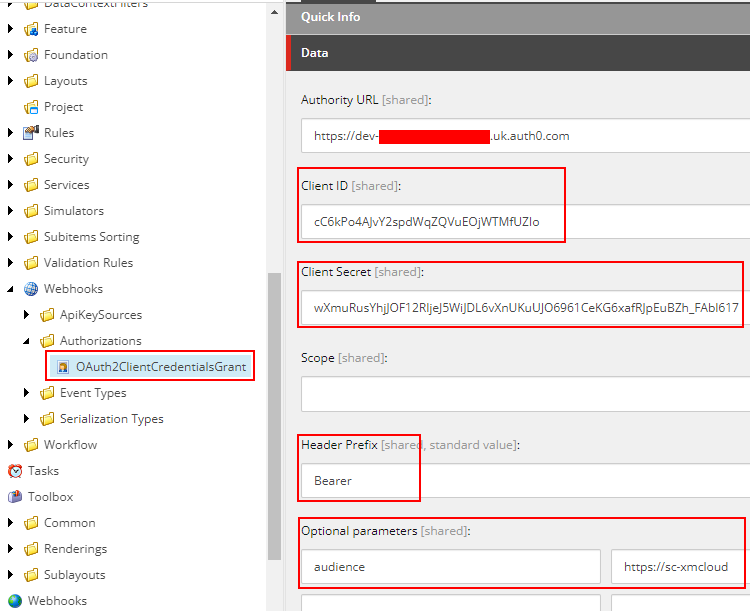
Create a Authorization in XM CLoud-
Craee a new OAuth2ClientCredentialsGrant in Authorization folder. This should be available in following path in Sitecore-
/sitecore/system/Settings/Webhooks/Authorizations
Setup the OAuth2ClientCredentialsGrant –
Setup the Authority URL, Client ID, Client Secret, Header Prefix and OptionalParameter as follows- This values we noted above whilst creating a API and Application in Auth0.
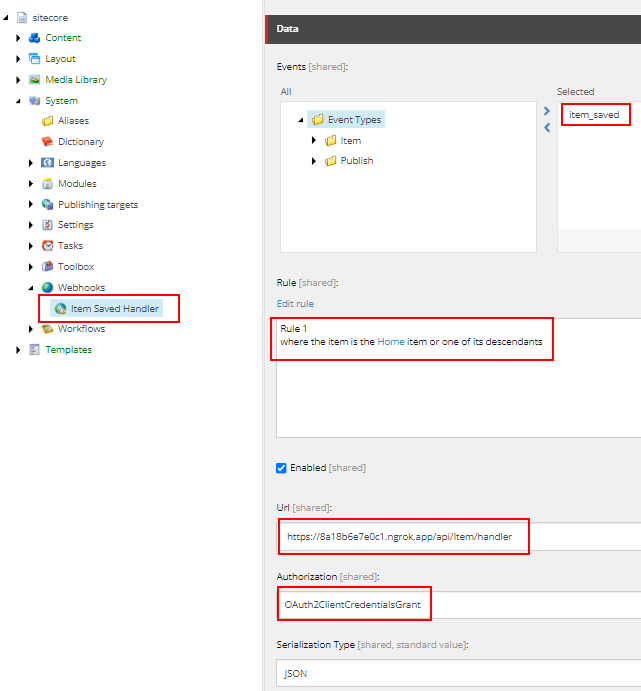
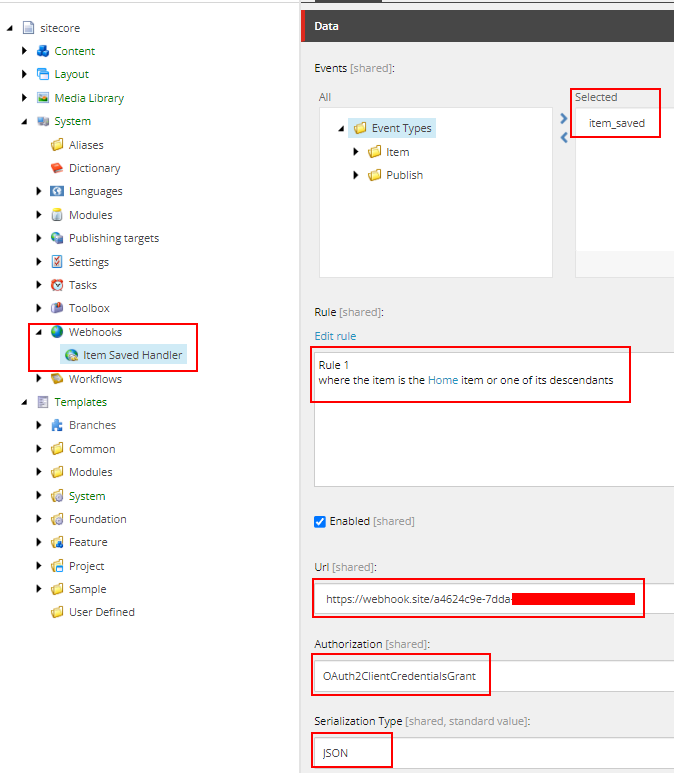
Setup Webhook Handler
Create a new Webhook handler and provide the newly created authorization –
For testing purpose I have set the
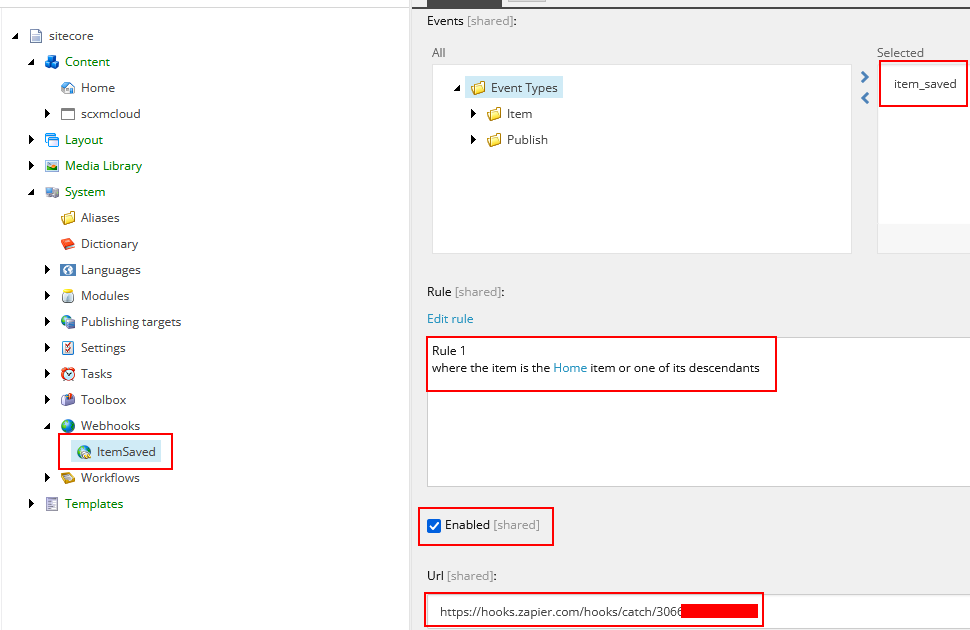
Event – item_saved, Rule – When the Home Item or its descendants are changed
Url – https://webhook.site/a4624c9e-7dda……
Webhook.site should listen to any calls from Sitecore for testing purpose. This can be your Webhook handler app.
Authorization – Select the newly created authorization to Auth0 which create a token
Serialization Type- JSON
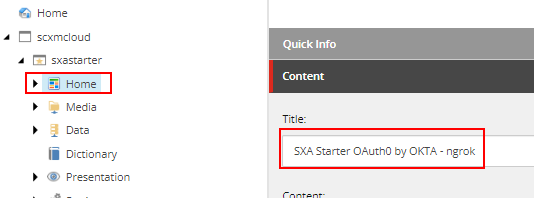
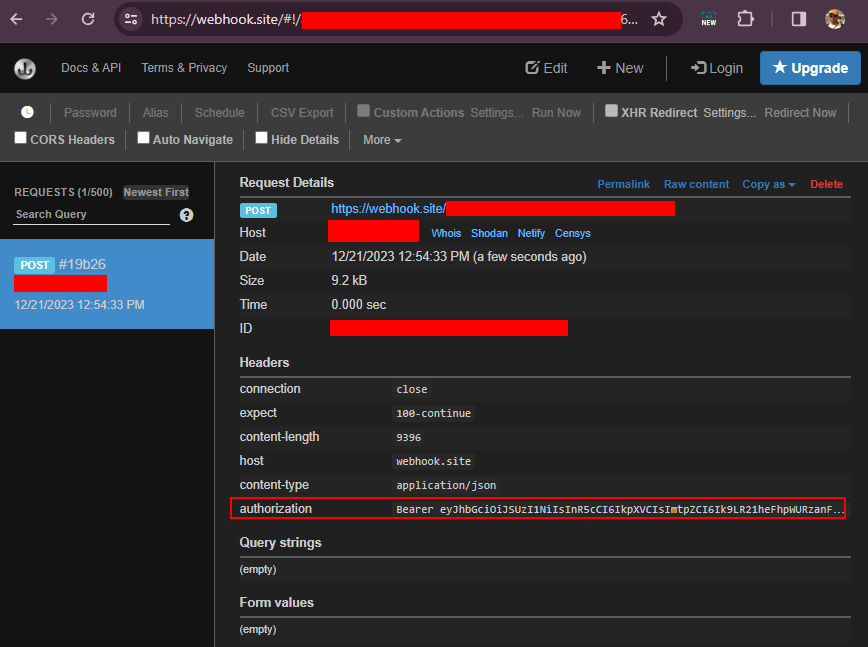
Fire a webhook
Save a home or its descendants to fire a webhook
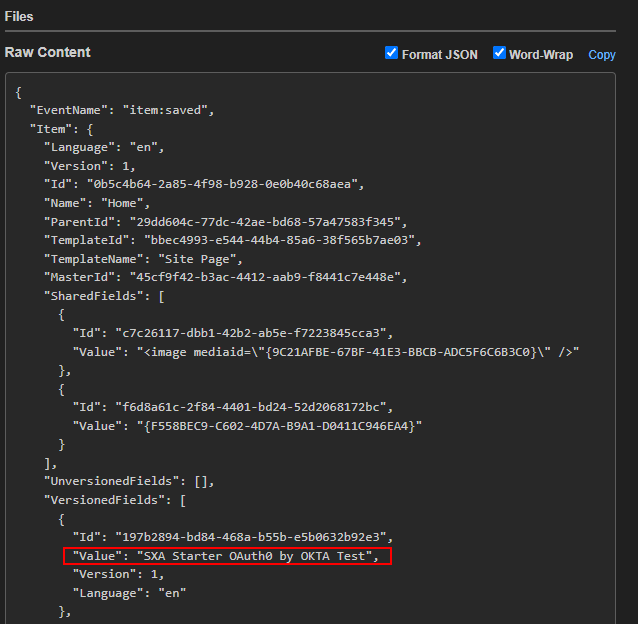
On save it should fire a webhook which can be seen in webhook.site which should also pass the newly created token.
We can see the token was successfully created and a webhook was fired on saving a Home item as configured in Auntorization and Webhook Handler.
Errors-
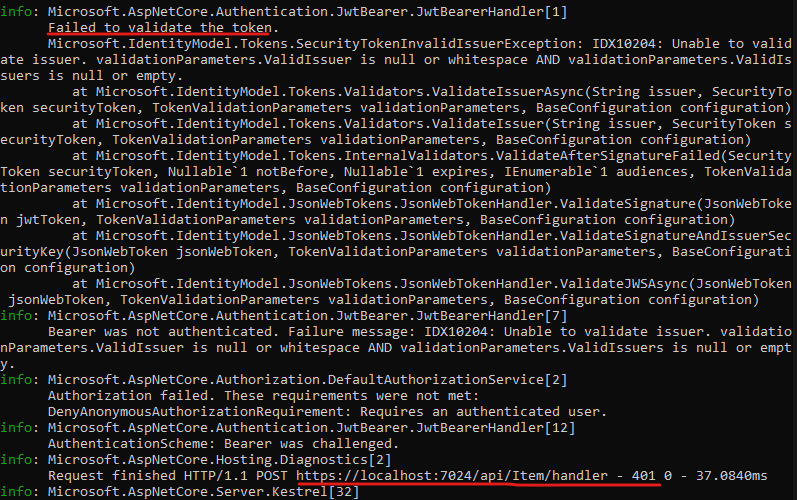
If the request to Auth0 fails you should be able to see the same in logs- something like this due to configuration-
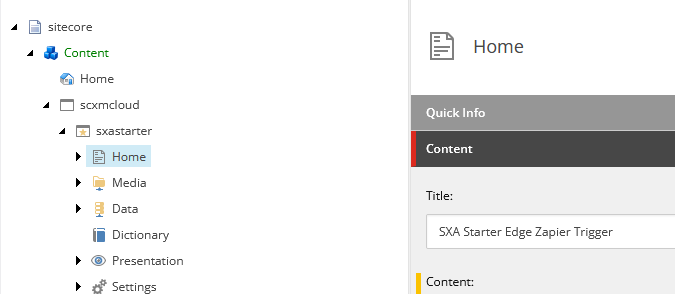
4016 12:37:00 INFO  AUDIT (sitecore\sandeep@): Save item: master:/sitecore/content/scxmcloud/sxastarter/Home, language: en, version: 1, id: {0B5C4B64-2A85-4F98-B928-0E0B40C68AEA}
1928 12:37:01 ERROR Webhooks: Token request failed with error: Unauthorized
I have tried this in my local instance but the same can also be done in XM Cloud.
Next we will create a Web Api which should be able to validate the token and executes any custom implementation. This will be in next blog.