Last Updated on February 1, 2025 by sandeeppote

Sitecore SXA module contains templates, Renderings, Layouts, Placeholder Settings, branch etc. It helps structure the SXA site by scaffolding items required to setup the component.
In this blog post I will walkthrough the steps to create a module manually to have a better understanding and helps specially to debug when there are issues with the existing modules.
Create Module (Part 1)
Navigate to – /sitecore/system/Settings/Feature
Right click Featur folder to create module

Create new module overlay will open.

- Provide a Module name – i.e. Custom Image Block
- Choose the location where this module to be created.
- Select the system areas the module folders to be created
- Choose the module should be applied to tenant or site
When module is created should be able to see the folder with the Site Setup Root item

Once the Site Setup Root is created you should be able to see folders with name “Custom Image Block” will be created in Branch, Template, Renderings, Placeholder Settings, Layouts and Media Library or the system areas selected.
Create template required for creating Branch
For creating a branch you will need a template and rendering. Create a template in “Custom Image Block” folder. For now you don’t have to add fields. See blog the fields that were created for component.
Create “Image Block Folder” Template

Create rendering required for creating Branch
Create controller rendering with name “Image Block” in – /sitecore/layout/Renderings/Feature/Wits/Custom Image Block.
For now don’t setup anything in rendering. See blog for the configuration required in rendering-

Create Branch
Navigate to /sitecore/templates/Branches/Feature
Create a new branch. Right click on the folder “Custom Image Block” and insert new branch option

Select the template earlier created-

Branch with name “Image Block” will be created.

Delete $name item in the branch
Rename the Image Block to “Available Image Block Renderings”.
Right click branch and insert item from template-
/sitecore/templates/Foundation/Experience Accelerator/Presentation/Available Renderings/Available Renderings
Give it a name $name as this will create a item in “Available Renderings” folder in site with the component name

Select $name and select the newly created rendering-

Create or Copy the existing branch and name it as “Image Block Variant”
Create a variant, name it as “$name” from template – /sitecore/templates/Foundation/Experience Accelerator/Rendering Variants/Variants

Create Variant Definition under Variant name it as “Default” from template
Path of the variant definition- /sitecore/templates/Foundation/Experience Accelerator/Rendering Variants/Variant Definition

Create Scriban Variant named “Scriban” from template – /sitecore/templates/Foundation/Experience Accelerator/Scriban/Scriban

Add markup in template field or the same can be added when the module is installed on the site – if the markup is specific to the site.
Branch structure should like this-

Create Module (Part 2)
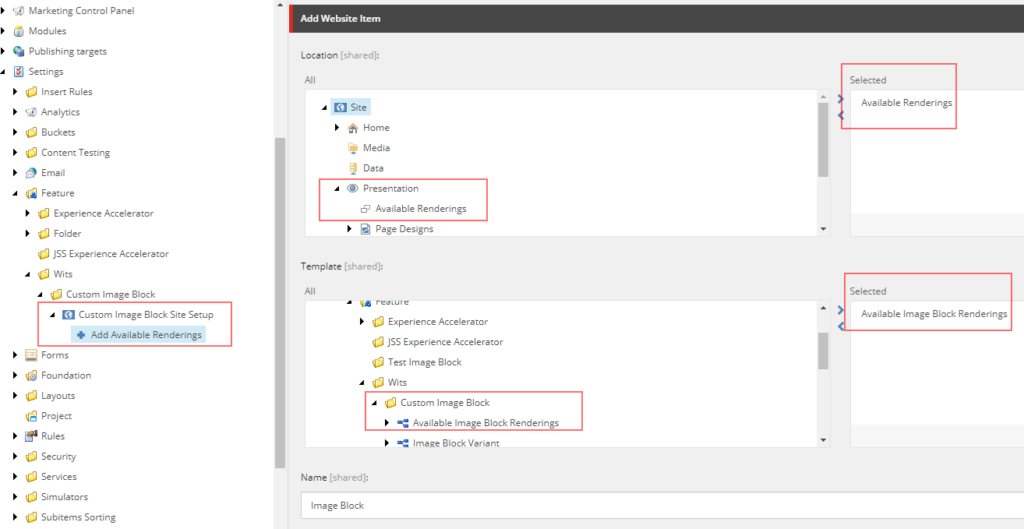
Add Site Item to add Available rendering to the site module is installed

Name it “Add Available Renderings”
Select the Location from the Site>>Presentation>>Available Renderings
In Template field select the “Available Image Block Renderings” from the newly created branch.
Provide the Name

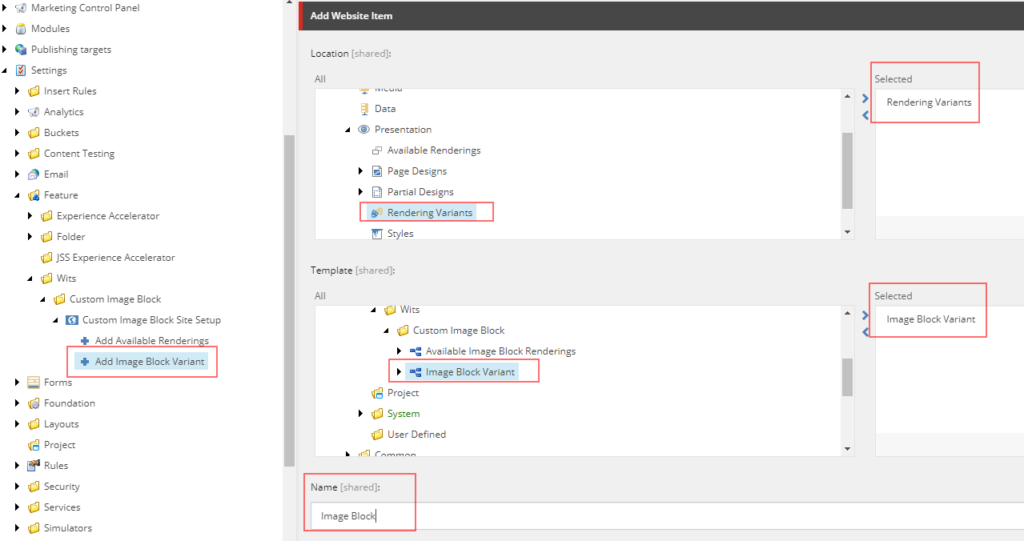
Add Site Item to add rendering variant to the site module is installed
Add another site item, name it “Add Image Block Variant”
Select “Rendering Variant” in Location and “Image Block Variant” created in branch

This will create a “Image Block” in the “Rendering Variant” folder in the site where the module will be installed
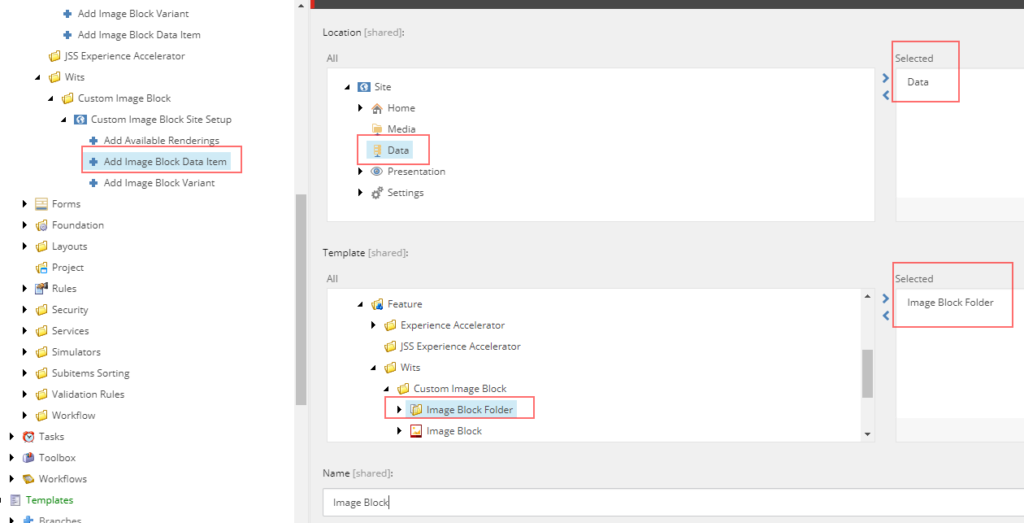
Add Site Item to add data folder to the site module is installed
Add another site item, name it “Add Image Block Data Item”

This will create a “Image Block Folder” in “Data” folder in the site where the module will be installed
That’s it you are good to install “Image Block” module.


0 Comments
1 Pingback