Tag: Sitecore

Setup Sitecore OrderCloud Headstart Seller UI – Part 3

Part 1 using offline Azure resource and Part 1 using online Azure resources gives a walkthrough on setting Sitecore Ordercloud Headstart pre-requisites. While Part 2 helps setup middleware.

In this blog we are setting the Sitecore Ordercloud Headstart UI for Seller

Step 1- Setup the UI project

Install node js – https://nodejs.org/en/download/

Open the Seller UI project in Visual Studio Code (prefered) from /src/UI/Seller folder

Step 2 – Change configuration defaultadmin-test.json

Navigate to – \src\UI\Seller\src\assets\appConfigs\defaultadmin-test.json

Change the highlighted values-

Change Client ID

This is a Seller Client ID. In Part 1 response to the seed also provided Seller Client ID.Use the same clinet id here

OR

Goto the marketplace you have created earlier and API Client to copy the Default HeadStart Admin UI ID

Copy the ID in clientID below-

{
  "hostedApp": true,
  "marketplaceID": "ocdockertest",
  "marketplaceName": "Default Admin",
  "appname": "Default Admin",
  "clientID": "your-seller-client-id",
  "middlewareUrl": "https://localhost:5001",
  "translateBlobUrl": "http://127.0.0.1:10000/devstoreaccount1/ngx-translate/i18n/",
  "supportedLanguages": ["en", "fr", "jp"],
  "defaultLanguage": "en",
  "blobStorageUrl": "http://127.0.0.1:10000/devstoreaccount1",
  "orderCloudApiUrl": "https://sandboxapi.ordercloud.io"
}

Change the storage account created in Step 1

Keep everything else as is or you may change as per your configuration.

Step 3 – Change/Check the configuration environment.local.json

Navigate to \src\UI\Seller\src\environments\environment.local.ts

Change/Check useLocalMiddleware=true if not already set.

Change/Check localMiddlewareURL = ‘https://localhost:5001’

Step 4 – Setup the App Configuration either using appSettings or Azure App Configuration

Setup a App Configuration using appSettings.json

Use/Download the template here provided by Sitecore to setup the configuration

Create a json file on your local machine by copying the content in the template. In my case I have created OCHeadstartConfig.json. The template looks as below- Highlighted values are the minimum configuration required for Headstart project. Few of the configuration will come from the Seed step explained in Part-2Step 4 – Populate Ordercloud Markeplace with the seed request

Following configuration(highlighted) needs to be updated minimum to get the Headstart project working-

OrderCloudSettings:MiddlewareClientID

OrderCloudSettings:MiddlewareClientSecret

OrderCloudSettings:MarketplaceID

OrderCloudSettings:MarketplaceName

{
"ApplicationInsightsSettings:InstrumentationKey": "",
"AvalaraSettings:AccountID": "0",
"AvalaraSettings:BaseApiUrl": "https://sandbox-rest.avatax.com/api/v2",
"AvalaraSettings:CompanyCode": "",
"AvalaraSettings:CompanyID": "0",
"AvalaraSettings:LicenseKey": "",
"CardConnectSettings:Authorization": "",
"CardConnectSettings:AuthorizationCad": "",
"CardConnectSettings:BaseUrl": "cardconnect.com",
"CardConnectSettings:CadMerchantID": "",
"CardConnectSettings:Site": "fts-uat",
"CardConnectSettings:UsdMerchantID": "",
"CosmosSettings:DatabaseName": "",
"CosmosSettings:EnableTcpConnectionEndpointRediscovery": "false",
"CosmosSettings:EndpointUri": "",
"CosmosSettings:PrimaryKey": "",
"CosmosSettings:RequestTimeoutInSeconds": "15",
"EasyPostSettings:APIKey": "",
"EasyPostSettings:FreeShippingTransitDays": "3",
"EasyPostSettings:NoRatesFallbackCost": "20",
"EasyPostSettings:NoRatesFallbackTransitDays": "3",
"EnvironmentSettings:AppTimeoutInSeconds": "30",
"EnvironmentSettings:BuildNumber": "",
"EnvironmentSettings:Commit": "",
"EnvironmentSettings:Environment": "Test",
"EnvironmentSettings:MiddlewareBaseUrl": "",
"EnvironmentSettings:TaxProvider": "Avalara",
"FlurlSettings:TimeoutInSeconds": "40",
"OrderCloudSettings:ApiUrl": "https://sandboxapi.ordercloud.io",
"OrderCloudSettings:IncrementorPrefix": "DB_TEST",
"OrderCloudSettings:MarketplaceID": "<<market place id >>",
"OrderCloudSettings:MarketplaceName": "<<market place name>>",
"OrderCloudSettings:MiddlewareClientID": "<<Middleware ClientId>>",
"OrderCloudSettings:MiddlewareClientSecret": "<<middleware client secret>>",
"OrderCloudSettings:WebhookHashKey": "<<webhook key>>",
"OrderCloudSettings:ClientIDsWithAPIAccess": "<<Enter the Seller or Buyer ClientID's sperated with comma>>"
"SendGridSettings:ApiKey": "",
"SendgridSettings:BillingEmail": "",
"SendgridSettings:CriticalSupportEmails": "",
"SendgridSettings:CriticalSupportTemplateID": "",
"SendgridSettings:FromEmail": "",
"SendgridSettings:LineItemStatusChangeTemplateID": "",
"SendgridSettings:NewUserTemplateID": "",
"SendgridSettings:OrderSubmitTemplateID": "",
"SendgridSettings:PasswordResetTemplateID": "",
"SendgridSettings:ProductInformationRequestTemplateID": "",
"SendgridSettings:QuoteOrderSubmitTemplateID": "",
"SendgridSettings:SupportCaseEmail": "",
"SmartyStreetSettings:AuthID": "",
"SmartyStreetSettings:AuthToken": "",
"SmartyStreetSettings:RefererHost": "",
"SmartyStreetSettings:WebsiteKey": "",
"StorageAccountSettings:BlobContainerNameCache": "cache",
"StorageAccountSettings:BlobContainerNameExchangeRates": "currency",
"StorageAccountSettings:BlobContainerNameQueue": "queue",
"StorageAccountSettings:BlobContainerNameTranslations": "ngx-translate",
"StorageAccountSettings:BlobPrimaryEndpoint": "http://127.0.0.1:10000/devstoreaccount1",
"StorageAccountSettings:ConnectionString": "<<copy Connectionstring from Storage explorer >>",
"UI:BaseAdminUrl": "",
"ZohoSettings:AccessToken": "",
"ZohoSettings:ClientId": "",
"ZohoSettings:ClientSecret": "",
"ZohoSettings:OrgID": "",
"ZohoSettings:PerformOrderSubmitTasks": "false"
}

Get the StorageAccount.Settings.ConnectionString from Storage Explorer-

Create appSettings.json file and copy the above configuration in the file.

appSettings.json file should be in Headstart.API project-

IMP – Check if the middleware applicaiton is running and listening to localhsot 5001 port. If not you should run the Headstart.Api before running UI application.

Setup a App Configuration using Azure App Configuration

Get the configuration connection string

Goto the Access Keys – Read-only keys tab and copy the connection string

Add a new Environment Variable named – APP_CONFIG_CONNECTION and copy the connection string in the Value.

Run the middleware application with the Demo profile.

IMP – If you see compiler error’s whilst running the application. See this blog for the resolution.

Step 5 – Run the Seller UI application

Now that we have all the required configuration checked and changed, time to run the Seller UI application

RUN – from the visual studio terminal or powershell

npm install
npm run start

Now we have Seller application runing on localhost:4200 port

Provide Admin Username and Password as noted in Part -1 of the blog Step 3- Prepare Seed Request

After successful login-

Also we can see the Seller Admin-

Hope you enjoyed setting Sitecore Ordercloud Headstart 🙂

Setup Sitecore OrderCloud Headstart Project – Part 2

This blog will walkthrough step by step to setup OrderCloud Headstart Solution on your development machine.

You may want to first see Part 1 with Azurite or through Azure resources

Headstart project and instructions are here

In this blog we are setting the Sitecore Ordercloud Headstart middleware

Step 1- Create a Sitecore OrderCloud Marketplace

See this blog to setup the OrderCloud Marketplace

Create a new maketplace e.g.- OrderCloudHeadstart in Us-West region

IMP– At the time this blog was written looks like only Us-West region is supported when a seed request is sent. This may change in future but connect to OrderCloud team is you want this to be in region other than Us-West

Note the newly created Marketplace ID – in my case it is – OrderCloudHeadstart

If you havent provided the Marketplace ID whilst creating the OrederCloud will create once for you. You can find the same in the Marketplace.

Navigate to API Console and Get the Admin User, as you see there are no Admin users. You may also check other endpoints.

Step 2 – Setup Middleware

Clone headstart repository – https://github.com/ordercloud-api/headstart.git

Open Headstart.sln in src/Middleware. I am using Visual Studio 2019.

Open Headstart.API project proerties

Create a new Debug Profile for Headstart.Api project. Set this as Start project.

Run the Headstart.Api project and should listen to localhost 5000 and 5001 port

Step 3- Prepare Seed Request

Open postman and create a new Post request to – https://localhost:5001/seed

Use the below request body –

{
  "Portal": {
    "Username": "username@company.com",
    "Password": "XXXXXXXXXXXXXXXX"
  },
  "Marketplace": {
    "Environment": "sandbox",
    "Region": "Us-West",
    "ID": "your-marketplace-id",
    "Name": "your-marketplace-name",
    "InitialAdmin": {
      "Username": "adminuser",
      "Password": "XXXXXXXXXX"
    },
    "EnableAnonymousShopping": true,
    "MiddlewareBaseUrl": "http://localhost:5000",
    "WebhookHashKey": "hashkey"
  }
}

PortalUsername – enter the portal username you used to create a marketplace

PortalPassword – enter the portal password you used to create a marketplace

InitialAdminUsername – this request will create a admin user. Enter the admin username you wish to create

InitialAdminPassword – enter the admin password you want to set

MiddlewareBaseUrl – this is not required for local build

MarketplaceID – Enter the Marketplace ID you created in Step 1

Marketplace.Region– enter this to be sandbox in this case. For the other environments you might want to user different values for Staging and Production

WebhookHashKey – Set the webhook haskey to secure your webhook request.

Postman request should look like this –

STEP 4 – Setup a App Configuration using appSettings.json

Use/Download the template here provided by Sitecore to setup the configuration

Create a json file on your local machine by copying the content in the template. In my case I have created OCHeadstartConfig.json. The template looks as below- Highlighted values are the minimum configuration required for Headstart project.

Following configuration(highlighted) needs to be updated minimum to send the seed request working-

StorageAccountSettings:ConnectionString

StorageAccountSettings:HostUrl

StorageAccountSettings:Key

{
 "StorageAccountSettings:ConnectionString": "DefaultEndpointsProtocol=http;AccountName=devstoreaccount1;AccountKey=Eby8vdM02xNOcqFlqUwJPLlmEtlCDXJ1OUzFT50uSRZ6IFsuFq2UVErCz4I6tq/K1SZFPTOtr/KBHBeksoGMGw==;BlobEndpoint=http://127.0.0.1:10000/devstoreaccount1;QueueEndpoint=http://127.0.0.1:10001/devstoreaccount1;",
  "StorageAccountSettings:ContainerNameCache": "cache",
  "StorageAccountSettings:ContainerNameExchangeRates": "",
  "StorageAccountSettings:ContainerNameTranslations": "ngx-translate",
  "StorageAccountSettings:ContainerNameQueue": "queue",
  "StorageAccountSettings:HostUrl": "http://127.0.0.1:10000/devstoreaccount1",
  "StorageAccountSettings:Key": "Eby8vdM02xNOcqFlqUwJPLlmEtlCDXJ1OUzFT50uSRZ6IFsuFq2UVErCz4I6tq/K1SZFPTOtr/KBHBeksoGMGw=="
}

Get the StorageAccount.Settings.ConnectionString from Storage Explorer-

Create appSettings.json file and copy the above configuration in the file.

appSettings.json file should be in Headstart.API project-

IMP – Check if the middleware applicaiton is running and listening to localhsot 5001 port. If not you should run the Headstart.Api before running UI application.

Step 5 – Send the seed request to Ordercloud Markeplace

Ensure the Headstart Api is running and listening to 5001 port as mentioned in Step 2

Send the seed request

You can see the same in application that is listening to 5001 port the request was sent to-

If you have set the request correctly you should receive the success response-

IMP – Note the below response and the request that was sent specifically Admin Username and Password as this will be required later when configuring the UI application

{
    "Comments": "Success! Your environment is now seeded. The following clientIDs & secrets should be used to finalize the configuration of your application. The initial admin username and password can be used to sign into your admin application",
    "MarketplaceName": "ocdockertest",
    "MarketplaceID": "ocdockertest",
    "OrderCloudEnvironment": "Sandbox",
    "ApiClients": {
        "Middleware": {
            "ClientID": "1141E496-8517-4953-809B-XXXXXXXXX",
            "ClientSecret": "XXXXXXXXXXXXXXXXXXXXXXXXXXXXXXXXXXXX"
        },
        "Seller": {
            "ClientID": "6E98D7A1-35E9-4156-B60B-XXXXXXXXXX"
        },
        "Buyer": {
            "ClientID": "E1EBE13C-CC74-4021-B4A9-XXXXXXXXXX"
        }
    },
    "Success": true,
    "Exception": null
}

Comments – seed response comments

MarketplaceName – gets the Marketplace name that was configured in Step 1

MarketplaceID – UniqueId that was sent as part of request and the data seeded in this Marketplace

OrderCloudEnvironment – Environment where the request was sent

ApiClients.Middleware.ClientID – Note down Middleware ClientID

ApiClients.Middleware. ClientSecret – Note down Middleware ClientSecret

ApiClients.Seller.ClientID – Note down the Seller ClientID

ApiClients.Buyer.ClientID – Note down the Buyer ClientID

Step 5- Check the Marketplace for the data been puplated

In Step 1- we saw there was not admin user created. After the seed request you can see the Admin User is created with the name mentioned in request.

Admin User

InitialAdminUser with the username provided in request is created

Also the MiddlewareIntegrationsUser is created

Buyer User

Buyer User is created-

Api Clients

Api clients created and the same was sent as response. This is used so each client have a different Id’s that helps any application to connect.

Errors-

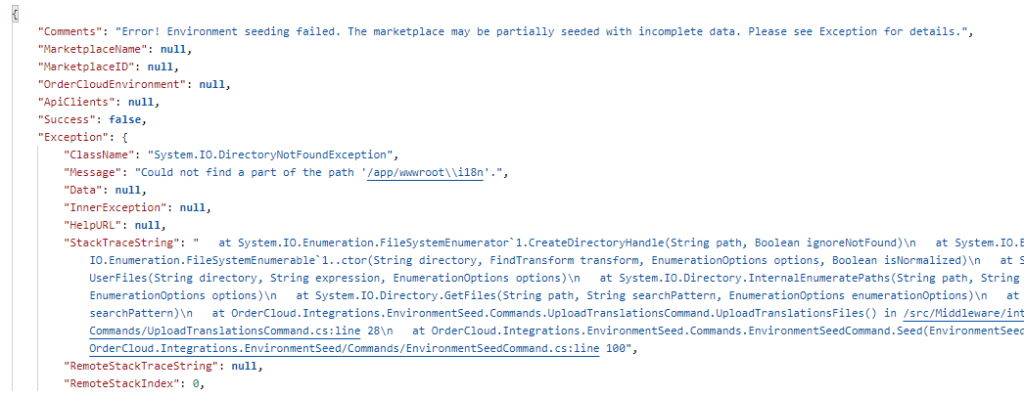
Ensure the StorageAccountSettings:HostUrl and ConnectionString is configured correctly.

Thats it in this blog. Hope you are enjoying setting your Ordercloud Headstart project.

Loading

Setup Sitecore OrderCloud Headstart project using Azure Resources – Part 1

Follow below steps to configure Sitecore Ordercloud Headstart middleware using Azure Resources

Step 1 – Setup a Azure App Configuration

Since we will be now setup a backend application (i.e. admin etc) the Client IDs and Client Secret that was create in Step 5 needs to be secured. This can be condifured in Azure App Configuration. See the link on how to setup this.

Use/Download the template here provided by Sitecore to setup the configuration

Create a json file on your local machine by copying the content in the template. In my case I have created OCHeadstartConfig.json. The template looks as below-

{
    "ApplicationInsightsSettings:InstrumentationKey": "",
    "AvalaraSettings:AccountID": 0,
    "AvalaraSettings:CompanyCode": "",
    "AvalaraSettings:CompanyID": 0,
    "AvalaraSettings:LicenseKey": "",
    "AvalaraSettings:BaseApiUrl": "https://sandbox-rest.avatax.com/api/v2",
    "StorageAccountSettings:ConnectionString": "",
    "StorageAccountSettings:BlobPrimaryEndpoint": "",
    "StorageAccountSettings:BlobContainerNameQueue": "queue",
    "StorageAccountSettings:BlobContainerNameCache": "cache",
    "StorageAccountSettings:BlobContainerNameExchangeRates": "currency",
    "StorageAccountSettings:BlobContainerNameTranslations": "ngx-translate",
    "CardConnectSettings:Authorization": "",
    "CardConnectSettings:AuthorizationCad": "",
    "CardConnectSettings:BaseUrl": "cardconnect.com",
    "CardConnectSettings:CadMerchantID": "",
    "CardConnectSettings:Site": "fts-uat",
    "CardConnectSettings:UsdMerchantID": "",
    "CosmosSettings:DatabaseName": "",
    "CosmosSettings:EnableTcpConnectionEndpointRediscovery": "false",
    "CosmosSettings:EndpointUri": "",
    "CosmosSettings:PrimaryKey": "",
    "CosmosSettings:RequestTimeoutInSeconds": "15",
    "EasyPostSettings:APIKey": "",
    "EasyPostSettings:FreeShippingTransitDays": "3",
    "EasyPostSettings:NoRatesFallbackCost": "20",
    "EasyPostSettings:NoRatesFallbackTransitDays": "3",
    "EnvironmentSettings:AppTimeoutInSeconds": "30",
    "EnvironmentSettings:MiddlewareBaseUrl": "",
    "EnvironmentSettings:BuildNumber": "",
    "EnvironmentSettings:Commit": "",
    "EnvironmentSettings:Environment": "Test",
    "EnvironmentSettings:TaxProvider": "Avalara",
    "FlurlSettings:TimeoutInSeconds": "40",
    "OrderCloudSettings:ApiUrl": "https://sandboxapi.ordercloud.io",
    "OrderCloudSettings:MiddlewareClientID": "",
    "OrderCloudSettings:MiddlewareClientSecret": "",
    "OrderCloudSettings:IncrementorPrefix": "DB_TEST",
    "OrderCloudSettings:WebhookHashKey": "",
    "OrderCloudSettings:MarketplaceID": "",
    "OrderCloudSettings:MarketplaceName": "",
    "SendGridSettings:ApiKey": "",
    "SendgridSettings:FromEmail": "",
    "SendgridSettings:CriticalSupportEmails": "",
    "SendgridSettings:SupportCaseEmail": "",
    "SendgridSettings:BillingEmail": "",
    "SendgridSettings:OrderSubmitTemplateID": "",
    "SendgridSettings:OrderApprovalTemplateID": "",
    "SendgridSettings:LineItemStatusChangeTemplateID": "",
    "SendgridSettings:QuoteOrderSubmitTemplateID": "",
    "SendgridSettings:NewUserTemplateID": "",
    "SendgridSettings:ProductInformationRequestTemplateID": "",
    "SendgridSettings:PasswordResetTemplateID": "",
    "SendgridSettings:CriticalSupportTemplateID": "",
    "SmartyStreetSettings:AuthID": "",
    "SmartyStreetSettings:AuthToken": "",
    "SmartyStreetSettings:RefererHost": "",
    "SmartyStreetSettings:WebsiteKey": "",
    "UI:BaseAdminUrl": "",
    "ZohoSettings:AccessToken": "",
    "ZohoSettings:ClientId": "",
    "ZohoSettings:ClientSecret": "",
    "ZohoSettings:OrgID": "",
    "ZohoSettings:PerformOrderSubmitTasks": "false"
  }

Select the subscription and Resource group

Provide the Resource name in this case I have used OrderCloudHeadStartConfig

Select Location and Pricing tier.

Once the resource is created in the Import/Export option select –

Source service – Configuration file

For language – Other

File type- Json

Source file – *.json (auto selected)

Select the folder icon in Source file option and click Apply to import the configuration.

After the config file is imported navigate to “Configuration Explorer”. There are 63 config key values are imported but in template there are 64.

“SendgridSettings:OrderApprovalTemplateID”: “”, is not imported for due to some reason. Create a new manually if required. For the Demo this is not required.

Click on the values to see the values of the key that was imported-

Set the following values by Right clicking the keys. Copy this from Step 4 where the response was received from seed request-

OrderCloudSettings:MiddlewareClientID

OrderCloudSettings:MiddlewareClientSecret

OrderCloudSettings:MarketplaceID

OrderCloudSettings:MarketplaceName

Continue updating config in next section for Storage Account.

Step 2- Create a Azure Storage Account (if you already don’t have)

Create a Azure Storage Account

Follow the steps and set the configuration as per your requirements

Copy the storage account name and Storage connection string

Set StorageAccountSettings:BlobPrimaryEndpoint – https://yourstorageaccount.blob.core.windows.net/occontainer

Set StorageAccountSettings:ConnectionString

Thats in in this blog. In next blog will cover setting up the UI project.

Hope you are enjoying setting your Ordercloud Headstart project.

Process to delete Sitecore OrderCloud Marketplace

Admin User who created the Marketplace can delete and Transfer the Ownership of the Account. Where the ownership is transfered to the users cannot delete the Marketplace.

To delete the Marketplace you should have first created a Marketplace and login to the portal as Admin User having Full Access.

For creating your Marketplace see this blog.

Once you have logged in to the portal from Dashboard select the Marketplace you want to delete.

In this case lets delete the Marketplace with name “OrderCloud Blog Auto Generated ID”

Once you are in the Marketplace, you should see the option to Delete since you have FullAccess

Confirmation message is displayed. Click on Send Confirmation Code

A confirmation code is sent to your registered mail.

Once you select option to Send Confirmation Code, you should receive mail on your registered email address from noreply@four51.com.

The mail should have details of the Marketplace you are attempting ot delete along with the code

Use this code to confirm the deletion of Maretplace

And the deleted Marketplace is no more in the Dashboard-

Setup OrderCloud Headstart project using Azurite, Storage Explorer and Cosmos DB Emulator – Part 1

Follow below steps to configure Sitecore Ordercloud Headstart middleware without having to provision Azure online resources. i.e. setup offline Azure resources

Online vs Local Azure resources-

Azure Online ResourcesAzure Offline Resources
Azure App Configurationuse appSettings.json
Storage AccountAzurite Emulator and Azure Storage Explorer
Azure Cosmos DatabaseAzure Cosmos DB Emulator

Step 1 – Install and Run Azurite Emulator

Install Azurite- Pre-requisite is to install node js

npm install -g azurite

Run Azurite- Navigate to the folder where the supporting files should be deployed e.g.: c:\Azurite

azurite start

OR - if you want specfic folder and in debug mode 

azurite --silent --location c:\azurite --debug c:\azurite\debug.log

Blob service should listen to http://127.0.0.1:10000

Step 2 – Install Microsoft Azure Storage Explorer

Install Azure storage explorer. Download from here

Step 3 – Configure Blob Containers

Connect to Local Azure Storage

Click on the connect to open the connection dialog box

Select the Local storage emulator

Fill in the required details

Display name

Account name – this wil be used to connect to the blob storage

Blobs port- port used to connect to the vlob storage

Queues and Tables port- port used to connect queues and tables respectively

These are the connection information (you might have to note this)-

Local account is created-

Storage Explorer is now able to conect to Local Storage Emulator i.e. Azurite

Create a Blob Container – ngx-translate and create new Virtual Directory i18n

Blob Container and folder name can be any other name. You need to configure this correctly in UI config. See this in later steps

Upload the translation file

Ideally Container, Virtual Directory and trnslation file should be created by Headstart Api. I couldn’t make it work. Hence alternative this I have attached en.json file here.

Once uploaded you should be able to see the uploaded file-

Set Public Access Level to Blob Container

Select the Public read access for containers and blobs

Configure CORS settings

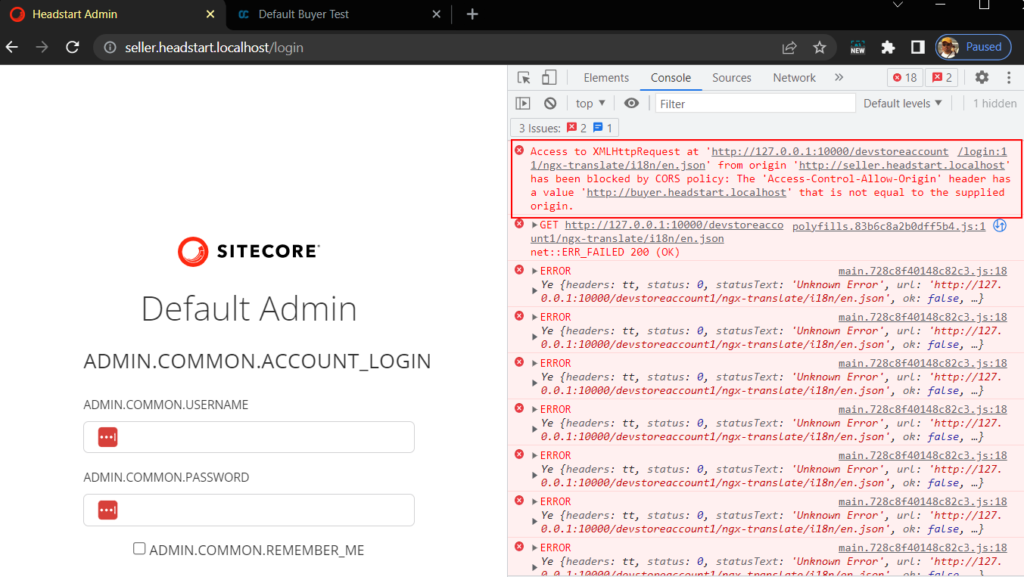
CORS settings are required for accessing the en.json file to access from the local blob storage

Click “Add” to add new CORS Settings-

Following values in –

Allowed Headers – x-ms-meta-data,x-ms-meta-target,x-ms-meta-abc

Exposed Headers – x-ms-meta-*

Check for all the steps performed above the operations in Blob Storage Explorer is successful.

Reference for CORS Rule-

https://docs.microsoft.com/en-us/rest/api/storageservices/cross-origin-resource-sharing–cors–support-for-the-azure-storage-services

Now try to access the translator file from local blob storage on – 127.0.0.1:10000/devstoreaccount1/ngx-translate/i18n/en.json

Setup Sitecore 10.2 JSS using next js in secured and connected mode

Sitecore 10.2 uses Sitecore Headless Rendering 19.0.0. See link here

See this blog for prerequisites and setting jss using next js in disconnected mode.

Follow below steps after the steps completed in above blog

Download Sitecore Headless Services for Sitecore XM

Prerequisite

Install Sitecore 10.2 XP0 on local development environment. See hte blog here if not already installed

Install downloaded package for Headless Service

https://dev.sitecore.net/Downloads/Sitecore_Headless_Rendering/19x/Sitecore_Headless_Rendering_1900.aspx OR

https://dev.sitecore.net/Downloads/Sitecore_Headless_Rendering/20x/Sitecore_Headless_Rendering_2000.aspx

Run the next js app in connected mode

Before working on connected mode create API Key

Navigate to – /sitecore/system/Settings/Services/API Keys

Create a new API Key e.g.:- nextjsservice

API key here is Item ID

Create a custom binding-

For this create a self signed certificate with a custom domain name in this case – next-jss-prj.dev.local

New-SelfSignedCertificate -CertStoreLocation C:\certificates -DnsName "next-jss-prj.dev.local" -FriendlyName "My First Next JSS App" -NotAfter (Get-Date).AddYears(10)

Create a new https binding and assign the newly create SSL certificate

Add domain to the host file – next-jss-prj.dev.local

Inititate JSS

Run the command

npm init sitecore-jss nextjs

Where would you like your new app created? C:\projects\nextjs
Initializing ‘nextjs’…
What is the name of your app? next-jss-prj.dev.local
What is your Sitecore hostname (used if deployed to Sitecore)? next-jss-prj.dev.local
How would you like to fetch Layout and Dictionary data? REST
How would you like to prerender your application? SSG
Would you like to include any add-on initializers? nextjs-styleguide – Includes example components and setup for
working disconnected
Initializing ‘nextjs-styleguide’…
Which additional language do you want to support (en is already included and required)? da-DK

Setup JSS

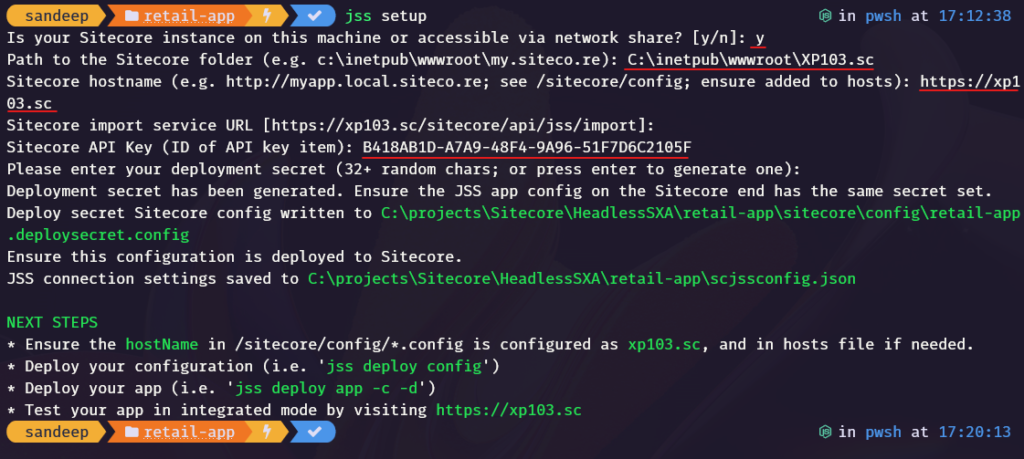
jss setup

Is your Sitecore instance on this machine or accessible via network share? [y/n]: y
Path to the Sitecore folder (e.g. c:\inetpub\wwwroot\my.siteco.re):
Invalid input.
Path to the Sitecore folder (e.g. c:\inetpub\wwwroot\my.siteco.re): C:\inetpub\wwwroot\xp102sc.dev.local
Sitecore hostname (e.g. http://myapp.local.siteco.re; see /sitecore/config; ensure added to hosts): next-jss-prj.dev.local
Invalid input. Must start with http(s)
Sitecore hostname (e.g. http://myapp.local.siteco.re; see /sitecore/config; ensure added to hosts): https://next-jss-prj.dev.local
Sitecore import service URL [https://next-jss-prj.dev.local/sitecore/api/jss/import]: https://next-jss-prj.dev.local/sitecore/api/jss/import
Sitecore API Key (ID of API key item): {2318A20A-6DF1-4AB8-B49E-F933A3B79160}
Please enter your deployment secret (32+ random chars; or press enter to generate one):

Deployment secret– Leave this blank as this will generate new secret key

Deployment secret key is generate and stored in <<jss development folder>>\sitecore\config\next-jss-prj.deploysecret.config

JSS connection settings saved to scjssconfig.json

Connection and the deployment secret is created, now this needs to be deployed to Sitecore instance so the JSS app is able to establish a connection with Sitecoore

To deploy the config setting deploy the config to Sitecore instance-

jss deploy config

Configs are copied to Sitecore instance App_Config\Include\zzz…

Deploy the artifacts to Sitecore instance-

Since we don’t know hte thumbprint use the below command with –acceptCertificate as test

jss deploy app –includeContent –includeDictionary –acceptCertificate test

This will provide the thumbprint. highllighted in red

Copy the certificate and try deploying again-

jss deploy app –includeContent –includeDictionary –acceptCertificate E4:54:12:A0:7E:D5:95:9B:B0:C2:00:17:3A:26:1B:AD:71:73:9F:05

if you see this error while importing – Message: An item name must satisfy the pattern: ^[\w*\$][\w\s-\$]*((\d{1,})){0,1}$ (controlled by the setting ItemNameValidation)

Change the ItemnameValidation to .* while importing and revert back to original in Sitecore.config file. Refer this –

https://sitecore.stackexchange.com/questions/470/an-item-name-must-satisfy-the-pattern-w-w-s-d1-0-1-c

To run the app run following command

jss start:connected

If you receive this error-

Execute following command to get this working on port 3000

$env:NODE_TLS_REJECT_UNAUTHORIZED=0

Execute JSS start again-

jss start:connected

ERROR-

Connection to your rendering host failed with a Not Found error. Ensure the POST endpoint at URL http://localhost:3000/api/editing/render has been enabled.

Copy the deploy secret and update the – value of setting of JavaScriptServices.ViewEngine.Http.JssEditingSecret in Sitecore.JavaScriptServices.ViewEngine.Http with the deploy secret.

This now work in connected mode. Any content changes in Sitecore should reflect localhost:3000 and Sitecore instance (https://next-jss-prj.dev.local/)

Sitecore next js working in connected mode with SSL

Error-

Exception thrown while importing JSS app
Exception: System.UnauthorizedAccessException
Message: The current user does not have write access to this item. User: sitecore\JssImport, Item: ContentBlock ({23CE8001-F405-5E50-AE61-AD3057660BBD})
Source: Sitecore.Kernel

Resolution-

Error-

Resolution-

Check if the API key is correct at the location – /sitecore/system/Settings/Services/API Keys

Also check if the CORS and Allowed Controllers are set correctly

For developement environment put * for both the highlighted fields

Setup Sitecore 10.2 JSS using next js with disconnected mode

Prerequisite

Install Node js – Download the latest node js from here

Install JSS CLI

npm install -g @sitecore-jss/sitecore-jss-cli

Create a new next js app using JSS CLI

Note the project name should be valid as per below error

next-jss-prj1 is not a valid name; you may use lowercase letters, hyphens, and underscores only.

Numbers not allowed in project name

jss create next-jss-prj nextjs

Installs all the required artifacts in the specified folder

Run the next jss app in desconneted mode-

jss start

The app should listen to port 3000

Errors

JSS CLI is running in global mode because it was not installed in the local node_modules folder.

Resolution– Install jss cli locally. Also ensure you are in correct directory. Should be in project directory

npm install @sitecore-jss/sitecore-jss-cli

Sitecore Commerce Business Tools Compatibility Table

Sitecore Commerce installation package comes with Sitecore Business Tools SDK.

If you are planning to custommise Business Tools you might have to setup the development environment for Business Tools. You can find more information on how to setup the development environment here

For each version of Sitecore Commerce you need to install the specific version of Business Tools in you development environment.

See below the compatibility table for Business Tools with Sitecore commerce-

Package for the same can be found here

Sitecore Commerce (XC) VersionSitecore Business Tools VersionDownload Link
10.27.0.6https://sitecore.myget.org/feed/sc-npm-packages/package/npm/@sitecore/bizfx/7.0.6
10.16.0.6https://sitecore.myget.org/feed/sc-npm-packages/package/npm/@sitecore/bizfx/6.0.6
10.05.0.12https://sitecore.myget.org/feed/sc-npm-packages/package/npm/@sitecore/bizfx/5.0.12
9.34.0.8https://sitecore.myget.org/feed/sc-npm-packages/package/npm/@sitecore/bizfx/4.0.8
9.23.0.7https://sitecore.myget.org/feed/sc-npm-packages/package/npm/@sitecore/bizfx/3.0.7
9.12.0.3https://sitecore.myget.org/feed/sc-npm-packages/package/npm/@sitecore/bizfx/2.0.3
9.0.31.4.1https://sitecore.myget.org/feed/sc-npm-packages/package/npm/@sitecore/bizfx/1.4.1
9.0.21.2.19https://sitecore.myget.org/feed/sc-npm-packages/package/npm/@sitecore/bizfx/1.2.19
9.0.11.1.9https://sitecore.myget.org/feed/sc-npm-packages/package/npm/@sitecore/bizfx/1.1.9
9.0.01.0.572https://sitecore.myget.org/feed/sc-npm-packages/package/npm/@sitecore/bizfx/1.0.572

Sitecore SXA Series

Sharing my experience on developing and configuring a site using Sitecore SXA.

Topics-

  1. Creating a SXA tenant and site
  2. Know what is in your installed Tenant and Site
  3. Themes – Create and Assign themes
  4. Create Sitecore SXA module
  5. Create a SXA component form scratch using Scriban
    1. Create data and rendering templates
    2. Setup content and create renderings
    3. Create rendering variants using Scriban
    4. Add rendering to Page (Option 1)
    5. Setup page and partial design
  6. Install module to SXA Site
  7. Add rendering to Page using Toolbox (Option 2) – Coming Soon
  8. Setup custom domain for SXA site – Coming Soon
  9. Debug- Remove div row wrappers when using Sitecore placeholders
  10. Debug- Enable and configure the Asset optimizer
  11. Setup Favicon for your SXA site
  12. Configure settings for Error Handling SXA site- Coming Soon