Page 17 of 22

Sitecore Commerce environments- configure and access environment policy

Environments in Sitecore XC are used to control the configuration policies that defines behavior. Define a Commerce environment in the environment configuration JSON file. JSON file contains information specific to Commerce Engine policies that needs to be implemented for specific environment for example Habitat Authoring.

In this article will show how to configure the policy in a specific environment JSON file and access the policy that affects the behavior based on the settings.

First check the default environment. Open Sitecore.Commerce.Engine.Connect.config and see

<defaultEnvironment>HabitatAuthoring</defaultEnvironment>

In this case will add a setting to include Sitecore Clinet Url in enviornment-

Open Comerce Authoring – wwwroot\data\Environments folder

Since the default environment is HabitatAuthoring, you should update PlugIn.Habitat.CommerceAuthoring-1.0.0.json file-

{
"$type": "Sample.Commerce.Plugin.Management.Policies.SitecoreCmsServerPolicy, Sample.Commerce.Plugin.Management",
"ServerHostName": "https://mystorefront.local/"
},

Restart IIS. Hope you already know how to run the Commerce Ops script using postman.

Open Postman, run the GetToken and in SitecoreCommerce_DevOps

run Bootstrap Sitecore Commerce.

This should sync the environment related changes.

Assuming you have a plugin. Create a policy in  Sample.Commerce.Plugin.Management.Policies namespace with the class SitecoreCmsServerPolicy inherited from Policy as below-

using Sitecore.Commerce.Core;

namespace Sample.Commerce.Plugin.Management.Policies
{

public class SitecoreCmsServerPolicy: Policy
{
public string ServerHostName { get; set; }
}
}

You can use the environment configurations by getting the policy as folloes-

var cmsSitecoreServerPolicy = context.GetPolicy<SitecoreCmsServerPolicy>();

cmsSitecoreServerPolicy.ServerHostName;

You should now get the value “https://mystorefront.local/” when ServerHostName is accessed.

You may update these environment files- PlugIn.Habitat.CommerceShops-1.0.0.json for shops environment

Hope this helps.


Reference- Commerce Engine environments


Some useful PowerShell commands

Check version of PowerShell with following command-

get-host | select-object version


Set unrestricted execution to current user

Set-ExecutionPolicy -Scope CurrentUser Unrestricted

This should also the following error when trying to execute a script – cannot be loaded because running scripts is disabled on this system.


How to install and switch between multiple versions of Sitecore Installation Framework.

Installation – Sandeep Pote

To run the multiple versions of Sitecore Installation Framework (SIF) first check the installed versions with following command-

Register the repository command followed by SIF List available command-

Register-PSRepository -Name SitecoreGallery -SourceLocation https://sitecore.myget.org/F/sc-powershell/api/v2

Get-Module SitecoreInstallFramework –ListAvailable

This should list the all the installed version of SIF

sifv1

In this case it shows 2.1.0 and 1.2.1 installed.

To list the version version that is currently in use, execute following command-

Get-Command -Module SitecoreInstallFramework | Select-Object -Property name, version

sifv2

Currently it shows v1.2.1 is active, to switch to the latest version i.e. 2.1.0 or any other version, run the following command-

Remove-Module -Name SitecoreInstallFramework
Import-Module -Name SitecoreInstallFramework -RequiredVersion 2.1.0

Now this should switch to the version 2.1.0

Hope this helps.

Installing Sitecore Installation Framework (SIF)

To have Sitecore Installation Framework in local machine, follow these steps-

Opent the Powershell Command in Administrator mode, make sure have Version 5.1

Run the following command to register the repository

Register-PSRepository -Name SitecoreGallery -SourceLocation https://sitecore.myget.org/F/sc-powershell/api/v2

Install the PowerShell module by running following command-

Install-Module SitecoreInstallFramework

To install specific version provide version number-

Install-Module -Name SitecoreInstallFramework -Repository SitecoreGallery -RequiredVersion 2.2.0


Get-Module SitecoreInstallFramework –ListAvailable

Sitecore commerce (XC) 9.2 installation errors

Whilst installing XC 9.2 I faced following issues, these are basic issues but as a newbie was a good learning and a in depth understanding of the configurations and tasks required to get the commerce installed.

Configuration contains no tasks

This was the trickiest issue. XC9.2 required SIF 2.1.0, you might have installed this version but if you have multiple versions of SIF you might have to switch to SIF 2.1.0 whilst installing the XC9.2

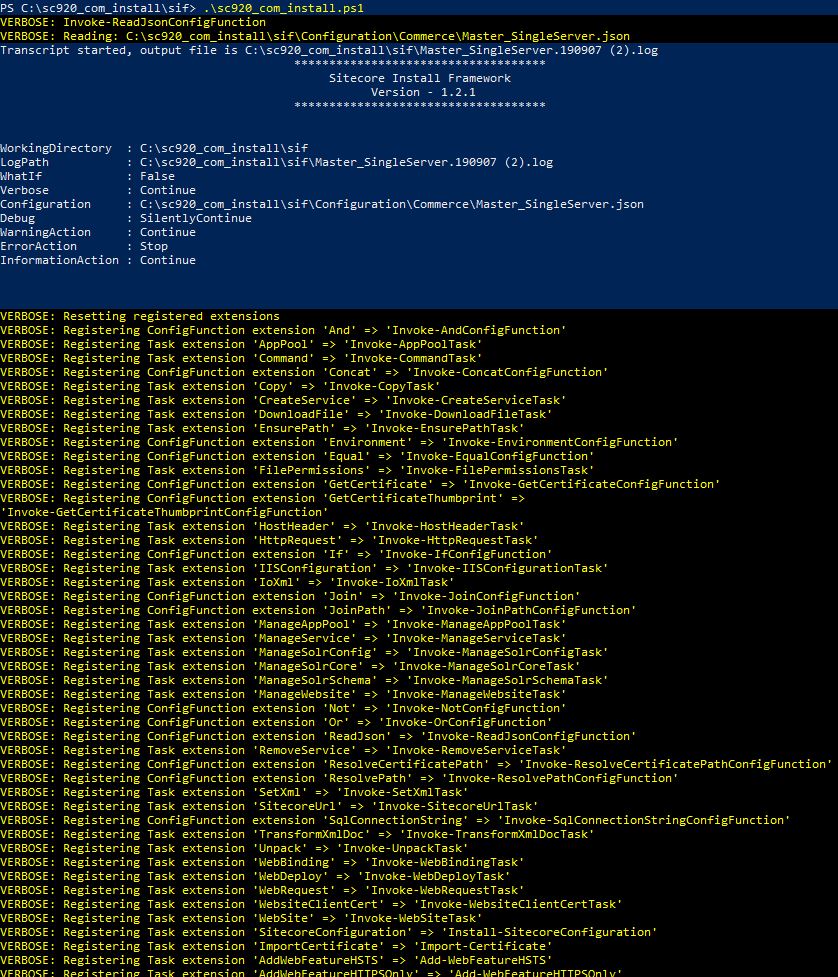
Following is the coupe of lines, end of the scripts ends during installation-

VERBOSE: Registering Task extension ‘TestWebFeatureSSL’ => ‘Test-WebFeatureSSL’
VERBOSE: Registering task parameter map
VERBOSE: WarningAction => Continue
VERBOSE: Verbose => Continue
VERBOSE: InformationAction => Continue
VERBOSE: WhatIf => False
VERBOSE: Debug => SilentlyContinue
VERBOSE: ErrorAction => Stop
WARNING: Configuration contains no tasks
[TIME] 00:00:00

Solution to issue-

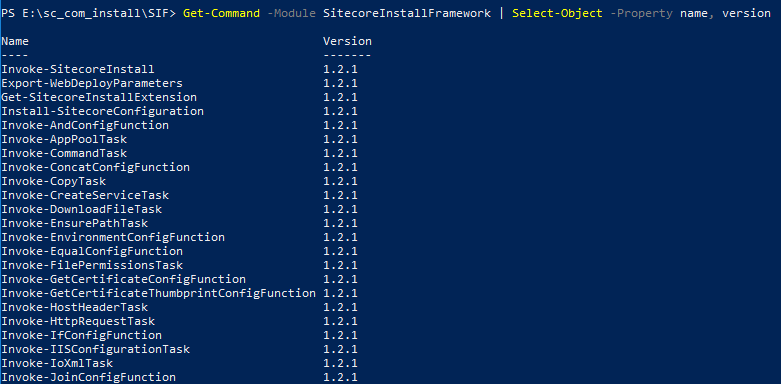
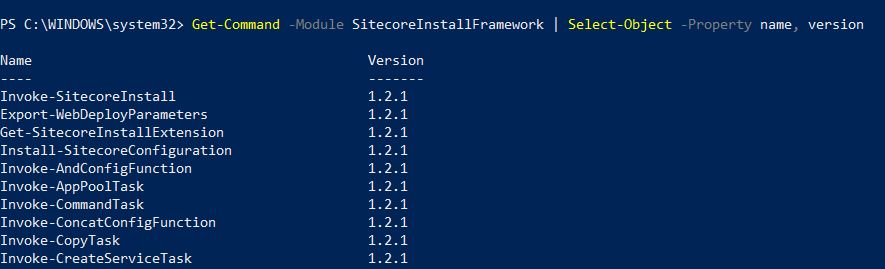
Check the version of SIF active in the powershell or currently used with following command-

Get-Command -Module SitecoreInstallFramework | Select-Object -Property name, version

XC1

Resolution-

If it shows V1.2.1 switch to version 2.1.0 but ensure the this version is installed. To switch to the new version-

Remove-Module -Name SitecoreInstallFramework
Import-Module -Name SitecoreInstallFramework -RequiredVersion 2.1.0

This should allow you to proceed with the instllation.

How I found this might be the issue-

Firstly its a pre-requisite to XC9.2, SIF 2.1. is required.

When I ran the installation script it showed this screen. It shows SIF version as 1.2.1, this were I guessed version might be wrong.

Logs didn’t mention the same.

ConfigurationTask

https://sitecore.stackexchange.com/questions/20791/xc-9-2-installation-error-configuration-contains-no-tasks

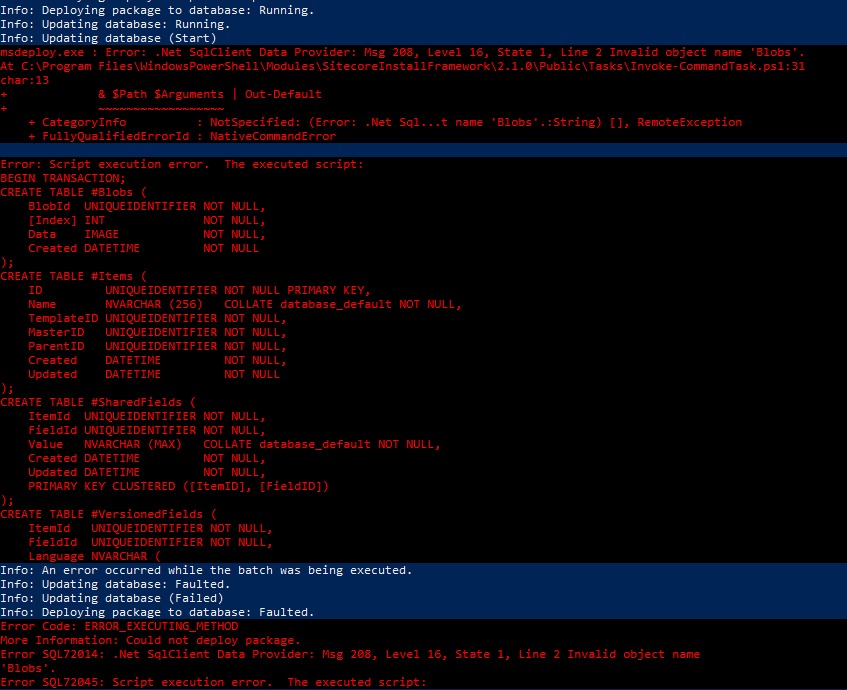
.Net SqlClient Data Provider: Invalid object name ‘Blobs’

This happens to be another silly mistake I made in the script file where I mentioned wrong site name prefix.

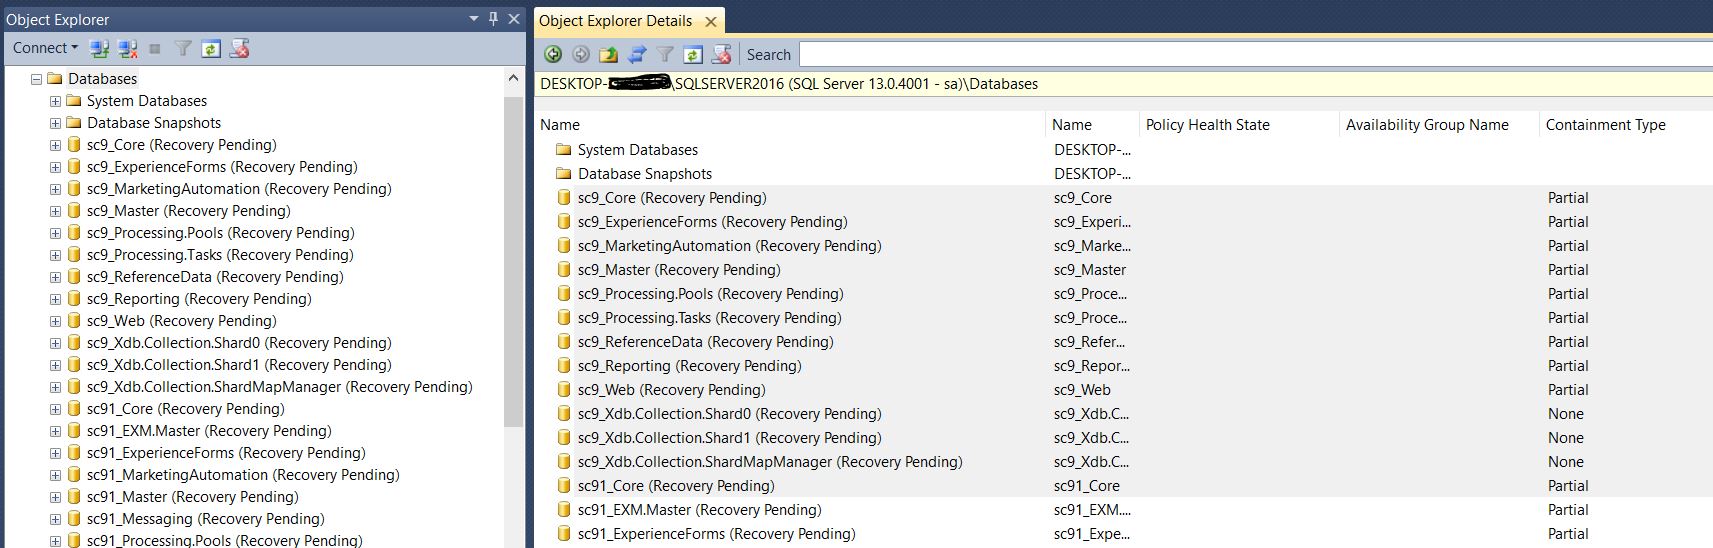
Found that it tries to update the Blobs and other tables in XP instance i.e. YourSitecoreXP_Master DB

So if the Sitecore prefix in the deploy script is wrong it tries to create a new database and update the Blobs table which is not available and hence fails.


XC2

Resolution-

So please check $SiteNamePrefix in deploy script, should match to the XP prefix. e.g.- if your Sitecore XP site name is storefront920.local so the database will be created as storefront920_Master. So in this case $SiteNamePrefix will have to be storefront920

Invoke-RestMethod : The remote server returned an error: (500) Internal Server Error

If you see this error-

VERBOSE: Result: https://commerceshops.sc920.local/commerceops/Bootstrap()
BootStrapping Commerce Services: https://commerceshops.sc920.local/commerceops/Bootstrap()
VERBOSE: PUT https://commerceshops.sc920.local/commerceops/Bootstrap() with 0-byte payload
Install-SitecoreConfiguration : The remote server returned an error: (500) Internal Server Error.
At E:\sc_com_install\SIF\sc_com_install.ps1:100 char:1
+ Install-SitecoreConfiguration @params -Verbose *>&1 | Tee-Object “$PS …
+ ~~~~~~~~~~~~~~~~~
+ CategoryInfo : NotSpecified: (:) [Write-Error], WriteErrorException
+ FullyQualifiedErrorId : Microsoft.PowerShell.Commands.WriteErrorException,Install-SitecoreConfiguration

Resolution-

Managed to resolve this issue by updating the Sql database name to have double slash “\\” between the machine name and sql instance.

This is applies to following paramsters in script-

CommerceServicesDbServer and SitecoreDbServer

e.g.:- machinename\\sql-instance

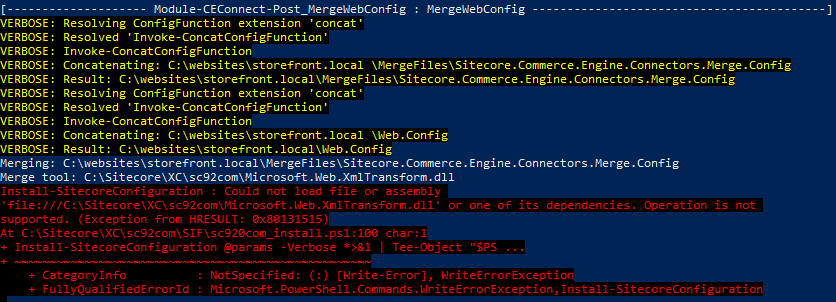
Could not load file or assembly (Microsoft.Web.XmlTransform.dll)

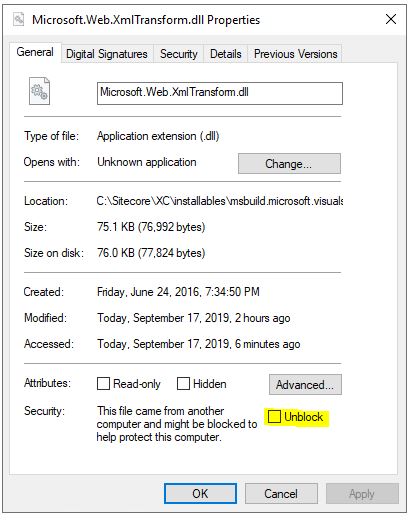
If you see below error even if the file is present in the desired location, Unblock the file to continue the installation.

XCERROR

Go to directory having files Microsoft.Web.XmlTransform.dll. Right click the dll and Unblock the dll

scerror2

If you still see this issue, provide the relative path to the dll in script file for parameter – MergeToolFullPath

SQL error- No process is on the other end of the pipe

A connection was successfully established with the server, but then an error occurred during the login process. (provider: Shared Memory Provider, error: 0 – No process is on the other end of the pipe.) (Microsoft SQL Server, Error: 233)

To resolve this issue: Switch from Windows to SQL Authentication:

  1. Right click on the server name and select properties
  2. Select security tab
  3. Enable the SQL Server and Windows Authentication mode
  4. Restart the SQL Server service

Sitecore- Synchronise existing item after setting as bucketable

Existing Items set as bucketable aren’t hidden and still shows in item bucket, then you might have forgotten to sync the item bucket.

To sync item bucket do the following-

  1. Select the folder or a item bucket that is a bucket. Link here in how its done
  2. In the Content Editor, on the Configure tab in the Buckets group click Sync.
  3. It should show the progress bar on the items been synced.

Depending on number of items in item bucket the items should have synced and hidden.

Items those are marked bucketable should be hidden and those not should still show as a child of item bucket.

bucket9

How to delete mutiple database from sql management studio

At times you might have come across deleting multiple databases. One of the scenarios may be Sitecore creating many DB’s and if it is sitting stale doing nothing you might want to delete those DB’s. You might first try to run the uninstall script to get the site and all related db’s deleted, but if you are deleting this manually you might wonder how to delete mutiple or all db’s in sql server on dev machine in one go.

  1. Open the SQL server management studio
  2. Press F7 or select View in menu and open Object Explorer Details.
  3. Click on Database folder in Object Explorer all db’s will be listed
  4. Select DB’s of your choice to delete. Right click on selected DB’s
  5. Choose option Close existing connections and Click OK
  6. Selected DB’s will be deleted


sc902error4

sc902error5


How to know which container’s are item bucket in Sitecore

Items buckets are used in Sitecore to store millions of content items in one container but also to not load all those items in a content tree instead can be searched within the container. The items in bucket container are hidden and the parent-child relationship is lost once bucketed.

There is a lost to tell and discuss about bucket in Sitecore but to enable the content editor to know which container are item bucket can and Item bucket icon can be enabled in the Quick Action Bar to the left of the content tree in Content Editor.

To do this –

Right click on Quick Action Bar and select option Item Buckets

bucket1

This should show a icon on Quick Action Bar for a bucketed item, in this case Airlines item is a buckatable item.

bucket2


Hope this helps.

Visual Studio 2019 preview

Visual Studio 2019 preview been out, changes that comes are-

  1. Start window
  2. UI refresh
  3. Search improvements
  4. Code cleanup
  5. Debugger Search

Start Window

A refreshed start window allows quickly to clone or checkout code or open a project or solution. Open a local folder and create a new project. Are able to open a most recent projects. Microsoft call this as “Start Window Experience” which allows developers to start quickly.

vs1

UI refresh – Create New project dialog

Devs are now able to search the project templates quickly and filter as per language, platform and project type.

vs2

Search improvements

Search bar is right at the top after the menus. Allows to search items very instantly provides suggestions if anything can be searched online.vs3

Code clean up

Now have a code clean up option can be configured to include fixers and clean up code if for any warnings or errors.

vs4

vs5

You may change the direction of rule- Tools > Options > Text Editor >  Code Style.