Category: Sitecore

Create a custom Sitecore SXA component using Scriban from scratch

Often you see examples for creating a new Sitecore SXA component is suggested to be cloned from the Promo component which helps developers to quick start the development.

But its always good to know the process and supporting items that are created to support he component.

In this blog post I will walk through the steps required to create a SXA component using Scriban from scratch. This post is not about how to use Scriban, will cover that in another post.

This post assumes the SXA Site is configured with the custom theme. See links to create Tenants/Sites/Themes –

  1. Create Tenant and SXA Site
  2. Configure Theme to the SXA Site
  3. Assign Theme to the SXA Site

The component contains images and text and should look like this-

Step 1 – Create Templates –

Lets start creating a template first. Lets give it a name ImageBlock

Template Name – Image Block

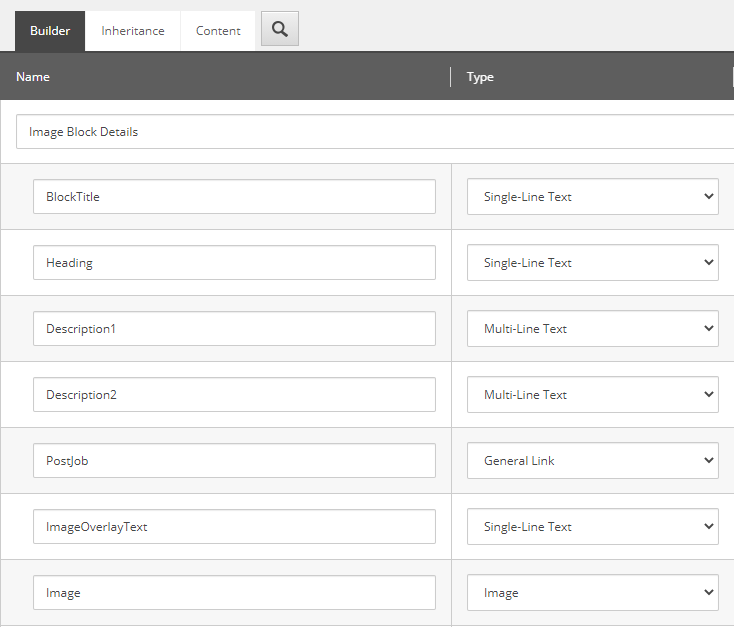
Template Name – Image Block Folder

Set the Image Block as Insert Options so Image Blocks can be created under Image Block Folder

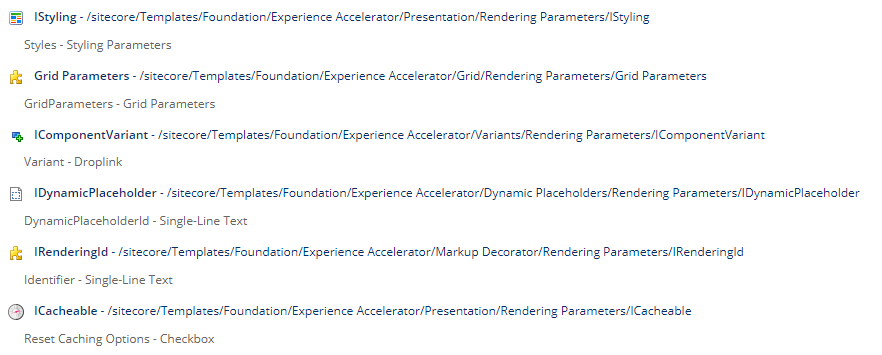
Template Name- Image Block (Rendering Parameter)

The below inheritance is required to style, cache and attach a rendering variant.

This template should inherit following-

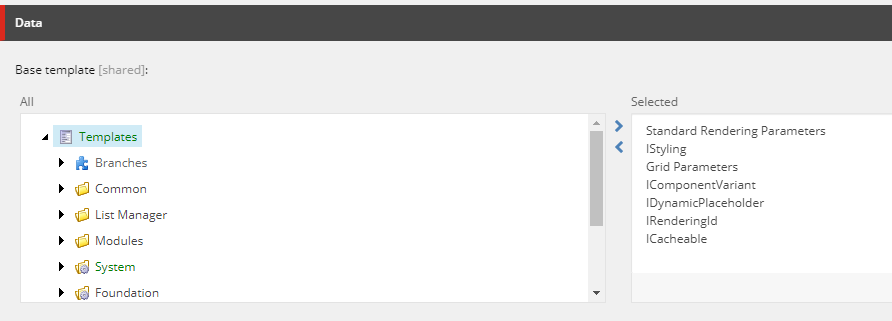
Inherited template paths-

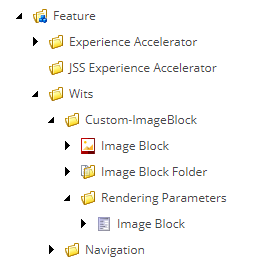
Template structure for Image Block component looks like this-

Step 2 – Create Rendering for Image Block component

Before you could start creating rendering, its good to have content as the rendering will require the Datasource location and the view.

Content

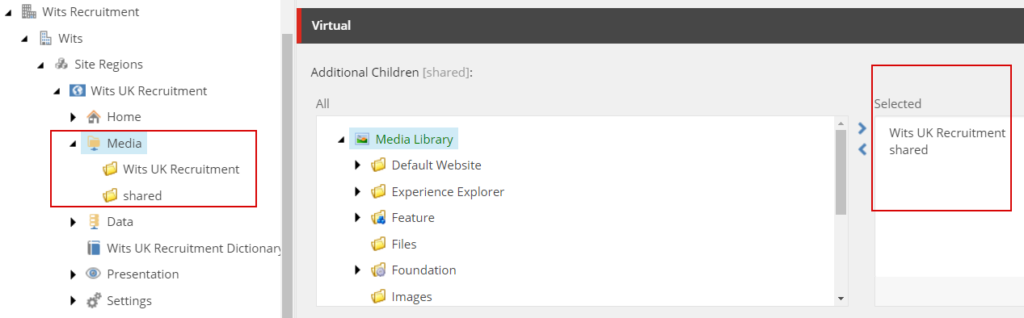
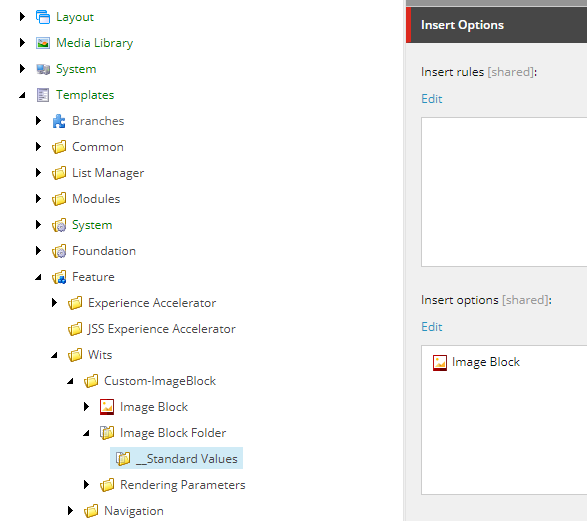
IMPORTANT– Data folders for component can be configured using modules. For this post will create it manually.

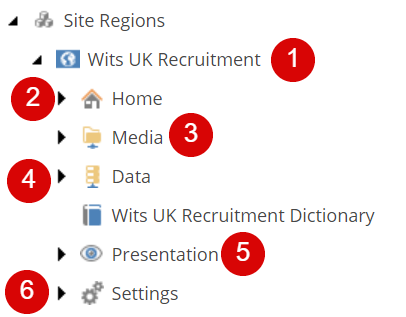
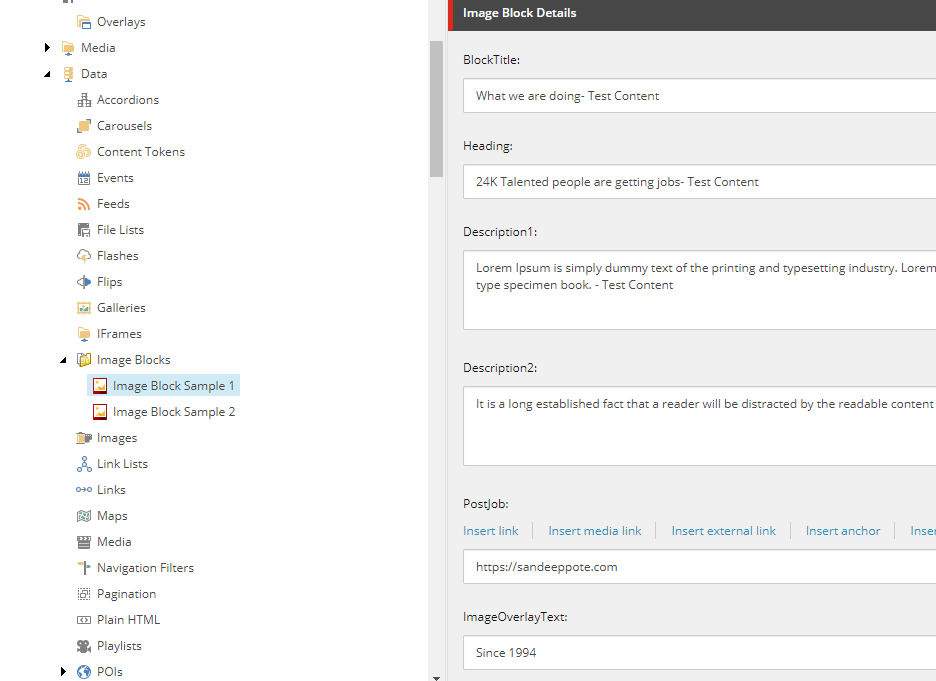
Navigate to the Site -Data folder and create a Image Block Folder

Example at this location-

/sitecore/content/Wits Recruitment/Wits/Site Regions/Wits UK Recruitment/Data

I have named it Image Blocks and enter content for the template-

View

Create a view. Place following markup in cshtml. Place this in your custom folder in Sitecore instance view folder

@using Sitecore.XA.Foundation.RenderingVariants.Extensions
@using Sitecore.XA.Foundation.SitecoreExtensions.Extensions
@using Sitecore.XA.Foundation.Variants.Abstractions.Fields
@model Sitecore.XA.Foundation.Variants.Abstractions.Models.VariantsRenderingModel

@if (Model.DataSourceItem != null || Html.Sxa().IsEdit)
{
    if (Model.DataSourceItem == null)
    {
        @Model.MessageIsEmpty
    }
    else
    {
        foreach (BaseVariantField variantField in Model.VariantFields)
        {
            @Html.RenderingVariants().RenderVariant(variantField, Model.Item, Model.RenderingWebEditingParams, Model)
        }
    }
}

Rendering

Create controller rendering for Image Block Controller

Controller– Sitecore.XA.Foundation.RenderingVariants.Controllers.VariantsController, Sitecore.XA.Foundation.RenderingVariants

Controller Action- Index

Parameter Templates – Select the Rendering Parameter template created in previous step.

Example – /sitecore/templates/Feature/Wits/PageContent/Rendering Parameters/Image Block

Datasource Location – Query to the Site data location. You may also have to consider same for shared sites

Sample- query:$site/[@@name=’Data’]/[@@templatename=’Image Block Folder’] | query:$sharedSites/[@@name=’Data’]/ [@@templatename=’Image Block Folder’]

Datasource Template– Location of the template (Image Block)

Example- /sitecore/templates/Feature/Wits/PageContent/Image Block

Rendering view path– provide the path of your custom view

Example- ~/Views/Wits/ImageBlock.cshtml

Step 3 – Create Rendering Variant

Create a rendering variant i.e. items from templates-

/sitecore/templates/Foundation/Experience Accelerator/Rendering Variants/Variants

/sitecore/templates/Foundation/Experience Accelerator/Rendering Variants/Variant Definition

/sitecore/templates/Foundation/Experience Accelerator/Scriban/Scriban

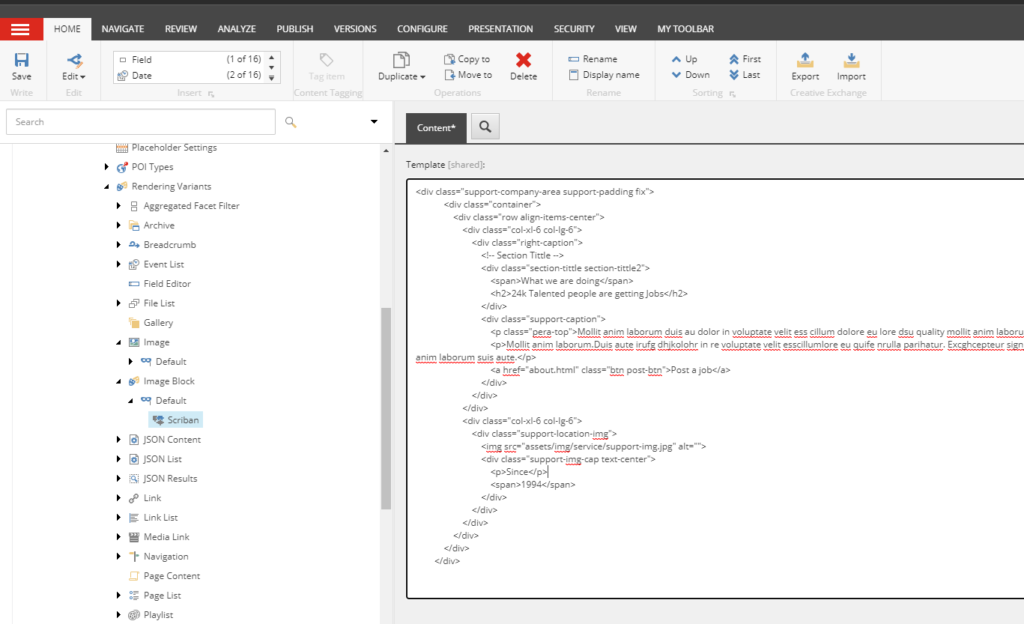
Paste the markup to render

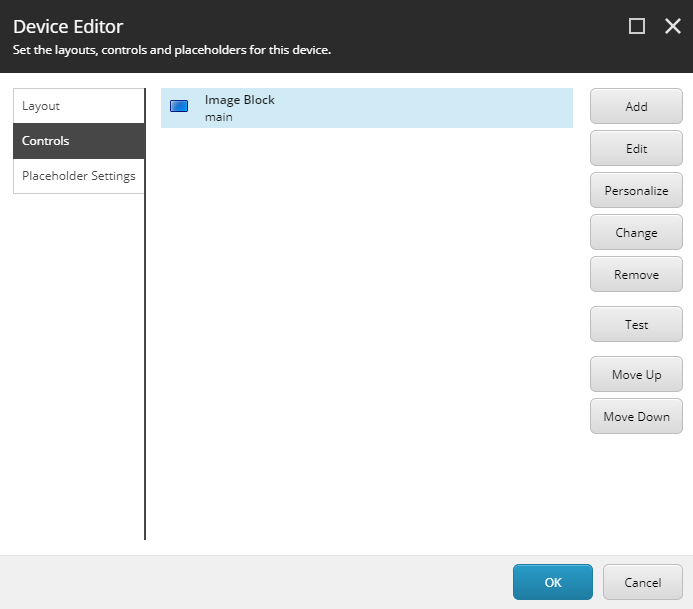
Step 4 – Add rendering to Page

Add rendering to the page. Ideally this can be done by creating a Branch and create a module which should allow to drag and drop the SXA component to the page using experience editor.

Select Home page and select option Presentation ==> Details

Add the rendering “Image Block” in the placeholder “main”

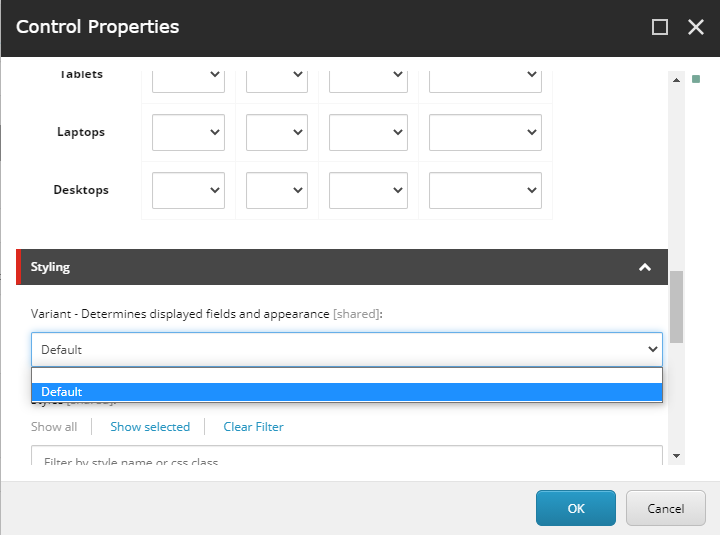
Edit the control and select the Variant “Default” in Styling section.

Remember we created a Rendering Variant “Image Block” in step Step 3 and the name of the variant was “Default”. This variant is listed in dropdown for selection. Also select the datasource

Select rendering variant-

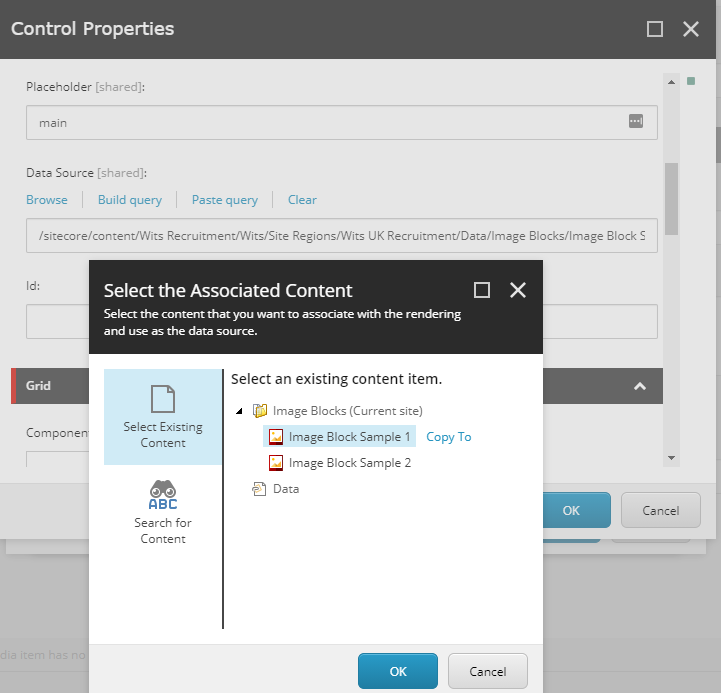
Select the datasource-

Save and Publish and should be able to see the newly created component in Home page

Step 5- Update rendering variant to display content from Image Block item

In step-3 we added a static markup in rendering variant.

Use the following scriban changes to get the content from selected datasource. See BlockTitle, Heading and Description1 and Description2 to pull the content from item-

Example- {{sc_raw i_datasource ‘Description2’ }}

<div class="support-company-area support-padding fix">
            <div class="container">
                <div class="row align-items-center">
                    <div class="col-xl-6 col-lg-6">
                        <div class="right-caption">
                            <!-- Section Tittle -->
                            <div class="section-tittle section-tittle2">
                                <span>{{sc_raw i_datasource 'BlockTitle' }} </span>
                                <h2>{{sc_raw i_datasource 'Heading' }}</h2>
                            </div>
                            <div class="support-caption">
                                <p class="pera-top">{{sc_raw i_datasource 'Description1' }}</p>
                                <p>{{sc_raw i_datasource 'Description2' }}</p>
                                <a href="about.html" class="btn post-btn">Post a job</a>
                            </div>
                        </div>
                    </div>
                    <div class="col-xl-6 col-lg-6">
                        <div class="support-location-img">
                            <img src="assets/img/service/support-img.jpg" alt="">
                            <div class="support-img-cap text-center">
                                <p>Since</p>
                                <span>1994</span>
                            </div>
                        </div>
                    </div>
                </div>
            </div>
        </div>

Finally we have component been rendered and content pulled from item-

Hope this helps.

Sitecore XC 10.1 compatibility

Browser
Microsoft Edge
Mozilla Firefox
Google Chrome
Apple Safari

Operating System
Window Server 2019 (GA)
Windows Server 2016
Windows 10

.NET Framework
.NET 4.8
.NET 4.7.2
.NET 4.7.1

ASP.NET MVC
ASP.NET MVC 5.2

ASP.NET Core
ASP.NET Core 3.1

Database Server
MS Azure SQL
MS SQL 2019
MS SQL 2017

Windows PowerShell
PowerShell 5.1 or later

Search provider
Solr 8.4.0
SolrCloud

Caching
Redis (Linux) 4.0.9
Redis (Azure) 4.0.14
Redis (Windows) 3.0.504

Newtonsoft Json.NET
Newtonsoft Json.Net 12.0.1

OData
OData 7.5

Visual Studio
Visual Studio 2019

Docker Images
Windows 10 Enterprise 2019 LTSC
Windows 10, version 2004
Windows 10, version 20H2
Sitecore XP and modules 
XP 10.1 Initial
SXA 10.1
SPE 6.2

Step-by-step install Sitecore XP 10.1 to developer workstation using Sitecore Containers with Docker

To know more about containers here is the official documentation from Sitecore on Containers

Lets get started to create a Sitecore XP 10.1 development environment using docker.

Before getting started please see Installation Guide for Developer Workstation with Containers

Topology user here will XP0 or per guide XP Workstation (XP Single)

Hardware and Networking Requirements-

Sitecore instance needs below ports, avoid using these ports other than Sitecore.

Required portRoleDescription
443TraefikHTTPS proxy
8079TraefikTraefik dashboard
8984SolrSolr API and dashboard
14330SQLSQL Server

Prepare/prerequisite for Sitecore XP workstation

  • [Optional] OS- Windows 10 1809 or later or Windows Server 1809 or later

Login to Azure portal to create a VM

Image – Select Image to Windows 10 Pro, Version 1809- Gen 1

Size – Standard_D8s_v3- * vcpus, 32GiB memory

Inbound ports– Select RDP, dont select HTTPS 443 as this will be used by Traefik as mentioned in previous section

  • Download and Install Docker Desktop for Windows

Download and install Docker Desktop for Windows. You can get Stable version from here

After installation Restart the machine, this should enable the Hyper-V feature

This should also have Docker running and should see the same in system tray

  • Switch to Windows containers

Right click on Docker icon and switch to Windows Container. See this link for more details as per guide

Download and Prepare for installation

  • Download and extract the Sitecore Container Deployment Package from the Sitecore Developer Portal and store it on your local workstation or check releases here
  • Copy and extract SitecoreContainerDeployment.10.1.0.005207.309.zip for e.g:- C:/sc101_install

Navigate to C:\sc101_install\compose\ltsc2019\xp0

  • Open .env file, we need to fill in this parameters before starting installation. You can find more details in guide for each option.
  • Download PowerShell script to initialize (init.ps1) the parameters from docker-examples. Parameter values in .env can be populated manually by individually executing the commands for required for each parameter in guide(see Appendices) but I would recommend to use init.ps1 as this is provided by Sitecore and hence tried and tested.

Folder structure should look like this-

  • Change parameter values in init.ps1 file.

Change the SitecoreAdminPassword, SqlSaPassword and host entries as per requirement. If you are changing host entries also ensure the same is updated in .env file for CM_HOST and ID_HOST parameters. Lets keep the default values.

  • Populate .env file using init command

Open PowerShell as a Administrator, navigate to the folder having init.ps1 file.

Execute init.ps1 script. You may have to set the execution rights to current user to execute the script-

Set-ExecutionPolicy -Scope CurrentUser Unrestricted
.init.ps1

Provide the path of license file

This should Install and Import SitecoreDockerTools and Populate the environment file.

Ensure to Switch to Windows Container before executing below command

Install

Execute docker compose command

docker-compose.exe up --detach

Installation complete-

Once command execution is complete, should see all the checks done and Sitecore dev. instance ready in 20 minutes

Open Docker Dashboard and should see Sitecore-XP0 running

Site listening to address- https://xp0cm.localhost/

Cleanup the workstation

To cleanup/stop workstation use following commands. You can find these in instllation guide

To stop a Docker Compose environment without removing its contents:

docker-compose.exe stop

To resume a previously stopped Docker Compose environment:

docker-compose.exe start

To remove a Docker Compose environment and all the non-mounted volumes

docker-compose.exe down

Hope this helps to install Sitecore XP 10.1 using Docker!!!

Step-by-step install Sitecore XP 10.1 using Sitecore Installation Framework (SIF)

install

To install XP Single Developer(XP0) 10.1 on development machine, follow the steps in this blog post

Use the Sitecore Installation Guide for hardware, OS, database and other software requirements

Installation guide for Developer workstation

Download/Install following-

  • Windows Server 2019/2016 or Windows 10(64-bit)
  • Install Microsoft PowerShell 7.0.3 if not already installed
    1. PowerShell in installed with OS. Check version using this command
      • Get-Host | Select-Object Version
    2. Optionally install version 7.0.3 if version 5.1 or later is already installed
  • Install .Net Framework 4.8.0

Machine restart might be required whilst installation of above software’s

Step-by-step prepare and organize pre-requisite and installation files

  • Enable Contained Database Authentication

After installing SQL Server launch SQL Server Management Studio and run following-

EXEC sp_configure 'contained', 1;
 RECONFIGURE;
  • Prepare the installation folder
  1. Extract downloaded XP Single Developer package to a folder e.g.:- sc101_install
  2. Extract XP0 Configuration files 10.1.0 rev. 005207.zip in same folder
  • Install SIF Module
  1. Open PowerShell as an administrator.
  2. Set unrestricted execution to current user
Set-ExecutionPolicy -Scope CurrentUser Unrestricted

3. Register repository

Register-PSRepository -Name SitecoreGallery https://sitecore.myget.org/F/sc-powershell/api/v2

4. Install SIF

Install-Module SitecoreInstallFramework

5. After SIF installation check if the SIF 2.3.0 is installed

Get-Module SitecoreInstallFramework –ListAvailable 

To install specific version of SIF or run multiple version of SIF see this blog

  • Install prerequisites before installing XP 10

Switch to the sitecorexp10 folder and execute following script

Install-SitecoreConfiguration -Path .Prerequisites.json
  • Install SOLR 8.4.0

1. Switch to e.g.- sc101_install folder. Open Solr-SingleDeveloper.json file

2. Change the Install Root for SOLR – DefaultValue

 "SolrInstallRoot": {
            "Type": "String",
            "Description": "The file path to install Solr. This config will add the prefix and solr version e.g C:\Solr becomes C:\Solr\[SolrServicePrefix]Solr-8.4.0",
            "DefaultValue": "C:\SOLR"
        },

3. Execute –

Install-SitecoreConfiguration -Path Solr-SingleDeveloper.json

4. Check https://localhost:8983/solr/#/ if SOLR installed on SSL

Prepare and Execute script for installation

Open XP0-SingleDeveloper.ps1 file to update following-

  • $Prefix
  • $SitecoreAdminPassword
  • $SCInstallRoot – change path to the folder installers are available
  • $SolrUrl
  • $SolrRoot
  • $SolrService
  • $SqlServer
  • $SqlAdminUser
  • $SqlAdminPassword

Copy license to the e.g. – sc101_install folder

Execute installation script – .\XP0-SingleDevelor.ps1

Hope the installation completes without any issues

Post Installation activities

Rebuild the search indexes and the Link database
After you install Sitecore Experience Platform, you must rebuild the search indexes and rebuild the Link databases.


To rebuild all the indexes:

  1. On the Sitecore Launchpad, click Control Panel, and in the Indexing section, click Indexing manager.
  2. In the Indexing Manager dialog box, click Select all, and then click Rebuild.

To rebuild the Link databases for the Master and Core databases:

  1. On the Sitecore Launchpad, click Control Panel, and in the Database section, click Rebuild Link Databases.
  2. Select the Master and Core databases and then click Rebuild

Uninstall Sitecore Instance

To uninstall Sitecore instance uncomment the Uninstall command in XP0-SingleDeveloper.ps1 file. Comment the install command-

Errors

“No registration found for extension ‘RemoveSQLDatabase’ of type ‘Task’”

Run

Install-SitecoreConfiguration -Path .Prerequisites.json

OR

Install-Module -Name SQLServer

Hope this helps to install Sitecore XP 10.1 instance

Different approaches to assign Sitecore SXA theme to a site

Once a tenant and site are created and/or a theme is manually created you may want to assign a theme to a site. A theme is automatically assigned when during a site creation but what if you want to assign a theme to already created site.

See this blog to create a tenant and site and different approaches of creating a theme.

Experience Editor

Select any Partial design and open experience editor select Experience Accelerator option.

Select Theme option. Change the theme.

This will also the change the theme in the selected site – /sitecore/content/<<tenant folder>>/<<tenant>>/<<site folder>>/<<site>>/Presentation/Page Designs

Content Editor

To change the theme for a specific site. Navigate to the site/Presentation/Page Designs

for e.g.:- /sitecore/content/<<tenant folder>>/<<tenant>>/<<site folder>>/<<site>>/Presentation/Page Designs

In the Styling section change the Theme field

Hope this helps.

Different approaches of creating Sitecore SXA themes

Themes define the look and feel of a site and makes it flexible to change the layout and design of the website.

Themes help to customize the appearance of the site which includes layout, typography, color and other design elements.

SXA come with two types of themes- Site and Base themes. To add own/custom classes and assets, such as styles, scripts, images and fonts use Site theme.

There are multiple ways site theme cane be created-

Option 1 – Add custom theme when creating a Site

Check out this blog post for adding a theme when creating a site

Option 2 – Add theme to existing Site (create theme manually)

Right click on your site- click Scripts and click New Site Theme option

Provide the theme name and location.

Click OK and a theme should be created on specified location

Option 3 – Add a theme using SXA CLI

Will add the details shortly.

Hope this helps!

Sitecore 10 SXA Site Structure

Previous blog shows how to create Tenant and SXA Site.

In this blog lets see what does the installation script adds to the SXA site.

Following is the site content structure-

1. Site

SXA site is a container to the content that will be used as a output of the site. Site contains the settings to select the Site Media Library, Theme Folder and Modules.

2. Home Page

This is the home page of the site. All other pages in the site must be stored under the Home item.

3. Media Folder

Media Folder helps scope the part of media library is available to content editors on the images selection dialog.

You can change the scope by adding or removing the folder in “Virtual” section “Additional Children” field.

Media Folder “Additional Children” field
Scoped item in media folder from Media Library
Scoped to the selected folders configured in “Additional Children” field

Best Practice – Do not put media items directly under the Media folder. Form SXA 1.7 and higher uploading items to media folder in the Site is not allowed.

4. Data Folder

Data Folder is the repository for storing all the data sources. These data sources can be reused across many pages scoped inside the Site. Data folder had component type folder and can be created manually or when the module is installed.

Data for each component can be created manually from the content tree or from experience editor by using the “Associated Content” option. Data folder is used as a source configured in rendering’s Data Source field in a form of query or directly mapped to the component folder.

Best Practice – Clean up unused data sources

Best Practice – Give Site data sources meaningful names

Best Practice – Organize site data sources in folders

Best Practice –Run source field reports to help set the data source context

5. Presentation

The presentation folder contains all the presentation related details and settings for the components selected while creating the site.

Presentation folder has list of components based on the modules selected while creating the site.

Presentation folder contains Page and Partial Designs, Layout Service , Available Renderings, Rendering Variants and Styles.

Rendering variant contains list of components on the site and can be customized using Variant Definition and Variant Fields. Also can use template based Variant like Scriban and Template

6. Settings

Settings folder contains site specific configuration. Site Grouping contains the Site Settings like site name, host name, database etc.

Settings also contains the Redirects, HTML snippets and Item Queries. Settings Folder contains options to select the Fav icon, error handling and other SEO related settings.

Sitecore 10 SXA-Create a tenant and Site

Tenant Folder

Sitecore supports multitenancy, which means you can have multiple sites running on a single Sitecore instance.

Tenant folder is just a container to hold multiple tenants you may have as a part of site structure. Inherited from _Base Tenant Folder. You may create a tenant folder to hold the multiple tenants of a Company.

A folder with provide tenant folder name is create here – /sitecore/templates/Project/<Tenant Folder Name>

Template Path – /sitecore/templates/Foundation/Experience Accelerator/Multisite/Tenant Folder

Tenant

Tenant is a top-level container for the Sites underneath. Site in same tenant are related, that means they are able to share data and layouts. Creation of tenants comes with optional modules.

Template/sitecore/templates/Project/<<Tenant Folder>>/<<Tenant>>/Tenant

Tenant been created successfully.

Creating Site

Site is a collection of content and output with a common overall business objective sharing a common set of assets

To create site right click on Tenant and select an option to create Site or Site Folder

Site Folder –

Site folder is a container for multiple sites.

Template – /sitecore/templates/Foundation/Experience Accelerator/Multisite/Site Folder

Site

General tab- Provide Site name, host name and Virtual folder. You may keep this as default and change later based on the requirements.

Select the required modules as a part of Site creation.

Create a new theme or select existing. This will e your site theme and can be changed from Page Design –

Template – /sitecore/content/<<tenant folder>>/<<tenant>>/<<site folder>>/<<site>>/Presentation/Page Designs

Select a grid mainly Bootstrap 4

At this point we have SXA site been created-

Remove Site

To remove Site, right click on site, select scripts and Remove Site option.

Sitecore Technology MVP 2021

Voluntarily contributing your time, energy and skills to the community and help customers succeed and be a part of their growth is all that matters. I believe going above and beyond to achieve expertise in whatever you are doing and giving back to community however small it may be is the key to grow together and when these efforts are recognized it inspires the community to continue their good work.

Happy to share that I have been recognized as 2021 Sitecore MVP.

Sitecore recognizes professionals who deliver outstanding customer experiences through shared expertise on Sitecore’s products, the 2021 MVP program draws from a community of 12,000 certified developers and over 20,000 active participants. This year’s 284 MVPs contributed invaluable knowledge to the community in 2020 and demonstrated true mastery of the Sitecore platform to support partners, customers and prospects.

Sitecore XC 10 – code breaking changes

Sitecore Commerce 10

Sitecore Commerce supports integration to the third-part system and customization and extension to the OOTB entities. This can be achieved by custom plugins.

If you are migrating your code from XC 9.x version to XC 10 you will have to update the code to newest API’s provided with XC. Following is the list of breaking changes if migrating from older versions or good to know if you are starting with the new XC 10 solution.

Wrappers to PipelineBlock

Commerce Engine uses pipeline framework to support extensibility. Pipelines act as a containers for business logic. Commerce pipeline consists of a block which has a detailed business logic.

With Sitecore 10 PipelineBlock are now wrapped with AsyncPipeline and SyncPipeline. So if you have your code using PipelineBlock it should be using Run method to execute the block you may have injected to pipeline.

AsyncPipelineBlock

If block needs to be executed Asynchronously use AsyncPipelineBlock. Also the method name changes to RunAsync()

SyncPipelineBlock

If block needs to be executed Synchronously use SyncPipelineBlock. The method name used to execute block is Run()

ConfigureServiceApiBlock also now uses SyncPipelineBlock

2. IPipeline RunAsync() method

IPipeline interface method is changed from Run to RunAsync() which now makes sense as the method is asynchronous operation.

So where are the changes you might need to make, some of the pipelines that is used frequently and need change are listed below-

  1. IFindEntityPipeline
  2. IFindEntitiesInListPipeline
  3. IFindEntitiesPipeline
  4. IPersistEntityPipeline
  5. Any custom pipeline and list goes on…

Api Controller

Commerce api controller exposes the endpoint to communicate from FE or Commerce Connect to Commerce Engine. You can create custom endpoint and the api controller inherited from class CommerceController.

With XC 10.x the class file to inherit for same is CommerceODataController

See this link for more details – CommerceODataController

ODataActionParameters

ODataActionParameters should now be referenced from Microsoft.AspNet.OData namespace.

FileResultExecutorBase

FileResultExecutorBase should be referenced from Microsoft.AspNetCore.Mvc.Infrastructure

These are few of the breaking changes. There are more and I shall keep updating.