In Rust arrays are stored in contigious section of memory locations and sorted in order. They are fixed length and cannot be dynamically resize, containing elements of same data type.
A fix size array denotes [T;N]. where T denotes element type i.e. i32, u64 etc. and N denoted non-negative compile time constant size. This means compiler needs to know before running the code the size of array.
One way of declaring an array is to have the values comma seperated in square brackets e.g.- [1, 2, 3]
Example-
let fruits = ["apple", "orange"];
let selected_fruit = fruits[0];

// Retrieve first element of an array.
println!("Selected fruit is - {}", selected_fruit);
Output-
Selected fruit is - appleTo modify the value in the array make the array mutable and change the value of an element in array, in this case first element.
let mut fruits = ["apple", "orange"];
fruits[0]= "mango";

let selected_fruit = fruits[0];
println!("Selected fruit is - {}", selected_fruit);
Output-
Selected fruit is - mangoRepeat expression – Declaring arrays with the data type and length [expr, N] where N is the times to repeat expression (expr).
Note that [expr; 0] is allowed, and produces an empty array. This will still evaluate expr, however, and immediately drop the resulting value, so be mindful of side effects.
let numbers : [i32; 5]; // declare array
numbers= [1, 3, 5, 7, 9]; // initalize array
println!("Selected number - {}", numbers[0]); // print first element
Output-
Selected number - 1Compiler Errors-
If array is not initalised and the element of array is tried to access the compiler thorws an error-
let numbers : [i32; 5];
println!("Selected number - {}", numbers[0]);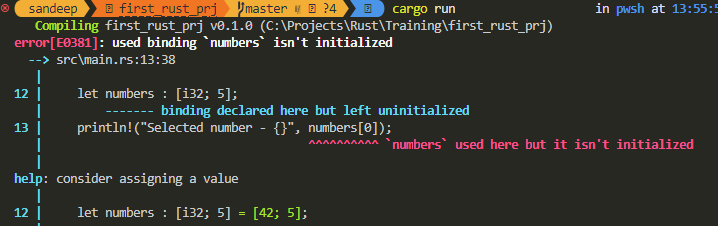
Solution-
let numbers : [i32; 5];
numbers = [0;5]; // All elements has value 0
println!("Selected number - {}", numbers[0]);
Output-
Selected number - 0Compiler Errors-
Index out of bounds – if the element accessed is larger than the array length.
let numbers : [i32; 5];
println!("Selected number - {}", numbers[5]);
The array length is 5 and index starts from 0, so the last index is 4. But in above program the index 5 is trying to access hence error

Solution-
The element accessed here is the last element i.e. index 4.
let numbers : [i32; 5];
numbers = [0;5]; // all elements has value 0
println!("Selected number - {}", numbers[4]);/ Compiles successfully
Count of elements
Get the length of an array using extension function len()
let numbers : [i32; 5];
numbers = [0;5];
println!("Length of numbers is {}", numbers.len());
Output-
Length of numbers is 5Slice Array
Slice the array by giving an expression the starting and ending index with double dots between. e.g.- [starting_index..ending_index]. Access the memory of the variable and provide the range e.g.- &array_variable[2..4]
Print the array and the slice using {:?}
Omit start index and end index [..4] and [2..] respectively
let numbers : [i32; 5] = [10, 20, 30, 40, 50];
let array_slice = &numbers[2..4];
let omit_start_index = &numbers[..4];
let omit_end_index = &numbers[2..];
println!("array = {:?}", numbers);
println!("slice = {:?}", array_slice);
println!("omit start index = {:?}", omit_start_index );
println!("omit end index = {:?}", omit_end_index );
Output
array = [10, 20, 30, 40, 50]
slice = [30, 40] // [2..4]
omit start index = [10, 20, 30, 40] // [..4]
omit end index = [30, 40, 50] // [2..]
Multi-dimensional array
Can be declared as follows-
let fruits = [["1", "2"],["apple", "orange"]];
println!("Selected fruit is - {}", fruits[1][1]);
Tuples
Tuples are similar to arrays except that tuples can have mixed data types. Similar to arrays tuples are stored in a fiexed-length and the data types must be know at compile time with elements are ordered.
Tuples is declared with comma seperated elements with round braces – (“hello”, 5 , ‘c’)
Here the first element is string then integer and character. See below example how to declare tuples and access elements.
Example-
// declare and inititaize tuple
let tuple = ("Hello", 5 , 's');
// Access elements
println!("First element in tupple is - {}",tuple.0)
Output-
First element in tupple is - HelloExplict declaration can be done as follows-
Example-
// declare and inititaize tuple
let tuple: (&str, i32, char) = ("Hello", 5 , 's');
// Access elements
println!("First element in tupple is - {}",tuple.0)
// Prints "First element in tupple is Hello"
Updating element in tuple
First mark the variable as mutable. Access the element of the tuple and update.
// declare and inititaize tuple
let mut tuple: (&str, i32, char) = ("Hello", 5 , 's');
// Access second element and add 5
tuple.1 += 5;
// Print updated element
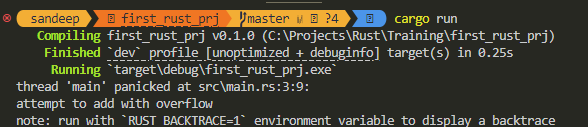
println!("Add 5 to second element in tupple - {}",tuple.1)While updating the element be careful that the element value does-not exceeds the max value a data type can hold or there will be memory overflow error.
Copy the tuple object
Continuing to the aboce code, decalre the tuple with 3 elements, assign the updated tuple and access the declared variable in tuple.
// declare and inititaize tuple
let mut tuple: (&str, i32, char)    = ("Hello", 5 , 's');
// Access second element and add 5
tuple.1 += 5;
// Print updated element
println!("Add 5 to second element in tupple - {}",tuple.1);

let (first, second , third ) = tuple;
println!("Copied tuple third element is {}", third);
Output-
Add 5 to second element in tupple - 10
Copied tuple third element is s
Warnings-
Above code, first and second element are never used, hence the compiler will give warnings – unused variable:
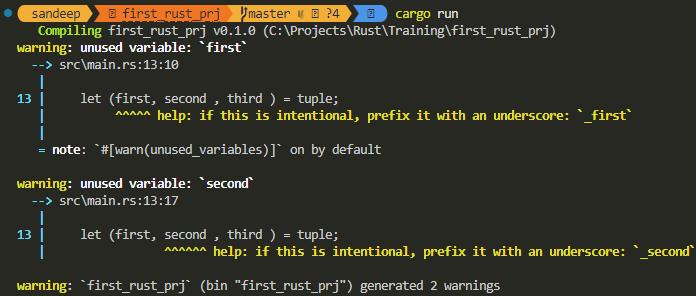
Although it won’t stop the compiler from running the code. The suggestion here is to use prefix tuple element with _ (underscore) i.e. _first and _second. Lets change this and see if there are no warnings.
    // declare and inititaize tuple
    let mut tuple: (&str, i32, char)    = ("Hello", 5 , 's');
    // Access second element and add 5
    tuple.1 += 5;
    // Print updated element
    println!("Add 5 to second element in tupple - {}",tuple.1);

    let (_first, _second , _third ) = tuple;
    println!("Copied tuple third element is {}", _third);
Now there are no warnings and compiles with results-

Reference –
https://doc.rust-lang.org/std/primitive.tuple.html
https://doc.rust-lang.org/rust-by-example/primitives/array.html