
Install Rust and setup development IDE with cargo
Loops and conditional statement in Rust
Ownership of resources in Rust
Borrowing, mutable and dangling references in Rust
String Type vs String literal in Rust
![]()
Sitecore Consultant. Sitecore MVP 2021 - 2026


Use todo! macro for unimplemented traits
todo! macro will compile and run successsfuly the unimplemented traits. But if we call the unimplemented trait it will panic and give error.
Struct
struct Language{
    name: String,
    stable_version: f32,
    launched_year: u32
}
Struct implementation with unimplmented method named – represent
impl Description for Language{
    fn represent(&self) -> String{     // Error
    }
}
Main Block
fn main() {

   let pro_langauge_rust = Language{
        name: String::from("Rust"),
        stable_version: 1.84,
        launched_year: 2012
    };

    println!("{}" , pro_langauge_rust.name);
}
Compiler Error-
18 |     fn represent(&self) -> String{
   |        ---------           ^^^^^^ expected `String`, found `()`
Change the Struct implementation with todo! macro
impl Description for Language{
    fn represent(&self) -> String{
        todo!();
        //format!("the language {} was lauched in {} year and current stable version is {}", self.name, self.launched_year, self.stable_version)
    }
}
Output
Rusttodo!() is actually the same as another macro: unimplemented!(). Programmers were using unimplemented!() a lot but it was long to type, so they created todo!() which is shorter.
Panic if reached – if we call the unimplemented trait it will panic and give error.
fn main() {

   let pro_langauge_rust = Language{
        name: String::from("Rust"),
        stable_version: 1.84,
        launched_year: 2012
    };

    println!("{} {}" , pro_langauge_rust.name, pro_langauge_rust.represent()); // Error

}
Output
thread 'main' panicked at src\main.rs:19:9:
not yet implemented
Reference – https://dhghomon.github.io/easy_rust/Chapter_44.html
Unreachable! macro
This macro is kind of like todo!() except it’s for code that you will never do. Maybe you have a match in an enum that you know will never choose one of the arms, so the code can never be reached. If that’s so, you can write unreachable!() so the compiler knows that it can ignore that part.
enum
enum PaymentStatus{
    Succeeded,
    Processing,
    Fail
}
Enum implementation
impl PaymentStatus {
    fn after_payment_action(&self) -> &str{
        match *self {
            PaymentStatus::Succeeded => "UpdateERP",
            PaymentStatus::Processing => "Wait",
            PaymentStatus::Fail => "Block",
            _ => unreachable!()
        }
    }
}
unreachable!() is also nice for you to read because it reminds you that some part of the code is unreachable. You have to be sure that the code is actually unreachable though. If the compiler ever calls unreachable!(), the program will panic.
dbg! macro
dbg! is a very useful macro that prints quick information. It is a good alternative to println! because it is faster to type and gives more information
As per the Rust documentation, the dbg! macro works exactly the same in release builds. This is useful when debugging issues that only occur in release builds or when debugging in release mode is significantly faster.
fn main() {

   let pro_langauge_rust = Language{
        name: String::from("Rust"),
        stable_version: 1.84,
        launched_year: 2012
    };

    dbg!(&pro_langauge_rust);
    dbg!(pro_langauge_rust.represent());
}
Output
[src\main.rs:33:5] &pro_langauge_rust = Language {
    name: "Rust",
    stable_version: 1.84,
    launched_year: 2012,
}
[src\main.rs:34:5] pro_langauge_rust.represent() = "the language Rust was lauched in 2012 year and current stable version is 1.84"
env! and option_env! macro
Any sensitive information that are harcoded can be a security breach. To avoid this these should be go set as environment variables. For this use env! or option_env!
env!(“key”) or option_env!(“key”)
env! will panic if the key does not exists. It is better to use env! if you want program to crash when the environment variable is not found.
option_env! – on the other hand is safer as it won’t panic if the key not found, instead allows to handle the error.
let language_name = env!("name");This will not compile if the environment variable is not set in project. To do this you can use dotenc crate to read variables from .env file.
But what when the variables are set through command line. This won’t even compile to run the project. Use option_env! macro
let language_name = option_env!("name").expect("Language name is required!");Make Struct Field optional using Option Enum
Use Option to make the struct field optional and set it to None if it has to be empty or Some if the value has to be set.
struct Language{
    name: String,
    stable_version: f32,
    launched_year: u32,
    description: Option<String>
}
{
   let pro_langauge_rust = Language{
        name:  String::from("Rust"),
        stable_version: 1.84,
        launched_year: 2012,
        description: None
    };

    dbg!(&pro_langauge_rust);

    let pro_langauge_rust1 = Language{
        name:  String::from("Rust"),
        stable_version: 1.84,
        launched_year: 2012,
        description: Some("Rust is a compiled language".to_string())
    };

    dbg!(&pro_langauge_rust1);
}
Output
[src\main.rs:37:5] &pro_langauge_rust = Language {
    name: "Rust",
    stable_version: 1.84,
    launched_year: 2012,
    description: None,
}
[src\main.rs:47:5] &pro_langauge_rust1 = Language {
    name: "Rust",
    stable_version: 1.84,
    launched_year: 2012,
    description: Some(
        "Rust is a compiled language",
    ),
}
Check if the option is None or Some using is_none() and is_some() method.
Match patterns
To match patterns use .. or | (pipe) operators. .. is used to match the range while | is used to match multiple OR expressions.
fn get_degree_class(percentage: u32) ->  String{
    match percentage {
        70..=100 => "First-Class Honours".to_string(),
        60..=69 => "Upper Second-Class Degree".to_string(),
        50..=59 => "Lower Second-Class Degree".to_string(),
        40..=49 => "Third Class Degree".to_string(),
        _ => "Fail".to_string()
    }
}

{
    dbg!(get_degree_class(75),get_degree_class(45), get_degree_class(61));
}
Output
[src\main.rs:52:5] get_degree_class(75) = "First-Class Honours"
[src\main.rs:52:5] get_degree_class(45) = "Third Class Degree"
[src\main.rs:52:5] get_degree_class(61) = "Upper Second-Class Degree"
Likewise use ! operator to match the mutiple OR expressions
fn get_degree_class(percentage: u32) ->  String{
    match percentage {
        99 | 100 => "Distinction".to_string(), // This is example. There is nothing above First Class
        70..=98 => "First-Class Honours".to_string(),
        60..=69 => "Upper Second-Class Degree".to_string(),
        50..=59 => "Lower Second-Class Degree".to_string(),
        40..=49 => "Third Class Degree".to_string(),
        _ => "Fail".to_string()
    }
}
Output
[src\main.rs:52:5] get_degree_class(99) = "Distinction"
[src\main.rs:52:5] get_degree_class(45) = "Third Class Degree"
[src\main.rs:52:5] get_degree_class(75) = "First-Class Honours"
For performance user release profile
Release profile – runs fast but compiles slow as it executes all of the compile optimisations.
cargom run --releasefold() method
fold is a consuming iterator adaptor which applies a function to each element of the iteration, accumulating the result into a new value.
This method is used a lot to add together the items in an iterator, but you can also do a lot more. It is somewhat similar to .for_each(). In .fold(), you first add a starting value (if you are adding items together, then 0), then a comma, then the closure. The closure gives you two items: the total so far, and the next item. First here is a simple example showing .fold() to add items together.
{
    let some_numbers = vec![9, 6, 9, 10, 11];

    println!("Total using fold method - {}", some_numbers
            .iter()
            .fold(0, |total_so_far, next_number| total_so_far + next_number)
        );
}
Output
Total using fold method - 45Rust Docs
Check installed components –
rustup component list --installed Add Rust docs component
rustup component add rust-docsOpen the Rust book
rustup docs --book
rustup docs std
rustup docs std::iter
Installing the RUST-
Browse https://rustup.rs/
This should detect the current OS and provide the various installation instructions.
If using Visual Code – use rust-analyzer extension. https://marketplace.visualstudio.com/items?itemName=rust-lang.rust-analyzer
Tags- #todo! #macro #rust #unimplemented #traits #dbg! #env!
![]()
Use generics to create definitions for items like function signatures or structs, which we can then use with many different concrete data types. Defined with <T>
Generics make programming easier without reducing runtime performance.
Generics uses process called Monomorphization where compiler replaces generic placeholders with data types.
struct Language<T, T1, T2>{
    name: T,
    stable_version: T1,
    launched_year: T2
}


fn main{
    let pro_langauge_rust = Language{
        name: String::from("Rust"),
        stable_version: 1.84,
        launched_year: 2012
    };

    println!("Programming language is {:?}", pro_langauge_rust)
}
Output-
Programming language is Language { name: "Rust", stable_version: 1.84, launched_year: 2012 }Gneneric Method
struct Language<T, T1, T2>{
    name: T,
    stable_version: T1,
    launched_year: T2
}
//struct Color(u8,u8,u8);

impl<T,T1,T2> Language<T, T1, T2> {
    fn get_name(&self) -> &T
    {
        &self.name
    }
}

fn main {
   let pro_langauge_rust = Language{
        name: String::from("Rust"),
        stable_version: 1.84,
        launched_year: 2012
    };

    println!("Programming language is {:?}", pro_langauge_rust.get_name())
}
Ouput
Programming language is "Rust" ![]()
A trait defines the functionality a particular type has and can share with other types. We can use traits to define shared behavior in an abstract way. We can use trait bounds to specify that a generic type can be any type that has certain behavior.
Traits are similar to a feature often called interfaces in other languages, although with some differences.
Struct
Define a struct – in this case Langauge struct with fields and data types
struct Language{
    name: String,
    stable_version: f32,
    launched_year: u32
}
Define Trait and implemenation
Define trait Description with represent method. Implement trait Description for Language struct.
trait Description{
    fn represent(&self) -> String;
}

impl Description for Language{
    fn represent(&self) -> String{
        format!("the language {} was lauched in {} year and current stable version is {}", self.name, self.launched_year, self.stable_version)
    }

}
Main Block
Instantiate Langauge and call the represent method implemented for Struct
{
    let pro_langauge_rust = Language{
        name: String::from("Rust"),
        stable_version: 1.84,
        launched_year: 2012
    };

    println!("Programming language is {}", pro_langauge_rust.represent())
}
Output
Programming language is the language Rust was lauched in 2012 year and current stable version is 1.84Default Trait
In the previous example Trait just has the definition but no implementation. Define a default implementation to the trait and no remove the implementaion for Langauge
trait Description{
    fn represent(&self) -> String{
        String::from("is the langauge you should learn.")
    }
}

impl Description for Language{
// No implementation
}

fn main{

   let pro_langauge_rust = Language{
        name: String::from("Rust"),
        stable_version: 1.84,
        launched_year: 2012
    };

    println!("{} {}", pro_langauge_rust.name,  pro_langauge_rust.represent());
}
Output
Rust is the langauge you should learn. ![]()
Struct group multiple items of mixed data types. Elements are named instead of order as defined in tuple.
Defining struct
struct Language{
    name: String,
    stable_version: f32,
    launched_year: i32
}

{
    let mut pro_langauge = Language{
        name: String::from("Rust"),
        stable_version: 1.84,
        launched_year: 2012
    };

    println!("Programming language {} current version is {} and launched on {}",
    pro_langauge.name,
    pro_langauge.stable_version,
    pro_langauge.launched_year);

    pro_langauge.name = String::from("java");
    println!("Programming language is {:?}", pro_langauge);
}
Output
Programming language Rust current version is 1.84 and launched on 2012
Programming language is Language { name: "java", stable_version: 1.84, launched_year: 2012 }
Struct managed in memory
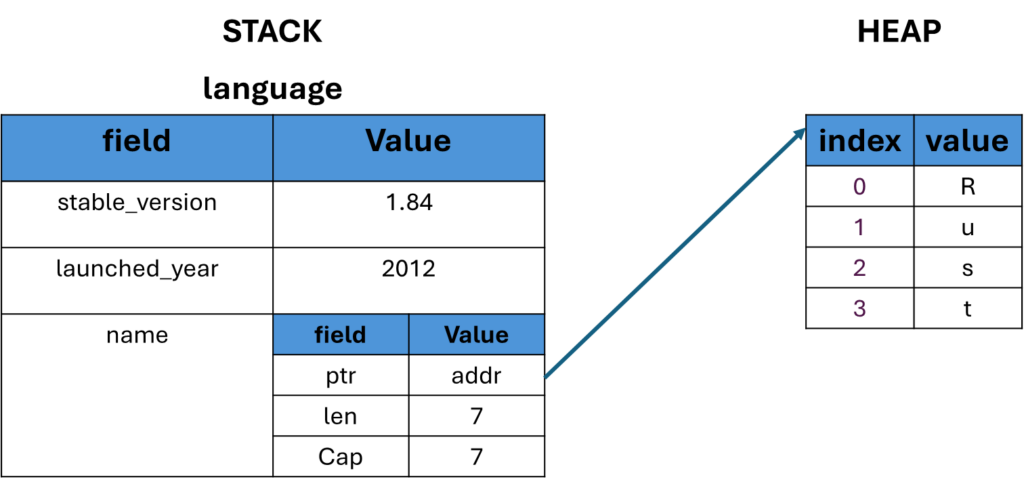
Struct Clone
Struct clone is possible using clone() method. Will take the above example to clone the struct instance.
    let pro_langauge_rust = Language{
        name: String::from("Rust"),
        stable_version: 1.84,
        launched_year: 2012
    };

    let pro_langauge_java = Language{
        name: String::from("Java"),
        ..pro_langauge_rust
    };

    println!("Programming language {} current version is {} and launched on {}",
    pro_langauge_rust.name,
    pro_langauge_rust.stable_version,
    pro_langauge_rust.launched_year);

    println!("Programming language is {:?}", pro_langauge_java);
Here some of the fields are copied from the other instance using .. notation and the name for the new instance is different.
Output
Programming language Rust current version is 1.84 and launched on 2012
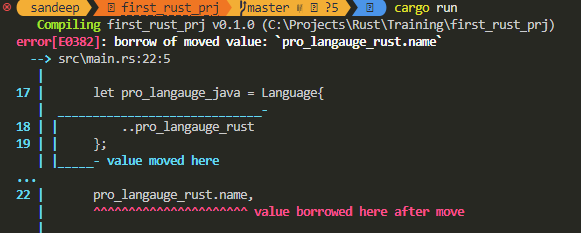
Programming language is Language { name: "Java", stable_version: 1.84, launched_year: 2012 }You cannot copy eveything from the previous instance to the new instance as this breaks the rule oif Rust of having a single variable with same data. For this a clone() method is used.
let pro_langauge_rust = Language{
        name: String::from("Rust"),
        stable_version: 1.84,
        launched_year: 2012
    };
 let pro_langauge_java = Language{
        ..pro_langauge_rust
    };
Here all the data of the variable pro_langauge_rust is trying to copy to pro_langauge_java gives an error.
Use clone method
let pro_langauge_rust = Language{
        name: String::from("Rust"),
        stable_version: 1.84,
        launched_year: 2012
    };

    let pro_langauge_java = Language{
        ..pro_langauge_rust.clone()
    };

    println!("Programming language {} current version is {} and launched on {}",
    pro_langauge_rust.name,
    pro_langauge_rust.stable_version,
    pro_langauge_rust.launched_year);

    println!("Programming language is {:?}", pro_langauge_java);
Output
Programming language Rust current version is 1.84 and launched on 2012
Programming language is Language { name: "Rust", stable_version: 1.84, launched_year: 2012 }
Struct Methods
Subroutine associated with a struct and the first parameter is a reference to the struct instance. It is declared same as funciton using fn keyword.
In the below example the struct method is implemeted using imp keyword. The method takes the reference to the instance i.e. self. This method is called on the Struct instance in main block.
// Implementation of Struct
impl Language{
    fn get_name(&self) -> &str
    {
        &self.name
    }
}

fn main() {
    let pro_langauge_rust = Language{
        name: String::from("Rust"),
        stable_version: 1.84,
        launched_year: 2012
    };

    let pro_langauge_java = Language{
        ..pro_langauge_rust.clone()
    };

    let language_name = pro_langauge_rust.get_name();
    println!("Language name is {:?}", language_name);
}
Update the Struct instance
To update make the struct instance mutable with mut keyword. Implement the method to update in Struct implementaion.
See the update_version method and how is called from the main block
impl Language{
    fn get_name(&self) -> &str
    {
        &self.name
    }

    fn update_version(&mut self, version: f32){
        self.stable_version = version;
    }
}

 let mut pro_langauge_rust = Language{
        name: String::from("Rust"),
        stable_version: 1.84,
        launched_year: 2012
};

let language_name = pro_langauge_rust.get_name();
println!("Language name is {:?}", language_name);

pro_langauge_rust.update_version(1.85);
println!("Latest version {:?}", pro_langauge_rust.stable_version);
Output
Language name is "Rust"
Latest version 1.85
Associated Functions/Constructor
Functions associated with a struct data type. They are similar to methods but functions does not have a self input parameter. So we cannot use an associated function to reference the data from whithin a specific instance of a struct.
Mainly associated functions in Struct are used as a constructor to build a new instance of a Struct. See below example a new function with the name parameter and return the instance of Struct. The instance of Struct is created in main block.
impl Language{
    fn get_name(&self) -> &str
    {
        &self.name
    }

    fn update_version(&mut self, version: f32){
        self.stable_version = version;
    }

    fn new(name: &str) -> Language{
        Language { name: String::from(name), stable_version: 0.0, launched_year: 0000 }
    }
}

{
    let mut pro_langauge_rust = Language::new("Rust");

    let language_name = pro_langauge_rust.get_name();
    println!("Language name is {:?}", language_name);

    pro_langauge_rust.update_version(1.85);
    println!("Latest version {:?}", pro_langauge_rust.stable_version);
}
Output
Language name is "Rust"
Latest version 1.85
Tuple Structs
Tuple Structs – Store a collection of mixed data without named fields but just the datatype of the field. They are distinguished as a unique data type.
struct Color(u8,u8,u8);

{
    let color = Color(255,0,0,);
    println!("First value in tuple struct is {}", color.0);
}
Output
First value in tuple struct is 255 ![]()
Below table see what is String Literal and String Type/Object with differences.
| String Literal | String Type |
| Hard-coded into the executable | Allocated on the heap |
| Immutable | Mutable |
| String must be known before compilation i.e. static in nature | Dynamically generated at runtime |
| Faster | Slower than String literal (reading and writing to the heap is slower) |
| &str | String::new() or String::from() |
| Small in size since sits in stack | Large in size since sits in heap but not infinite space |
String literals are written as follows-
let message: &str = "Welcome to the Rust world!";String Object/Type is written as follows-
Make the variable mutable and use push_str() method to append the string
let mut content_string = String::from("Welcome");
content_string.push_str( " to the Rust world." );

println!("String object is {}", content_string);
Output
String object is Welcome to the Rust world.To append the character use push() method.
Converting String literal (&str) to String Type (string)
let  str_literal ="Welcome to Rust";
let str_type = str_literal.to_string();

println!("String literal to type is {}", str_type);
Output-
String literal to type is Welcome to RustConverting String Type (string) to String literal (&str)
let str_type = String::from("Welcome to Rust");
let  str_literal = str_type.as_str();

println!("String type to literal is {}", str_literal);
Output
String type to literal is Welcome to RustReference –
https://doc.rust-lang.org/std/string/struct.String.html#impl-Any-for-T
Variable scope
Variable bindings have a scope, and are constrained to live in a block. A block is a collection of statements enclosed by braces {}.
In the below example the scope for the variable language is only within the enclosed block.
if true {
    let language  = "English";
    println!("Language is {}", language);
}
If this variable is accessed outside the block it will be a compiler error-
if true {
   let language  = "English";
   println!("Language is {}", language);
}
println!("Language is {}", language);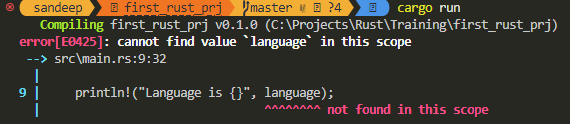
To make the scope within the main method declare the vaiable outside the block.
let language  = "English";
if true {
    println!("Language is {}", language);
}
println!("Language is {}", language);
Output
Language is English
Language is English
Variable shadowing
Variable shadowing occurs when a variable declared within a certain scope (decision block, method or inner class) has the same name as a variable declared in an outer scope.
let language  = "English";
if true {
   println!("Language is {}", language);
}
let language  = "French";
println!("Language is {}", language);
Output
Language is English
Language is French
In the above code the variable language is declared twice. Rust allows multiple variables with the same name, and these varaibles can be of different data type. The scope of the first variable remains until the next variable with same name is declared. The last variable with same name remains for the rest of the code.
Shadowing variable with different data type
let language  = "English";
if true {
   println!("Language is {}", language);
}
let language  = 1; //here the first variable is de-scoped
println!("Language is {}", language);
Output
Language is English
Language is 1
When used correctly shadowing can be used for reusing common variable for different purposes and the ability to the mutability of data type. If this is not done carefully this can have a strange bugs in code.
![]()
Enum is a data type with mutiple possible variants. To declare an enum, write enum and use a code block with the options, separated by commas. These options are called as variants.
Define Enum
#[derive(Debug)]

enum PaymentStatus{
    Succeeded,
    Processing,
    Fail,
}
Main Block
fn main() {

    let payment_status = PaymentStatus::Processing;
    println!("Enum - {:?}", payment_status);
}
Output
Enum - ProcessingMatch Operator
Match operator compares a value to the series patterns to determine which code to execute.
fn main() {
     let payment_status = PaymentStatus::Processing;
    println!("Enum - {:?}", payment_status);

    //let status = {};
    match payment_status{
        PaymentStatus::Succeeded => println!("Payment compelte." ),
        PaymentStatus::Processing => println!("Payment processing."),
        PaymentStatus::Fail => println!("Payment failed! Please try again!"),
    }
}
Output
Enum - Processing
Payment processing.
Enum Methods
Enum methods are plaved in the enum implementation i.e. imp <<Enum>>
Here we use wild card case ie. _ or the default match case.
Similar to a switch statement, Match operator compares a given value to a series of patterns to determine which code to execute.
impl PaymentStatus {
    fn after_payment_action(&self) -> &str{
        match *self {
            PaymentStatus::Succeeded => "UpdateERP",
            PaymentStatus::Processing => "Wait",
            PaymentStatus::Fail => "Block",
            _ => "NoChange"
        }
    }
}

fn main() {

    let payment_status = PaymentStatus::Processing;
    println!("Enum - {:?}", payment_status);

    let action = payment_status.after_payment_action();

    println!("After payment request action --> {}", action )

}
Output
Enum - Processing
After payment request action --> Wait ![]()
Borrowing reference
A borrowed reference allow you to access data without taking ownership of it. The & operator creates a borrowed reference to a variable.
If we want to pass the reference of string it can be done as follows-
Here the program uses tuple to pass the string refernce back with the length
{
    let inner_variable = String::from("welcome");

    let (note, note_length) = wlecome_note(inner_variable);

    println!("Length of {} is {}", note, note_length);
}

fn wlecome_note(note: String) -> (String, usize){
    let note_length = note.len();
    (note, note_length)
}
Output-
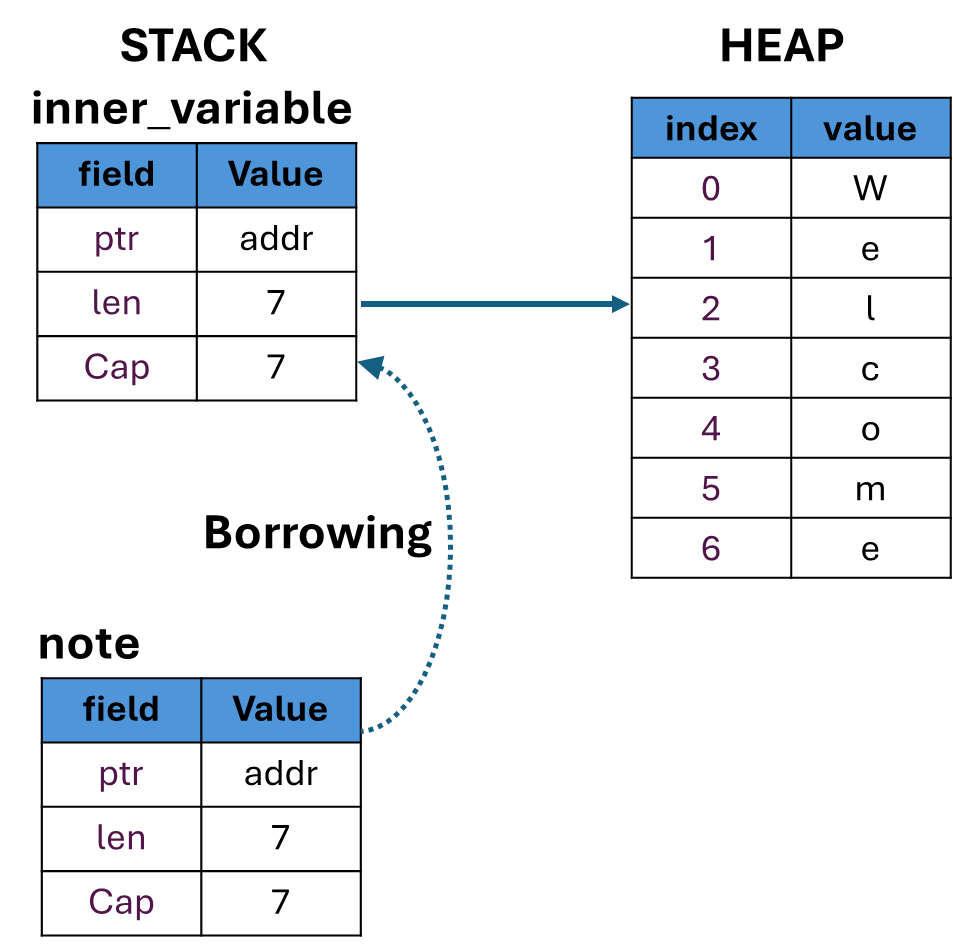
Length of welcome is 7This is a tedious way, instead the string reference can be borrowed in the function, unaffecting the refernece in main block.
{
    let inner_variable = String::from("welcome");

    let  note_length = wlecome_note(&inner_variable);

    println!("Length of {} is {}", inner_variable, note_length);
}

fn wlecome_note(note: &String) -> usize{

    let note_length = note.len();
    note_length
}
Here & operator borrows the reference temporary into the note variable and when the it comes out of scope doesn’t affect the inner_variable in main block. This process is called as borrowing refernce.
Summary
Mutable reference
In the above code we didn’t change the reference i.e. the note variable in wlecome_note function. To do so use push_str() method.
{
    let inner_variable = String::from("welcome");
    let  note_length = wlecome_note(&inner_variable);
    println!("Length of {} is {}", inner_variable, note_length);
}

fn wlecome_note(note: &String) -> usize{
    let note_length = note.len();
    note.push_str(" to the Rust programming"); // Error
    note_length
}
This gives a compiler error.
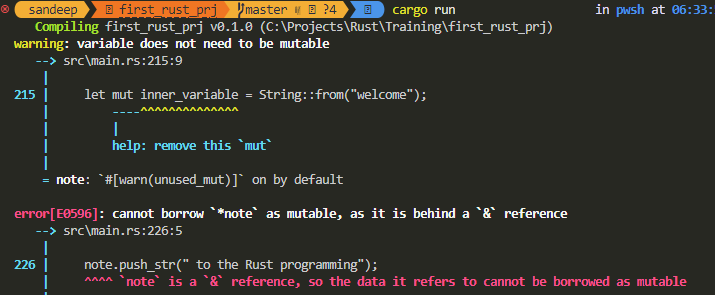
The error is data we are referencing is not mutable reference. We have to tell Rust that it is a mutable reference. For this use &mut keyword .
{
    let mut inner_variable = String::from("welcome");
    let  note_length = wlecome_note(&mut inner_variable);
    println!("Length of {} is {}", inner_variable, note_length);
}

fn wlecome_note(note: &mut String) -> usize{
    note.push_str(" to the Rust programming");

    let note_length = note.len();
    note_length
}
Output-
Length of welcome to the Rust programming is 31This updates the borrowed reference and main block has the updated data.
Summary-
When using a mutable reference, you cannot create other references, to prevent the data races.
If you’re only working with regular immutable references, then you can create as many of those as you want pointing to the same variable. The restriction comes in when you try to create references in addition to the one allowed mutable reference. Even if those additional references are immutable, it creates the potential for problems and the Rust compiler will not allow it.
Dangling references
A dangling reference is a reference to something that no longer exists at the referenced location.
A dangling reference can occur when a function returns a reference to a value that is owned by a variable whose scope is limited to that function.
It’s easy to erroneously create a dangling pointer—a pointer that references a location in memory that may have been given to someone else—by freeing some memory while preserving a pointer to that memory. In Rust, by contrast, the compiler guarantees that references will never be dangling references: if you have a reference to some data, the compiler will ensure that the data will not go out of scope before the reference to the data does.
{
   let reference_to_nothing = dangle();
}

fn dangle() -> &String {
    let s = String::from("hello");

    &s // Error
}
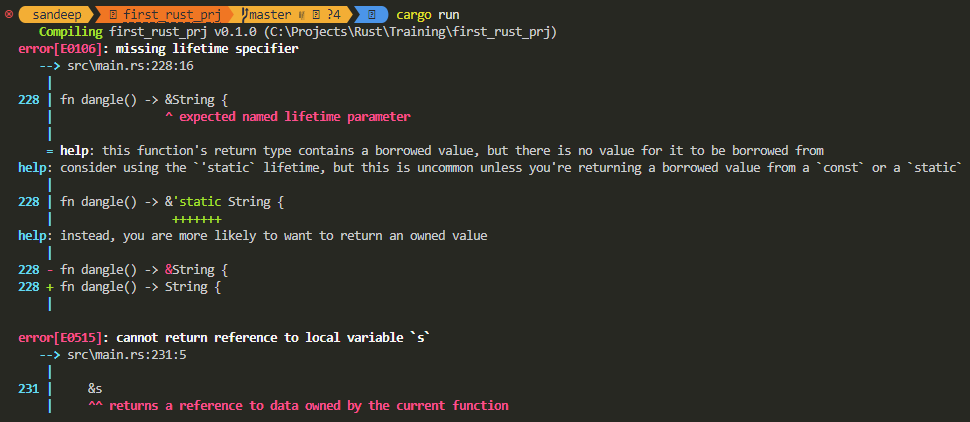
Solution-
Remove borrow operator
{
    let reference_to_nothing = dangle();

    println!("Dangling refernce data is {}", reference_to_nothing);
}

fn dangle() -> String { // Remove borrow operator
    let s = String::from("hello");

    s // Remove borrow operator
}
Output-
Dangling refernce data is helloSlices
Borrowing a data type with sequence of elements, if we only want subset of elements we use Slice. Commonly used slices is String &str
let  message = String::from("Welcome to Rust");
println!("message is {}", message);

let last_word = &message[10..];
println!("last word is - {}", last_word);
Here we sliced the string to only get the last word i.e. Rust. Here the message variable is still the owner of the string. and last_word variable points to the address of the slice.
Output
message is Welcome to Rust
last word is Rust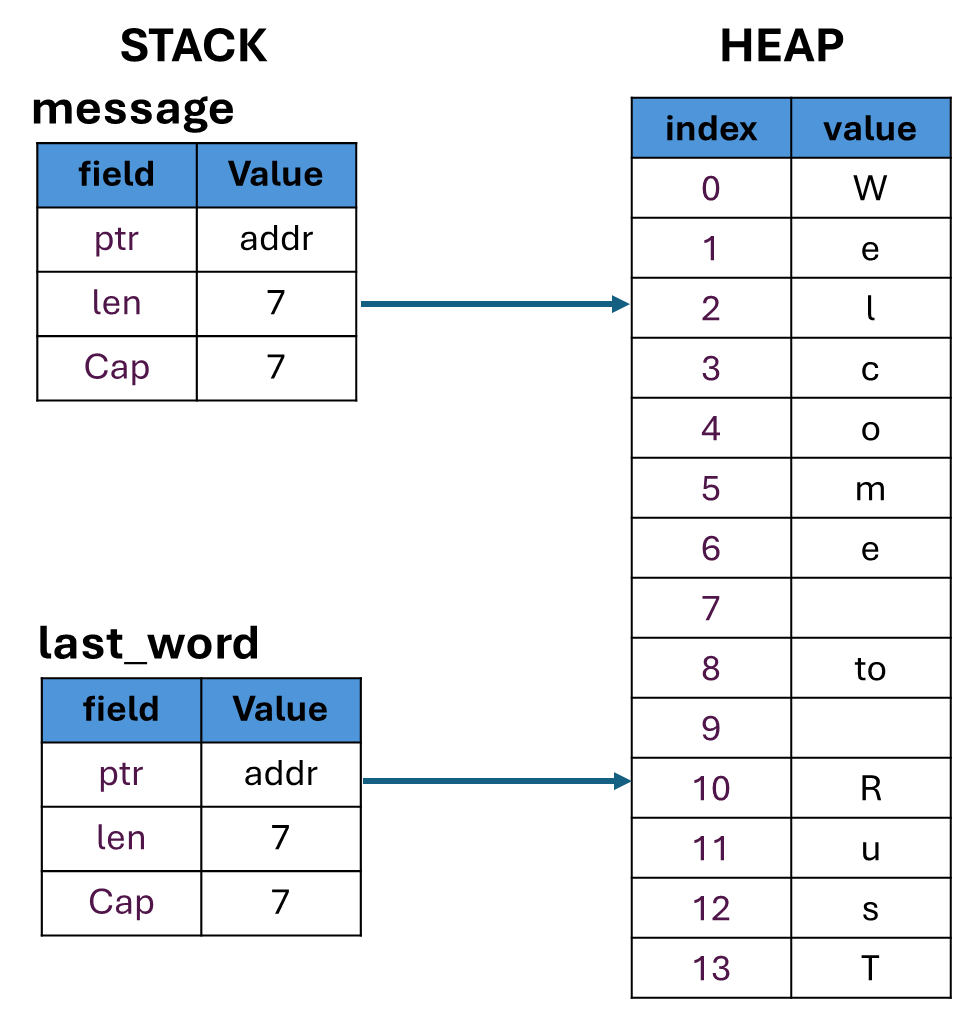
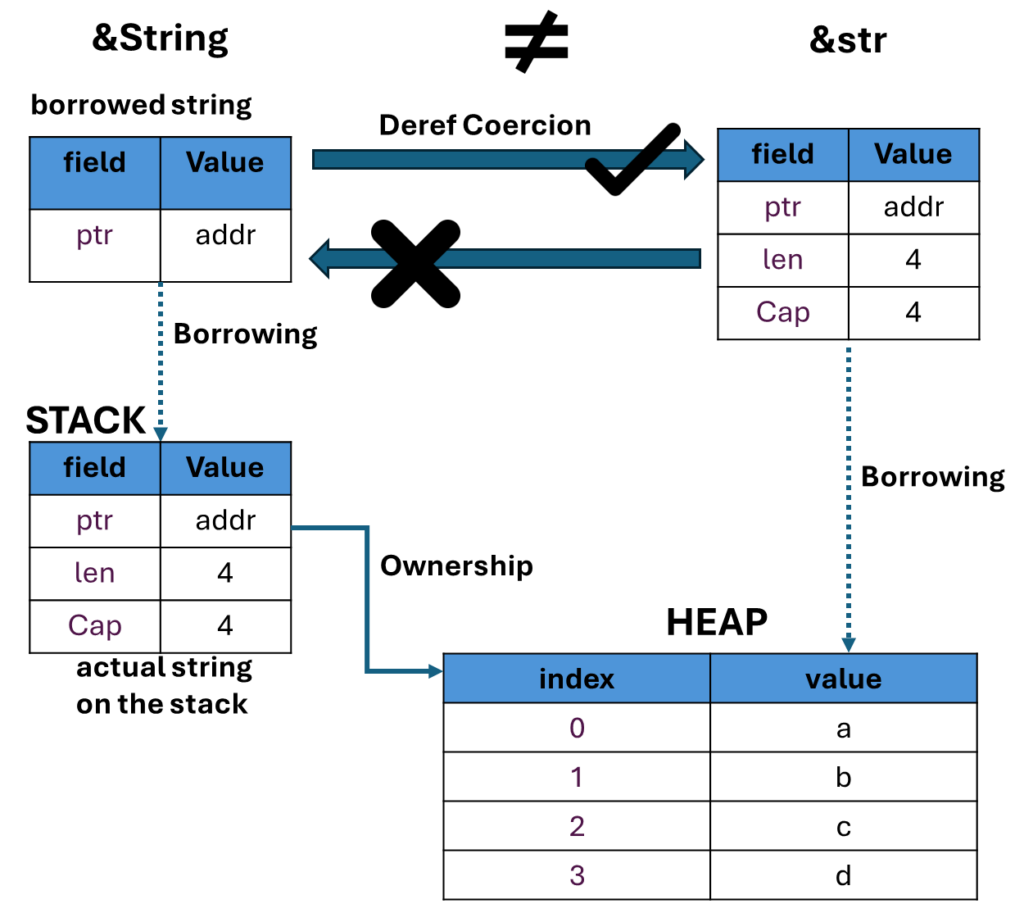
&String != &str – String Type is not String Literal
With strings, a borrowed reference to a string is not equivalent to a slice from the string. They’re different data types.
Dref Coercion- The deref gives the compiler the ability to take a value of any type that implements Deref and call the deref method to get an & reference that it knows how to dereference
Summary –
Reference-
https://doc.rust-lang.org/stable/book/ch04-02-references-and-borrowing.html
![]()
Ownership in Rust where the variables are responsible for creating their own resources.
Every value is owned by one, and only one variable at a time
When the owning variable goes out of scope, the value is dropped
Memory Management in Rust and other languages
| Memory Management | Feature | Advantage | Disadvantage |
| Manual Allocation and Deallocation | Progammer responsible for memory mgmt C/C++ – malloc() and free() | Programmer has lots of control | Memory leaks |
| Garbage Collection | Automatically cleans up memory Java, Python, C#, Ruby, Go | Its easy as programmer don’t have to worry about memory mgmt | Can lead to wasteful memory Can run at inconvenient times |
| Ownership | Variables are responsible for freeing their own resources Rust | Safe, Effecient (when data will be dropped at compile time) | Requires understanding of ownership |
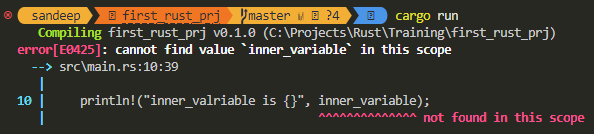
Example – Every value is owned by one, and only one variable at a time
{
    1let inner_variable = String::from("Welcome");
    println!("inner_valriable is {}", inner_variable);
}2

println!("inner_valriable is {}", inner_variable);3 // Error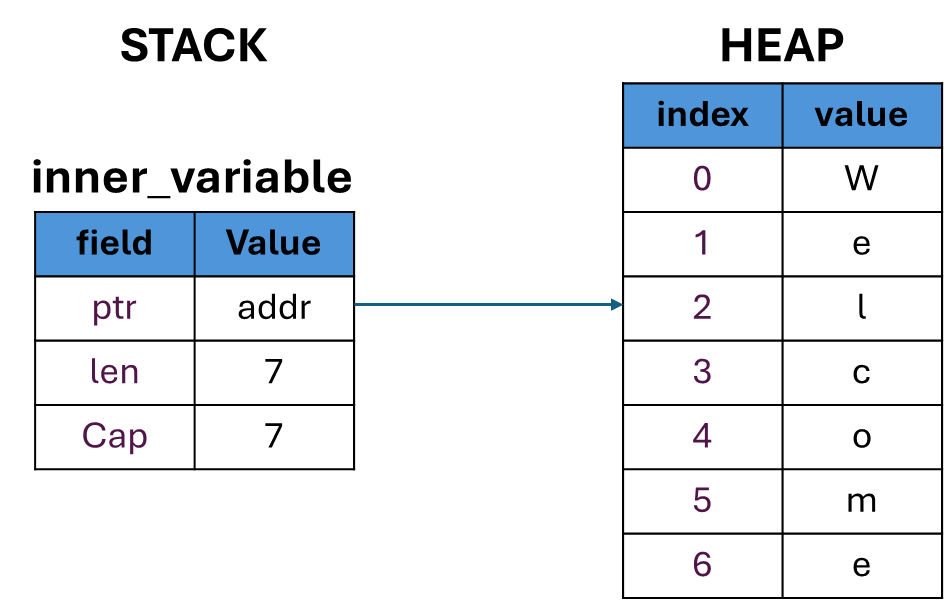
Example – When the owning variable goes out of scope, the value is dropped
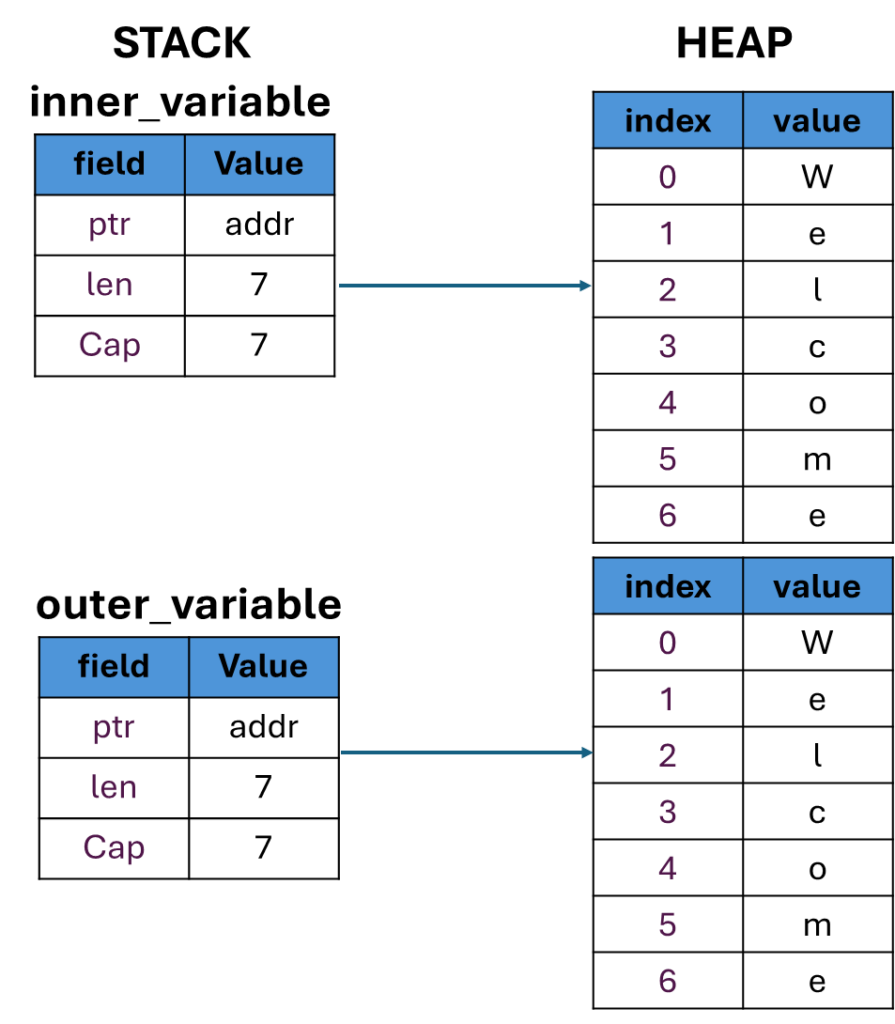
Ownership is moved to another variable (outer_variable)
let outer_variable : String;
{
    let inner_variable = String::from("welcome");
    println!("inner_valriable is {}", inner_variable);
    outer_variable = inner_variable;
}

println!("outer_variable is {}", outer_variable);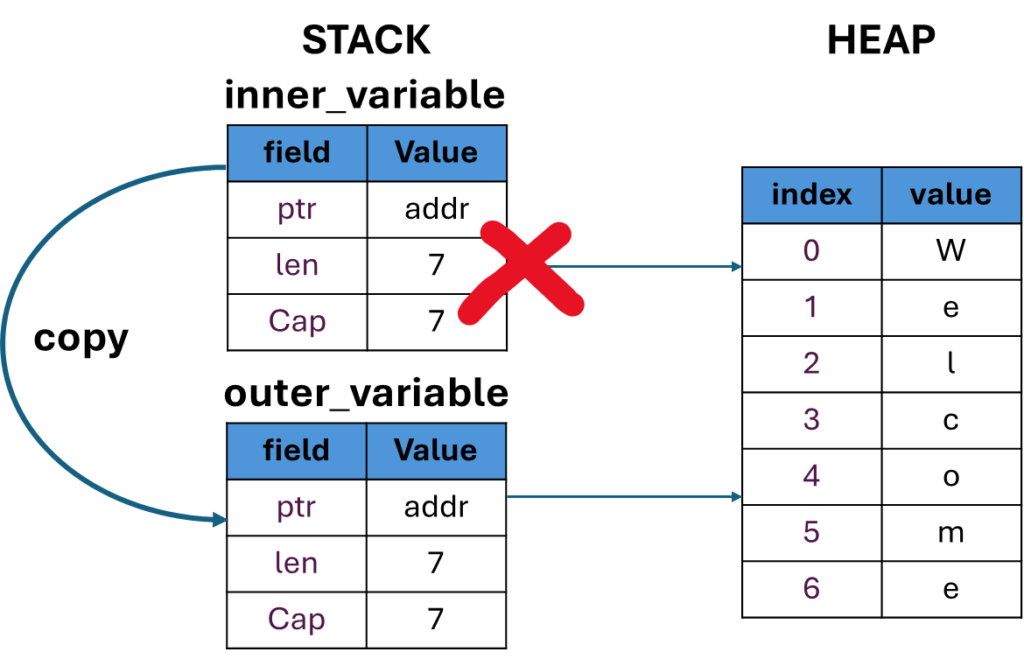
X The above example breaks the rule since 2 variables assigned to same address in heap. Hence this is called as move the inner_varaible is out of scope.
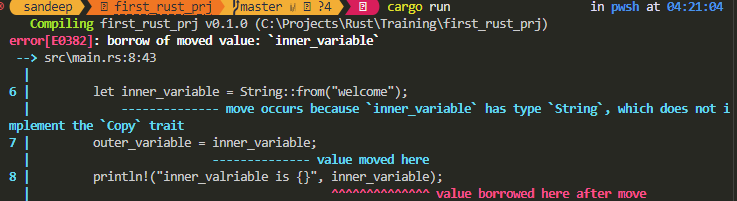
    let outer_variable : String;
    {
        let inner_variable = String::from("welcome");
        outer_variable = inner_variable;
        println!("inner_valriable is {}", inner_variable); // Error
    }

    println!("outer_variable is {}", outer_variable);
Since the inner_variable scope is moved to outer_variable the memory allocation is dropped.
Copy works only for stack data types, such as integer and floating point
Cloning the data
The clone() method is used to create a deep copy of heap data.
String data is not implicitly copied and must be explicitly cloned using the clone() method.
let outer_variable : String;
{
    let inner_variable = String::from("welcome");
    outer_variable = inner_variable.clone();
    println!("inner_valriable is {}", inner_variable);
}

println!("uter_valriable is {}", outer_variable);
Clone creates a new heap and copies the data and binds to the stack.
Output
inner_valriable is welcome
outer_valriable is welcome
Copy occurs implicitly; cloning must be done explicitly
Transfering Ownership
When a function takes ownership of a value, it becomes responsible for that value and its associated data. The function can then do whatever it wants with the data, including modify or delete it. If the function doesn’t need the data anymore, it will be dropped.
Hence Rust is Safe i.e. at compile time the program knows when the variables are accessible and efficient since it knows when to drop the data from memory.
Summary-
Shadowing allows you to declare a new variable with the same name as an existing variable.
Copying allows you to duplicate a value that is stored on the stack.
The heap can dynamically add and remove data.
The stack stores values in sequential order. The stack adds and removed data as LIFO.
Copying data on the stack occurs implicitly, whereas cloning data on the heap must be done explicitly using the clone method.
The String data type stores the sequence of characters that make up the String on the heap and it stores a structure containing a pointer to the heap data, the String’s length, and its capacity on the stack.
Rust uses an ownership model to manage memory.
![]()