


Last Updated on February 1, 2025 by sandeeppote

This is a Part-2 of customizing Sitecore Commerce Business Tools. To see how to setup the environment for customization before you could start creating a custom component see Part-1
Often you have seen entity details are shown in Flat view i.e. horizontally, fields and there values are displayed. If you have too many fields to display flat view doesn’t seem to be user friendly. In this case the best way to display such details will a vertical view.
This post assumes Instance of Commerce Engine deployed in development environment and a custom entity is created. This is just a example on how to extend Business Tools using Angular which shows the flexibility of Business Tools in terms of cusotmization.
I have a entity named Organization and captures details for same which has quite a few properties as seen in below screen-
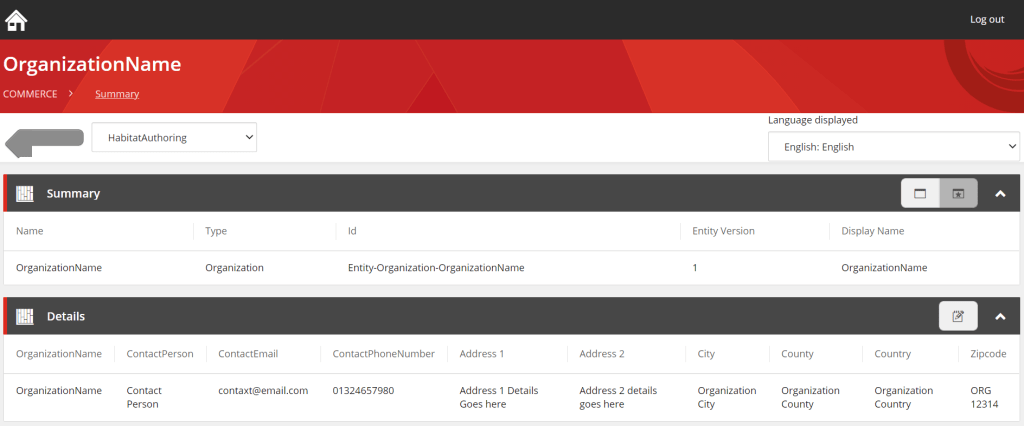
There are around 10 fields in the details section of the entity. These fields are squeezed and also doesn’t look user friendly. This would go more ugly if there are more fields added in the entity.
Sitecore Entity View default UIHint is Flat where a single row is displayed in a form of table.
This would look better if it is displayed in Vertical View or Form View i.e. each field in a different row.
Lets see how this can be done using BizFx SDK and the development environment we have created in this post – <<ENTER SETUP DEV BUSINESS TOOL ENVIRONMENT LINK HERE>>
Sitecore business tools already have Flat and Table View. Flat been default. Lets create a new view called as Vertical View.
Open the folder where the SDK zip file was extracted and navigate to src/app/components/views folder
View folder should look like this-

Copy paste and rename following files-
- Copy and Rename sc-bizfx-flatview.component.css to sc-bizfx-verticalview.component.css
- Copy and Rename sc-bizfx-flatview.component.html to sc-bizfx-verticalview.component.html
- Copy and Rename sc-bizfx-flatview.component.ts to sc-bizfx-verticalview.component.ts
Open sc-bizfx-verticalview.component.html. Change the table to display the property name and value-
 <table scTable class="mb-0" *ngIf="view.Properties.length">
      <thead>
        <tr>
		<th>Property Name</th>
		<th>Property Value</th>
	</tr>
      </thead>
      <tbody>
		<tr *ngFor="let property of (view.Properties | isNotHidden)">
          <td>{{property.DisplayName}}</td>
		  <td>
            <div [ngSwitch]="property.OriginalType">
              <div id="property-{{view.Name}}-{{property.Name}}" *ngSwitchCase="'System.DateTimeOffset'" class="property">
                  <div *ngIf="property.UiType === 'FullDateTime'">
                      {{property.Value | date:'short':'':bizFxContext.language}}
                  </div>
                  <div *ngIf="property.UiType !== 'FullDateTime'">
                      {{property.Value | date:'shortDate':'':bizFxContext.language}}
                  </div>
              </div>

              <div id="property-{{view.Name}}-{{property.Name}}" *ngSwitchCase="'System.Decimal'" class="property">
                {{property.Value | number:'':bizFxContext.language}}
              </div>

              <div id="property-{{view.Name}}-{{property.Name}}" *ngSwitchCase="'Sitecore.Commerce.Core.Money'" class="property">
                {{property.Value | scCurrency:'code':'1.2-2':bizFxContext.language}}
              </div>

              <div id="property-{{view.Name}}-{{property.Name}}" *ngSwitchCase="'Html'" class="property">
                <div [innerHTML]="property.Value"></div>
              </div>

              <div id="property-{{view.Name}}-{{property.Name}}" *ngSwitchCase="'List'" class="property">
                <div *ngFor="let item of getList(property)">
                  {{item}}
                </div>
              </div>

              <div id="property-{{view.Name}}-{{property.Name}}" *ngSwitchDefault class="property">
                {{property.Value}}
              </div>
            </div>
          </td>
        </tr>
      </tbody>
    </table>
Add following to div having childViews loop to sc-bizfx-flatview.component.html-
<sc-bizfx-verticalview *ngIf="childView.UiHint === 'Vertical'" id="verticalView-{{childView.Name}}" [view]="childView"></sc-bizfx-verticalview>
Open sc-bizfx-verticalview.component.ts. Change the @Component and export Class name
@Component({
  selector: 'sc-bizfx-verticalview',
  templateUrl: './sc-bizfx-verticalview.component.html',
  styleUrls: ['./sc-bizfx-verticalview.component.css']
})
export class ScBizFxVerticalViewComponent {
  /**
    * Defines the view
    */
  @Input() view: ScBizFxView;

  /**
    * @ignore
    */
  constructor(
    public bizFxContext: ScBizFxContextService) {
  }

  /**
    * Helper method
    *
    * Parse the value of property with `UiType` of `List`.
    */
  getList(property: ScBizFxProperty) {
    return property.Value != null ? JSON.parse(property.Value) : [];
  }
}
Navigate to components folder. Open index.ts
Add- export * from ‘./views/sc-bizfx-verticalview.component’;
Navigate to app folder. Since a new class is registered this needs to be registered in app.module.ts file.
Open app.module.ts file. Add ScBizFxVerticalViewComponent to App Root import and to the @NgModule – declarations section-
import {
  ScBizFxActionComponent,
  ScBizFxActionBarComponent,
  ScBizFxFlatViewComponent,
  ScBizFxItemViewComponent,
  ScBizFxListPoliciesComponent,
  ScBizFxListViewComponent,
  ScBizFxSearchViewComponent,
  ScBizFxTableViewComponent,
  ScBizFxViewPropertyByTypeComponent,
  ScBizFxViewPropertyByUiComponent,
  ScBizFxViewPropertyTagsComponent,
  ScBizFxActionGridComponent,
  ScBizFxActionPropertyDateTimeComponent,
  ScBizFxActionPropertyTagsComponent,
  ScBizFxActionPropertyComponent,
  ScBizFxAutocompleteComponent,
  ScBizFxBraintreeComponent,
  ScBizFxMediaPickerComponent,
  ScBizFxViewComponent,
  ScBizFxVerticalViewComponent
} from './components';
declarations: [
AppComponent,
ScBizFxActionComponent,
ScBizFxActionBarComponent,
ScBizFxFlatViewComponent,
ScBizFxItemViewComponent,
ScBizFxListPoliciesComponent,
ScBizFxListViewComponent,
ScBizFxSearchViewComponent,
ScBizFxTableViewComponent,
ScBizFxViewPropertyByTypeComponent,
ScBizFxViewPropertyByUiComponent,
ScBizFxViewPropertyTagsComponent,
ScBizFxActionGridComponent,
ScBizFxActionPropertyDateTimeComponent,
ScBizFxActionPropertyTagsComponent,
ScBizFxActionPropertyComponent,
ScBizFxAutocompleteComponent,
ScBizFxBraintreeComponent,
ScBizFxMediaPickerComponent,
ScBizFxViewComponent,
ScBizFxVerticalViewComponent
],That’s all changes required to have a custom component in Business Tools.
Next open PowerShell and build the changes made and run the Business Tools site
ng serveThe site should now listen to 4200 port.
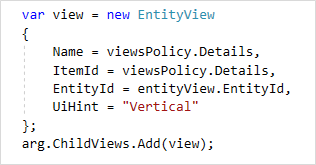
Now lets create/update a entity view with a Vertical view UIHint. I already have entity with the Flat view. I will change the UIHint to “Vertical” to display the properties and there values vertically.
Build and deploy engine changes to Authoring site. (Not covered in this blog)
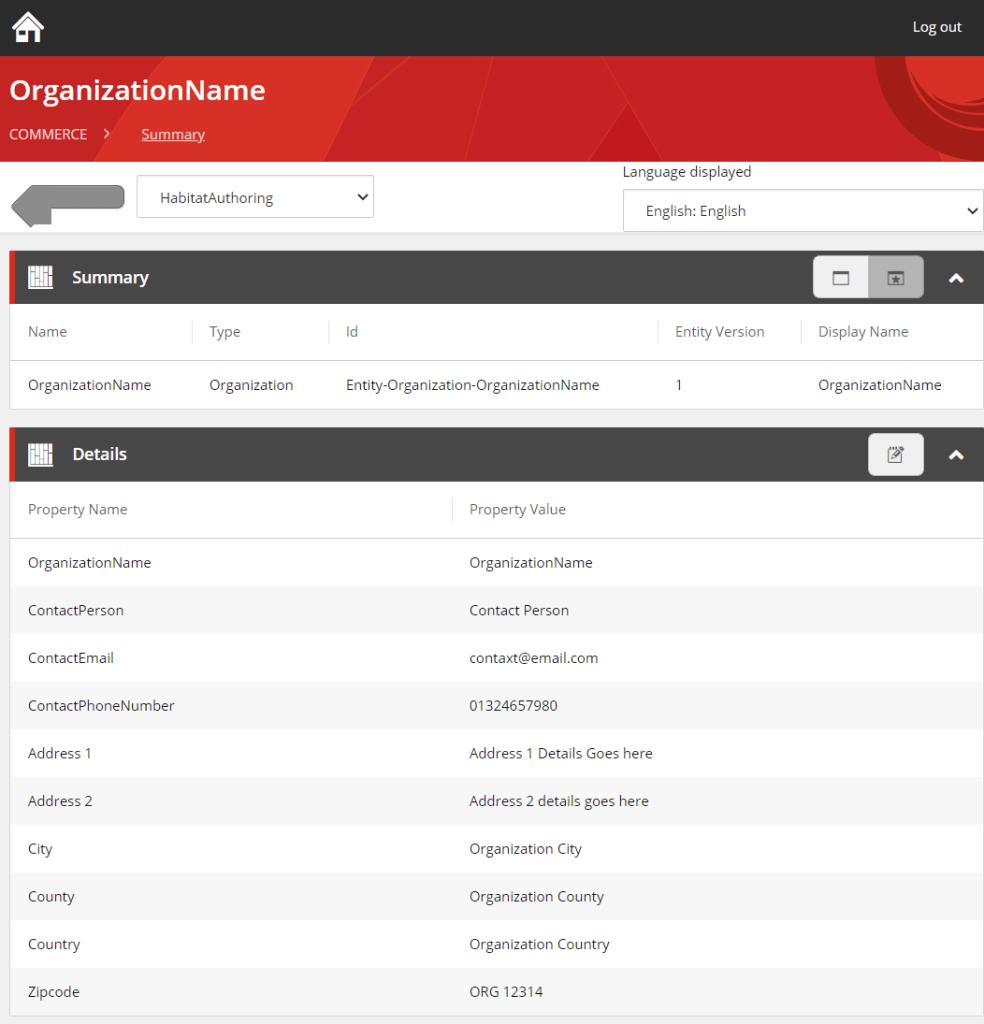
Using Flat view either squeezes the table or a horizontal scroll which is not user friendly. With the Verticalview Organization details are now shown vertical with the Property Names and Values in different rows.
This view is more readable for user specially with the long text in Address.
Easy to implement and test on development environment you can build more complex controls with the same approach
Next post will see how to deploy these changes to production.
Hope you liked this post.