Tag: Campaign

Gracefully handle user subscription using Sitecore Send

In this blog will walk you through on implementing subscribing and ubsubscribing user from the mail list using Sitecore Send

Use hostname- https://api.sitecoresend.io/v3

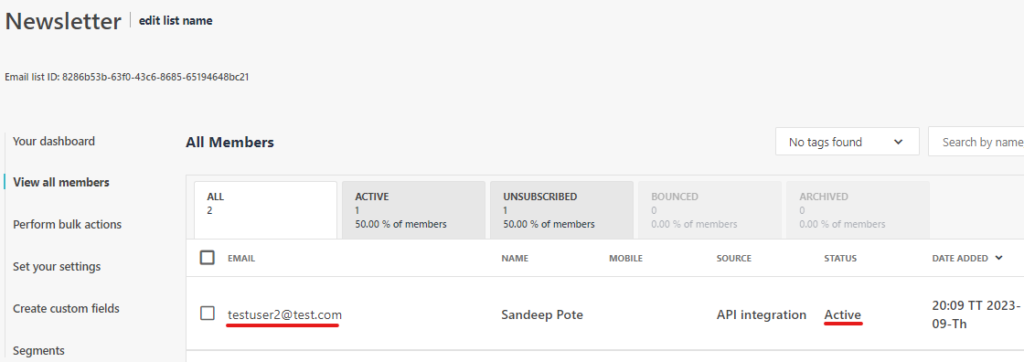
Subscribing a user to a mailing list

Api endpoint to subscribe a user to a mailing list

{hostname}/subscribers/{MailingListID}/subscribe.{Format}?apikey={apikey}
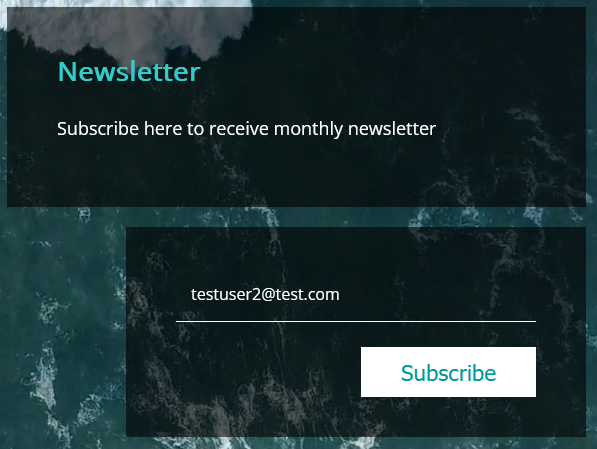
Subscribe Code

function SubscribeNewsletter(){

              let email = document.getElementById("newsletteremail");
              console.log(email)

              if (email.value == "") {
                alert("Ensure you input a value in both fields!");
              } else {
                // perform operation with form input
                
                var request = new XMLHttpRequest();
                request.open('POST', 'https://api.sitecoresend.io/v3/subscribers/{maillist}/subscribe.json?apikey={apikey}');
                request.setRequestHeader('Content-Type', 'application/json');
                request.setRequestHeader('Accept', 'application/json');
                request.onreadystatechange = function () {
                  if (this.readyState === 4) {
                    console.log('Status:', this.status);
                    console.log('Headers:', this.getAllResponseHeaders());
                    console.log('Body:', this.responseText);
                  }
                };
                var body = {
                  'Name': 'Sandeep Pote',
                  'Email': email.value,
                  'HasExternalDoubleOptIn': false
                };
                request.send(JSON.stringify(body));
                email.value = "";
                alert("User subscribed to newsletter")
              }
            };

Unsubscribe a user from a mailing list

Api endpoint to un-subscribe a user to a mailing list

{hostname}/subscribers/{MailingListID}/unsubscribe.{Format}?apikey={apikey}

Unsubscribe Code-

function UnSubscribeNewsletter(){

              let email = document.getElementById("optout-newsletteremail");
              console.log(email)

              if (email.value == "") {
                alert("Ensure you input a value in both fields!");
              } else {
                // perform operation with form input
                
                var request = new XMLHttpRequest();
                request.open('POST', 'https://api.sitecoresend.io/v3/subscribers/{maillist}/unsubscribe.json?apikey={apikey}');
                request.setRequestHeader('Content-Type', 'application/json');
                request.setRequestHeader('Accept', 'application/json');
                request.onreadystatechange = function () {
                  if (this.readyState === 4) {
                    console.log('Status:', this.status);
                    console.log('Headers:', this.getAllResponseHeaders());
                    console.log('Body:', this.responseText);
                  }
                };
                var body = {
                    'Email': email.value,                  
                };
                request.send(JSON.stringify(body));
                email.value = "";
                alert("User subscribed to newsletter")
              }
              };

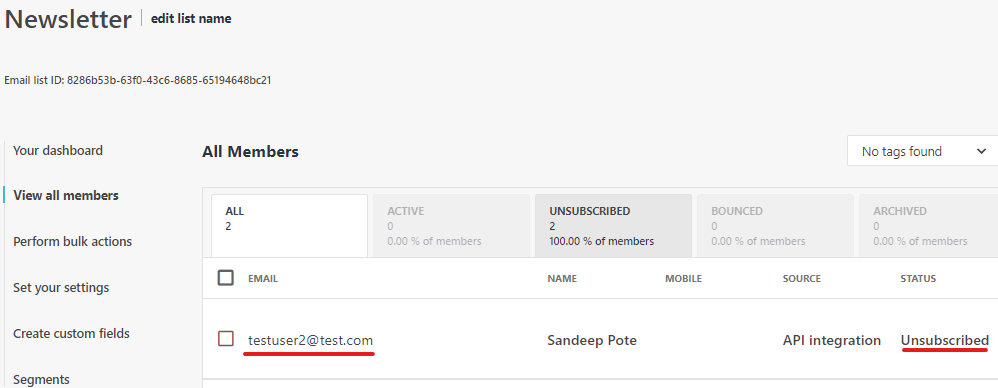
Looks simple, but you might see when the user un-subscribed from a mailing list the user is never sent a mail from other mailing list or any other transactional mail.

Set user to unsubscribe from a specific mailing list

To allow only to unsubscribe from the a specific mailing list update a Unsubscribe setting-

For this goto Settings –> Set your account settings in Sitecore Send and check the Unsubscribe settings

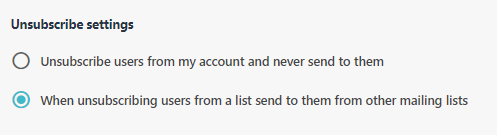
Select option- When unsubscribing users from a list send to them from other mailing lists

Now the user will be only unsubscribed from the specific mailing list and sending mails from the Other mailing list of capaign should be possible.

This setting is very important whilst working with Sitecore send.

Reference-

https://doc.sitecore.com/send/en/developers/api-documentation/add-a-new-subscriber.html

https://doc.sitecore.com/send/en/developers/api-documentation/unsubscribe-a-subscriber-from-a-mailing-list.html

Loading

Enable website tracking service using Sitecore Send

Sitecore Send website tracking service enables to collect data and makes it available for users. It uses cookie-based technology to track data on end-user page visits, product view, add to cart and purchase.

Add website to Sitecore Send

Pre-requisite-

You need to have a website up and running. this can be a simple HTML site or you can choose any other web techology with any Fronetend framework like nextjs, react or jquery etc.

I have created a simple site and hosted using vercel – e.g.:- https://moosend.vercel.app/

To add a website to Sitecore Send –

Navigate to Account –> Websites or New Website option

List of Websites-

Should display list of Websites already configured and if its verified.

Add Website-

On this page enter your website url- https://moosend.vercel.app/

Once this is submitted it should show the Website Id alond with Connection Script. Website Id is required to add this in script to start tracking.

The website list should show the newly added website which should be in unverfied state-

Connect Website

Navigate to Install connection script option. Install button should show the script that is require to add to your website

Copy this script to you website head section, this may be different for you site –

mootrack('init', '77d7daa0-b906-4965-be85-7d8a8892019f');

The Id in the above code is website id.

Identify the visitor

To verify your site and to track the visitor use this script-

mootrack('identify', 'john@doe.com');

The above email will be identified.

Add script to you Website-

Add the above script in your website Head section, something like this-

The initila script which allows to use the mootrack fucntion with various options.

The mootrack init along with you website id

Local function to track user. I have hooked this function to a button

<button class="button" onclick="trackuser()">Track User</button>

Deploy the site to vercel-

I have deployed the site to vercel but you can choose your own hosting provider or the way you want to deploy the site.

My site looks like this and have button to “Track User”, “Add to cart” and “Checkout”

Click on “Track User” button, it should confirm the tracking.

This should also add cookie entry with user email-

And now you should see the website in Sitecore send should be in Verified state-

A new Email List will be created and a subscriber should have been added-

This concludes enabling the Sitecore Send for your website.

Errors

If you see this warning the site might not be tracking correctly due to cookie conflict. Delete all cookies before starting the tracking.

Loading