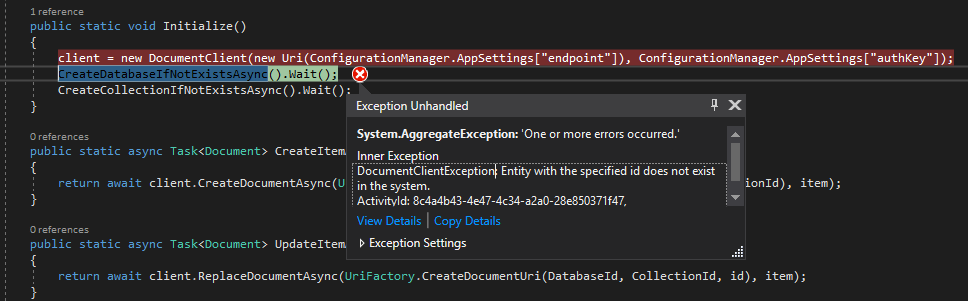
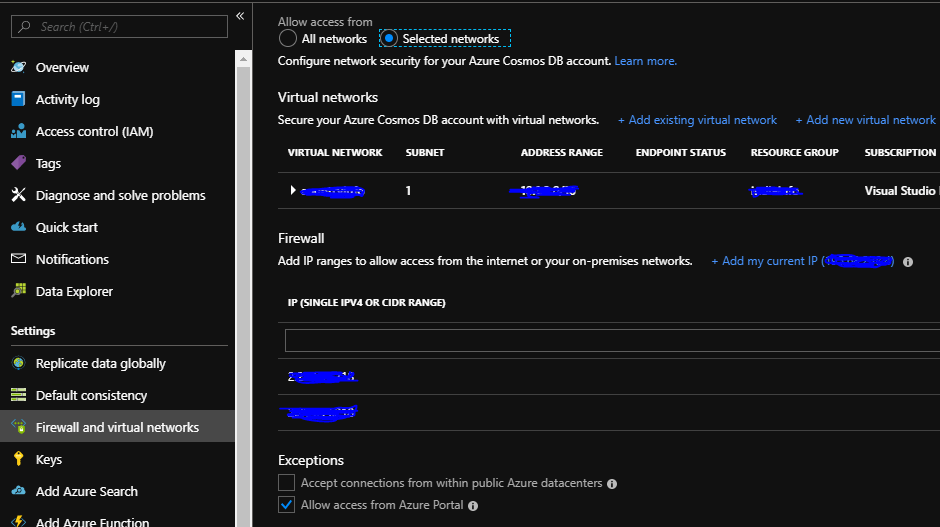
If you see following error whilst connecting to Cosmos DB, you must add your current IP address to firewall in Azure for the DB you are trying to connect to.
Sitecore Consultant. Sitecore MVP 2021 - 2025


If you see following error whilst connecting to Cosmos DB, you must add your current IP address to firewall in Azure for the DB you are trying to connect to.
Referred from- https://learnsitecorebasics.wordpress.com/2018/06/28/install-sitecoreconfiguration-the-certificate-does-not-have-a-property-that-references-a-private-key/
Remove existing certificate. If you know the thumbprint use the below powershell command to remove certificate-
Get-ChildItem Cert:\LocalMachine\Root\<<thumbprint>> | Remove-Item
To list the existing certificates use following command-
Set-Location Cert:\LocalMachine\Root
Get-ChildItem | Format-Table Subject, FriendlyName, Thumbprint -AutoSize
Often question arises why we need build server and why not push the built code tested on dev to test environment.
Automation.
One of the keystone for having the build server is to have the software built automatically
To have the code built, packaged and released to the prod and non-prod environments we may use automation which contains mainly 2 things, a tool to build the code i.e. Jenkins, Team city or VSTS and tool to manage releases like Octopus etc.
Automation tasks may look like this-
Get code from source control (TFS/VSTS)
Build the Software (Jenkins, TC etc)
Package the files
Push the package to Release (Octopus)
Create the release
Removes the dev machine been the source of truth
Dev machine should not be the only place to prove the code been satisfactorily built. Build server helps integrate dev team work and compiled and build at central place. Sometimes devs dont know how things got working, build server helps answer that.
If you are using VIM press ESC and :wq or ESC and SHIFT + zz
If you are setting asp.net membership and see following error
Add following data in [aspnet_SchemaVersions] table
| Feature | CompatibleSchemaVersion | IsCurrentVersion |
| common | 1 | 1 |
| health monitoring | 1 | 1 |
| membership | 1 | 1 |
| personalization | 1 | 1 |
| profile | 1 | 1 |
| role manager | 1 | 1 |
IMP- Restart the app pool and website
Changes committed to local or remote repository needs to be synced.
To get the remote repository synced with local use fetch and push vise versa.
git fetch origin branch_name
When a fetch is done it creates or brings in changes from remote to origin/branch_name in local but not merge with local branch. For this we need to merge the changes to the local branch
To see the origin branch-
git branch -r
Use these strategies for fetch-
Fetch the changes often
Fetch before you start the work
Fetch before you push the changes so that any conflicts can be resolved.
To Merge the changes to the local branch or the working branch first checkout the branch where you want to merge and then use following-
git merge origin/branch_name
You may also use git pull
git pull = git fetch + git merge
To pull the changes again switch to the local branch you want to merge the changes to-
git pull origin branch_name
Push changes to remote
You may use following-
git push origin remote_branch_name
This command shall push changes from source local branch into origin target branch
You may also use this –
git push origin source_local_branch:target_remote_branch
Note this is separated by :(colan)
Delete remote branch
To remove remote branch simply use –
git push origin :target_remote_branch
Note there is nothing before : here which means push nothing to target remote branch which shall delete that branch.
OR use following to delete remote branch-
git push origin --delete remote_branch
Git has working directory, Staging Index and local repository. All changes done to the project sits in local repository until it is been pushed to the remote repository. There are different tools that facilitates to provide code management system using git. One of them is GitHub, you may also use VSTS.
To push or sync the changes to the remote repository, you may clone the changes from remote to your local empty repository or if you have local repository you may add changes to remote repository.
To add changes to remote- github in this case-
git remote add origin remote_repository_url
To remove the remote remote origin-
git remote rm origin
To clone from the remote-
git clone remote_repository_url
This shall be cloned in the current directory. In case if you want to new directory specify a name-
git clone remote_repository_url directory_name
git-stash is used to record the current state of the working directory and the index and want to clean the directory with the intent of applying or dropping the stashed changes to the working directory. Suppose there are changes made to a file in working directory but before committing those changes you are willing to pull the changes from master. Stash the changes made to working directory-
Stash Changes
git stash
You may also stash changes with comments-
git stash save "Content updated to stash"
![]()
You can stash multiple times, while stashed git reference this with unique name i.e. stash@{0}, stash@{1} and so forth. You may also switch between the branches once stashed as the recorded copy is available between the branches.
If you want to see the stash list
git stash list

Revert Stashed Changes
To apply stashed changes made to the working directory, use either-
git stash pop
This shall apply/merge changes to the working directory and remove it from stash list.
git stash apply
This shall apply/merge changes to the working directory but still keep the copy of stash.
Removing stashed changes
To delete specific stash item use-
git stash drop stash@{0}
To delete all stash items-
git stash clear
Use Stash clear wisely as it is destructive.
Branches are used to isolate working folder. The HEAD always point to the current branch and can be checked as follows-
cat .git/HEAD
This shall give the reference where the HEAD point to.
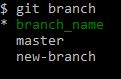
Before creating a branch you may check the if its already created by-
git branch
This shall display the list of branch in current repository.
To create a new branch-
git branch branch_name
Use basic letters and punctuation for branch name. Although the branch is created it is not yet checkout to use. To switch the branch-
git checkout branch_name
You may also use following to create and switch to the new branch-
git checkout -b "branch_name"
![]()
Switching between branches
If you want to switch between the branches that are already created-
git checkout branch_name
If there are staged changes but changes not committed you wont be able to switch between branch as git gives a warning that the changes done in current branch might be overwritten-

Comparing branches
If you want compare the difference between the branches-
git diff master..branch_name
master and branch_name are branches been compared here.
.. is a range operator.
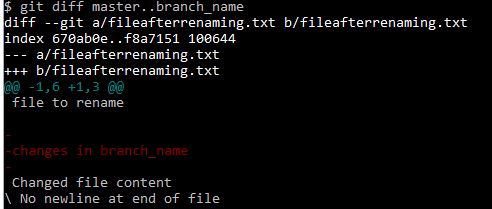
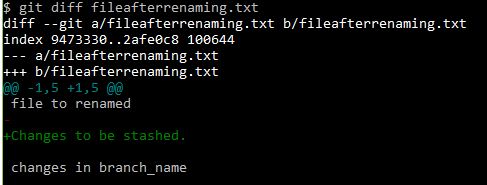
“Changed file content” text in the fileafterrenaming.txt is the change between branches
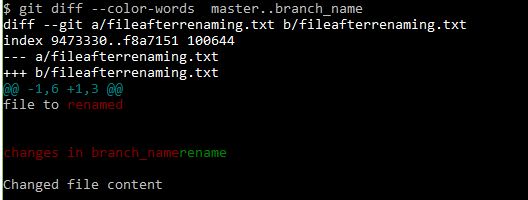
If you want to see the differences with colored text-
git diff --color-words master..branch_name
Rename branch
You might want to rename branch to match to the changes it has or if you are resolving and defect to identify branch with the ticket number or name. To rename branch-
git branch -m branch_you_wan_to_rename newname
Deleting branch
If you are up to deleting a branch switch to master branch as you are not able to delete the branch if its been checked out and hit below command-
git branch -d branch_to_delete
If there are changes that are not merged between branches git wont allow to delete the branch and shall provide following warning- To see the difference use
git diff master..new-branch

git branch -d new-branch

As it suggests if you want to really delete use -D to permanently delete the branch losing the changes-
git branch -D new-branch
![]()
Creating branch from remote-
If you want to checkout and create a local branch from remote-
git checkout -b local_branch_name remote_branch_name
Here all changes from remote_branch_name will be available in local machine with the branch name local_branch_name