Author: sandeeppote

Entity Framework – Code First DB migration

Code first is useful in Domain Driven Design.Code first use Convention based migration- it is a set of rules to automatically configure a conceptual model based on domain class definition.
Type Discovery- Code first approach generates classes for the properties set in DBSet and also includes referenced types that are included in classes, even if referenced types are defined in another assembly.
The conventions for the type discovery are:

  1. Code-First includes types defined as a DbSet property in context class.
  2. Code-First includes reference types included in entity types even if they are defined in different assembly.
  3. Code-First includes derived classes even if only the base class is defined as DbSet property.

Assuming entities are created and DBContext is set along with the DB Connection string to enable migration use –
enable-migration command in package manager console.once the migrations are enabled Migrations folder is created with the InitalCreate.cs class. Any further changes to the model a version of changes are created with a Up() and down() method which helps to Migrate and Rollback the model changes to database.
To update the last changes to the DB use add-migration “migration title” and update-database command in console.This should now update or create Initial tables and changed schema. Along side this a Seed() method is called. You may need to add the initial/sample data to tables use the context for same in Seed() method.
To Rollback the changes use update-database -targetmigration “migration title”. I find this a bit confusing initially but what this command does is it takes back the database state to the last best migration performed rollingback the latest changes performed.
While doing so you may receive error-Unable to generate an explicit migration because the following explicit migrations are pending: [201704251318501_migrationname]. Apply the pending explicit migrations before attempting to generate a new explicit migration.
This seems to complaining about the migration which are performed where a version is missing. So migrations has to be happen in a sequence of it was created.

Hope this helps.

Asp.Net MVC Attribute Routing

Asp.net MVC Routing determines the appropriate actions, controllers and Ā data for any incoming request specified in a format or a group of format sent to parse the URL’s.Routing rather than having concrete physical files uses abstract actions.


This is achieved mostly by Convention Routing. Asp.net MVC 5 as another scheme calledĀ Attribute Routing.Ā Attribute routing helps to keep the routing definition at the close proximate of actions and controllers. This similar to Convention Routing adds the routes to Route Table.Ā 

Enabling Attribute Routing

Use MapMvcAttributeRoutes() as shown in below code sample. This enables both Convention and Attribute routing

 public static void RegisterRoutes(RouteCollection routes)  
     {  
       routes.IgnoreRoute("{resource}.axd/{*pathInfo}");  
       routes.MapMvcAttributeRoutes();  
       routes.MapRoute(  
         name: "Default",  
         url: "{controller}/{action}/{id}",  
         defaults: new { controller = "Home", action = "Index", id = UrlParameter.Optional }  
       );  
     }  

Following example shows usage of Attribute Routing :-

 [Route("SingleStringParam/{FirstParam}")]  
     public ActionResult OneStringParameter(string FirstParam)  
     {  
       ViewBag.FirstParameter = FirstParam;  
       return View();  
     }  

For nullable parameters use ? in front of parameter:-

[Route("SingleStringOptionalParam/{FirstParam?}")]  
     public ActionResult OneStringOptionalParameter(string FirstParam)  
     {  
       ViewBag.FirstParameter = FirstParam;  
       return View();  
     }  
   }  

What is better – Convention or Attribute routing, my opinion-
Attribute routing is more flexible than Convention routing as it is easy to maintain and close to the actions and controllers. Instead of managing whole list of routes in route.config, tedious to maintain, use attribute routing.Ā As attribute routing are close to Controller Action it helps in debugging and troubleshooting, as well as ability to quickly search the route information in your solution.

Reference- Attribute Routing

Sitecore project – Fix broken intellisense

IntelliSense provides code completions based on language semantics and an analysis of your source code.IntelliSense suggestions popup as you type. This might trouble you whilst setting up Sitecore new project. 

It comes with the following error-Error CS1061 ‘HtmlHelper<RenderingModel>’ does not contain a definition for ‘Sitecore’ and no extension method ‘Sitecore’ accepting a first argument of type ‘HtmlHelper<RenderingModel>’ could be found (are you missing a using directive or an assembly reference?)


Following can be checked if the Sitecore intellisense is not poping up-1. Check if Sitecore.Mvc namespace is added in web.config. Namespace should sit inĀ Ā <pages pageBaseType=”System.Web.Mvc.WebViewPage”><namespaces>2. Check if web.config file is in View folder. If not, you might need to add this.3. Follow same as Point 1 for web.config file in View folder.4. Next you must have referenced Sitecore.Mvc dll in the project. Set the Copy Local to true.5. Rebuild solution and re-open the cshtml file(s).
The intellisense should now be working.

Estimating the Size of a SQL Table

Estimating the Size of a Table

The following steps can be used to estimate the amount of space required to store the data in a table:

  1. Specify the number of rows present in the table:Number of rows in the table = Num_Rows
  2. If there are fixed-length and variable-length columns in the table definition, calculate the space that each of these groups of columns occupies within the data row. The size of a column depends on the data type and length specification. For more information, see Data Types.Number of columns = Num_ColsSum of bytes in all fixed-length columns = Fixed_Data_SizeNumber of variable-length columns = Num_Variable_ColsMaximum size of all variable-length columns = Max_Var_Size
  3. If there are fixed-length columns in the table, a portion of the row, known as the null bitmap, is reserved to manage column nullability. Calculate its size:Null Bitmap (Null_Bitmap) = 2 + (( Num_Cols + 7) / 8 )Only the integer portion of the above expression should be used; discard any remainder.
  4. If there are variable-length columns in the table, determine how much space is used to store the columns within the row:Total size of variable-length columns (Variable_Data_Size) = 2 + (Num_Variable_Cols x 2) + Max_Var_SizeIf there are no variable-length columns, set Variable_Data_Size to 0.This formula assumes that all variable-length columns are 100 percent full. If you anticipate that a lower percentage of the variable-length column storage space will be used, you can adjust the result by that percentage to yield a more accurate estimate of the overall table size.
  5. Calculate the row size:Total row size (Row_Size) = Fixed_Data_Size + Variable_Data_Size + Null_Bitmap +4The final value of 4 represents the data row header.
  6. Calculate the number of rows per page (8096 free bytes per page):Number of rows per page (Rows_Per_Page) = ( 8096 ) / (Row_Size + 2)Because rows do not span pages, the number of rows per page should be rounded down to the nearest whole row.
  7. If a clustered index is to be created on the table, calculate the number of reserved free rows per page, based on the fill factor specified. For more information, see Fill Factor. If no clustered index is to be created, specify Fill_Factor as 100.Number of free rows per page (Free_Rows_Per_Page) = 8096 x ((100 – Fill_Factor) / 100) / (Row_Size + 2)The fill factor used in the calculation is an integer value rather than a percentage.Because rows do not span pages, the number of rows per page should be rounded down to the nearest whole row. As the fill factor grows, more data will be stored on each page and there will be fewer pages.
  8. Calculate the number of pages required to store all the rows:Number of pages (Num_Pages) = Num_Rows / (Rows_Per_Page – Free_Rows_Per_Page)The number of pages estimated should be rounded up to the nearest whole page.
  9. Calculate the amount of space required to store the data in a table (8192 total bytes per page):Table size (bytes) = 8192 x Num_Pages

Umbraco custom section name – How to remove square brackets

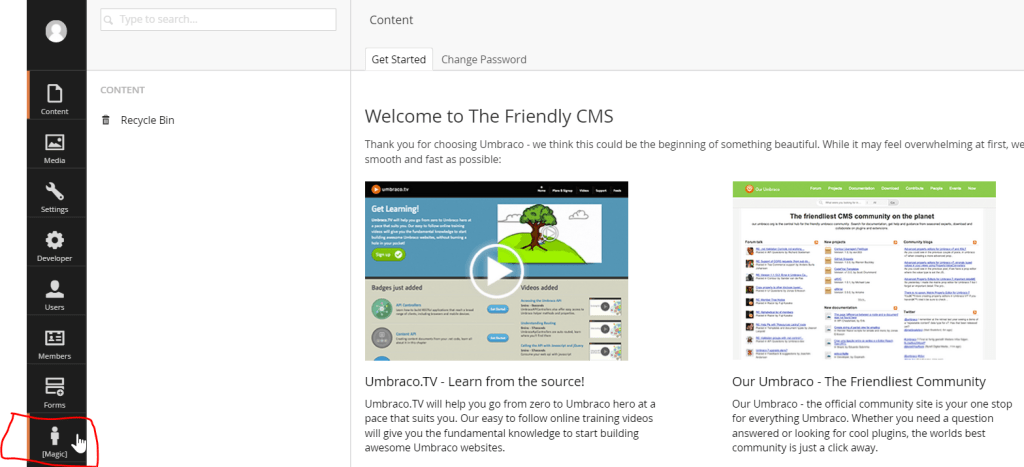
After configuring the custom section with help of IApplication interface in Umbraco, you must have faced issue with custom section name decorated with square brackets. This issue occurs due to the translations (language) being missing in config file for custom section name.

Problem – Remove square brackets from custom section name-

Soultion – Goto Umbraco\Config\Lang folder in your umbraco project

In en.xml file, under sections area – add key with alias magic and provide a relevant name as shown below-

Done square brackets are removed and replaced with custom description. Check out-

Installing Umbraco 7+ in visual studio 2012/2013

How to install Umbraco 7+ in visual studio 2012/13 using nuget package

1. Create a blank Web application using visual studio

2. Open package manager console. Select appropriate project(web application) and hit commandĀ Install-Package UmbracoCms -Version 7.2.6At the time of writing this post Umbraco 7.2.6 was the latest version.Refer –Ā https://www.nuget.org/packages/UmbracoCms

3. Done- Umbraco is installed. All binaries and config files are automatically included in project.

4. Run web application and Umbraco site setup details are asked.

List of LINQ syntax for immediate execution

These are some of the LINQ syntax for immediate query execution (more to add)-
1. ToList()

2. FirstOrDefault

3. Aggregate Methods (like Count(), Sum() etc.)

4. AsEnumerable()

As I said there are more to add, will keep updating as and when I find more methods.


Happy Coding!!!

Adding Custom section in Umbraco 7+

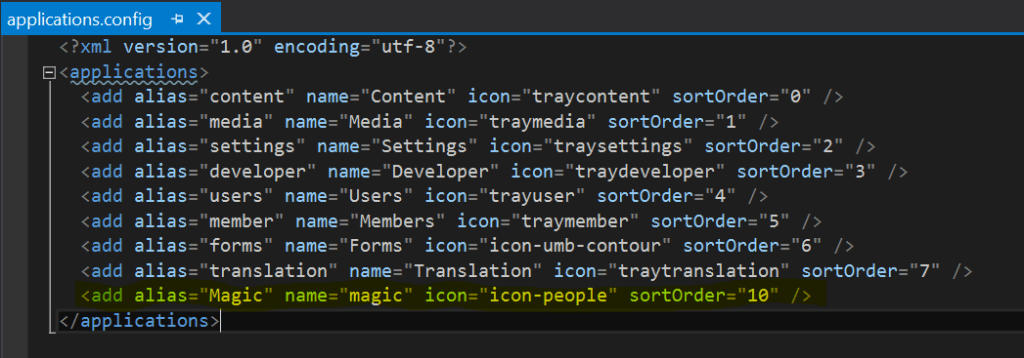
To add a custom section in Umbraco add following class to your VS Umbraco Solution- [Application(“Magic”,”magic”,”icon-people”,10)] public class Section : IApplication{}
Use following namespace-using umbraco.businesslogic;using umbraco.interfaces;using Umbraco.Web.Mvc;
Refere following Umbraco dll’s-

  • businesslogic.dll
  • intefaces.dll
  • umbraco.dll

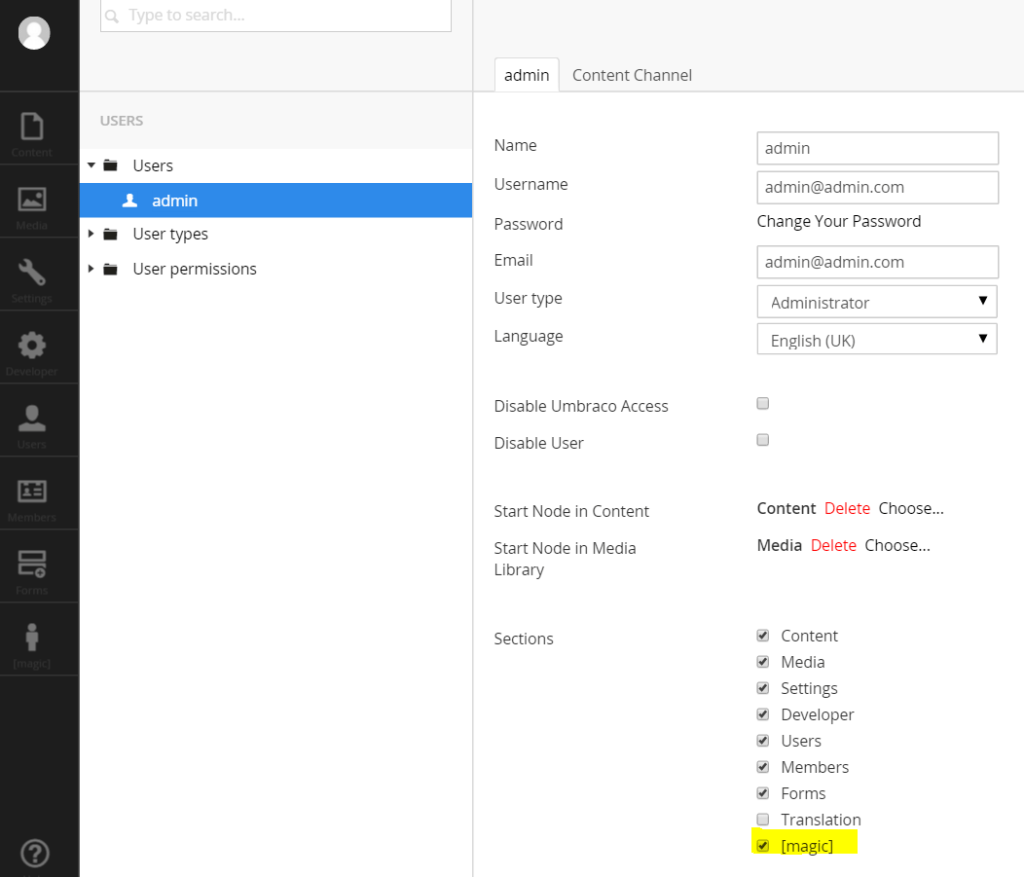
Dont forget to provide admin user access to the newly added section

Screenshot below -

Please note the first time you run app after making this change Umbraco will update application.config file. So you might consider to close the application and run again to reflect the change.
application.config file is located in Config folder.

Unfortunately I am not able to remove square bracketsĀ [Magic]Ā in custom section, as soon as I know it will share with you,
Also will shortly share how to configure Umbraco in VS2013.