Welcome! This is my personal blog about Web technologies, software development, open source and other related topics
The ideas and opinions expressed here are solely mine and don't represent those of others, either individuals or companies.The code snippets or references to software products or analogous are to be used without any warranty of any kind. If you enjoy the content, feel free to share it and re-use it as long as you provide a link to the original post.
Variable bindings have a scope, and are constrained to live in a block. A block is a collection of statements enclosed by braces {}.
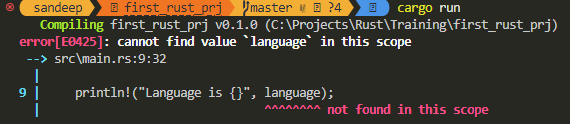
In the below example the scope for the variable language is only within the enclosed block.
if true {
    let language  = "English";
    println!("Language is {}", language);
}
If this variable is accessed outside the block it will be a compiler error-
if true {
   let language  = "English";
   println!("Language is {}", language);
}
println!("Language is {}", language);
To make the scope within the main method declare the vaiable outside the block.
let language  = "English";
if true {
    println!("Language is {}", language);
}
println!("Language is {}", language);
Output
Language is English
Language is English
Variable shadowing
Variable shadowing occurs when a variable declared within a certain scope (decision block, method or inner class) has the same name as a variable declared in an outer scope.
let language  = "English";
if true {
   println!("Language is {}", language);
}
let language  = "French";
println!("Language is {}", language);
Output
Language is English
Language is French
In the above code the variable language is declared twice. Rust allows multiple variables with the same name, and these varaibles can be of different data type. The scope of the first variable remains until the next variable with same name is declared. The last variable with same name remains for the rest of the code.
Shadowing variable with different data type
let language  = "English";
if true {
   println!("Language is {}", language);
}
let language  = 1; //here the first variable is de-scoped
println!("Language is {}", language);
Output
Language is English
Language is 1
When used correctly shadowing can be used for reusing common variable for different purposes and the ability to the mutability of data type. If this is not done carefully this can have a strange bugs in code.
Enum is a data type with mutiple possible variants. To declare an enum, write enum and use a code block with the options, separated by commas. These options are called as variants.
A borrowed reference allow you to access data without taking ownership of it. The & operator creates a borrowed reference to a variable.
If we want to pass the reference of string it can be done as follows-
Here the program uses tuple to pass the string refernce back with the length
{
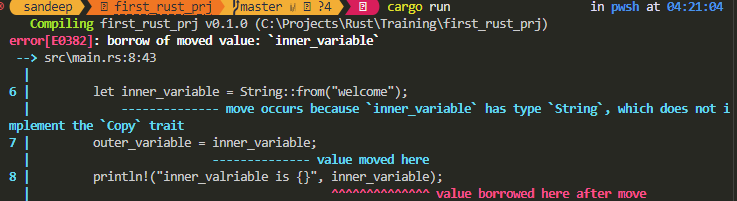
let inner_variable = String::from("welcome");
let (note, note_length) = wlecome_note(inner_variable);
println!("Length of {} is {}", note, note_length);
}
fn wlecome_note(note: String) -> (String, usize){
let note_length = note.len();
(note, note_length)
}
Output-
Length of welcome is 7
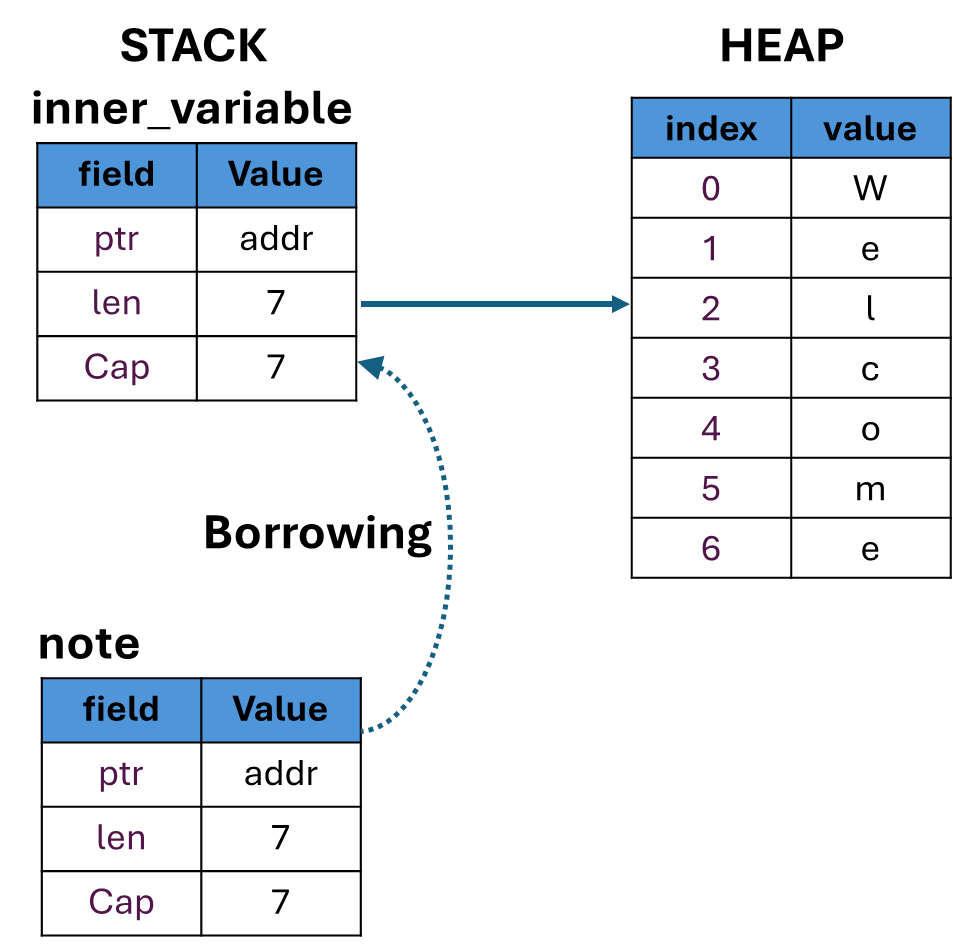
This is a tedious way, instead the string reference can be borrowed in the function, unaffecting the refernece in main block.
{
    let inner_variable = String::from("welcome");

    let  note_length = wlecome_note(&inner_variable);

    println!("Length of {} is {}", inner_variable, note_length);
}

fn wlecome_note(note: &String) -> usize{

    let note_length = note.len();
    note_length
}
Here & operator borrows the reference temporary into the note variable and when the it comes out of scope doesn’t affect the inner_variable in main block. This process is called as borrowing refernce.
Summary
Borrowing – Access data without taking ownership of it
Borrowing – Create reference using the borrow operator &
When working with reference its important to understand which variable own the data
Mutable reference
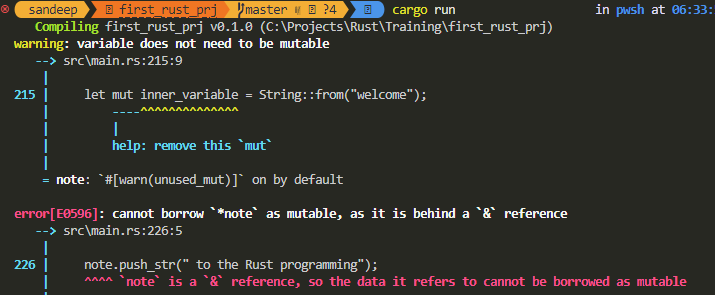
In the above code we didn’t change the reference i.e. the note variable in wlecome_note function. To do so use push_str() method.
{
    let inner_variable = String::from("welcome");
    let  note_length = wlecome_note(&inner_variable);
    println!("Length of {} is {}", inner_variable, note_length);
}

fn wlecome_note(note: &String) -> usize{
    let note_length = note.len();
    note.push_str(" to the Rust programming"); // Error
    note_length
}
This gives a compiler error.
The error is data we are referencing is not mutable reference. We have to tell Rust that it is a mutable reference. For this use &mut keyword .
{
    let mut inner_variable = String::from("welcome");
    let  note_length = wlecome_note(&mut inner_variable);
    println!("Length of {} is {}", inner_variable, note_length);
}

fn wlecome_note(note: &mut String) -> usize{
    note.push_str(" to the Rust programming");

    let note_length = note.len();
    note_length
}
Output-
Length of welcome to the Rust programming is 31
This updates the borrowed reference and main block has the updated data.
Summary-
When using a mutable reference, you cannot create other references, to prevent the data races.
If you’re only working with regular immutable references, then you can create as many of those as you want pointing to the same variable. The restriction comes in when you try to create references in addition to the one allowed mutable reference. Even if those additional references are immutable, it creates the potential for problems and the Rust compiler will not allow it.
Dangling references
A dangling reference is a reference to something that no longer exists at the referenced location.
A dangling reference can occur when a function returns a reference to a value that is owned by a variable whose scope is limited to that function.
It’s easy to erroneously create a dangling pointer—a pointer that references a location in memory that may have been given to someone else—by freeing some memory while preserving a pointer to that memory. In Rust, by contrast, the compiler guarantees that references will never be dangling references: if you have a reference to some data, the compiler will ensure that the data will not go out of scope before the reference to the data does.
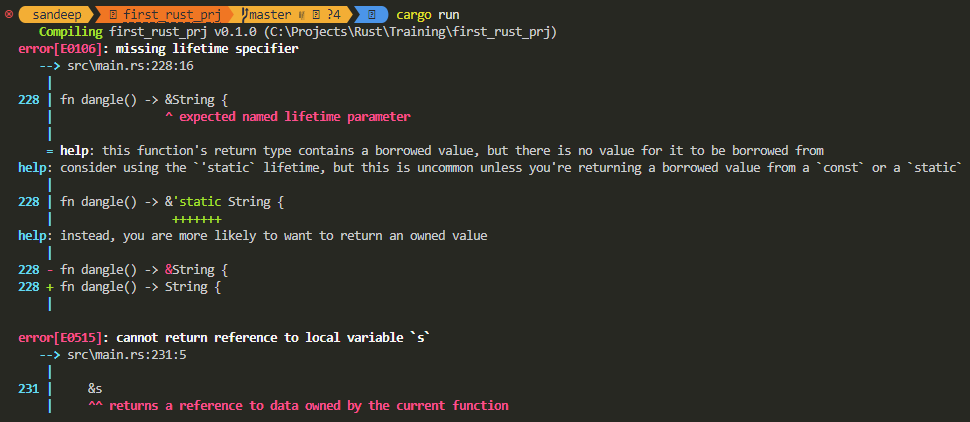
{
   let reference_to_nothing = dangle();
}

fn dangle() -> &String {
    let s = String::from("hello");

    &s // Error
}
Solution-
Remove borrow operator
{
    let reference_to_nothing = dangle();

    println!("Dangling refernce data is {}", reference_to_nothing);
}

fn dangle() -> String { // Remove borrow operator
    let s = String::from("hello");

    s // Remove borrow operator
}
Output-
Dangling refernce data is hello
Slices
Borrowing a data type with sequence of elements, if we only want subset of elements we use Slice. Commonly used slices is String &str
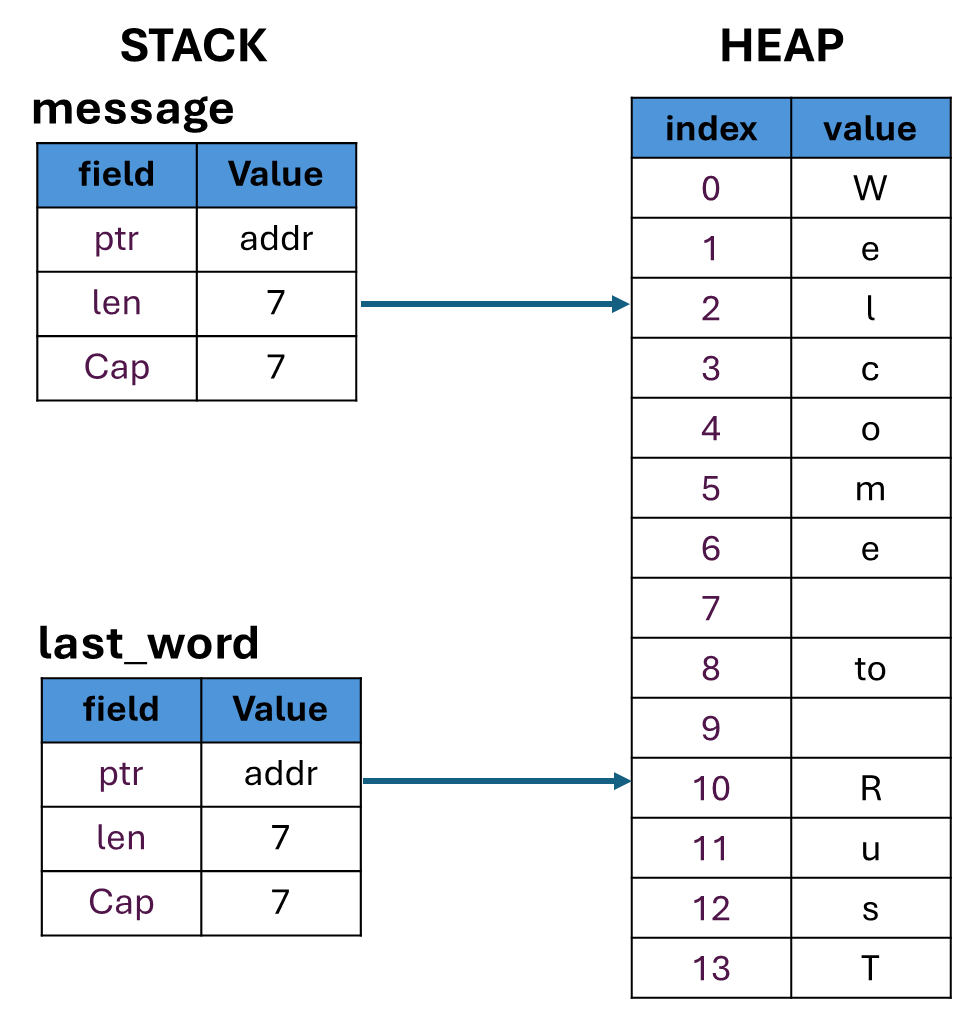
let  message = String::from("Welcome to Rust");
println!("message is {}", message);

let last_word = &message[10..];
println!("last word is - {}", last_word);
Here we sliced the string to only get the last word i.e. Rust. Here the message variable is still the owner of the string. and last_word variable points to the address of the slice.
Output
message is Welcome to Rust
last word is Rust
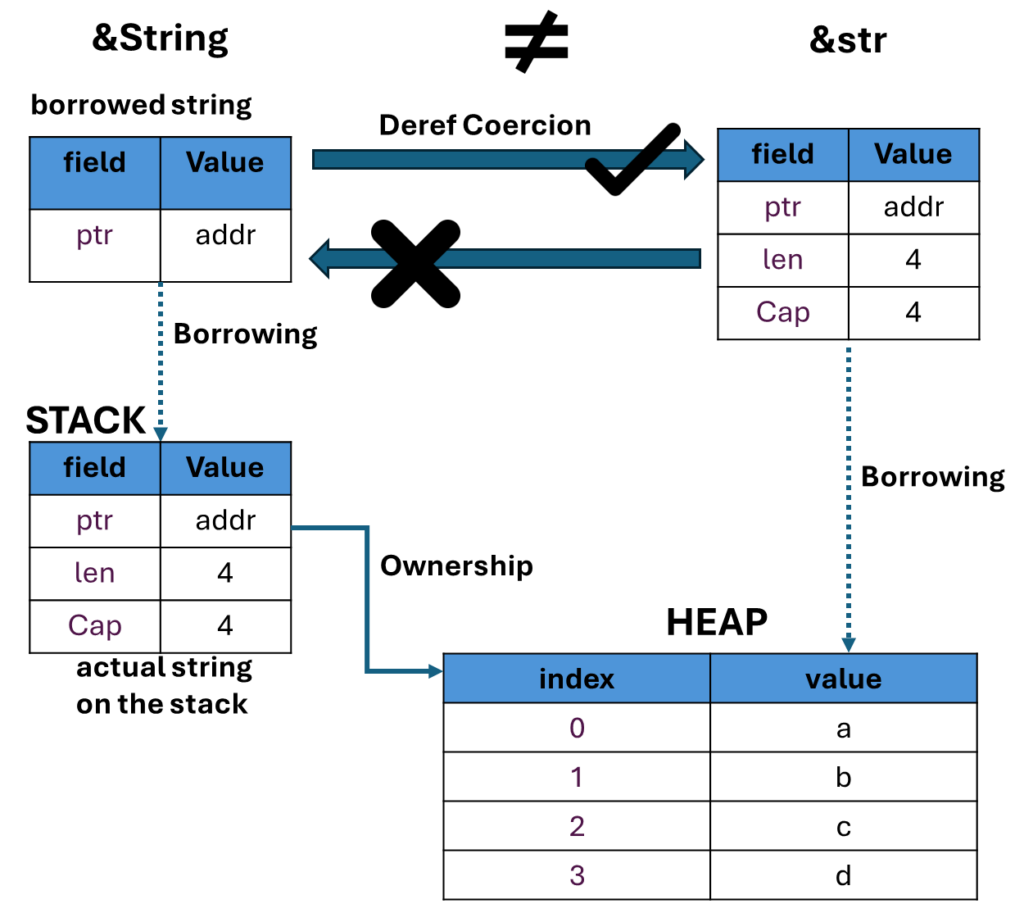
&String != &str – String Type is not String Literal
With strings, a borrowed reference to a string is not equivalent to a slice from the string. They’re different data types.
Dref Coercion- The deref gives the compiler the ability to take a value of any type that implements Deref and call the deref method to get an & reference that it knows how to dereference
Summary –
Borrow the string object to slice the string &my_string[4..]
Once you create one mutable reference to a variable you cannot create any other references to it.
A slice only stores a pointer to the heap data, along with length information. The slice doesn’t need to keep track of capacity because the slice will never own anything on the heap.
A string reference will point to an actual string on the stack, which in turn points to and owns the string data that lives on the heap. A slice will only store a pointer to the heap data.
Ownership in Rust where the variables are responsible for creating their own resources.
Every value is owned by one, and only one variable at a time
When the owning variable goes out of scope, the value is dropped
Memory Management in Rust and other languages
Memory Management
Feature
Advantage
Disadvantage
Manual Allocation and Deallocation
Progammer responsible for memory mgmt C/C++ – malloc() and free()
Programmer has lots of control
Memory leaks
Garbage Collection
Automatically cleans up memory Java, Python, C#, Ruby, Go
Its easy as programmer don’t have to worry about memory mgmt
Can lead to wasteful memory Can run at inconvenient times
Ownership
Variables are responsible for freeing their own resources Rust
Safe, Effecient (when data will be dropped at compile time)
Requires understanding of ownership
Example – Every value is owned by one, and only one variable at a time
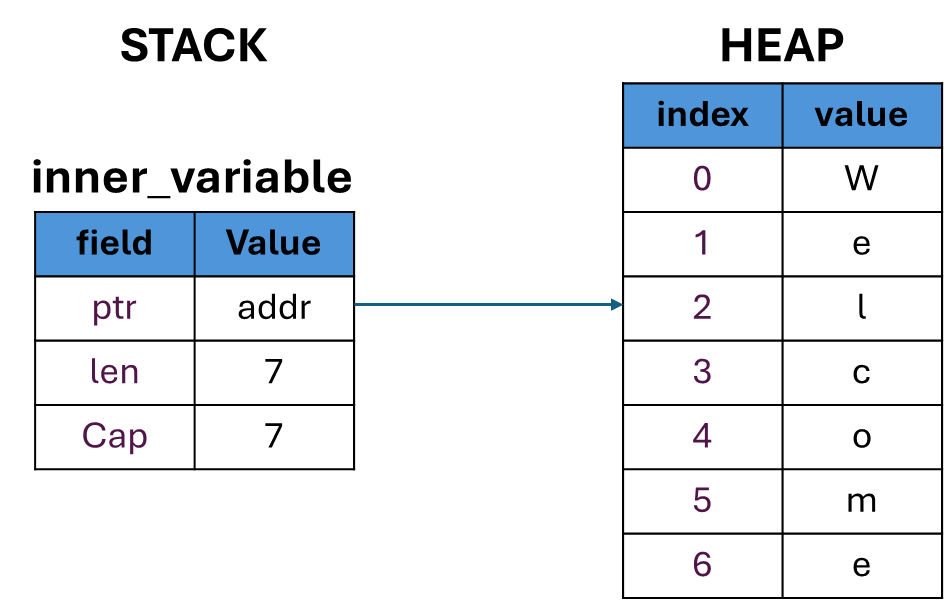
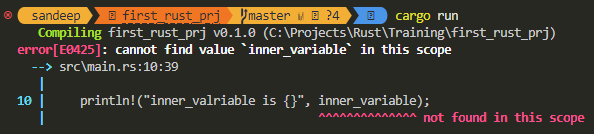
{
    1let inner_variable = String::from("Welcome");
    println!("inner_valriable is {}", inner_variable);
}2

println!("inner_valriable is {}", inner_variable);3 // Error
The memory is allocated at this line of code in Stack and points to heap where the data is stored. ↩︎
Deallocates/drops the data in heap and stack since the scope is complete ↩︎
Error – Variable is not available here since its deallocated in prevous line. ↩︎
Example – When the owning variable goes out of scope, the value is dropped
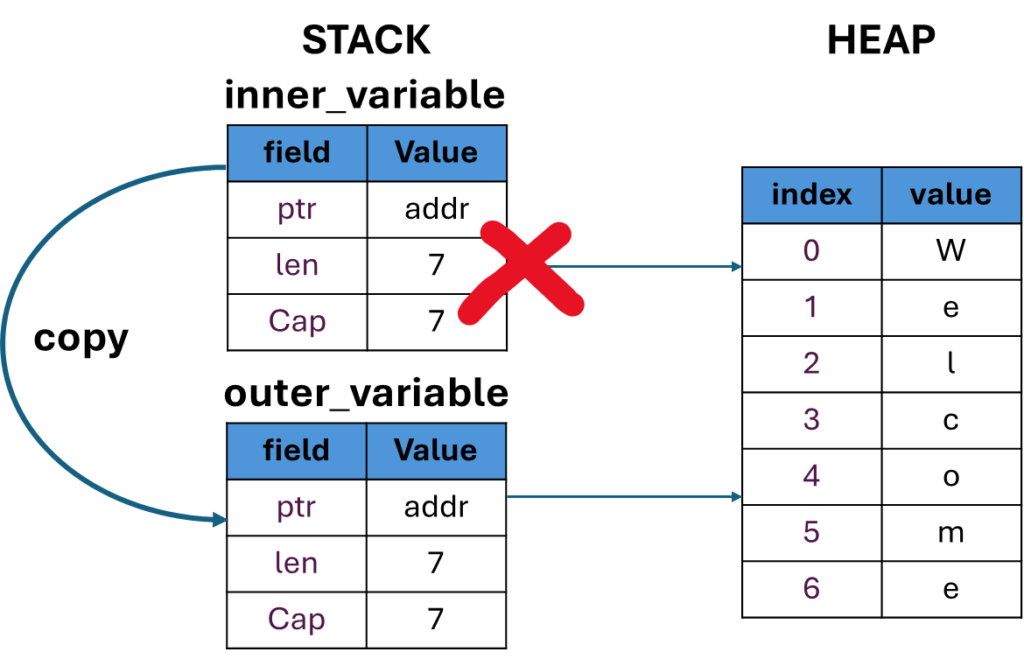
Ownership is moved to another variable (outer_variable)
let outer_variable : String;
{
    let inner_variable = String::from("welcome");
    println!("inner_valriable is {}", inner_variable);
    outer_variable = inner_variable;
}

println!("outer_variable is {}", outer_variable);
X The above example breaks the rule since 2 variables assigned to same address in heap. Hence this is called as move the inner_varaible is out of scope.
    let outer_variable : String;
    {
        let inner_variable = String::from("welcome");
        outer_variable = inner_variable;
        println!("inner_valriable is {}", inner_variable); // Error
    }

    println!("outer_variable is {}", outer_variable);
Since the inner_variable scope is moved to outer_variable the memory allocation is dropped.
Copy works only for stack data types, such as integer and floating point
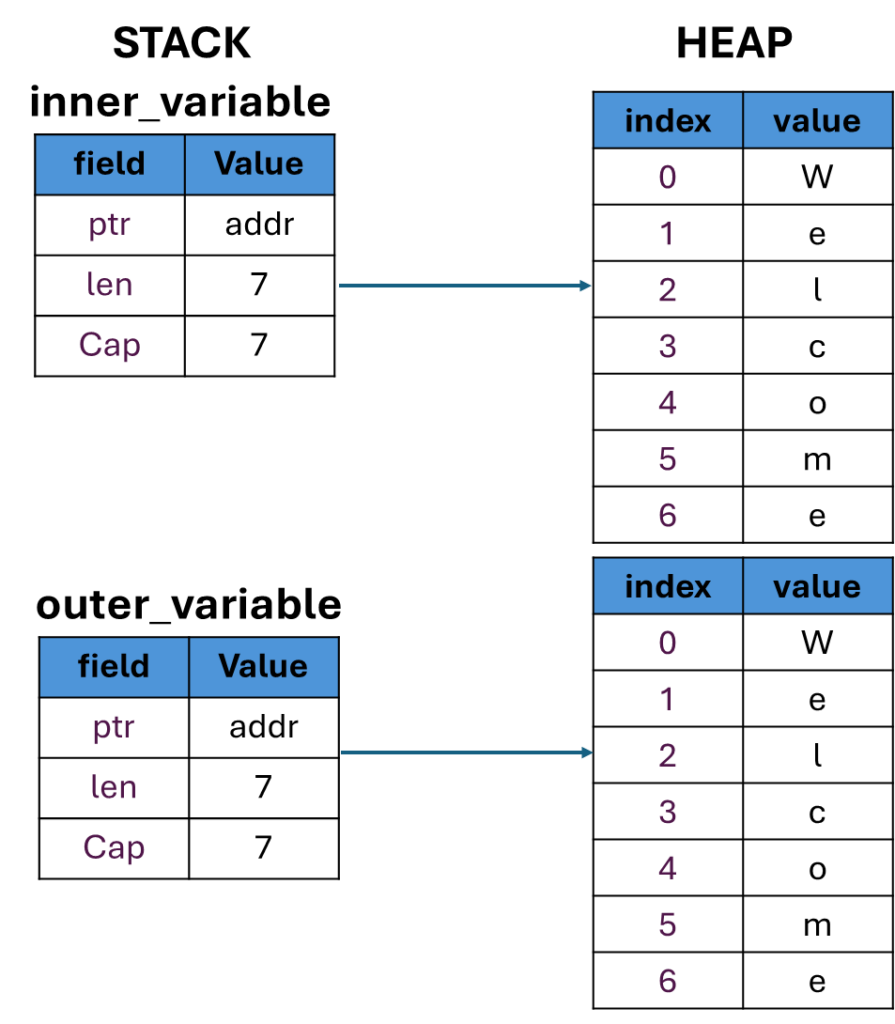
Cloning the data
The clone() method is used to create a deep copy of heap data.
String data is not implicitly copied and must be explicitly cloned using the clone() method.
let outer_variable : String;
{
    let inner_variable = String::from("welcome");
    outer_variable = inner_variable.clone();
    println!("inner_valriable is {}", inner_variable);
}

println!("uter_valriable is {}", outer_variable);
Clone creates a new heap and copies the data and binds to the stack.
Output
inner_valriable is welcome
outer_valriable is welcome
Copy occurs implicitly; cloning must be done explicitly
Transfering Ownership
When a function takes ownership of a value, it becomes responsible for that value and its associated data. The function can then do whatever it wants with the data, including modify or delete it. If the function doesn’t need the data anymore, it will be dropped.
Hence Rust is Safe i.e. at compile time the program knows when the variables are accessible and efficient since it knows when to drop the data from memory.
Summary-
Shadowing allows you to declare a new variable with the same name as an existing variable.
Copying allows you to duplicate a value that is stored on the stack.
The heap can dynamically add and remove data.
The stack stores values in sequential order. The stack adds and removed data as LIFO.
Copying data on the stack occurs implicitly, whereas cloning data on the heap must be done explicitly using the clone method.
The String data type stores the sequence of characters that make up the String on the heap and it stores a structure containing a pointer to the heap data, the String’s length, and its capacity on the stack.
0 47.60 npm notice Beginning October 4, 2021, all connections to the npm registry – including for package installation – must use TLS 1.2 or higher. You are currently using plaintext http to connect. Please visit the GitHub blog for more information: https://github.blog/2021-08-23-npm-registry-deprecating-tls-1-0-tls-1-1/
An if expression is used to control which code gets executed based on conditions the program can evaluate at runtime.
Short hand to use if condition.
let y =true;
let x = if y {1} else {0};
println!("x is {}", x)
Output-
x is 1
Loop
Rust provides a loop keyword to indicate an infinite loop. Unless stopped manually or with a break staement, loop can go infinitely.
Infinite loop example. Manually stop the program
let mut count=0;

loop{
   count += 1;
   println!("count is {}", count)
}
break keyword
Immediately exit the loop and continue execution forward. The break statement can be used to prematurely exit all types of loop constructs.
Here once loop is at 10 it breaks the loop and continues further execution
let mut count=0;

loop{
   if count == 10{
      println!("breaking the loop on count  {}", count);
      break;
    }
    count += 1;
    println!("count is {}", count);
}
println!("Continues execution.");
Output-
count is 1
count is 2
count is 3
count is 4
count is 5
count is 6
count is 7
count is 8
count is 9
count is 10
breaking the loop on count  10
Continues execution.
break with return
In the below code break can return the result or the reason the loop is stopped to the execution program.
let mut count=0;

let result = loop{
    if count == 10{
        println!("breaking the loop on count  {}", count);
        break count * 5
     }
     count += 1;
     println!("count is {}", count);
};

println!("Count result is - {} * 5 = {}", count, result);
Output-
count is 1
count is 2
count is 3
count is 4
count is 5
count is 6
count is 7
count is 8
count is 9
count is 10
breaking the loop on count  10
Count result is - 10 * 5 = 50
Predicate (while) loop
Predicate loop that repeats a block of code while the condition is true. Begins by evaluating a boolean condition and breaks/completes when the condition is false. A while-loop repeats a block of code while a condition is true.
Here break statement can be used to terminate the loop but it doesnot return the value as comapred to loop
let mut count=0;
while count < 5 {
   count += 1;
   println!("count is {}", count);
}
Output
count is 1
count is 2
count is 3
count is 4
count is 5
Iteratorfor loop
The for in construct can be used to iterate through an Iterator. One of the easiest ways to create an iterator is to use the range notation a..b. This yields values from a (inclusive) to b (exclusive) in steps of one.
For loops are mainly used to iterate over the items in a collection, and execute some code for each one so that you can process each item in the collection individually. If you need to repeat a block of code for a specific number of times that you know before starting the loop, you can use a ‘for’ loop to iterate over the range from zero to that value.
for n in 1..5{
   print!("{}\t", n)
}
loop 1..5, here 1 is inclusive while 5 is exclusive. Print! won;t print in new line.
Output
1 2 3 4
user iter() methodto iterate over the list-
let message= ['r','u','s','t'];

for msg in message.iter(){
    print!("{}\t", msg)
}
Output-
r u s t
Iterator with index
At times apart from the element in the array or list and index is required. This can be achieved by using enumerate() method
let message= ['r','u','s','t'];

for (index,msg) in message.iter().enumerate(){
     println!("item {} is {}", index, msg)
}
Output-
item 0 is r
item 1 is u
item 2 is s
item 3 is t
Nested loops
Example here taking row and columns and printing those values in a nested loop i.e. for loop(rows) wthin for loop(columns)
let matrix = [[1,2,3],[10,20,30], [100,200,300]];

for row in matrix.iter(){
    for col in row.iter(){
        print!("{}\t", col);
     }
     println!();
}
Output-
All the columsn are printed in same line while row in new line.
variable.iter() is used to iterate between rows and columns
1       2       3
10      20      30
100     200     300
Modify the value in for loop using iter_mut()
Sometimes value in the collection needs to be updated. This can be done by iterating and updating the values. To do so use iter_mut() function as follows-
let mut matrix = [[1,2,3],[10,20,30], [100,200,300]];

for row in matrix.iter_mut(){
   for col in row.iter_mut(){
         *col += 5;
         print!("{}\t", col);
    }
    println!();
 }
Notice here the iter_mut() method is used which give a reference to the mmeory allocated for the collection. In the next line *col is used to deference so that a addition operation can be performed.
Using * is called “dereferencing”.
Output-
6       7       8
15      25      35
105     205     305
Rust has two rules for mutable and immutable references. They are very important, but also easy to remember because they make sense.
Rule 1: If you have only immutable references, you can have as many as you want. 1 is fine, 3 is fine, 1000 is fine. No problem.
Rule 2: If you have a mutable reference, you can only have one. Also, you can’t have an immutable reference and a mutable reference together.